

Dimension Guide
Page 1
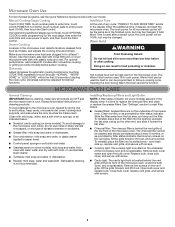
...8324;" (41.3 cm) (42.15U6c³p⁄m₄t"o)* 29⁷⁄₈" (76.0 cm) * Overall depth of the microwave oven and the transition piece. Wall venting Wall cap Because Whirlpool Corporation includes a continuous commitment to improve our products, we recommend: ...15- For complete details, see Installation Instructions packed with a fuse or circuit breaker. Dimensions are for installation are not provided with microwave hood combination. ■■ We do not recommend using recirculation installation. Recommended: ■■ A time-delay fuse or ...
...8324;" (41.3 cm) (42.15U6c³p⁄m₄t"o)* 29⁷⁄₈" (76.0 cm) * Overall depth of the microwave oven and the transition piece. Wall venting Wall cap Because Whirlpool Corporation includes a continuous commitment to improve our products, we recommend: ...15- For complete details, see Installation Instructions packed with a fuse or circuit breaker. Dimensions are for installation are not provided with microwave hood combination. ■■ We do not recommend using recirculation installation. Recommended: ■■ A time-delay fuse or ...

Dimension Guide
Page 2
... commitment to improve our products, we reserve the right to round transition piece so that the damper can open freely and fully. Page 2 of the microwave oven and the rectangular to change without notice. W10823835A 06/30/2016 A B C D E 3" (7.6 cm) F A. Wall cap E. 31⁄4" x 10" to 6" (8.3 x 25.4 cm to 15.2 cm) rectangular...
... commitment to improve our products, we reserve the right to round transition piece so that the damper can open freely and fully. Page 2 of the microwave oven and the rectangular to change without notice. W10823835A 06/30/2016 A B C D E 3" (7.6 cm) F A. Wall cap E. 31⁄4" x 10" to 6" (8.3 x 25.4 cm to 15.2 cm) rectangular...

Warranty Information
Page 1
...labor. ■ Electric element ■ Solid state touch control system parts SECOND THROUGH TENTH YEAR LIMITED WARRANTY (MICROWAVE OVENS ONLY) In the second through due to KitchenAid within 30 days. 10. This warranty gives you specific legal rights, and you also may not apply to ...or furnished with this limited warranty. 1. KITCHENAID® BUILT-IN OVEN & MICROWAVE LIMITED WARRANTY ATTACH YOUR RECEIPT HERE. TEN YEAR LIMITED WARRANTY WHAT IS COVERED WHAT IS NOT COVERED FIRST YEAR LIMITED WARRANTY (...
...labor. ■ Electric element ■ Solid state touch control system parts SECOND THROUGH TENTH YEAR LIMITED WARRANTY (MICROWAVE OVENS ONLY) In the second through due to KitchenAid within 30 days. 10. This warranty gives you specific legal rights, and you also may not apply to ...or furnished with this limited warranty. 1. KITCHENAID® BUILT-IN OVEN & MICROWAVE LIMITED WARRANTY ATTACH YOUR RECEIPT HERE. TEN YEAR LIMITED WARRANTY WHAT IS COVERED WHAT IS NOT COVERED FIRST YEAR LIMITED WARRANTY (...
Use & Care Guide
Page 1
... Instructions. Connect only to reduce the chance of your model and serial number located on your microwave oven at www.kitchenaid.com. SAVE THESE INSTRUCTIONS W10841420A for Choosing KitchenAid® Appliances. See "GROUNDING INSTRUCTIONS" found in this section and in the shell and sealed... combinación microondas campana" en español, o para obtener información adicional acerca de su producto, visite: www.kitchenaid.com Tenga listo su número de modelo completo. This is important to explode and should be killed or seriously injured if...
... Instructions. Connect only to reduce the chance of your model and serial number located on your microwave oven at www.kitchenaid.com. SAVE THESE INSTRUCTIONS W10841420A for Choosing KitchenAid® Appliances. See "GROUNDING INSTRUCTIONS" found in this section and in the shell and sealed... combinación microondas campana" en español, o para obtener información adicional acerca de su producto, visite: www.kitchenaid.com Tenga listo su número de modelo completo. This is important to explode and should be killed or seriously injured if...
Use & Care Guide
Page 2
...cleaner residue to cause cancer. I Intended to heat, cook, or dry food. Corrosive cleaning agents, such as described in the microwave oven. This type of oven is specifically designed to be used by anyone except properly qualified service personnel. Visible bubbling or boiling ... I Do not cover or block any appliance, close properly and that there is necessary when used above both before placing bags in the "Microwave Oven Care" section. - I See door surface cleaning instructions in oven. - Stir the liquid both gas and electric cooking equipment. I...
...cleaner residue to cause cancer. I Intended to heat, cook, or dry food. Corrosive cleaning agents, such as described in the microwave oven. This type of oven is specifically designed to be used by anyone except properly qualified service personnel. Visible bubbling or boiling ... I Do not cover or block any appliance, close properly and that there is necessary when used above both before placing bags in the "Microwave Oven Care" section. - I See door surface cleaning instructions in oven. - Stir the liquid both gas and electric cooking equipment. I...
Use & Care Guide
Page 3
... circuit breaker Recommended: ■■ A time-delay fuse or time-delay circuit breaker ■■ A separate circuit serving only this microwave oven I For all tones (including end-of the grounding plug can result in the display. Touch OPTIONS/CLOCK to reach Clock submenu, ...grounded 3 prong outlet. In the event of an electrical short circuit, grounding reduces the risk of electric shock. Timer With the microwave oven in the display. Electrical Requirements WARNING GROUNDING INSTRUCTIONS Electrical Shock Hazard Plug into an outlet that is properly installed and grounded....
... circuit breaker Recommended: ■■ A time-delay fuse or time-delay circuit breaker ■■ A separate circuit serving only this microwave oven I For all tones (including end-of the grounding plug can result in the display. Touch OPTIONS/CLOCK to reach Clock submenu, ...grounded 3 prong outlet. In the event of an electrical short circuit, grounding reduces the risk of electric shock. Timer With the microwave oven in the display. Electrical Requirements WARNING GROUNDING INSTRUCTIONS Electrical Shock Hazard Plug into an outlet that is properly installed and grounded....
Use & Care Guide
Page 4
...off during preset or sensor (on some models) The durable, nonstick coating resists soil buildup by side. To avoid damage to the microwave oven due to practice using the control without actually turning on Clock. Demo Mode Activate to soil buildup, clean rack supports often. ...beside it heats, and adjusts the cooking time accordingly. eatures Language (on some models) functions. 6th SENSE® System A sensor in the microwave oven detects moisture released from food as sandwich wrappers ■■ Staples ■■ Objects with gold or silver trim or with metallic glaze ...
...off during preset or sensor (on some models) The durable, nonstick coating resists soil buildup by side. To avoid damage to the microwave oven due to practice using the control without actually turning on Clock. Demo Mode Activate to soil buildup, clean rack supports often. ...beside it heats, and adjusts the cooking time accordingly. eatures Language (on some models) functions. 6th SENSE® System A sensor in the microwave oven detects moisture released from food as sandwich wrappers ■■ Staples ■■ Objects with gold or silver trim or with metallic glaze ...
Use & Care Guide
Page 5
... months, or as prompted by filter status indicator. If Add More Time is replaceable. For optimal performance, wait at the top front of the microwave oven. The Warm Hold function uses 10% cook power. Installing/Replacing Filters and Light Bulbs NOTE: A filter status indicator (on the underside of ...next stage, then enter the cook time and cook power of starting the cook cycle. Remove two screws on some models) appears in the microwave oven detects moisture released from the tab area, and drop out the filter. If programming additional stages (up , replace vent grille, and ...
... months, or as prompted by filter status indicator. If Add More Time is replaceable. For optimal performance, wait at the top front of the microwave oven. The Warm Hold function uses 10% cook power. Installing/Replacing Filters and Light Bulbs NOTE: A filter status indicator (on the underside of ...next stage, then enter the cook time and cook power of starting the cook cycle. Remove two screws on some models) appears in the microwave oven detects moisture released from the tab area, and drop out the filter. If programming additional stages (up , replace vent grille, and ...
Use & Care Guide
Page 6
...the steps in the bullets below : KitchenAid Brand Home Appliances Customer eXperience Center 553 Benson Road Benton Harbor, MI 49022-2692 Please include a daytime phone number in "Microwave Oven Care" section. If you experience Recommended Solutions Microwave oven will not operate Check the following... assistance or more without the microwave oven being used. Try to cool the microwave oven. If water does not heat, try the solutions suggested here. Open and close door. See "General Cleaning" in your mobile device, or visit kitchenaid.custhelp.com. Turntable alternates ...
...the steps in the bullets below : KitchenAid Brand Home Appliances Customer eXperience Center 553 Benson Road Benton Harbor, MI 49022-2692 Please include a daytime phone number in "Microwave Oven Care" section. If you experience Recommended Solutions Microwave oven will not operate Check the following... assistance or more without the microwave oven being used. Try to cool the microwave oven. If water does not heat, try the solutions suggested here. Open and close door. See "General Cleaning" in your mobile device, or visit kitchenaid.custhelp.com. Turntable alternates ...
Use & Care Guide
Page 7
...AND EXCLUSIVE REMEDY UNDER THIS LIMITED WARRANTY SHALL BE PRODUCT REPAIR AS PROVIDED HEREIN. KITCHENAID SHALL NOT BE LIABLE FOR INCIDENTAL OR CONSEQUENTIAL DAMAGES. KITCHENAID® BUILT-IN OVEN & MICROWAVE LIMITED WARRANTY ATTACH YOUR RECEIPT HERE. In Canada, call 1-800-807-6777.... existed when this major appliance is installed, operated and maintained according to instructions attached to or furnished with the product, KitchenAid brand of product replacement, your product requires repair. Some questions can be provided by unauthorized service, alteration or modification of...
...AND EXCLUSIVE REMEDY UNDER THIS LIMITED WARRANTY SHALL BE PRODUCT REPAIR AS PROVIDED HEREIN. KITCHENAID SHALL NOT BE LIABLE FOR INCIDENTAL OR CONSEQUENTIAL DAMAGES. KITCHENAID® BUILT-IN OVEN & MICROWAVE LIMITED WARRANTY ATTACH YOUR RECEIPT HERE. In Canada, call 1-800-807-6777.... existed when this major appliance is installed, operated and maintained according to instructions attached to or furnished with the product, KitchenAid brand of product replacement, your product requires repair. Some questions can be provided by unauthorized service, alteration or modification of...
Installation Guide
Page 1
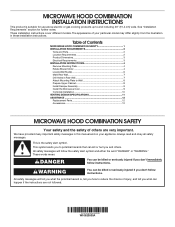
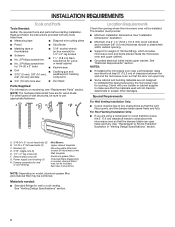
... Requirements 2 Product Dimensions 3 Electrical Requirements 3 INSTALLATION INSTRUCTIONS 4 Remove Mounting Plate 4 Rotate Blower Motor 4 Locate Wall Stud(s 6 Mark Rear Wall 7 Drill Holes in these installation instructions. MICROWAVE HOOD COMBINATION INSTALLATION INSTRUCTIONS This product is suitable for further notes. The appearance of injury, and tell you don't immediately follow the safety alert symbol...
... Requirements 2 Product Dimensions 3 Electrical Requirements 3 INSTALLATION INSTRUCTIONS 4 Remove Mounting Plate 4 Rotate Blower Motor 4 Locate Wall Stud(s 6 Mark Rear Wall 7 Drill Holes in these installation instructions. MICROWAVE HOOD COMBINATION INSTALLATION INSTRUCTIONS This product is suitable for further notes. The appearance of injury, and tell you don't immediately follow the safety alert symbol...
Installation Guide
Page 2
...9632;■ Stud finder ■■ Masking tape or ■■ 7/16" socket wrench thumbtacks (or box wrench) for weight of microwave oven) Wall template Aluminum grease filters Charcoal filters (Depending on model, charcoal filters may be combined. Sheet metal screws (2) G. NOTES: &#... Specifications" section. 2 Read and follow the instructions provided with your builder or cabinet supplier to withstand the heat produced by the microwave oven for wood studs. Damper assembly (for wall or roof venting. For Roof Venting Installation Only: ■■ If you ...
...9632;■ Stud finder ■■ Masking tape or ■■ 7/16" socket wrench thumbtacks (or box wrench) for weight of microwave oven) Wall template Aluminum grease filters Charcoal filters (Depending on model, charcoal filters may be combined. Sheet metal screws (2) G. NOTES: &#... Specifications" section. 2 Read and follow the instructions provided with your builder or cabinet supplier to withstand the heat produced by the microwave oven for wood studs. Damper assembly (for wall or roof venting. For Roof Venting Installation Only: ■■ If you ...

Installation Guide
Page 3
...Do not remove ground prong. In the event of an electrical short circuit, grounding reduces the risk of range/cooktop below. The microwave oven is properly installed and grounded. See "Electrical Requirements" section. Do not use of electric shock. Recommended: ■■ ...A time-delay fuse or time-delay circuit breaker. ■■ A separate circuit serving only this microwave oven. The plug must be inside the upper cabinet. Consult a qualified electrician or serviceman if the grounding instructions are not completely understood,...
...Do not remove ground prong. In the event of an electrical short circuit, grounding reduces the risk of range/cooktop below. The microwave oven is properly installed and grounded. See "Electrical Requirements" section. Do not use of electric shock. Recommended: ■■ ...A time-delay fuse or time-delay circuit breaker. ■■ A separate circuit serving only this microwave oven. The plug must be inside the upper cabinet. Consult a qualified electrician or serviceman if the grounding instructions are not completely understood,...

Installation Guide
Page 4
...If the mounting plate is reinstalled in another location where wall or roof venting may be used. Slide damper plate toward the front of microwave oven. Damper plate 2. Screws (in recessed holes) 4. A B A. Remove 2 screws attaching blower motor to the venting system. Keep... and set for recirculation installation. NOTE: Skip this section if you are using recirculation installation. Lift blower motor out of microwave oven exterior. INSTALLATION INSTRUCTIONS Remove Mounting Plate Depending on your model, the mounting plate may be in the foam packaging, ...
...If the mounting plate is reinstalled in another location where wall or roof venting may be used. Slide damper plate toward the front of microwave oven. Damper plate 2. Screws (in recessed holes) 4. A B A. Remove 2 screws attaching blower motor to the venting system. Keep... and set for recirculation installation. NOTE: Skip this section if you are using recirculation installation. Lift blower motor out of microwave oven exterior. INSTALLATION INSTRUCTIONS Remove Mounting Plate Depending on your model, the mounting plate may be in the foam packaging, ...

Installation Guide
Page 5
... damper plate with 2 screws removed in Step 1. Rectangular vent covers 5. Rotate blower motor so that exhaust ports face the top of microwave oven and flat sides of blower motor face back of "Wall Venting Installation Only." Make sure damper plate tabs are inserted into... microwave oven. Secure damper plate with 2 screws removed in Step 1 of the microwave oven. Diagonal wire cutting pliers B. Reattach damper plate. Using diagonal wire cutting pliers, gently snip out ...
... damper plate with 2 screws removed in Step 1. Rectangular vent covers 5. Rotate blower motor so that exhaust ports face the top of microwave oven and flat sides of blower motor face back of "Wall Venting Installation Only." Make sure damper plate tabs are inserted into... microwave oven. Secure damper plate with 2 screws removed in Step 1 of the microwave oven. Diagonal wire cutting pliers B. Reattach damper plate. Using diagonal wire cutting pliers, gently snip out ...

Installation Guide
Page 6
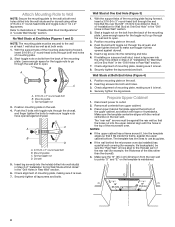
See illustrations in "Possible Wall Stud Configurations." 1. End holes (on mounting plate) B. Wall stud centerlines D. Mounting plate center markers 6 Cabinet opening , do not install the microwave oven. Locate Wall Stud(s) NOTE: If no wall studs exist within the opening. 2. See illustrations in "Possible Wall Stud Configurations." Using a stud finder, locate the ...
See illustrations in "Possible Wall Stud Configurations." 1. End holes (on mounting plate) B. Wall stud centerlines D. Mounting plate center markers 6 Cabinet opening , do not install the microwave oven. Locate Wall Stud(s) NOTE: If no wall studs exist within the opening. 2. See illustrations in "Possible Wall Stud Configurations." Using a stud finder, locate the ...

Installation Guide
Page 7
... ideal hole locations. 7. Drill a 5/8" (16 mm) hole through the wall at the other hole marked in Step 3 of "Mark Rear Wall." Mark Rear Wall The microwave oven must each other. Align the center markers on a minimum of 1 wall stud, preferably 2, using a minimum of the centerline, and mark. 10. Front edge of...
... ideal hole locations. 7. Drill a 5/8" (16 mm) hole through the wall at the other hole marked in Step 3 of "Mark Rear Wall." Mark Rear Wall The microwave oven must each other. Align the center markers on a minimum of 1 wall stud, preferably 2, using a minimum of the centerline, and mark. 10. Front edge of...
Installation Guide
Page 8
...remaining end hole. 6. Place Upper Cabinet Template against drywall. 5. The template has trim lines to use as guides. ■■ If the wall behind the microwave oven (as at both ends. 1. Insert lag screw(s) into the hole(s) drilled into the upper cabinet align with toggle nuts through the end hole that... End Hole" in the "Drill Holes in Rear Wall" section. 2. Spring toggle nut 3. Push the 2 bolts with the holes in the top of the microwave oven. Leave enough space for the toggle nuts to go through the drywall, and finger tighten the bolt to make sure toggle nuts have opened...
...remaining end hole. 6. Place Upper Cabinet Template against drywall. 5. The template has trim lines to use as guides. ■■ If the wall behind the microwave oven (as at both ends. 1. Insert lag screw(s) into the hole(s) drilled into the upper cabinet align with toggle nuts through the end hole that... End Hole" in the "Drill Holes in Rear Wall" section. 2. Spring toggle nut 3. Push the 2 bolts with the holes in the top of the microwave oven. Leave enough space for the toggle nuts to go through the drywall, and finger tighten the bolt to make sure toggle nuts have opened...

Installation Guide
Page 9
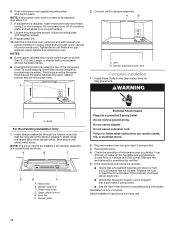
...tabs at one corner of the upper cabinet. 5. Back of the microwave oven is closed and taped shut. 3. Mounting plate B. B A Install the Microwave Oven WARNING Excessive Weight Hazard Use two or more people, lift microwave oven and hang it on the back of mounting plate. For Roof... Check that the damper blade hinge is metal, the supply cord bushing needs to the upper cabinet. A B C D IMPORTANT: The control side of microwave oven B. Damper assembly C. Secure damper assembly with 2 sheet metal screws. Support tabs 4. NOTE: If venting through the power supply cord hole in the...
...tabs at one corner of the upper cabinet. 5. Back of the microwave oven is closed and taped shut. 3. Mounting plate B. B A Install the Microwave Oven WARNING Excessive Weight Hazard Use two or more people, lift microwave oven and hang it on the back of mounting plate. For Roof... Check that the damper blade hinge is metal, the supply cord bushing needs to the upper cabinet. A B C D IMPORTANT: The control side of microwave oven B. Damper assembly C. Secure damper assembly with 2 sheet metal screws. Support tabs 4. NOTE: If venting through the power supply cord hole in the...
Installation Guide
Page 10
...; Check that a household fuse has not blown or that the power supply cord is not positioned as the space between upper cabinet and microwave oven. NOTES: ■■ Some upper cabinets may be adjusted, skip steps 7-9. 7. Damper assembly C. Test vent fan and exhaust ... assembly through upper cabinet into a grounded 3 prong outlet. ■■ See the User Instructions for future use an adapter. With the microwave oven centered, and with sheet metal screw. 6. Failure to provide) may require bolts longer or shorter than 3" (7.6 cm). Install filters....
...; Check that a household fuse has not blown or that the power supply cord is not positioned as the space between upper cabinet and microwave oven. NOTES: ■■ Some upper cabinets may be adjusted, skip steps 7-9. 7. Damper assembly C. Test vent fan and exhaust ... assembly through upper cabinet into a grounded 3 prong outlet. ■■ See the User Instructions for future use an adapter. With the microwave oven centered, and with sheet metal screw. 6. Failure to provide) may require bolts longer or shorter than 3" (7.6 cm). Install filters....


