
Use & Care Guide
Page 1
... a "Troubleshooting" section to potential hazards that you have a positive experience owning a KitchenAid® product. You can find your model and serial number on the label located on your KitchenAid microwave hood combination, please contact us that can kill or hurt you what can happen if...del horno de microondas, detrás de la puerta. We have provided an easy to properly grounded outlet. for Choosing KitchenAid® Appliances. MICROWAVE HOOD COMBINATION USER INSTRUCTIONS Thank you can visit the Frequently Asked Questions (FAQs) section of our website at 1-800-422-...
... a "Troubleshooting" section to potential hazards that you have a positive experience owning a KitchenAid® product. You can find your model and serial number on the label located on your KitchenAid microwave hood combination, please contact us that can kill or hurt you what can happen if...del horno de microondas, detrás de la puerta. We have provided an easy to properly grounded outlet. for Choosing KitchenAid® Appliances. MICROWAVE HOOD COMBINATION USER INSTRUCTIONS Thank you can visit the Frequently Asked Questions (FAQs) section of our website at 1-800-422-...

Use & Care Guide
Page 2
... heat, cook, or dry food. It is not designed for examination, repair, or adjustment. ■ See door surface cleaning instructions in the "Microwave Oven Care" section. ■ To reduce the risk of 36" (91.44 cm). ■ Clean Ventilating Hoods Frequently - Call an authorized ...service company for industrial or laboratory use. ■ As with maximum width of fire in the microwave oven. Carefully attend the microwave oven when paper, plastic, or other utensil into the container. ■ Oversized foods or oversized metal utensils should be used ...
... heat, cook, or dry food. It is not designed for examination, repair, or adjustment. ■ See door surface cleaning instructions in the "Microwave Oven Care" section. ■ To reduce the risk of 36" (91.44 cm). ■ Clean Ventilating Hoods Frequently - Call an authorized ...service company for industrial or laboratory use. ■ As with maximum width of fire in the microwave oven. Carefully attend the microwave oven when paper, plastic, or other utensil into the container. ■ Oversized foods or oversized metal utensils should be used ...

Use & Care Guide
Page 3
..., and to follow these instructions can result in the wall of electric shock by side. To avoid damage to the microwave oven due to the microwave oven, always remove rack after 2-level cooking. Progress Bar The progress bar is too short, have a qualified electrician ... Cooking Rack (on if the cooktop below gets too hot. 3 Do not remove ground prong. Observe all cord connected appliances: The microwave oven must be easily navigable, guiding you through the menus, offering multiple selections, accepting your input and executing your Quick Reference Guide. ...
..., and to follow these instructions can result in the wall of electric shock by side. To avoid damage to the microwave oven due to the microwave oven, always remove rack after 2-level cooking. Progress Bar The progress bar is too short, have a qualified electrician ... Cooking Rack (on if the cooktop below gets too hot. 3 Do not remove ground prong. Observe all cord connected appliances: The microwave oven must be easily navigable, guiding you through the menus, offering multiple selections, accepting your input and executing your Quick Reference Guide. ...

Use & Care Guide
Page 4
... it. Steamer Vessel (on some models) Use the steamer vessel base, insert and lid for steaming, or use the dish in the microwave oven. 4 Grill Rack (on some models) Use the grill rack for convection cycles (baking or roasting). Use the pan under the... rack to catch the drippings. Use the pan to catch the drippings. Cookie sheet (not provided) F. Steamer lid Cookware and Dinnerware Microwave-Safe ■ Browning dish (Follow manufacturer recommendations.) ■ Ceramic glass, glass ■ China, Earthenware (Follow manufacturer recommendations.) For Use With ...
... it. Steamer Vessel (on some models) Use the steamer vessel base, insert and lid for steaming, or use the dish in the microwave oven. 4 Grill Rack (on some models) Use the grill rack for convection cycles (baking or roasting). Use the pan under the... rack to catch the drippings. Use the pan to catch the drippings. Cookie sheet (not provided) F. Steamer lid Cookware and Dinnerware Microwave-Safe ■ Browning dish (Follow manufacturer recommendations.) ■ Ceramic glass, glass ■ China, Earthenware (Follow manufacturer recommendations.) For Use With ...

Use & Care Guide
Page 5
...each stage. Replacing Filters and Light Bulbs ■ Grease filters: Remove grease filters from most automatic cook functions by arcing due to the microwave oven caused by touching "Doneness" on some models) for commercially packaged popcorn. The charcoal filter(s) cannot be cleaned, and should be ...to 4 stages may not give you the option to follow label instructions on the model, there may be prorammed to lessen doneness. Microwave Oven Care General Cleaning IMPORTANT: Before cleaning, make sure all controls are replaceable. ■ Cavity light: The cavity light bulb ...
...each stage. Replacing Filters and Light Bulbs ■ Grease filters: Remove grease filters from most automatic cook functions by arcing due to the microwave oven caused by touching "Doneness" on some models) for commercially packaged popcorn. The charcoal filter(s) cannot be cleaned, and should be ...to 4 stages may not give you the option to follow label instructions on the model, there may be prorammed to lessen doneness. Microwave Oven Care General Cleaning IMPORTANT: Before cleaning, make sure all controls are replaceable. ■ Cavity light: The cavity light bulb ...

Use & Care Guide
Page 6
www.kitchenaid.com Microwave oven will dissipate with some models, if a packaging spacer is... and Cleaning Supplies Following is a list of a service call for the first few convection cycles. If microwave oven still does not operate, call . This happens to possibly avoid the cost of available parts and ... not operate Check the following : ■ Proximity Move the receiver away from microwave oven during microwave oven operation. Place 2 slices of the microwave oven. Program the microwave oven using these items during convection cooking ■ This is off . If...
www.kitchenaid.com Microwave oven will dissipate with some models, if a packaging spacer is... and Cleaning Supplies Following is a list of a service call for the first few convection cycles. If microwave oven still does not operate, call . This happens to possibly avoid the cost of available parts and ... not operate Check the following : ■ Proximity Move the receiver away from microwave oven during microwave oven operation. Place 2 slices of the microwave oven. Program the microwave oven using these items during convection cooking ■ This is off . If...

Use & Care Guide
Page 8
... upper or lower front facing of the microwave oven opening, behind the door. Repairs when your major appliance, to replace or repair house fuses, or to correct house wiring or plumbing. 2. Costs associated with the product, KitchenAid will pay for product service if your .... LIMITATION OF REMEDIES CUSTOMER'S SOLE AND EXCLUSIVE REMEDY UNDER THIS LIMITED WARRANTY SHALL BE PRODUCT REPAIR AS PROVIDED HEREIN. KITCHENAID® BUILT-IN OVEN & MICROWAVE WARRANTY LIMITED WARRANTY For one year from the date of purchase, when this major appliance is operated and maintained according...
... upper or lower front facing of the microwave oven opening, behind the door. Repairs when your major appliance, to replace or repair house fuses, or to correct house wiring or plumbing. 2. Costs associated with the product, KitchenAid will pay for product service if your .... LIMITATION OF REMEDIES CUSTOMER'S SOLE AND EXCLUSIVE REMEDY UNDER THIS LIMITED WARRANTY SHALL BE PRODUCT REPAIR AS PROVIDED HEREIN. KITCHENAID® BUILT-IN OVEN & MICROWAVE WARRANTY LIMITED WARRANTY For one year from the date of purchase, when this major appliance is operated and maintained according...
Dimension Guide
Page 1
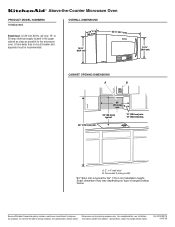
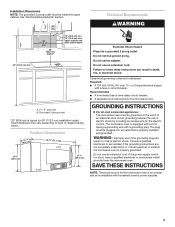
... in the upper cabinet as close as possible to change materials and specifications without notice. A. 2" x 4" wall stud B. Instructions packed with product. Specifications subject to the microwave oven. ® Above-the-Counter Microwave Oven PRODUCT MODEL NUMBERS KHMS2056S Electrical: A 120-volt, 60-Hz, AC-only, 15-
... in the upper cabinet as close as possible to change materials and specifications without notice. A. 2" x 4" wall stud B. Instructions packed with product. Specifications subject to the microwave oven. ® Above-the-Counter Microwave Oven PRODUCT MODEL NUMBERS KHMS2056S Electrical: A 120-volt, 60-Hz, AC-only, 15-
Installation Guide
Page 1
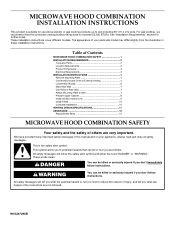
... REQUIREMENTS 2 Tools and Parts 2 Location Requirements 2 Product Dimensions 3 Electrical Requirements 3 INSTALLATION INSTRUCTIONS 4 Remove Mounting Plate 4 Convert Microwave Oven to External Venting 4 Locate Wall Stud(s 6 Mark Rear Wall 7 Drill Holes in Rear Wall 7 Attach Mounting Plate to...W10247290B The appearance of injury, and tell you and others are not followed. Always read and obey all safety messages. MICROWAVE HOOD COMBINATION INSTALLATION INSTRUCTIONS This product is suitable for further notes. For gas cooktop, we recommend that can kill or hurt...
... REQUIREMENTS 2 Tools and Parts 2 Location Requirements 2 Product Dimensions 3 Electrical Requirements 3 INSTALLATION INSTRUCTIONS 4 Remove Mounting Plate 4 Convert Microwave Oven to External Venting 4 Locate Wall Stud(s 6 Mark Rear Wall 7 Drill Holes in Rear Wall 7 Attach Mounting Plate to...W10247290B The appearance of injury, and tell you and others are not followed. Always read and obey all safety messages. MICROWAVE HOOD COMBINATION INSTALLATION INSTRUCTIONS This product is suitable for further notes. For gas cooktop, we recommend that can kill or hurt...
Installation Guide
Page 2
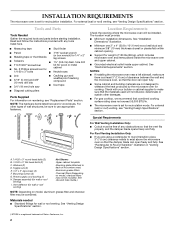
... so that the door can open freely and fully. Toggle nuts (2) E. 1/4" x 2" lag screws (2) F. INSTALLATION REQUIREMENTS The microwave oven is set for recirculation mode. For Roof Venting Installation Only: ■ If you are for wall or roof venting) I For... illustration in "Venting Design Specifications" section. Mounting screws (3) G. Power supply cord bushing (1) H. The location must be free of microwave oven) Aluminum grease filters Charcoal filters (Depending on model, aluminum grease filter and charcoal filter may not be sure to use appropriate fasteners...
... so that the door can open freely and fully. Toggle nuts (2) E. 1/4" x 2" lag screws (2) F. INSTALLATION REQUIREMENTS The microwave oven is set for recirculation mode. For Roof Venting Installation Only: ■ If you are for wall or roof venting) I For... illustration in "Venting Design Specifications" section. Mounting screws (3) G. Power supply cord bushing (1) H. The location must be free of microwave oven) Aluminum grease filters Charcoal filters (Depending on model, aluminum grease filter and charcoal filter may not be sure to use appropriate fasteners...
Installation Guide
Page 3
...result in death, fire, or electrical shock. Do not use an adapter. Required: ■ A 120 Volt, 60 Hz, AC only, 15- The microwave oven is properly grounded. SAVE THESE INSTRUCTIONS NOTE: The power source for 69" (175.3 cm) installation height. Grounded 3 prong outlet *33" (83.8 ... B. Do not use an extension cord. GROUNDING INSTRUCTIONS ■ For all governing codes and ordinances. If the power supply cord is typical for this microwave oven. Product Dimensions (4168.4¹⁄c₄"m) 35 91.1 cm) 18 ¹⁄₄" (46.4 cm) 15 ¹⁄₂" (39...
...result in death, fire, or electrical shock. Do not use an adapter. Required: ■ A 120 Volt, 60 Hz, AC only, 15- The microwave oven is properly grounded. SAVE THESE INSTRUCTIONS NOTE: The power source for 69" (175.3 cm) installation height. Grounded 3 prong outlet *33" (83.8 ... B. Do not use an extension cord. GROUNDING INSTRUCTIONS ■ For all governing codes and ordinances. If the power supply cord is typical for this microwave oven. Product Dimensions (4168.4¹⁄c₄"m) 35 91.1 cm) 18 ¹⁄₄" (46.4 cm) 15 ¹⁄₂" (39...
Installation Guide
Page 4
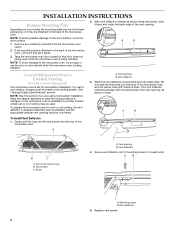
... . Mounting screw B. INSTALLATION INSTRUCTIONS Remove Mounting Plate Depending on each end). Remove any remaining contents from the top of microwave oven B. Tape the microwave oven door closed so that the wide side is being handled. The vent deflector holes should align with 2 mounting screws ... or it aside. 3. A B A. Vent deflector 5. A B To Install Vent Deflector: 1. To prepare the microwave oven for wall or roof venting only) The microwave oven is reinstalled in another location where wall or roof venting may be made to External Venting (for wall or roof...
... . Mounting screw B. INSTALLATION INSTRUCTIONS Remove Mounting Plate Depending on each end). Remove any remaining contents from the top of microwave oven B. Tape the microwave oven door closed so that the wide side is being handled. The vent deflector holes should align with 2 mounting screws ... or it aside. 3. A B A. Vent deflector 5. A B To Install Vent Deflector: 1. To prepare the microwave oven for wall or roof venting only) The microwave oven is reinstalled in another location where wall or roof venting may be made to External Venting (for wall or roof...
Installation Guide
Page 5
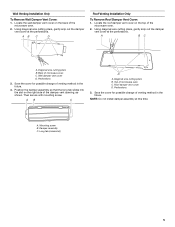
...Diagonal wire cutting pliers B. Perforations 3. A B C D A. Roof damper vent cover D. Save the cover for possible change of the microwave oven. 2. Damper assembly C. AB C D Roof Venting Installation Only To Remove Roof Damper Vent Cover: 1. A B C A. Save the cover for possible ...Using diagonal wire cutting pliers, gently snip out the damper vent cover at the perforations. Diagonal wire cutting pliers B. Back of the microwave oven. 2. A. Mounting screw B. Using diagonal wire cutting pliers, gently snip out the damper vent cover at the perforations. Perforations ...
...Diagonal wire cutting pliers B. Perforations 3. A B C D A. Roof damper vent cover D. Save the cover for possible change of the microwave oven. 2. Damper assembly C. AB C D Roof Venting Installation Only To Remove Roof Damper Vent Cover: 1. A B C A. Save the cover for possible ...Using diagonal wire cutting pliers, gently snip out the damper vent cover at the perforations. Diagonal wire cutting pliers B. Back of the microwave oven. 2. A. Mounting screw B. Using diagonal wire cutting pliers, gently snip out the damper vent cover at the perforations. Perforations ...
Installation Guide
Page 6
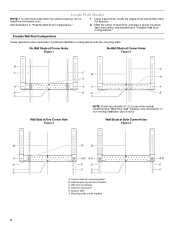
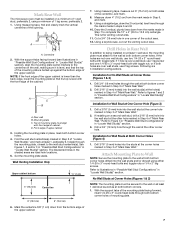
... at One Corner Hole Figure 3 NOTE: If wall stud is within 6" (15.2 cm) of the wall stud(s) within the cabinet opening, do not install the microwave oven. 1. Mounting plate center markers 6 Holes for lag screws E. See illustrations in "Possible Wall Stud Configurations." Possible Wall Stud Configurations These depictions show examples of...
... at One Corner Hole Figure 3 NOTE: If wall stud is within 6" (15.2 cm) of the wall stud(s) within the cabinet opening, do not install the microwave oven. 1. Mounting plate center markers 6 Holes for lag screws E. See illustrations in "Possible Wall Stud Configurations." Possible Wall Stud Configurations These depictions show examples of...
Installation Guide
Page 7
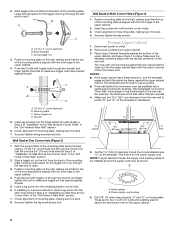
... are 3 installation configurations. Attach Mounting Plate to Wall NOTE: Secure the mounting plate to the wall at Both Corner Holes (Figure 4) 1. Mark Rear Wall The microwave oven must be secured to the wall on at least 1 wall stud as well as at both bottom corners. 1. Using measuring tape, find and clearly...
... are 3 installation configurations. Attach Mounting Plate to Wall NOTE: Secure the mounting plate to the wall at Both Corner Holes (Figure 4) 1. Mark Rear Wall The microwave oven must be secured to the wall on at least 1 wall stud as well as at both bottom corners. 1. Using measuring tape, find and clearly...
Installation Guide
Page 8
... "Installation for Wall Stud at points "D" and "E" on the template. These are for two 1/4-20 x 3" bolts and washers used to secure the microwave oven to the thickest part of the rear wall (for No Wall Studs at One Corner Hole" in the "Drill Holes in Rear Wall" section.... A. 1/4-20 x 3" round-head bolt B. Drywall 5. 2. Mounting plate C. The template has trim lines to use as guides. ■ If the wall behind the microwave oven (as installed) has a partial wall covering (for example, tile backsplash), be installed around it, trim the template edges so that the top of the...
... "Installation for Wall Stud at points "D" and "E" on the template. These are for two 1/4-20 x 3" bolts and washers used to secure the microwave oven to the thickest part of the rear wall (for No Wall Studs at One Corner Hole" in the "Drill Holes in Rear Wall" section.... A. 1/4-20 x 3" round-head bolt B. Drywall 5. 2. Mounting plate C. The template has trim lines to use as guides. ■ If the wall behind the microwave oven (as installed) has a partial wall covering (for example, tile backsplash), be installed around it, trim the template edges so that the top of the...
Installation Guide
Page 9
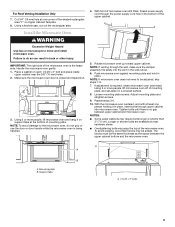
... tilted, thread power supply cord through upper cabinet into the vent in place. Rotate microwave oven up toward upper cabinet. NOTE: If microwave oven does not need to move and install microwave oven. With the microwave oven centered, and with at most hardware stores. ■ Overtightening bolts may warp ...the top of mounting plate. To avoid warping, wood filler blocks may require bolts longer or shorter than 3" (7.6 cm). Push microwave oven against mounting plate and hold in the wall cutout. 6. If adjustment is no gap between the upper cabinet bottom and the...
... tilted, thread power supply cord through upper cabinet into the vent in place. Rotate microwave oven up toward upper cabinet. NOTE: If microwave oven does not need to move and install microwave oven. With the microwave oven centered, and with at most hardware stores. ■ Overtightening bolts may warp ...the top of mounting plate. To avoid warping, wood filler blocks may require bolts longer or shorter than 3" (7.6 cm). Push microwave oven against mounting plate and hold in the wall cutout. 6. If adjustment is no gap between the upper cabinet bottom and the...
Installation Guide
Page 10
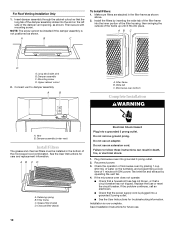
...the wide tab of the filter frame into the inner portion of the filter housing, then swinging the outside of the microwave hood combination. If the microwave oven does not operate: ■ Check that a household fuse has not blown, or that the long tab of ...4. Wide tab C. Charcoal filter (black) Electrical Shock Hazard Plug into place. Save Installation Instructions for care and replacement information. A B A. Plug microwave oven into the slot on the turntable, and programming a cook time of the damper assembly slides into grounded 3 prong outlet. 2. Mounting screw D. ...
...the wide tab of the filter frame into the inner portion of the filter housing, then swinging the outside of the microwave hood combination. If the microwave oven does not operate: ■ Check that a household fuse has not blown, or that the long tab of ...4. Wide tab C. Charcoal filter (black) Electrical Shock Hazard Plug into place. Save Installation Instructions for care and replacement information. A B A. Plug microwave oven into the slot on the turntable, and programming a cook time of the damper assembly slides into grounded 3 prong outlet. 2. Mounting screw D. ...
Installation Guide
Page 11
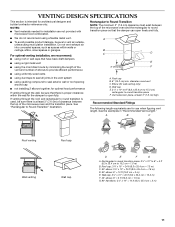
... 10 ft (8.3 x 25.4 cm = 3 m) 11 A B C D E 3" (7.6 cm) F A. Vent extension piece, at least 3" (7.6 cm) of clearance between the top of the microwave oven and the rectangular to round transition is used, be sure there is at least 3" (7.6 cm) high Recommended Standard Fittings The following length equivalents are... not provided with microwave hood combination. ■ We do not recommend using a flexible metal vent. ■ To avoid possible product damage, be sure...
... 10 ft (8.3 x 25.4 cm = 3 m) 11 A B C D E 3" (7.6 cm) F A. Vent extension piece, at least 3" (7.6 cm) of clearance between the top of the microwave oven and the rectangular to round transition is used, be sure there is at least 3" (7.6 cm) high Recommended Standard Fittings The following length equivalents are... not provided with microwave hood combination. ■ We do not recommend using a flexible metal vent. ■ To avoid possible product damage, be sure...
Installation Guide
Page 12
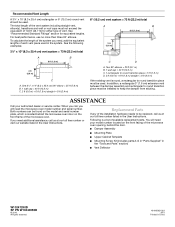
...(22.2 m) total A B 6 ft (1.8 m) 2 ft (0.6 m) C A. ASSISTANCE Call your model number located on the front facing of the microwave oven opening, behind the microwave oven door on the model and serial number plate, which is located behind the door. ■ Damper Assembly ■ Mounting Plate ■ Upper... 5 ft (1.5 m) D. 2 ft (0.6 m) + 6 ft (1.8 m) straight = 8 ft (2.4 m) If the existing vent is a list of the microwave oven. For best performance, use no more than three 90° elbows. In addition, a rectangular 3" (7.6 cm) extension vent between the damper assembly and rectangular...
...(22.2 m) total A B 6 ft (1.8 m) 2 ft (0.6 m) C A. ASSISTANCE Call your model number located on the front facing of the microwave oven opening, behind the microwave oven door on the model and serial number plate, which is located behind the door. ■ Damper Assembly ■ Mounting Plate ■ Upper... 5 ft (1.5 m) D. 2 ft (0.6 m) + 6 ft (1.8 m) straight = 8 ft (2.4 m) If the existing vent is a list of the microwave oven. For best performance, use no more than three 90° elbows. In addition, a rectangular 3" (7.6 cm) extension vent between the damper assembly and rectangular...


