
Use & Care Guide
Page 1
...W10170438A MICROWAVE HOOD COMBINATION USER INSTRUCTIONS Thank you for example, closed glass jars - For additional information, you have a positive experience owning a KitchenAid® product. Always read and obey all instructions before using the microwave oven. ■ Read and follow the specific "PRECAUTIONS TO AVOID...We hold our company to follow instructions. Puede encontrar su número de modelo y de serie en la etiqueta ubicada en la parte frontal de la abertura del horno de microondas, detrás de la puerta. See "GROUNDING INSTRUCTIONS" found in this manual and ...
...W10170438A MICROWAVE HOOD COMBINATION USER INSTRUCTIONS Thank you for example, closed glass jars - For additional information, you have a positive experience owning a KitchenAid® product. Always read and obey all instructions before using the microwave oven. ■ Read and follow the specific "PRECAUTIONS TO AVOID...We hold our company to follow instructions. Puede encontrar su número de modelo y de serie en la etiqueta ubicada en la parte frontal de la abertura del horno de microondas, detrás de la puerta. See "GROUNDING INSTRUCTIONS" found in this manual and ...

Use & Care Guide
Page 2
... Oven Care" section. ■ To reduce the risk of the oven with metal foil. Carefully attend the microwave oven when paper, plastic, or other part of fire in harmful exposure to defeat or tamper with maximum width of 36" (91.44 cm). ■ Clean Ventilating Hoods Frequently - If materials inside... in operation. ■ When flambeing foods under the hood, turn oven off, and disconnect the power cord, or shut off the pad and touch electrical parts involving a risk of table or counter. ■ Do not mount over a sink. ■ Do not cover racks or any openings on . ■ Use ...
... Oven Care" section. ■ To reduce the risk of the oven with metal foil. Carefully attend the microwave oven when paper, plastic, or other part of fire in harmful exposure to defeat or tamper with maximum width of 36" (91.44 cm). ■ Clean Ventilating Hoods Frequently - If materials inside... in operation. ■ When flambeing foods under the hood, turn oven off, and disconnect the power cord, or shut off the pad and touch electrical parts involving a risk of table or counter. ■ Do not mount over a sink. ■ Do not cover racks or any openings on . ■ Use ...

Use & Care Guide
Page 3
... grill element has a 1,000-watt halogen bulb and a 500-watt quartz bulb. If the power supply cord is equipped with a cord having a grounding wire with Part 18 of sensor functions. Cooking Rack (on some models) The convection element and fan are bigger than the turntable, or when cooking with a fuse or...
... grill element has a 1,000-watt halogen bulb and a 500-watt quartz bulb. If the power supply cord is equipped with a cord having a grounding wire with Part 18 of sensor functions. Cooking Rack (on some models) The convection element and fan are bigger than the turntable, or when cooking with a fuse or...

Use & Care Guide
Page 6
...■ Pan and handle ■ Convection rack (provided with some models) ■ Grill rack (provided with repeated use . Replacement Parts, Accesssories and Cleaning Supplies Following is separate from microwave oven during microwave oven operation. If it , then firmly close door. Arcing in... microwave oven. The bread should toast dark brown. Turntable alternates rotation directions ■ This is normal for 4 minutes. www.kitchenaid.com Microwave oven will dissipate with some models, if a packaging spacer is set properly. Fan running during microwave oven operation to...
...■ Pan and handle ■ Convection rack (provided with some models) ■ Grill rack (provided with repeated use . Replacement Parts, Accesssories and Cleaning Supplies Following is separate from microwave oven during microwave oven operation. If it , then firmly close door. Arcing in... microwave oven. The bread should toast dark brown. Turntable alternates rotation directions ■ This is normal for 4 minutes. www.kitchenaid.com Microwave oven will dissipate with some models, if a packaging spacer is set properly. Fan running during microwave oven operation to...

Use & Care Guide
Page 8
...the country in which it is used for other damage to the finish of your correspondence. Repairs to parts or systems resulting from warranty coverage. 3. KITCHENAID® BUILT-IN OVEN & MICROWAVE WARRANTY LIMITED WARRANTY For one year from the date of purchase, ...is operated and maintained according to instructions attached to or furnished with the product, KitchenAid brand of Whirlpool Corporation or Whirlpool Canada LP (hereafter "KitchenAid") will pay for Factory Specified Parts and repair labor to correct defects in materials or workmanship. Cosmetic damage, including ...
...the country in which it is used for other damage to the finish of your correspondence. Repairs to parts or systems resulting from warranty coverage. 3. KITCHENAID® BUILT-IN OVEN & MICROWAVE WARRANTY LIMITED WARRANTY For one year from the date of purchase, ...is operated and maintained according to instructions attached to or furnished with the product, KitchenAid brand of Whirlpool Corporation or Whirlpool Canada LP (hereafter "KitchenAid") will pay for Factory Specified Parts and repair labor to correct defects in materials or workmanship. Cosmetic damage, including ...
Installation Guide
Page 1
The appearance of your appliance. Table of Contents MICROWAVE HOOD COMBINATION SAFETY 1 INSTALLATION REQUIREMENTS 2 Tools and Parts 2 Location Requirements 2 Product Dimensions 3 Electrical Requirements 3 INSTALLATION INSTRUCTIONS 4 Remove Mounting Plate 4 Convert Microwave Oven to External Venting 4... Upper Cabinet 8 Install the Microwave Oven 9 Install Filters 10 Complete Installation 10 VENTING DESIGN SPECIFICATIONS 11 ASSISTANCE 12 Replacement Parts 12 MICROWAVE HOOD COMBINATION SAFETY Your safety and the safety of injury, and tell you what can be killed or seriously...
The appearance of your appliance. Table of Contents MICROWAVE HOOD COMBINATION SAFETY 1 INSTALLATION REQUIREMENTS 2 Tools and Parts 2 Location Requirements 2 Product Dimensions 3 Electrical Requirements 3 INSTALLATION INSTRUCTIONS 4 Remove Mounting Plate 4 Convert Microwave Oven to External Venting 4... Upper Cabinet 8 Install the Microwave Oven 9 Install Filters 10 Complete Installation 10 VENTING DESIGN SPECIFICATIONS 11 ASSISTANCE 12 Replacement Parts 12 MICROWAVE HOOD COMBINATION SAFETY Your safety and the safety of injury, and tell you what can be killed or seriously...
Installation Guide
Page 2
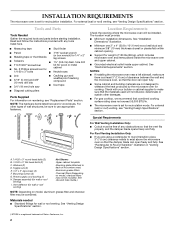
... saw ■ Caulking gun and weatherproof caulking compound ■ Duct tape ■ Diagonal cutting pliers Parts Supplied For information on reordering, see "Replacement Parts" section. See "Electrical Requirements" section. Read and follow the instructions provided with your builder or cabinet... supplier to use appropriate fasteners. Toggle nuts (2) E. 1/4" x 2" lag screws (2) F. Tools and Parts Tools Needed Gather the required tools and parts before starting installation. See Use and Care Guide.) NOTE: Depending on model, charcoal filters may be installed. ...
... saw ■ Caulking gun and weatherproof caulking compound ■ Duct tape ■ Diagonal cutting pliers Parts Supplied For information on reordering, see "Replacement Parts" section. See "Electrical Requirements" section. Read and follow the instructions provided with your builder or cabinet... supplier to use appropriate fasteners. Toggle nuts (2) E. 1/4" x 2" lag screws (2) F. Tools and Parts Tools Needed Gather the required tools and parts before starting installation. See Use and Care Guide.) NOTE: Depending on model, charcoal filters may be installed. ...
Installation Guide
Page 8
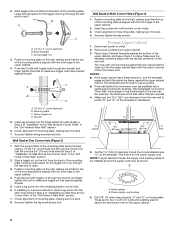
... Wall" arrows align to use as guides. ■ If the wall behind the microwave oven (as shown. The template has trim lines to the thickest part of the upper cabinet. 4. Insert lag screw(s) into the holes drilled into the upper cabinet align with the front edge of the tiles rather than...
... Wall" arrows align to use as guides. ■ If the wall behind the microwave oven (as shown. The template has trim lines to the thickest part of the upper cabinet. 4. Insert lag screw(s) into the holes drilled into the upper cabinet align with the front edge of the tiles rather than...
Installation Guide
Page 12
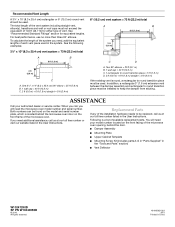
...9632; Upper Cabinet Template ■ Mounting Screw Kit (includes parts A-G in "Parts Supplied" in the "Tools and Parts" section) ■ Vent Deflector W10247290B SP PN W10344996B © 2010. Replacement Parts If any of the microwave oven opening, behind the microwave ... m) total A B 6 ft (1.8 m) 2 ft (0.6 m) C A. ASSISTANCE Call your model number located on the front frame of available replacement parts. All rights reserved. 461965621023 9/10 Printed in the system. The total length of the vent system including straight vent, elbow(s), transitions and wall or...
...9632; Upper Cabinet Template ■ Mounting Screw Kit (includes parts A-G in "Parts Supplied" in the "Tools and Parts" section) ■ Vent Deflector W10247290B SP PN W10344996B © 2010. Replacement Parts If any of the microwave oven opening, behind the microwave ... m) total A B 6 ft (1.8 m) 2 ft (0.6 m) C A. ASSISTANCE Call your model number located on the front frame of available replacement parts. All rights reserved. 461965621023 9/10 Printed in the system. The total length of the vent system including straight vent, elbow(s), transitions and wall or...

