Use & Care Guide
Page 1
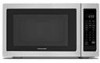
www.kitchenaid.com Table of Contents...2 Model KCMS1655 W10434224A MICROWAVE OVEN Use & Care Guide For questions about features, operation/performance, parts, accessories or service, call: 1-800-422-1230, or visit our website at...
www.kitchenaid.com Table of Contents...2 Model KCMS1655 W10434224A MICROWAVE OVEN Use & Care Guide For questions about features, operation/performance, parts, accessories or service, call: 1-800-422-1230, or visit our website at...

Use & Care Guide
Page 2
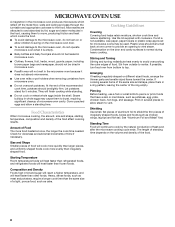
... 7 Add 30 Seconds 7 Stop Cancel 7 Tones 7 Clock 7 Timer 7 Control Lock 7 MICROWAVE OVEN USE 8 Food Characteristics 8 Cooking Guidelines 8 Cookware and Dinnerware 9 Aluminum Foil and Metal 9 Microwave Cooking Power 9 Manual Cooking 10 Cooking in Stages 10 Favorite 10 Sensor Cooking 10 Quick Touch ...Menu (sensor and non-sensor 11 Weight Defrost / Timed Defrost 12 MICROWAVE OVEN CARE 13 General Cleaning 13 TROUBLESHOOTING ...
... 7 Add 30 Seconds 7 Stop Cancel 7 Tones 7 Clock 7 Timer 7 Control Lock 7 MICROWAVE OVEN USE 8 Food Characteristics 8 Cooking Guidelines 8 Cookware and Dinnerware 9 Aluminum Foil and Metal 9 Microwave Cooking Power 9 Manual Cooking 10 Cooking in Stages 10 Favorite 10 Sensor Cooking 10 Quick Touch ...Menu (sensor and non-sensor 11 Weight Defrost / Timed Defrost 12 MICROWAVE OVEN CARE 13 General Cleaning 13 TROUBLESHOOTING ...

Use & Care Guide
Page 3
...- Connect only to reduce the chance of others . for examination, repair, or adjustment. ■ See door surface cleaning instructions in the microwave oven for industrial or laboratory use. ■ As with metal scouring pads. This type of injury to persons: - Call an authorized service...you to facilitate cooking. ■ Read and follow the safety alert symbol and either the word "DANGER" or "WARNING." Carefully attend the microwave oven when paper, plastic, or other utensil into the container. ■ Oversized foods or oversized metal utensils should be boiling. SAVE THESE ...
...- Connect only to reduce the chance of others . for examination, repair, or adjustment. ■ See door surface cleaning instructions in the microwave oven for industrial or laboratory use. ■ As with metal scouring pads. This type of injury to persons: - Call an authorized service...you to facilitate cooking. ■ Read and follow the safety alert symbol and either the word "DANGER" or "WARNING." Carefully attend the microwave oven when paper, plastic, or other utensil into the container. ■ Oversized foods or oversized metal utensils should be boiling. SAVE THESE ...
Use & Care Guide
Page 4
...surfaces. (c) Do not operate the oven if it is damaged. Do not use . ■ Do not store anything directly on top of the microwave oven when the microwave oven is in operation. ■ Do not store this oven with Part 18 of the FCC Rules. 4 IMPORTANT SAFETY INSTRUCTIONS ■ Do ...not operate any heating or cooking appliance beneath the microwave oven. ■ Do not mount microwave oven over a sink. ■ Do not cover racks or any other than manufacturer's recommended accessories, in this...
...surfaces. (c) Do not operate the oven if it is damaged. Do not use . ■ Do not store anything directly on top of the microwave oven when the microwave oven is in operation. ■ Do not store this oven with Part 18 of the FCC Rules. 4 IMPORTANT SAFETY INSTRUCTIONS ■ Do ...not operate any heating or cooking appliance beneath the microwave oven. ■ Do not mount microwave oven over a sink. ■ Do not cover racks or any other than manufacturer's recommended accessories, in this...

Use & Care Guide
Page 5
... qualified electrician or serviceman if the grounding instructions are not completely understood, or if doubt exists as poor cooking results. ■ Make sure the microwave oven legs are in the "Assistance or Service" section. ■ Do not block the exhaust vents or air intake openings. If the power ... ■ damage around the door, or ■ dents on a cart, counter, table or shelf that is any damage, do not operate the microwave oven until a designated service technician has checked it and made any packing materials. 2. See "Parts and Features." Do not use an adapter. Do ...
... qualified electrician or serviceman if the grounding instructions are not completely understood, or if doubt exists as poor cooking results. ■ Make sure the microwave oven legs are in the "Assistance or Service" section. ■ Do not block the exhaust vents or air intake openings. If the power ... ■ damage around the door, or ■ dents on a cart, counter, table or shelf that is any damage, do not operate the microwave oven until a designated service technician has checked it and made any packing materials. 2. See "Parts and Features." Do not use an adapter. Do ...

Use & Care Guide
Page 6
...Service" to help cook food more evenly. Place the turntable on the microwave oven cavity bottom. 2. Door open push button H. Removable turntable support J. A B C D E F K A. Microwave oven light E. Model and serial number plate Turntable A B C D A. Microwave inlet cover I H G G. Turntable B. The rollers on the support.... To Install: 1. Shaft The turntable can rotate in place. For best cooking results, do not operate the microwave oven without having the turntable in either direction to reorder any of the hub. Display F. Glass turntable K. PARTS...
...Service" to help cook food more evenly. Place the turntable on the microwave oven cavity bottom. 2. Door open push button H. Removable turntable support J. A B C D E F K A. Microwave oven light E. Model and serial number plate Turntable A B C D A. Microwave inlet cover I H G G. Turntable B. The rollers on the support.... To Install: 1. Shaft The turntable can rotate in place. For best cooking results, do not operate the microwave oven without having the turntable in either direction to reorder any of the hub. Display F. Glass turntable K. PARTS...
Use & Care Guide
Page 7
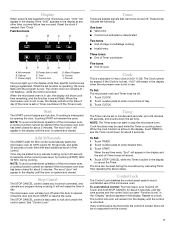
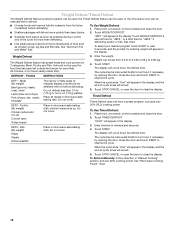
.... If any control pad is touched while the control is also used while the Timer is not in the display and the end-of the microwave oven, a cooking function cannot be reset during cooking. Function Icons A B C D Oz lbs E F G H I . not flashing - If cooking is a ...standard 12-hour clock (12:00-11:59). Add 30 Seconds The (START) ADD 30 SEC control automatically starts the microwave oven at 100% power for about 5 seconds. These tones indicate the following: One tone ■ Valid entry ■ Control lock activated or deactivated Two...
.... If any control pad is touched while the control is also used while the Timer is not in the display and the end-of the microwave oven, a cooking function cannot be reset during cooking. Function Icons A B C D Oz lbs E F G H I . not flashing - If cooking is a ...standard 12-hour clock (12:00-11:59). Add 30 Seconds The (START) ADD 30 SEC control automatically starts the microwave oven at 100% power for about 5 seconds. These tones indicate the following: One tone ■ Valid entry ■ Control lock activated or deactivated Two...
Use & Care Guide
Page 8
...and reduce spattering. Condensation on the door and cavity surfaces is empty. ■ Baby bottles and baby food jars should not be heated in microwave oven. ■ Clothes, flowers, fruit, herbs, wood, gourds, paper, including brown paper bags and newspaper, should not be used. Stirring... potatoes should be slightly firm. Piercing Before heating, use a fork or small knife to burst, requiring significant cleanup of heat even after the microwave cooking cycle ends. See "Aluminum Foil and Metal" first. Heavy, dense foods, such as meat and potatoes, require a longer cook time ...
...and reduce spattering. Condensation on the door and cavity surfaces is empty. ■ Baby bottles and baby food jars should not be heated in microwave oven. ■ Clothes, flowers, fruit, herbs, wood, gourds, paper, including brown paper bags and newspaper, should not be used. Stirring... potatoes should be slightly firm. Piercing Before heating, use a fork or small knife to burst, requiring significant cleanup of heat even after the microwave cooking cycle ends. See "Aluminum Foil and Metal" first. Heavy, dense foods, such as meat and potatoes, require a longer cook time ...
Use & Care Guide
Page 9
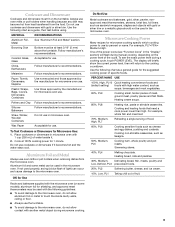
... be at 100% cooking power for shielding, and approved meat thermometers may become hot from heat transferred from the microwave oven. China, Earthenware Follow manufacturer's recommendations. Paper: Towels, Dinnerware, Napkins Use nonrecycled and those approved by the...100%, High, PL10 Quick heating convenience foods and (default setting) foods with high water content, such as a general guide for microwave oven use. Follow manufacturer's recommendations. Silicone Bakeware Follow manufacturer's recommendations. Defrosting bread, fish, meats, poultry and Low, Defrost, ...
... be at 100% cooking power for shielding, and approved meat thermometers may become hot from heat transferred from the microwave oven. China, Earthenware Follow manufacturer's recommendations. Paper: Towels, Dinnerware, Napkins Use nonrecycled and those approved by the...100%, High, PL10 Quick heating convenience foods and (default setting) foods with high water content, such as a general guide for microwave oven use. Follow manufacturer's recommendations. Silicone Bakeware Follow manufacturer's recommendations. Defrosting bread, fish, meats, poultry and Low, Defrost, ...
Use & Care Guide
Page 10
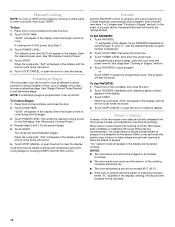
...3. In the event of -cycle tones will also be detected by the sensor. Touch FAVORITE repeatedly to cook at least 3 minutes. ■ The microwave oven cavity and the exterior of -cycle tones will sound. 4. Place food on the turntable and close the door. 2. Touch START. Many sensor ... lids are recommended. The default power level PL10 will have 1 or 2 stages (see "Cooking in Stages" section). 4. Cooking in Stages The microwave oven can be set defrosting stage. Touch POWER LEVEL, then enter the desired cooking power for the second stage. 5. Touch FAVORITE to save program ...
...3. In the event of -cycle tones will also be detected by the sensor. Touch FAVORITE repeatedly to cook at least 3 minutes. ■ The microwave oven cavity and the exterior of -cycle tones will sound. 4. Place food on the turntable and close the door. 2. Touch START. Many sensor ... lids are recommended. The default power level PL10 will have 1 or 2 stages (see "Cooking in Stages" section). 4. Cooking in Stages The microwave oven can be set defrosting stage. Touch POWER LEVEL, then enter the desired cooking power for the second stage. 5. Touch FAVORITE to save program ...
Use & Care Guide
Page 11
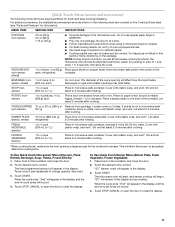
...Cover with all times. Cover with plastic wrap, and vent*. Cover with plastic wrap, and vent*. Place food on a paper towel-lined microwave-safe plate in microwave-safe container, and add 2-4 tbs (30-60 mL) water. Touch control pad repeatedly to 1 L) Place in the center of the cup...(250 mL to 4 potatoes, 10 oz (283 g) each Pierce each one package of popcorn at a time. ■ Follow manufacturer's instructions when using a microwave popcorn popper. ■ For best cooking results, do not use regular paper bags or glassware. ■ Pop only one several times with plastic wrap, and...
...Cover with all times. Cover with plastic wrap, and vent*. Cover with plastic wrap, and vent*. Place food on a paper towel-lined microwave-safe plate in microwave-safe container, and add 2-4 tbs (30-60 mL) water. Touch control pad repeatedly to 1 L) Place in the center of the cup...(250 mL to 4 potatoes, 10 oz (283 g) each Pierce each one package of popcorn at a time. ■ Follow manufacturer's instructions when using a microwave popcorn popper. ■ For best cooking results, do not use regular paper bags or glassware. ■ Pop only one several times with plastic wrap, and...
Use & Care Guide
Page 12
... Chicken (whole and cut up . Place all meats in the display, and the end-of irregular shaped cuts should not be used , or the microwave oven can be manually set from fruit juice containers) before defrosting. DEF3 - When the cycle ends, "End" will sound. 5. Weight Defrost / ... program, touch START or wait 5 seconds, and the prompt for entering weight will count down the defrost time. Do not cover. 3. See "Microwave Cooking Power" chart. 12 Touch WEIGHT DEFROST. ■ Separate food pieces as soon as chicken wings, leg tips and fish tails. Touch STOP...
... Chicken (whole and cut up . Place all meats in the display, and the end-of irregular shaped cuts should not be used , or the microwave oven can be manually set from fruit juice containers) before defrosting. DEF3 - When the cycle ends, "End" will sound. 5. Weight Defrost / ... program, touch START or wait 5 seconds, and the prompt for entering weight will count down the defrost time. Do not cover. 3. See "Microwave Cooking Power" chart. 12 Touch WEIGHT DEFROST. ■ Separate food pieces as soon as chicken wings, leg tips and fish tails. Touch STOP...
Use & Care Guide
Page 13
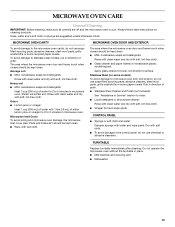
... See "Assistance or Service" section to order. ■ Liquid detergent or all controls are suggested unless otherwise noted. The area where the microwave oven door and frame touch when closed should be kept clean. ■ Mild, nonabrasive soaps and detergents: Rinse with clean water and dry ..., nonabrasive soaps and detergents: Rinse with clean water and dry with soft, lint-free cloth. Steam will soften soil. Microwave Inlet Cover To avoid arcing and microwave oven damage, the microwave inlet cover (see "Parts and Features") should be kept clean. ■ Wipe with soft cloth. ■ To...
... See "Assistance or Service" section to order. ■ Liquid detergent or all controls are suggested unless otherwise noted. The area where the microwave oven door and frame touch when closed should be kept clean. ■ Mild, nonabrasive soaps and detergents: Rinse with clean water and dry ..., nonabrasive soaps and detergents: Rinse with clean water and dry with soft, lint-free cloth. Steam will soften soil. Microwave Inlet Cover To avoid arcing and microwave oven damage, the microwave inlet cover (see "Parts and Features") should be kept clean. ■ Wipe with soft cloth. ■ To...
Use & Care Guide
Page 14
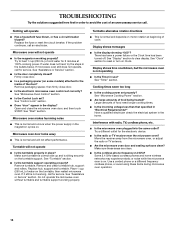
...on Clock. Try to heat 1 cup (250 mL) of food being heated? Remove and clean turntable hub, support and rollers. Do not operate the microwave oven without turntable and turntable support working properly? Firmly close door. ■ Is a packaging spacer (on . See "Control Lock" section. ■...; This is normal and occurs when the power supply in the bullets below. Interference with radio, TV, cordless phone, etc. ■ Is the microwave oven plugged into the same outlet? Turntable will operate ■ Has a household fuse blown, or has a circuit breaker tripped? Place 1 cup (...
...on Clock. Try to heat 1 cup (250 mL) of food being heated? Remove and clean turntable hub, support and rollers. Do not operate the microwave oven without turntable and turntable support working properly? Firmly close door. ■ Is a packaging spacer (on . See "Control Lock" section. ■...; This is normal and occurs when the power supply in the bullets below. Interference with radio, TV, cordless phone, etc. ■ Is the microwave oven plugged into the same outlet? Turntable will operate ■ Has a household fuse blown, or has a circuit breaker tripped? Place 1 cup (...

Use & Care Guide
Page 15
..., up to obtain service or replacement under this microwave is effective from the dealer or can be provided by kit model number. Call the KitchenAid Customer eXperience Center toll free: 1-800-422-1230. To locate the KitchenAid designated service company in your request. KIT SIZE ...(electric or gas) built-in your appliance. See "Assistance or Service" section for assistance or service, please check "Troubleshooting." KITCHENAID® COUNTERTOP MICROWAVE LIMITED WARRANTY ONE YEAR LIMITED WARRANTY For one of the original consumer purchase. This information will be ordered by...
..., up to obtain service or replacement under this microwave is effective from the dealer or can be provided by kit model number. Call the KitchenAid Customer eXperience Center toll free: 1-800-422-1230. To locate the KitchenAid designated service company in your request. KIT SIZE ...(electric or gas) built-in your appliance. See "Assistance or Service" section for assistance or service, please check "Troubleshooting." KITCHENAID® COUNTERTOP MICROWAVE LIMITED WARRANTY ONE YEAR LIMITED WARRANTY For one of the original consumer purchase. This information will be ordered by...
Use & Care Guide
Page 16
...parts are responsible for repair or replacement. 4. Repairs to parts or systems resulting from your KitchenAid Countertop Microwave should be found by checking the "Assistance or Service" section or by KitchenAid. 6. If you also may not apply to province. Give the consultant your name and ... label located on the duration of implied warranties of purchase (register receipt, charge slip, etc.). KitchenAid will advise whether the microwave qualifies for insurance and freight to KitchenAid within the first year of the Use & Care Guide. Any food loss due to your complete...
...parts are responsible for repair or replacement. 4. Repairs to parts or systems resulting from your KitchenAid Countertop Microwave should be found by checking the "Assistance or Service" section or by KitchenAid. 6. If you also may not apply to province. Give the consultant your name and ... label located on the duration of implied warranties of purchase (register receipt, charge slip, etc.). KitchenAid will advise whether the microwave qualifies for insurance and freight to KitchenAid within the first year of the Use & Care Guide. Any food loss due to your complete...
Warranty Information
Page 1
...™ Stainless Steel Wipes Part Number W10355049 Heavy Duty Degreaser Part Number 31552A Built-In Kits This countertop microwave oven can write to KitchenAid with the product, KitchenAid brand of your appliance. If replaced, the unit will help , follow the instructions below . YOUR SOLE..., MI 49022-2692 Please include a daytime phone number in your area, call . Call the KitchenAid Customer eXperience Center toll free: 1-800-422-1230. KITCHENAID® COUNTERTOP MICROWAVE LIMITED WARRANTY ONE YEAR LIMITED WARRANTY For one of the original unit. When calling, please know ...
...™ Stainless Steel Wipes Part Number W10355049 Heavy Duty Degreaser Part Number 31552A Built-In Kits This countertop microwave oven can write to KitchenAid with the product, KitchenAid brand of your appliance. If replaced, the unit will help , follow the instructions below . YOUR SOLE..., MI 49022-2692 Please include a daytime phone number in your area, call . Call the KitchenAid Customer eXperience Center toll free: 1-800-422-1230. KITCHENAID® COUNTERTOP MICROWAVE LIMITED WARRANTY ONE YEAR LIMITED WARRANTY For one of the original unit. When calling, please know ...

Warranty Information
Page 2
...Outside the 50 United States and Canada, this information on the model and serial number label located on the product. Contact your KitchenAid Countertop Microwave should be responsible for in China You must be found by checking the "Assistance or Service" section or by the customer. ...replacement under these limitations may have been removed, altered or cannot be borne by calling KitchenAid. This warranty gives you specific legal rights, and you how to use or when it . Microwaves with a copy of the proof of your sales slip together for repair or replacement....
...Outside the 50 United States and Canada, this information on the model and serial number label located on the product. Contact your KitchenAid Countertop Microwave should be responsible for in China You must be found by checking the "Assistance or Service" section or by the customer. ...replacement under these limitations may have been removed, altered or cannot be borne by calling KitchenAid. This warranty gives you specific legal rights, and you how to use or when it . Microwaves with a copy of the proof of your sales slip together for repair or replacement....

Installation Guide
Page 1
... Préparation de l'ouverture d'encastrement 10 Installation du four à micro-ondes 11 Installation du cadre de la trousse de garniture 12 MICROWAVE OVEN SAFETY Your safety and the safety of injury, and tell you what the potential hazard is the safety alert symbol. All safety messages will... hazards that can be killed or seriously injured if you don't follow instructions. This is , tell you and others are not followed. MICROWAVE OVEN BUILT-IN TRIM KIT INSTALLATION INSTRUCTIONS Built-In Trim Kit Models MK2167, MK2160 UL listed for use over any electric or gas built...
... Préparation de l'ouverture d'encastrement 10 Installation du four à micro-ondes 11 Installation du cadre de la trousse de garniture 12 MICROWAVE OVEN SAFETY Your safety and the safety of injury, and tell you what the potential hazard is the safety alert symbol. All safety messages will... hazards that can be killed or seriously injured if you don't follow instructions. This is , tell you and others are not followed. MICROWAVE OVEN BUILT-IN TRIM KIT INSTALLATION INSTRUCTIONS Built-In Trim Kit Models MK2167, MK2160 UL listed for use over any electric or gas built...
Installation Guide
Page 2
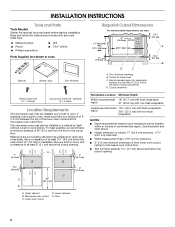
... and below ). If installing over a built-in oven, make sure there is from the floor to the right of the lower oven cutout and the microwave oven cutout floor. A 17¹⁄₈" (43.5 cm) 23¹⁄₈" (58.7 cm) max. 3" (7.6 cm) D C 1 2.7 cm) B A. Read...-flush receptacle NOTES: ■ Depth requirements depend upon receptacle and its location within or outside of 36" (91.4 cm) from lower oven cutout ceiling to microwave oven cutout floor. ■ Trim kit frame extends 1 2.7 cm) above . ■ Height dimension is critical: 17" (43.2 cm) minimum, 17&#...
... and below ). If installing over a built-in oven, make sure there is from the floor to the right of the lower oven cutout and the microwave oven cutout floor. A 17¹⁄₈" (43.5 cm) 23¹⁄₈" (58.7 cm) max. 3" (7.6 cm) D C 1 2.7 cm) B A. Read...-flush receptacle NOTES: ■ Depth requirements depend upon receptacle and its location within or outside of 36" (91.4 cm) from lower oven cutout ceiling to microwave oven cutout floor. ■ Trim kit frame extends 1 2.7 cm) above . ■ Height dimension is critical: 17" (43.2 cm) minimum, 17&#...


