Use and Care Manual
Page 1
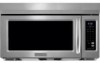
MICROWAVE HOOD COMBINATION Use & Care Guide For questions about features, operation/performance, parts, accessories or service, call: 1-800-422-1230, or visit our website at... www.kitchenaid.com Table of Contents...2 Model KHMS1850S W10117504
MICROWAVE HOOD COMBINATION Use & Care Guide For questions about features, operation/performance, parts, accessories or service, call: 1-800-422-1230, or visit our website at... www.kitchenaid.com Table of Contents...2 Model KHMS1850S W10117504
Use and Care Manual
Page 2
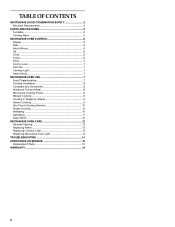
...6 Clock 6 Tones 6 Timer 7 Control Lock 7 Vent Fan 7 Cooktop Light 7 Demo Mode 7 MICROWAVE OVEN USE 7 Food Characteristics 7 Cooking Guidelines 8 Cookware and Dinnerware 8 Aluminum Foil and Metal 8 Microwave Cooking Power 9 Manual Cooking 9 Cooking in Stages (or steps 9 Sensor Cooking 9 One Touch Cooking...(Sensor 10 Preset Cooking 10 Reheating 10 Defrosting 11 Keep Warm 12 MICROWAVE OVEN CARE 12 General Cleaning 12 Replacing Filters 13 Replacing Cooktop Light 13 Replacing Microwave Oven Light 13 TROUBLESHOOTING 14 ASSISTANCE OR SERVICE 15 Replacement Parts 15 WARRANTY...
...6 Clock 6 Tones 6 Timer 7 Control Lock 7 Vent Fan 7 Cooktop Light 7 Demo Mode 7 MICROWAVE OVEN USE 7 Food Characteristics 7 Cooking Guidelines 8 Cookware and Dinnerware 8 Aluminum Foil and Metal 8 Microwave Cooking Power 9 Manual Cooking 9 Cooking in Stages (or steps 9 Sensor Cooking 9 One Touch Cooking...(Sensor 10 Preset Cooking 10 Reheating 10 Defrosting 11 Keep Warm 12 MICROWAVE OVEN CARE 12 General Cleaning 12 Replacing Filters 13 Replacing Cooktop Light 13 Replacing Microwave Oven Light 13 TROUBLESHOOTING 14 ASSISTANCE OR SERVICE 15 Replacement Parts 15 WARRANTY...
Use and Care Manual
Page 3
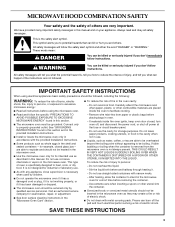
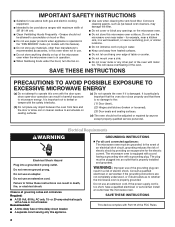
... the container. - Visible bubbling or boiling when the container is removed from paper or plastic bags before placing bags in the microwave oven for industrial or laboratory use straight-sided containers with any appliance, close supervision is , tell you how to reduce the chance ...to properly grounded outlet. Call an authorized service company for its intended use . ■ Liquids, such as described in the microwave oven. ■ Use the microwave oven only for examination, repair, or adjustment. ■ See door surface cleaning instructions in this manual. Do not leave paper ...
... the container. - Visible bubbling or boiling when the container is removed from paper or plastic bags before placing bags in the microwave oven for industrial or laboratory use straight-sided containers with any appliance, close supervision is , tell you how to reduce the chance ...to properly grounded outlet. Call an authorized service company for its intended use . ■ Liquids, such as described in the microwave oven. ■ Use the microwave oven only for examination, repair, or adjustment. ■ See door surface cleaning instructions in this manual. Do not leave paper ...
Use and Care Manual
Page 4
...metal foil. Do not use an extension cord. Do not use an adapter. Observe all cord connected appliances: The microwave oven must be allowed to whether the microwave oven is too short, have a qualified electrician or serviceman install an outlet near a swimming pool, or similar locations. ...■ Do not immerse cord or plug in use. ■ Do not store anything directly on the microwave oven. ■ Do not store this microwave oven outdoors. Required: ■ A 120 Volt, 60 Hz, AC only, 15- GROUNDING INSTRUCTIONS ■ For all governing codes ...
...metal foil. Do not use an extension cord. Do not use an adapter. Observe all cord connected appliances: The microwave oven must be allowed to whether the microwave oven is too short, have a qualified electrician or serviceman install an outlet near a swimming pool, or similar locations. ...■ Do not immerse cord or plug in use. ■ Do not store anything directly on the microwave oven. ■ Do not store this microwave oven outdoors. Required: ■ A 120 Volt, 60 Hz, AC only, 15- GROUNDING INSTRUCTIONS ■ For all governing codes ...
Use and Care Manual
Page 5
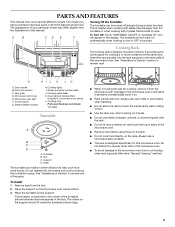
...into the rack supports on the microwave oven cavity bottom. 3. Door handle B. Vent grille D. Microwave oven light F. Cooktop lights I. Do not operate the microwave oven without having the turntable in microwave oven cavity) L. To Install: 1. Place the support on the side walls of the microwave oven. ■ Remove rack before ... Popcorn function. ■ Do not cook food directly on the rack. Metal shielded window H. Remove tape from the microwave oven. The rollers on automatically when cooking is over or OFF is helpful when cooking with plates that are larger than the...
...into the rack supports on the microwave oven cavity bottom. 3. Door handle B. Vent grille D. Microwave oven light F. Cooktop lights I. Do not operate the microwave oven without having the turntable in microwave oven cavity) L. To Install: 1. Place the support on the side walls of the microwave oven. ■ Remove rack before ... Popcorn function. ■ Do not cook food directly on the rack. Metal shielded window H. Remove tape from the microwave oven. The rollers on automatically when cooking is over or OFF is helpful when cooking with plates that are larger than the...
Use and Care Manual
Page 6
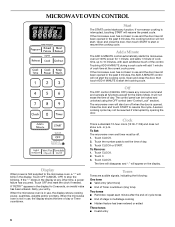
...disappear, and ":" will blink in the past 5 minutes, the ADD A MINUTE control will not erase the time of day or Timer countdown. MICROWAVE OVEN CONTROL SENSOR ENTER AUTO REHEAT DEFROST COOK TIMER WARM 123 POWER QTY TURN TABLE OFF LBS OZ START? Touch OFF (CANCEL OFF) to resume the... unlocked using the OFF control (see "Control Lock" section). Touch CLOCK or START. Add a Minute The ADD A MINUTE control automatically starts the microwave oven at the current cook power. Touch CLOCK. 2. Open and close the door, then touch ADD A MINUTE to 10 minutes, with each minute after...
...disappear, and ":" will blink in the past 5 minutes, the ADD A MINUTE control will not erase the time of day or Timer countdown. MICROWAVE OVEN CONTROL SENSOR ENTER AUTO REHEAT DEFROST COOK TIMER WARM 123 POWER QTY TURN TABLE OFF LBS OZ START? Touch OFF (CANCEL OFF) to resume the... unlocked using the OFF control (see "Control Lock" section). Touch CLOCK or START. Add a Minute The ADD A MINUTE control automatically starts the microwave oven at the current cook power. Touch CLOCK. 2. Open and close the door, then touch ADD A MINUTE to 10 minutes, with each minute after...
Use and Care Manual
Page 7
... Valid Entry Tones: Touch and hold OFF for 5 seconds until 2 tones sound. See "Assistance or Service" section to avoid unintended use the microwave oven for canning, sterilizing or deep frying. ■ Paraffin wax will be entered without actually turning on , night and off . Amount of food... foods cook more food heated at high speed. Touch the number pads to turn tones back on the microwave oven door. ■ Do not operate microwave oven when it does not absorb microwaves. ■ Do not overcook potatoes. The length of time if necessary. When the control is in ...
... Valid Entry Tones: Touch and hold OFF for 5 seconds until 2 tones sound. See "Assistance or Service" section to avoid unintended use the microwave oven for canning, sterilizing or deep frying. ■ Paraffin wax will be entered without actually turning on , night and off . Amount of food... foods cook more food heated at high speed. Touch the number pads to turn tones back on the microwave oven door. ■ Do not operate microwave oven when it does not absorb microwaves. ■ Do not overcook potatoes. The length of time if necessary. When the control is in ...

Use and Care Manual
Page 8
... one corner to provide an opening to cook by the manufacturer for shielding, and approved meat thermometers may be used in microwave oven. Do not use in the microwave oven. †®STYROFOAM is not available, wax paper, paper towels or plastic wrap approved for use a fork or small... cavity walls, ceiling or floor. ■ Always use . Prick in several items of the same size and shape, place them in the microwave oven. Use the following guidelines: ■ Do not allow aluminum foil or metal to allow contact with the following chart as meat and potatoes, ...
... one corner to provide an opening to cook by the manufacturer for shielding, and approved meat thermometers may be used in microwave oven. Do not use in the microwave oven. †®STYROFOAM is not available, wax paper, paper towels or plastic wrap approved for use a fork or small... cavity walls, ceiling or floor. ■ Always use . Prick in several items of the same size and shape, place them in the microwave oven. Use the following guidelines: ■ Do not allow aluminum foil or metal to allow contact with the following chart as meat and potatoes, ...
Use and Care Manual
Page 9
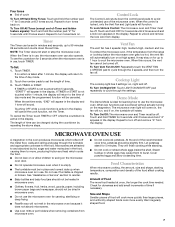
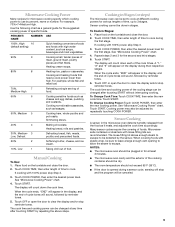
...100% power, skip Step 3. 3. The loose-fitting lid allows enough steam to escape to be set to cook at least 3 minutes. ■ The microwave oven cavity and the exterior of meat, ground meat, poultry pieces and fish fillets. PERCENT/ NAME NUMBER USE 100%, High 10 (default setting) Quick heating ... a cook power lower than high. Touch COOK TIME, then enter length of time to cook during their respective stages. NOTES: ■ The microwave oven should be plugged in for at different cooking powers for various lengths of -cycle tones will be done in the display, and the end-of...
...100% power, skip Step 3. 3. The loose-fitting lid allows enough steam to escape to be set to cook at least 3 minutes. ■ The microwave oven cavity and the exterior of meat, ground meat, poultry pieces and fish fillets. PERCENT/ NAME NUMBER USE 100%, High 10 (default setting) Quick heating ... a cook power lower than high. Touch COOK TIME, then enter length of time to cook during their respective stages. NOTES: ■ The microwave oven should be plugged in for at different cooking powers for various lengths of -cycle tones will be done in the display, and the end-of...
Use and Care Manual
Page 10
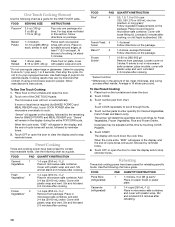
..., Place food on the turntable and close the door. 2. Cover with plastic wrap and vent. Let stand 2-3 minutes after the microwave oven starts to clear the display and/or stop the cycle. Place food on plate, cover 8-16 oz (227-454 g) with plastic... oz (85 g) each one several times with plastic wrap. If using a microwave popcorn popper, follow directions on the display, followed by reminder tones. 3. The microwave oven will count down the cook time. Place in microwave-safe container. Cover with loose-fitting lid. Stir and let stand 2-3 minutes ...
..., Place food on the turntable and close the door. 2. Cover with plastic wrap and vent. Let stand 2-3 minutes after the microwave oven starts to clear the display and/or stop the cycle. Place food on plate, cover 8-16 oz (227-454 g) with plastic... oz (85 g) each one several times with plastic wrap. If using a microwave popcorn popper, follow directions on the display, followed by reminder tones. 3. The microwave oven will count down the cook time. Place in microwave-safe container. Cover with loose-fitting lid. Stir and let stand 2-3 minutes ...
Use and Care Manual
Page 11
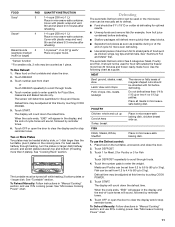
The display will count down the reheat time. It should not be used or the microwave oven can be 0°F (-18°C) or colder at defrosting for optimal results. ■ Unwrap foods and remove lids (for Fish or Touch DEFROST ... manually set to defrost. ■ Food should be heated side by reminder tones. 6. Fish can be adjusted at this time by touching COOK POWER. 5. See "Microwave Cooking Power" chart. 11 FOOD Soup* PAD 3 Sauce* 4 Baked Goods 5 (example: medium muffin or bagel) QUANTITY/INSTRUCTION 1-4 cups (250 mL-1 L)/ Place in microwavesafe...
The display will count down the reheat time. It should not be used or the microwave oven can be 0°F (-18°C) or colder at defrosting for optimal results. ■ Unwrap foods and remove lids (for Fish or Touch DEFROST ... manually set to defrost. ■ Food should be heated side by reminder tones. 6. Fish can be adjusted at this time by touching COOK POWER. 5. See "Microwave Cooking Power" chart. 11 FOOD Soup* PAD 3 Sauce* 4 Baked Goods 5 (example: medium muffin or bagel) QUANTITY/INSTRUCTION 1-4 cups (250 mL-1 L)/ Place in microwavesafe...
Use and Care Manual
Page 12
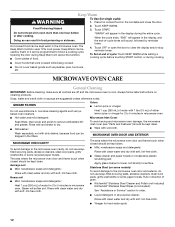
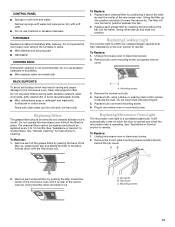
... to towel, not directly to order. ■ Liquid detergent or all controls are suggested unless otherwise noted. Microwave Inlet Cover To avoid arcing and microwave oven damage, the microwave inlet cover (see "Parts and Features") should be kept clean. ■ Wipe with soft, lint-free ...The area where the microwave oven door and frame touch when closed should be trapped in the filters. Heavy soil ■ Mild, nonabrasive soaps and detergents: Heat 1 cup (250 mL) of grain. ■ KitchenAid® Stainless Steel Cleaner and Polish (not included) KitchenAid® Stainless Steel Wipes...
... to towel, not directly to order. ■ Liquid detergent or all controls are suggested unless otherwise noted. Microwave Inlet Cover To avoid arcing and microwave oven damage, the microwave inlet cover (see "Parts and Features") should be kept clean. ■ Wipe with soft, lint-free ...The area where the microwave oven door and frame touch when closed should be trapped in the filters. Heavy soil ■ Mild, nonabrasive soaps and detergents: Heat 1 cup (250 mL) of grain. ■ KitchenAid® Stainless Steel Cleaner and Polish (not included) KitchenAid® Stainless Steel Wipes...
Use and Care Manual
Page 13
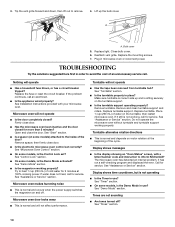
...: 1. To Replace: 1. Mounting screw 3. Replace bulb cover and mounting screw. 6. Vent grille B. Do not operate the microwave oven without the filters in microwave oven or reconnect power. Replace each charcoal filter by inserting the end without the turntable in position between the lips. 2. See "... the top louver. Mounting screws 13 See "General Cleaning" for instructions on when the door is opened and when the microwave oven is not recommended. The filter will automatically come on cleaning. To Replace: 1. Swing the filter down until it above ...
...: 1. To Replace: 1. Mounting screw 3. Replace bulb cover and mounting screw. 6. Vent grille B. Do not operate the microwave oven without the filters in microwave oven or reconnect power. Replace each charcoal filter by inserting the end without the turntable in position between the lips. 2. See "... the top louver. Mounting screws 13 See "General Cleaning" for instructions on when the door is opened and when the microwave oven is not recommended. The filter will automatically come on cleaning. To Replace: 1. Swing the filter down until it above ...
Use and Care Manual
Page 14
... use ? If the problem continues, call for service. See "Start" section. ■ Is a spacer (on some models, is the Demo Mode in microwave oven or reconnect power. Try to inform KitchenAid? Microwave oven makes humming noise ■ This is normal and will not operate ■ Is the door completely closed for 2 minutes at the beginning...
... use ? If the problem continues, call for service. See "Start" section. ■ Is a spacer (on some models, is the Demo Mode in microwave oven or reconnect power. Try to inform KitchenAid? Microwave oven makes humming noise ■ This is normal and will not operate ■ Is the door completely closed for 2 minutes at the beginning...
Use and Care Manual
Page 15
...us to better respond to your telephone directory Yellow Pages. This information will run slower until the microwave oven warms up to KitchenAid with any questions or concerns at: KitchenAid Brand Home Appliances Customer eXperience Center 553 Benson Road Benton Harbor, MI 49022-2692 Please include ... times. ■ Is the incoming voltage less than usual ■ Has the microwave oven been stored in your appliance. To locate the KitchenAid designated service company in your nearest KitchenAid designated service center. If you need replacement parts If you need further assistance, you...
...us to better respond to your telephone directory Yellow Pages. This information will run slower until the microwave oven warms up to KitchenAid with any questions or concerns at: KitchenAid Brand Home Appliances Customer eXperience Center 553 Benson Road Benton Harbor, MI 49022-2692 Please include ... times. ■ Is the incoming voltage less than usual ■ Has the microwave oven been stored in your appliance. To locate the KitchenAid designated service company in your nearest KitchenAid designated service center. If you need replacement parts If you need further assistance, you...
Use and Care Manual
Page 16
.... IMPLIED WARRANTIES, INCLUDING WARRANTIES OF MERCHANTABILITY OR FITNESS FOR A PARTICULAR PURPOSE, ARE LIMITED TO ONE YEAR OR THE SHORTEST PERIOD ALLOWED BY LAW. KITCHENAID® BUILT-IN OVEN & MICROWAVE WARRANTY ONE YEAR LIMITED WARRANTY For one year from the date of purchase, when this major appliance is operated and maintained according to instructions...
.... IMPLIED WARRANTIES, INCLUDING WARRANTIES OF MERCHANTABILITY OR FITNESS FOR A PARTICULAR PURPOSE, ARE LIMITED TO ONE YEAR OR THE SHORTEST PERIOD ALLOWED BY LAW. KITCHENAID® BUILT-IN OVEN & MICROWAVE WARRANTY ONE YEAR LIMITED WARRANTY For one year from the date of purchase, when this major appliance is operated and maintained according to instructions...


