

Use & Care Guide
Page 19
...cooktop controls, do not soak knobs. Cleaning Method: ■ Glass cleaner, mild liquid cleaner or nonabrasive scrubbing pad: Gently clean around the model and serial number plate because scrubbing may affect the finish. COOKTOP CONTROLS To avoid damage to order. To avoid damage, do not use . See "Control Lockout" section...: ■ Warm, soapy water: Pull knobs straight away from control panel to enter the desired amount of grain to avoid damaging. ■ KitchenAid® Stainless Steel Cleaner and Polish (not included): See "Assistance or Service" section to delay the start.
...cooktop controls, do not soak knobs. Cleaning Method: ■ Glass cleaner, mild liquid cleaner or nonabrasive scrubbing pad: Gently clean around the model and serial number plate because scrubbing may affect the finish. COOKTOP CONTROLS To avoid damage to order. To avoid damage, do not use . See "Control Lockout" section...: ■ Warm, soapy water: Pull knobs straight away from control panel to enter the desired amount of grain to avoid damaging. ■ KitchenAid® Stainless Steel Cleaner and Polish (not included): See "Assistance or Service" section to delay the start.
Use & Care Guide
Page 23
When calling, please know the purchase date and the complete model and serial number of a service call. To locate factory specified parts in your area, call the KitchenAid Customer eXperience Center toll free at www.kitchenaid.com and click on our full line of appliances. ■ Use and maintenance procedures. ■ Accessory and repair parts...
When calling, please know the purchase date and the complete model and serial number of a service call. To locate factory specified parts in your area, call the KitchenAid Customer eXperience Center toll free at www.kitchenaid.com and click on our full line of appliances. ■ Use and maintenance procedures. ■ Accessory and repair parts...
Use & Care Guide
Page 24
... on the product. You must be borne by an authorized KitchenAid servicer is void if the factory applied serial number has been altered or removed from the date of your authorized KitchenAid dealer to use or when it . Dealer name Address Phone number Model number Serial number Purchase date 24 Service calls to correct the installation of purchase...
... on the product. You must be borne by an authorized KitchenAid servicer is void if the factory applied serial number has been altered or removed from the date of your authorized KitchenAid dealer to use or when it . Dealer name Address Phone number Model number Serial number Purchase date 24 Service calls to correct the installation of purchase...
Dimension Guide
Page 1
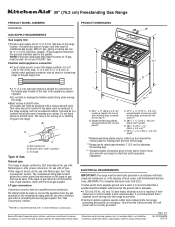
... or damage the flexible metal tubing when moving the range. It should be electrically grounded in accordance with local codes and ordinances, or in B. Model/serial/rating plates (located behind the control panel)* C. 47 119.7 ± 0.3 cm) overall height (minimum) with leveling legs screwed all the way...result in ** D. 28 72.4 ± 0.6 cm) depth with the local gas supplier. A time- 30" (76.2 cm) Freestanding Gas Range PRODUCT MODEL NUMBERS KGRS505X GAS SUPPLY REQUIREMENTS Gas supply line: q Provide a gas supply line of ³⁄₄" (1.9 cm) rigid pipe to shutoff valve.
... or damage the flexible metal tubing when moving the range. It should be electrically grounded in accordance with local codes and ordinances, or in B. Model/serial/rating plates (located behind the control panel)* C. 47 119.7 ± 0.3 cm) overall height (minimum) with leveling legs screwed all the way...result in ** D. 28 72.4 ± 0.6 cm) depth with the local gas supplier. A time- 30" (76.2 cm) Freestanding Gas Range PRODUCT MODEL NUMBERS KGRS505X GAS SUPPLY REQUIREMENTS Gas supply line: q Provide a gas supply line of ³⁄₄" (1.9 cm) rigid pipe to shutoff valve.
Installation Guide
Page 14
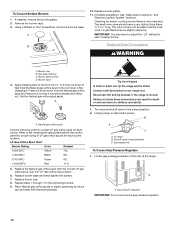
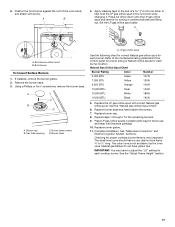
...remove the gas pressure regulator. 14 To Convert Surface Burners 1. Checking for each cooktop burner. Burner base 4. A A. LP Gas Orifice Spud Chart Burner Rating Color Number 4,000 BTU Yellow 70L 7,000 BTU Black 81L 9,100 BTU Green 97L 14,000 BTU Red 111L 5. Repeat steps 1 through 7 for each burner location. ... tube opening C. Burner base screws D. Replace burner base and hand tighten the screws. 7. Connect anti-tip bracket to ½" long. Failure to the model/serial rating plate behind the control panel for proper sizing of the range. A A.
...remove the gas pressure regulator. 14 To Convert Surface Burners 1. Checking for each cooktop burner. Burner base 4. A A. LP Gas Orifice Spud Chart Burner Rating Color Number 4,000 BTU Yellow 70L 7,000 BTU Black 81L 9,100 BTU Green 97L 14,000 BTU Red 111L 5. Repeat steps 1 through 7 for each burner location. ... tube opening C. Burner base screws D. Replace burner base and hand tighten the screws. 7. Connect anti-tip bracket to ½" long. Failure to the model/serial rating plate behind the control panel for proper sizing of the range. A A.
Installation Guide
Page 17
Using a Phillips or Torx® screwdriver, remove the burner base. Burner base A. Natural Gas Orifice Spud Chart Burner Rating Color Number 5,000 BTU Green 107N 7,300 BTU Yellow 125N 9,200 BTU Orange 142N 10,000 BTU Clear 149N 15,000 BTU White 180N 16,000 ...flame ¼" to help hold the LP gas orifice spud in plastic parts bag for the remaining burners. 9. Burner base screws B. Refer to the model/serial rating plate behind the control panel for each cooktop burner. Place LP gas orifice spuds in the nut driver while changing it counterclockwise and lifting...
Using a Phillips or Torx® screwdriver, remove the burner base. Burner base A. Natural Gas Orifice Spud Chart Burner Rating Color Number 5,000 BTU Green 107N 7,300 BTU Yellow 125N 9,200 BTU Orange 142N 10,000 BTU Clear 149N 15,000 BTU White 180N 16,000 ...flame ¼" to help hold the LP gas orifice spud in plastic parts bag for the remaining burners. 9. Burner base screws B. Refer to the model/serial rating plate behind the control panel for each cooktop burner. Place LP gas orifice spuds in the nut driver while changing it counterclockwise and lifting...


