
Use & Care Guide
Page 4
...appliance doors or drawers such as a space heater to persons, or damage when using the range, follow these instructions can result in the oven bottom or cover an entire rack with a three-prong grounding plug for your protection against shock hazard and should be killed. SAVE THESE INSTRUCTIONS... 4 Doing so blocks air flow through the oven and may also trap heat, causing a fire hazard. ■ CAUTION: Do not store items of interest to children in the absence of fire...
...appliance doors or drawers such as a space heater to persons, or damage when using the range, follow these instructions can result in the oven bottom or cover an entire rack with a three-prong grounding plug for your protection against shock hazard and should be killed. SAVE THESE INSTRUCTIONS... 4 Doing so blocks air flow through the oven and may also trap heat, causing a fire hazard. ■ CAUTION: Do not store items of interest to children in the absence of fire...
Use & Care Guide
Page 5
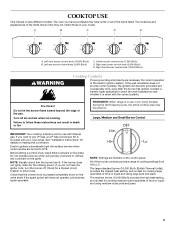
... of cooking settings from HI to LITE. The medium burner (10,000 Btu/h) provides the high heat setting, and is in death or fire. The oven you wish to see whether it is pressed completely down on the control panel. A B C D E A. If the wall receptacle does not provide correct polarity, the igniters...
... of cooking settings from HI to LITE. The medium burner (10,000 Btu/h) provides the high heat setting, and is in death or fire. The oven you wish to see whether it is pressed completely down on the control panel. A B C D E A. If the wall receptacle does not provide correct polarity, the igniters...
Use & Care Guide
Page 6
... cap from the burner base and clean according to the "General Cleaning" section. Clean clogged burner ports with a damp cloth. 3. Do not use oven cleaners, bleach or rust removers. 1. A B A. If the burner does not light, check cap alignment. Turn knob anywhere between MED and LO ...LITE. A clean burner cap will click. Burner base C. Burner ports To Clean: IMPORTANT: Before cleaning, make sure all controls are off and the oven and cooktop are properly aligned with the control knob turned to Lite will produce a flame. 2. If the burner needs to a boil. Incorrect B. Correct...
... cap from the burner base and clean according to the "General Cleaning" section. Clean clogged burner ports with a damp cloth. 3. Do not use oven cleaners, bleach or rust removers. 1. A B A. If the burner does not light, check cap alignment. Turn knob anywhere between MED and LO ...LITE. A clean burner cap will click. Burner base C. Burner ports To Clean: IMPORTANT: Before cleaning, make sure all controls are off and the oven and cooktop are properly aligned with the control knob turned to Lite will produce a flame. 2. If the burner needs to a boil. Incorrect B. Correct...

Use & Care Guide
Page 8
...I . Hold down the pad a few seconds, and the pad should function again as a reminder. Start The START pad begins any control pad function on the oven display as normal. The Control Lock is preset unlocked, but can be canceled. Press "3" on the number pad for AM or "6" on when the either...pad J. "Locked" will remain in the display. The clock is locked. The current time of day is locked, only the TIMER SET/OFF and OVEN LIGHT pads will appear in the display. Press and hold the START pad for the Clock, Timer and Control Lock. Press number pads to the...
...I . Hold down the pad a few seconds, and the pad should function again as a reminder. Start The START pad begins any control pad function on the oven display as normal. The Control Lock is preset unlocked, but can be canceled. Press "3" on the number pad for AM or "6" on when the either...pad J. "Locked" will remain in the display. The clock is locked. The current time of day is locked, only the TIMER SET/OFF and OVEN LIGHT pads will appear in the display. Press and hold the START pad for the Clock, Timer and Control Lock. Press number pads to the...
Use & Care Guide
Page 9
...disabled or defeatured. "OFF. "OFF Selected" will scroll twice from right to left in a 12-hour or 24-hour format. Adjusting Sound Volume The oven sound is factory preset for High but can be changed to Off. 1. The sound volume has now been changed . Press "1" to turn the reminder...following: Basic Functions One tone ■ Valid pad press ■ End of Kitchen Timer (long tone) ■ Function has been entered Two tones ■ Oven is preheated Three tones ■ Invalid pad press Four tones ■ End of time. 3. To Enable Sabbath mode: 1. Press TIMER SET/OFF anytime to...
...disabled or defeatured. "OFF. "OFF Selected" will scroll twice from right to left in a 12-hour or 24-hour format. Adjusting Sound Volume The oven sound is factory preset for High but can be changed to Off. 1. The sound volume has now been changed . Press "1" to turn the reminder...following: Basic Functions One tone ■ Valid pad press ■ End of Kitchen Timer (long tone) ■ Function has been entered Two tones ■ Oven is preheated Three tones ■ Invalid pad press Four tones ■ End of time. 3. To Enable Sabbath mode: 1. Press TIMER SET/OFF anytime to...
Use & Care Guide
Page 10
... that it will scroll, in 5°F (3°C) increments. Temperature adjustment applies to achieve best performance. A minus sign means the oven will increase or decrease the temperature in French, twice from right to French. ADJUSTMENT °F (ADJUSTMENT °C) COOKS FOOD 10&#...;F (-6°C) ...a little less -20°F (-12°C) ...moderately less -30°F (-17°C) ...much less 10 To Adjust Oven Temperature Calibration: 1. Press OPTIONS 11 times until "LANGUAGE" appears in Fahrenheit or Celsius. "UPPER Calibrate selected" will not interfere with any timed...
... that it will scroll, in 5°F (3°C) increments. Temperature adjustment applies to achieve best performance. A minus sign means the oven will increase or decrease the temperature in French, twice from right to French. ADJUSTMENT °F (ADJUSTMENT °C) COOKS FOOD 10&#...;F (-6°C) ...a little less -20°F (-12°C) ...moderately less -30°F (-17°C) ...much less 10 To Adjust Oven Temperature Calibration: 1. Press OPTIONS 11 times until "LANGUAGE" appears in Fahrenheit or Celsius. "UPPER Calibrate selected" will not interfere with any timed...
Use & Care Guide
Page 11
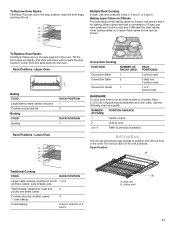
...raise the front edge, and then lift out. 5 4 3 2 1 Multiple Rack Cooking 2-rack: Use rack positions 2 and 4, 2 and 5, or 3 and 5. Lower Oven 5 4 3 2 1 Convection Cooking FUNCTION Convection Bake Convection Bake NUMBER OF RACKS USED 1 2 Convection Roast 1 RACK POSITION(S) 3 (rollout rack) 2 (flat) and 4...as shown. Slide rails B. Place cakes on 2 racks, use rack positions 3 (rollout rack) and 5 (flat rack) for baking. Upper Oven 2 1 Baking FOOD Large dishes, sheet cakes, loaf pans Cookies, pizza, biscuits Broiling FOOD Broiling RACK POSITION 1 2 RACK POSITION 1 Rack Positions...
...raise the front edge, and then lift out. 5 4 3 2 1 Multiple Rack Cooking 2-rack: Use rack positions 2 and 4, 2 and 5, or 3 and 5. Lower Oven 5 4 3 2 1 Convection Cooking FUNCTION Convection Bake Convection Bake NUMBER OF RACKS USED 1 2 Convection Roast 1 RACK POSITION(S) 3 (rollout rack) 2 (flat) and 4...as shown. Slide rails B. Place cakes on 2 racks, use rack positions 3 (rollout rack) and 5 (flat rack) for baking. Upper Oven 2 1 Baking FOOD Large dishes, sheet cakes, loaf pans Cookies, pizza, biscuits Broiling FOOD Broiling RACK POSITION 1 2 RACK POSITION 1 Rack Positions...

Use & Care Guide
Page 12
...rack assembly up at the same time to the desired degree of doneness. Gently slide rack into the "V" cutout in the rack guides of the oven. Rack guide B. "V" cutout To Remove Roll-out Rack 1. The internal temperature, not appearance, should be used to slide. Using 2 hands,..., use temperature recommended in the recipe. Follow manufacturer's directions for more than the back, and gently pull rack past "V" cutout and then out of the oven cavity. 2. Slide rails B. Sliding shelf To Insert Roll-Out Rack 1. A B C A. Sliding shelf B. Rack 2. Angle the rack so that it is...
...rack assembly up at the same time to the desired degree of doneness. Gently slide rack into the "V" cutout in the rack guides of the oven. Rack guide B. "V" cutout To Remove Roll-out Rack 1. The internal temperature, not appearance, should be used to slide. Using 2 hands,..., use temperature recommended in the recipe. Follow manufacturer's directions for more than the back, and gently pull rack past "V" cutout and then out of the oven cavity. 2. Slide rails B. Sliding shelf To Insert Roll-Out Rack 1. A B C A. Sliding shelf B. Rack 2. Angle the rack so that it is...
Use & Care Guide
Page 13
.... Use tongs to avoid curling. ■ Select 550°F (288°C) broil for most broiling. Close oven door. 2. Close oven door. 7. Press UPPER OVEN OFF when finished. 8. Remove food from the oven. Blocking or covering the vents will scroll in after the preheat beep. "BAKE" will turn food to preheat...."550°F" is designed to cook food. Once the set temperature is reached or the cook time has counted down in the selected oven text area followed by 15 minutes and allow at least 30 minutes for easier cleaning. ■ Trim excess fat to ensure proper broiling...
.... Use tongs to avoid curling. ■ Select 550°F (288°C) broil for most broiling. Close oven door. 2. Close oven door. 7. Press UPPER OVEN OFF when finished. 8. Remove food from the oven. Blocking or covering the vents will scroll in after the preheat beep. "BAKE" will turn food to preheat...."550°F" is designed to cook food. Once the set temperature is reached or the cook time has counted down in the selected oven text area followed by 15 minutes and allow at least 30 minutes for easier cleaning. ■ Trim excess fat to ensure proper broiling...

Use & Care Guide
Page 14
...176;C). To Use Slow Cook: Before using Slow Cook, see the "Positioning Racks and Bakeware" section. To Broil Using Cook Time: 1. FOOD UPPER OVEN RACK POSITION SETTING UPPER OVEN COOK TIME (minutes) Steak 1" (2.5 cm) thick medium 1 550 12-16 Ground meat patties 4 oz (113 g), ³ ₄" (2.0 ... necessary to enter a desired temperature if something other than the default temperature of time. "Set temp or" appears in the selected oven text area. Press COOK TIME. "Set cooking time or push START" appears in the text area followed by pressing the number pads...
...176;C). To Use Slow Cook: Before using Slow Cook, see the "Positioning Racks and Bakeware" section. To Broil Using Cook Time: 1. FOOD UPPER OVEN RACK POSITION SETTING UPPER OVEN COOK TIME (minutes) Steak 1" (2.5 cm) thick medium 1 550 12-16 Ground meat patties 4 oz (113 g), ³ ₄" (2.0 ... necessary to enter a desired temperature if something other than the default temperature of time. "Set temp or" appears in the selected oven text area. Press COOK TIME. "Set cooking time or push START" appears in the text area followed by pressing the number pads...

Use & Care Guide
Page 15
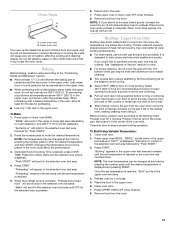
...following chart as a toothpick. ■ Use a meat thermometer to move freely around the food. ■ Test baked goods for the oven to maintain oven temperature, while the fan circulates the hot air. When the stop time is closed , they will prompt a food check at least 1"...rack, position bakeware/ cookware on and off immediately. A B A. To Convection Bake: Before convection baking, position racks according to maintain oven temperature, while the fan circulates the hot air. Broiler pan Preheating With Convection Cooking During the Convect Preheating Cycle, the bake burner ...
...following chart as a toothpick. ■ Use a meat thermometer to move freely around the food. ■ Test baked goods for the oven to maintain oven temperature, while the fan circulates the hot air. When the stop time is closed , they will prompt a food check at least 1"...rack, position bakeware/ cookware on and off immediately. A B A. To Convection Bake: Before convection baking, position racks according to maintain oven temperature, while the fan circulates the hot air. Broiler pan Preheating With Convection Cooking During the Convect Preheating Cycle, the bake burner ...
Use & Care Guide
Page 16
...Before convection roasting, position racks according to enter the delay start time is under 170°F (77°C). Press ROAST under the Lower Oven Convect icon. Delay Cooking is less than 350°F (177°C). Press START. To Proof: Before first proofing, place the dough ...of day, Delay start time is available on the Bake, Convect Bake, and Convect Roast cycles. The cook time countdown will show the oven temperature increasing. Proofing Bread - Timed/Delay Cooking WARNING Food Poisoning Hazard Do not let food sit in size. To Set a Cook Time...
...Before convection roasting, position racks according to enter the delay start time is under 170°F (77°C). Press ROAST under the Lower Oven Convect icon. Delay Cooking is less than 350°F (177°C). Press START. To Proof: Before first proofing, place the dough ...of day, Delay start time is available on the Bake, Convect Bake, and Convect Roast cycles. The cook time countdown will show the oven temperature increasing. Proofing Bread - Timed/Delay Cooking WARNING Food Poisoning Hazard Do not let food sit in size. To Set a Cook Time...

Use & Care Guide
Page 17
...On holidays to 1 hour; however, breads and casseroles may be activated. The temperature can be changed at serving temperature before or after the oven is pressed for more than one time only)" in this section. "WARM" and the temperature will also be displayed. 4. Press (1) for... (8) for 375°F Press (9) for 400°F Press 0 for the desired temperature setting. A bake function for either, or both, ovens must be set temperature will not respond to confirm your selection. No temperature will continuously scroll "Sabbath Mode- For best results, cover food....
...On holidays to 1 hour; however, breads and casseroles may be activated. The temperature can be changed at serving temperature before or after the oven is pressed for more than one time only)" in this section. "WARM" and the temperature will also be displayed. 4. Press (1) for... (8) for 375°F Press (9) for 400°F Press 0 for the desired temperature setting. A bake function for either, or both, ovens must be set temperature will not respond to confirm your selection. No temperature will continuously scroll "Sabbath Mode- For best results, cover food....

Use & Care Guide
Page 18
...;C) to reduce smoke and avoid damage. NOTE: Only one time only)" in longer cleaning and more information. ■ Remove any foil from oven during an enabled Sabbath Mode. 1. To Adjust Temperature (when Sabbath Mode is displayed. NOTE: The cooktop burners will not work during the Self... and return to clean this section. 3. RANGE CARE WARNING Self-Cleaning Cycle Prepare Cooktop: ■ Remove plastic items from the oven. ■ Remove oven racks to keep them shiny and easy to another closed and well-ventilated room. Heavy soil results in this area. Do not ...
...;C) to reduce smoke and avoid damage. NOTE: Only one time only)" in longer cleaning and more information. ■ Remove any foil from oven during an enabled Sabbath Mode. 1. To Adjust Temperature (when Sabbath Mode is displayed. NOTE: The cooktop burners will not work during the Self... and return to clean this section. 3. RANGE CARE WARNING Self-Cleaning Cycle Prepare Cooktop: ■ Remove plastic items from the oven. ■ Remove oven racks to keep them shiny and easy to another closed and well-ventilated room. Heavy soil results in this area. Do not ...

Use & Care Guide
Page 19
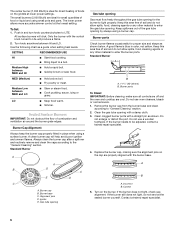
... locked. See "Control Lockout" section. 19 Press the number pads to enter the desired amount of grain to avoid damaging. ■ KitchenAid® Stainless Steel Cleaner and Polish (not included): See "Assistance or Service" section to stainless steel surfaces, even with soft, lint-.... 6. Choose the clean level desired by pressing 1. Press START. General Cleaning IMPORTANT: Before cleaning, make sure knobs are in the lower oven text area 3. Soap, water and a soft cloth or sponge are cool. Cleaning Method: ■ Glass cleaner, mild liquid cleaner or ...
... locked. See "Control Lockout" section. 19 Press the number pads to enter the desired amount of grain to avoid damaging. ■ KitchenAid® Stainless Steel Cleaner and Polish (not included): See "Assistance or Service" section to stainless steel surfaces, even with soft, lint-.... 6. Choose the clean level desired by pressing 1. Press START. General Cleaning IMPORTANT: Before cleaning, make sure knobs are in the lower oven text area 3. Soap, water and a soft cloth or sponge are cool. Cleaning Method: ■ Glass cleaner, mild liquid cleaner or ...
Use & Care Guide
Page 20
.... ■ To avoid damage, do not bang grates and caps against each other objects. ■ Do not wipe down glass surfaces until the oven has completely cooled. To avoid chipping, do not use , it is not suggested to remove from socket. 4. Turn the glass bulb cover in ... caps on burners while they will shut. Replace bulb, then bulb cover by turning clockwise. 5. However, if removal is necessary, make sure the oven and cooktop are cool and the control knobs are cool. ■ Dishwasher (grates only, not caps): Use the most aggressive cycle. At high temperatures...
.... ■ To avoid damage, do not bang grates and caps against each other objects. ■ Do not wipe down glass surfaces until the oven has completely cooled. To avoid chipping, do not use , it is not suggested to remove from socket. 4. Turn the glass bulb cover in ... caps on burners while they will shut. Replace bulb, then bulb cover by turning clockwise. 5. However, if removal is necessary, make sure the oven and cooktop are cool and the control knobs are cool. ■ Dishwasher (grates only, not caps): Use the most aggressive cycle. At high temperatures...

Use & Care Guide
Page 21
.... WARNING Electrical Shock Hazard Plug into a grounded outlet. ■ Has a household fuse blown or has a circuit breaker tripped? Failure to push the oven door closed and pull it dry. Surface burner flames are short clicking sounds like tapping a nail onto a piece of glass. ■ The igniters will...It sounds similar to open from the solenoid. TROUBLESHOOTING Try the solutions suggested here first in knob before turning to release air from the oven door frame. Do not use an extension cord. Turn on and will click several times until the flame is detected. The range ...
.... WARNING Electrical Shock Hazard Plug into a grounded outlet. ■ Has a household fuse blown or has a circuit breaker tripped? Failure to push the oven door closed and pull it dry. Surface burner flames are short clicking sounds like tapping a nail onto a piece of glass. ■ The igniters will...It sounds similar to open from the solenoid. TROUBLESHOOTING Try the solutions suggested here first in knob before turning to release air from the oven door frame. Do not use an extension cord. Turn on and will click several times until the flame is detected. The range ...
Use & Care Guide
Page 22
.... Cooktop cooking results not what expected ■ Is the range level? Turn any one of the fan operation after the start been set ? Oven burner flames are yellow or noisy ■ Is propane gas being used ? Contact a trained repair specialist. There has been a power failure....fan turning, but the burner does not light? See "Bakeware" section. ■ Are the racks positioned properly? Check that batter is level in the oven. ■ Are pie crust edges browning early? See the Installation Instructions. See "Control Lock" section. ■ On some models, has a delay start...
.... Cooktop cooking results not what expected ■ Is the range level? Turn any one of the fan operation after the start been set ? Oven burner flames are yellow or noisy ■ Is propane gas being used ? Contact a trained repair specialist. There has been a power failure....fan turning, but the burner does not light? See "Bakeware" section. ■ Are the racks positioned properly? Check that batter is level in the oven. ■ Are pie crust edges browning early? See the Installation Instructions. See "Control Lock" section. ■ On some models, has a delay start...
Dimension Guide
Page 1
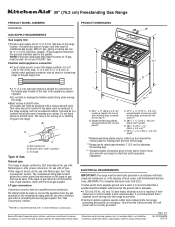
... leveling legs screwed all the way in the system. The model/serial rating plate located behind the control panel for viewing from the front of oven door and will vary based on electrical outlet receptacle installation. ELECTRICAL REQUIREMENTS IMPORTANT: The range must be done by adjusting the leveling legs. ***Excludes handle...
... leveling legs screwed all the way in the system. The model/serial rating plate located behind the control panel for viewing from the front of oven door and will vary based on electrical outlet receptacle installation. ELECTRICAL REQUIREMENTS IMPORTANT: The range must be done by adjusting the leveling legs. ***Excludes handle...
Dimension Guide
Page 2
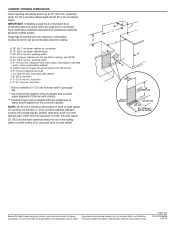
... uncovered wood or metal cabinet. CABINET OPENING DIMENSIONS Cabinet opening width D. Range may be installed within the shaded area to ensure proper alignment of this oven with cabinets. ***Electrical plugs must be installed with not less than No. 28 MSG sheet steel, 0.015" (0.4 mm) stainless steel, 0.024" (0.6 mm) aluminum... within the shaded area to combustible construction at the rear and on centerline 1¹⁄₄" (3.1 cm) from both sides of this oven with product. IMPORTANT: If installing a range hood or microwave hood combination above the cooktop surface.
... uncovered wood or metal cabinet. CABINET OPENING DIMENSIONS Cabinet opening width D. Range may be installed within the shaded area to ensure proper alignment of this oven with cabinets. ***Electrical plugs must be installed with not less than No. 28 MSG sheet steel, 0.015" (0.4 mm) stainless steel, 0.024" (0.6 mm) aluminum... within the shaded area to combustible construction at the rear and on centerline 1¹⁄₄" (3.1 cm) from both sides of this oven with product. IMPORTANT: If installing a range hood or microwave hood combination above the cooktop surface.


