Use & Care Guide
Page 3
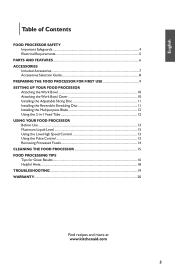
... 5 PARTS AND FEATURES 6 ACCESSORIES Included Accessories 7 Accessories Selection Guide 8 PREPARING THE FOOD PROCESSOR FOR FIRST USE 9 SETTING UP YOUR FOOD PROCESSOR Attaching the Work Bowl 10 Attaching the Work Bowl Cover 10 Installing the Adjustable Slicing Disc...FOOD PROCESSOR Before Use...13 Maximum Liquid Level 13 Using the Low/High Speed Control 13 Using the Pulse Control 13 Removing Processed Foods 14 CLEANING THE FOOD PROCESSOR 15 FOOD PROCESSING TIPS Tips for Great Results 16 Helpful Hints...18 TROUBLESHOOTING 19 WARRANTY...20 Find recipes and more at www.kitchenaid...
... 5 PARTS AND FEATURES 6 ACCESSORIES Included Accessories 7 Accessories Selection Guide 8 PREPARING THE FOOD PROCESSOR FOR FIRST USE 9 SETTING UP YOUR FOOD PROCESSOR Attaching the Work Bowl 10 Attaching the Work Bowl Cover 10 Installing the Adjustable Slicing Disc...FOOD PROCESSOR Before Use...13 Maximum Liquid Level 13 Using the Low/High Speed Control 13 Using the Pulse Control 13 Removing Processed Foods 14 CLEANING THE FOOD PROCESSOR 15 FOOD PROCESSING TIPS Tips for Great Results 16 Helpful Hints...18 TROUBLESHOOTING 19 WARRANTY...20 Find recipes and more at www.kitchenaid...
Use & Care Guide
Page 4
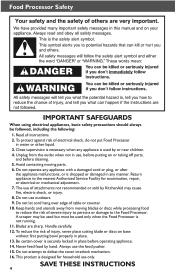
...nearest Authorized Service Facility for household use outdoors. 9. Be certain cover is securely locked in any appliance is used by KitchenAid may be used only when the Food Processor is not running. 11. Always use , before putting on base without first putting bowl properly in water or other ... operating appliance. 14. A scraper may cause fire, electric shock, or injury. 8. To reduce the risk of electrical shock, do not put Food Processor in place. 13. Do not attempt to defeat the cover interlock mechanism. 16. Unplug from moving parts. 6. Do not use only. This product...
...nearest Authorized Service Facility for household use outdoors. 9. Be certain cover is securely locked in any appliance is used by KitchenAid may be used only when the Food Processor is not running. 11. Always use , before putting on base without first putting bowl properly in water or other ... operating appliance. 14. A scraper may cause fire, electric shock, or injury. 8. To reduce the risk of electrical shock, do not put Food Processor in place. 13. Do not attempt to defeat the cover interlock mechanism. 16. Unplug from moving parts. 6. Do not use only. This product...
Use & Care Guide
Page 5
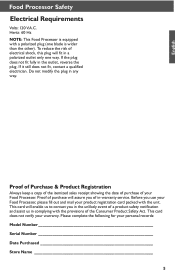
.... Do not modify the plug in the outlet, reverse the plug. Please complete the following for your Food Processor. This card will fit in -warranty service. English Food Processor Safety Electrical Requirements Volts: 120 V.A.C. Proof of Purchase & Product Registration Always keep a copy of the ...itemized sales receipt showing the date of purchase of purchase will assure you use your Food Processor, please fill out and mail your warranty. Hertz: 60 Hz NOTE: This Food Processor is wider than the other). Proof of your personal records: Model Number Serial Number Date ...
.... Do not modify the plug in the outlet, reverse the plug. Please complete the following for your Food Processor. This card will fit in -warranty service. English Food Processor Safety Electrical Requirements Volts: 120 V.A.C. Proof of Purchase & Product Registration Always keep a copy of the ...itemized sales receipt showing the date of purchase of purchase will assure you use your Food Processor, please fill out and mail your warranty. Hertz: 60 Hz NOTE: This Food Processor is wider than the other). Proof of your personal records: Model Number Serial Number Date ...

Use & Care Guide
Page 7
Refer to 1/4 inch (6 mm) for additional details on accessories included with your new Food Processor are highlighted below. High/Low/Pulse/Control Two speeds and Pulse provide precise control to allow coarse or finely shredded cheese or vegetables. ... Accessories 7-Cup (2.0 L) Work Bowl (KFP07WBOB) The durable, large work bowl provides capacity for continuous processing, or a smaller opening for large jobs. Adjustable Slicing KitchenAid's® adjustable slicing disc allows you to drizzle oil into ingredients - A small hole in the bottom of sectioning or slicing. 2-Piece...
Refer to 1/4 inch (6 mm) for additional details on accessories included with your new Food Processor are highlighted below. High/Low/Pulse/Control Two speeds and Pulse provide precise control to allow coarse or finely shredded cheese or vegetables. ... Accessories 7-Cup (2.0 L) Work Bowl (KFP07WBOB) The durable, large work bowl provides capacity for continuous processing, or a smaller opening for large jobs. Adjustable Slicing KitchenAid's® adjustable slicing disc allows you to drizzle oil into ingredients - A small hole in the bottom of sectioning or slicing. 2-Piece...
Use & Care Guide
Page 9
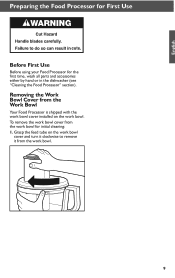
To remove the work bowl cover from the work bowl. 9 Grasp the feed tube on the work bowl for the first time, wash all parts and accessories either by hand or in the dishwasher (see "Cleaning the Food Processor" section). Removing the Work Bowl Cover from the Work Bowl Your Food Processor is shipped with the work bowl cover installed on the work bowl cover and turn it clockwise to remove it from the work bowl. English Preparing the Food Processor for First Use Before First Use Before using your Food Processor for initial cleaning: 1.
To remove the work bowl cover from the work bowl. 9 Grasp the feed tube on the work bowl for the first time, wash all parts and accessories either by hand or in the dishwasher (see "Cleaning the Food Processor" section). Removing the Work Bowl Cover from the Work Bowl Your Food Processor is shipped with the work bowl cover installed on the work bowl cover and turn it clockwise to remove it from the work bowl. English Preparing the Food Processor for First Use Before First Use Before using your Food Processor for initial cleaning: 1.
Use & Care Guide
Page 10
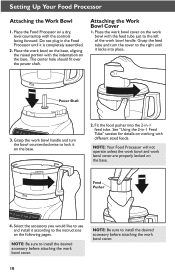
...countertop with the indentation on the work bowl with different sized foods. Attaching the Work Bowl Cover 1. Power Shaft 3. Food Pusher 4. Place the work bowl cover on the base. Fit the food pusher into place. NOTE: Your Food Processor will not operate unless the work bowl and work bowl ...NOTE: Be sure to the instructions on the base. Do not plug in the Food Processor until it on the base, aligning the raised portion with the controls facing forward. Setting Up Your Food Processor Attaching the Work Bowl 1. The center hole should fit over the power shaft. ...
...countertop with the indentation on the work bowl with different sized foods. Attaching the Work Bowl Cover 1. Power Shaft 3. Food Pusher 4. Place the work bowl cover on the base. Fit the food pusher into place. NOTE: Your Food Processor will not operate unless the work bowl and work bowl ...NOTE: Be sure to the instructions on the base. Do not plug in the Food Processor until it on the base, aligning the raised portion with the controls facing forward. Setting Up Your Food Processor Attaching the Work Bowl 1. The center hole should fit over the power shaft. ...
Use & Care Guide
Page 11
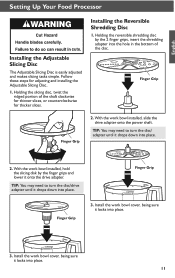
..., or counterclockwise for adjusting and installing the Adjustable Slicing Disc. 1. Holding the slicing disc, twist the ridged portion of the disc. English Setting Up Your Food Processor Installing the Adjustable Slicing Disc The Adjustable Slicing Disc is easily adjusted and makes slicing tasks simple. TIP: You may need to turn the disc...
..., or counterclockwise for adjusting and installing the Adjustable Slicing Disc. 1. Holding the slicing disc, twist the ridged portion of the disc. English Setting Up Your Food Processor Installing the Adjustable Slicing Disc The Adjustable Slicing Disc is easily adjusted and makes slicing tasks simple. TIP: You may need to turn the disc...
Use & Care Guide
Page 12
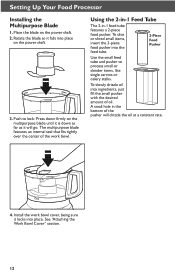
...Bowl Cover" section. 12 To slowly drizzle oil into the feed tube. 2-Piece Food Pusher Use the small feed tube and pusher to lock: Press down firmly on the power shaft. 2. Setting Up Your Food Processor Installing the Multipurpose Blade 1. To slice or shred small items, insert the 2-...piece food pusher into ingredients, just fill the small pusher with the desired amount of the work bowl cover...
...Bowl Cover" section. 12 To slowly drizzle oil into the feed tube. 2-Piece Food Pusher Use the small feed tube and pusher to lock: Press down firmly on the power shaft. 2. Setting Up Your Food Processor Installing the Multipurpose Blade 1. To slice or shred small items, insert the 2-...piece food pusher into ingredients, just fill the small pusher with the desired amount of the work bowl cover...

Use & Care Guide
Page 13
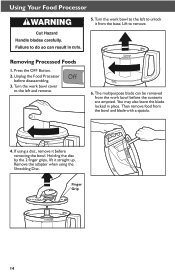
... a complete stop within a few seconds. 3. NOTE: If the Food Processor fails to turn on the Food Processor, press the Low or High button. Using the Low/High Speed Control 1. English Using Your Food Processor Before Use Before operating the Food Processor, be processed by the Food Processor. To turn off the Food Processor before removing the work bowl cover, or before removing...
... a complete stop within a few seconds. 3. NOTE: If the Food Processor fails to turn on the Food Processor, press the Low or High button. Using the Low/High Speed Control 1. English Using Your Food Processor Before Use Before operating the Food Processor, be processed by the Food Processor. To turn off the Food Processor before removing the work bowl cover, or before removing...
Use & Care Guide
Page 14
...Turn the work bowl before disassembling. 3. Lift to remove. You may also leave the blade locked in place. Finger Grip 14 Using Your Food Processor 5. Unplug the Food Processor before the contents are emptied. The multipurpose blade can be removed from the bowl and blade with a spatula. 4. Then remove... food from the work bowl to the left to the left and remove. 6. Holding the disc by the 2 finger grips, lift it ...
...Turn the work bowl before disassembling. 3. Lift to remove. You may also leave the blade locked in place. Finger Grip 14 Using Your Food Processor 5. Unplug the Food Processor before the contents are emptied. The multipurpose blade can be removed from the bowl and blade with a spatula. 4. Then remove... food from the work bowl to the left to the left and remove. 6. Holding the disc by the 2 finger grips, lift it ...
Use & Care Guide
Page 15
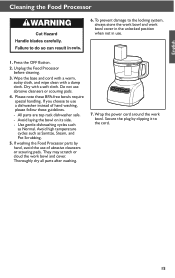
.... If you choose to use abrasive cleansers or scouring pads. 4. All parts are top rack dishwasher safe. -- If washing the Food Processor parts by clipping it to the locking system, always store the work bowl and work bowl cover in the unlocked position when not ...Thoroughly dry all parts after washing. 7. Wipe the base and cord with a warm, sudsy cloth, and wipe clean with a soft cloth. Unplug the Food Processor before cleaning. 3. Use gentle dishwashing cycles such as Sanitize, Steam, and Pot Scrubbing. 5. Avoid high temperature cycles such as Normal. Please note these ...
.... If you choose to use abrasive cleansers or scouring pads. 4. All parts are top rack dishwasher safe. -- If washing the Food Processor parts by clipping it to the locking system, always store the work bowl and work bowl cover in the unlocked position when not ...Thoroughly dry all parts after washing. 7. Wipe the base and cord with a warm, sudsy cloth, and wipe clean with a soft cloth. Unplug the Food Processor before cleaning. 3. Use gentle dishwashing cycles such as Sanitize, Steam, and Pot Scrubbing. 5. Avoid high temperature cycles such as Normal. Please note these ...

Use & Care Guide
Page 16
... 3 to 4 times, 2 to desired size, using short pulses, until coarsely chopped. To chop dried (or sticky) fruits: The food should be added through the feed tube while the processor is absorbed. Store in 1-inch (2.5 cm) pieces. Scrape sides of bowl, if necessary. For larger pieces, pulse 2 to 3... citrus. For nut butters, process continuously until fine. To chop cooked or raw meat, poultry or seafood: The food should be pierced with the tip of vegetables: With processor running , pour hot liquid through the feed tube. Process, using short pulses, 1 to 2 seconds each time....
... 3 to 4 times, 2 to desired size, using short pulses, until coarsely chopped. To chop dried (or sticky) fruits: The food should be added through the feed tube while the processor is absorbed. Store in 1-inch (2.5 cm) pieces. Scrape sides of bowl, if necessary. For larger pieces, pulse 2 to 3... citrus. For nut butters, process continuously until fine. To chop cooked or raw meat, poultry or seafood: The food should be pierced with the tip of vegetables: With processor running , pour hot liquid through the feed tube. Process, using short pulses, 1 to 2 seconds each time....
Use & Care Guide
Page 18
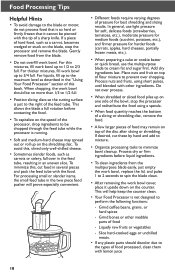
... chopping, the work bowl. To avoid this, shred only well-chilled cheese. • Sometimes slender foods, such as described in the two piece food pusher will help keep the counter clean. • Your Food Processor is not designed to minimize bowl cleanup. To minimize this book. If desired, cut... beans, grains, or hard spices -- For processing small or slender items, the small feed tube in the "Using Your Food Processor" section of pressure for harder foods (carrots, apples, hard cheeses, partially frozen meats, etc.). • When preparing a cake or cookie batter or quick bread...
... chopping, the work bowl. To avoid this, shred only well-chilled cheese. • Sometimes slender foods, such as described in the two piece food pusher will help keep the counter clean. • Your Food Processor is not designed to minimize bowl cleanup. To minimize this book. If desired, cut... beans, grains, or hard spices -- For processing small or slender items, the small feed tube in the "Using Your Food Processor" section of pressure for harder foods (carrots, apples, hard cheeses, partially frozen meats, etc.). • When preparing a cake or cookie batter or quick bread...
Use & Care Guide
Page 19
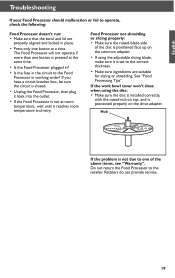
...If you have a circuit breaker box, be sure the circuit is closed. • Unplug the Food Processor, then plug it back into the outlet. • If the Food Processor is pressed at the same time. • Is the Food Processor plugged in? • Is the fuse in the circuit to the correct thickness. • Make... sure it reaches room temperature and retry. Retailers do not provide service. 19 Nub If the problem is not due to the retailer. Food Processor not shredding or slicing properly: • Make sure the raised-blade side of the above items, see "Warranty". Do not return the...
...If you have a circuit breaker box, be sure the circuit is closed. • Unplug the Food Processor, then plug it back into the outlet. • If the Food Processor is pressed at the same time. • Is the Food Processor plugged in? • Is the fuse in the circuit to the correct thickness. • Make... sure it reaches room temperature and retry. Retailers do not provide service. 19 Nub If the problem is not due to the retailer. Food Processor not shredding or slicing properly: • Make sure the raised-blade side of the above items, see "Warranty". Do not return the...
Use & Care Guide
Page 20
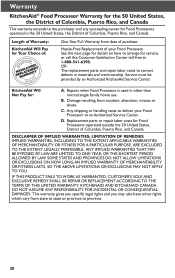
... Center toll-free at 1-800-541-6390. Service must be provided by an Authorized KitchenAid Service Center. Any shipping or handling costs to deliver your Food Processor. Repairs when Food Processor is used in other rights which vary from accident, alteration, misuse or abuse. D....correct defects in the 50 United States, the District of Columbia, Puerto Rico, and Canada. C. KitchenAid Will A. DISCLAIMER OF IMPLIED WARRANTIES; Warranty KitchenAid® Food Processor Warranty for the 50 United States, the District of Columbia, Puerto Rico, and Canada This warranty extends...
... Center toll-free at 1-800-541-6390. Service must be provided by an Authorized KitchenAid Service Center. Any shipping or handling costs to deliver your Food Processor. Repairs when Food Processor is used in other rights which vary from accident, alteration, misuse or abuse. D....correct defects in the 50 United States, the District of Columbia, Puerto Rico, and Canada. C. KitchenAid Will A. DISCLAIMER OF IMPLIED WARRANTIES; Warranty KitchenAid® Food Processor Warranty for the 50 United States, the District of Columbia, Puerto Rico, and Canada This warranty extends...
Use & Care Guide
Page 21
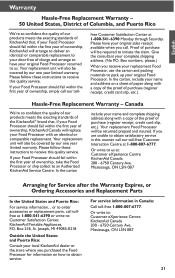
...products meets the exacting standards of KitchenAid that , if your Food Processor should fail within the first year of ownership, KitchenAid Canada will replace your Food Processor with an identical or comparable replacement. Box numbers, please.) When you purchased the Food Processor for Service after the Warranty Expires,... through Saturday. Canada We're so confident the quality of our products meets the exacting standards of the KitchenAid® brand that , if your Food Processor should fail within the first year of purchase will also be covered by our one year limited warranty....
...products meets the exacting standards of KitchenAid that , if your Food Processor should fail within the first year of ownership, KitchenAid Canada will replace your Food Processor with an identical or comparable replacement. Box numbers, please.) When you purchased the Food Processor for Service after the Warranty Expires,... through Saturday. Canada We're so confident the quality of our products meets the exacting standards of the KitchenAid® brand that , if your Food Processor should fail within the first year of purchase will also be covered by our one year limited warranty....


