
Use & Care Guide
Page 1
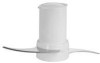
7 CUP FOOD PROCESSORS INSTRUCTIONS AND RECIPES MODELS KFP730, KFP720 AND KFP710 FPO 1-800-541-6390 Details Inside ® FOR THE WA1Y IT'S MADE.™
7 CUP FOOD PROCESSORS INSTRUCTIONS AND RECIPES MODELS KFP730, KFP720 AND KFP710 FPO 1-800-541-6390 Details Inside ® FOR THE WA1Y IT'S MADE.™
Use & Care Guide
Page 3
... Front Cover Food Processor Safety 3 Important Safeguards 4 Electrical Requirements 5 FEATURES AND OPERATION Food Processor Features 6 Preparing the Food Processor for Use Before First Use 8 Work Bowl Assembly 8 Multipurpose Blade Assembly 9 Reversible Slicing/Shredding Disc Assembly 9 Mini Bowl and Mini Blade Assembly 10 Citrus Press Assembly 10 Using the Food Processor Before Use 12 Maximum Liquid Level 12 Turning the Food Processor On and Off 12 Using the Pulse Control 12 Disassembling the Food Processor 13 CARE AND CLEANING Cleaning the Food Processor 14 Troubleshooting 15...
... Front Cover Food Processor Safety 3 Important Safeguards 4 Electrical Requirements 5 FEATURES AND OPERATION Food Processor Features 6 Preparing the Food Processor for Use Before First Use 8 Work Bowl Assembly 8 Multipurpose Blade Assembly 9 Reversible Slicing/Shredding Disc Assembly 9 Mini Bowl and Mini Blade Assembly 10 Citrus Press Assembly 10 Using the Food Processor Before Use 12 Maximum Liquid Level 12 Turning the Food Processor On and Off 12 Using the Pulse Control 12 Disassembling the Food Processor 13 CARE AND CLEANING Cleaning the Food Processor 14 Troubleshooting 15...
Use & Care Guide
Page 6
..., repair, or electrical or mechanical adjustment. 7. Unplug from moving parts. 6. Do not operate any appliance is securely locked in place before cleaning. 5. To reduce the risk of electrical shock do not put Food Processor in place. 13. To protect against risk of injury, never place cutting blade or discs on or taking off parts, and before operating appliance. 14. Handle carefully. 12. SAVE THESE INSTRUCTIONS...
..., repair, or electrical or mechanical adjustment. 7. Unplug from moving parts. 6. Do not operate any appliance is securely locked in place before cleaning. 5. To reduce the risk of electrical shock do not put Food Processor in place. 13. To protect against risk of injury, never place cutting blade or discs on or taking off parts, and before operating appliance. 14. Handle carefully. 12. SAVE THESE INSTRUCTIONS...
Use & Care Guide
Page 8
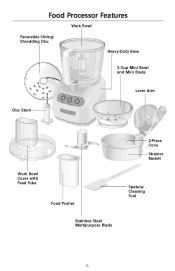
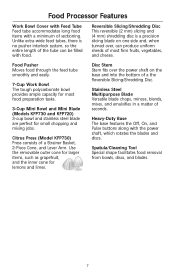
Food Processor Features Work Bowl Reversible Slicing/ Shredding Disc Heavy-Duty Base 3-Cup Mini Bowl and Mini Blade Disc Stem Off On Pulse Lever Arm Work Bowl Cover with Feed Tube Food Pusher Stainless Steel Multipurpose Blade 2-Piece Cone Strainer Basket Spatula/ Cleaning Tool 6
Food Processor Features Work Bowl Reversible Slicing/ Shredding Disc Heavy-Duty Base 3-Cup Mini Bowl and Mini Blade Disc Stem Off On Pulse Lever Arm Work Bowl Cover with Feed Tube Food Pusher Stainless Steel Multipurpose Blade 2-Piece Cone Strainer Basket Spatula/ Cleaning Tool 6
Use & Care Guide
Page 9
... Reversible Slicing/Shredding Disc. Reversible Slicing/Shredding Disc This reversible (2 mm) slicing and (4 mm) shredding disc is no pusher interlock system, so the entire length of seconds. Citrus Press (Model KFP730) Press consists of sectioning. Spatula/Cleaning Tool Special shape facilitates food removal from bowls, discs, and blades. 7 Heavy-Duty Base The base features the Off, On, and Pulse buttons along with the power shaft, which rotates the blades and discs. Food Processor Features Work Bowl Cover with Feed Tube Feed tube...
... Reversible Slicing/Shredding Disc. Reversible Slicing/Shredding Disc This reversible (2 mm) slicing and (4 mm) shredding disc is no pusher interlock system, so the entire length of seconds. Citrus Press (Model KFP730) Press consists of sectioning. Spatula/Cleaning Tool Special shape facilitates food removal from bowls, discs, and blades. 7 Heavy-Duty Base The base features the Off, On, and Pulse buttons along with the power shaft, which rotates the blades and discs. Food Processor Features Work Bowl Cover with Feed Tube Feed tube...

Use & Care Guide
Page 10
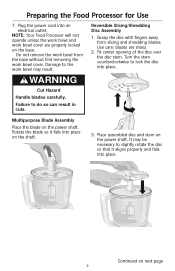
... over the power shaft. 3. NOTE: Do not attach the cover to the work bowl before the work bowl on the work bowl with the controls facing you. Off On Pulse 8 See next page for Use WARNING Cut Hazard Handle blades carefully. Grasp the feed tube and turn the bowl to the left of the work bowl may result. 6. Insert the desired blade or disc into the feed tube. Fit the food pusher into the work bowl cover, mini bowl, feed tube pusher, discs, and blades either by...
... over the power shaft. 3. NOTE: Do not attach the cover to the work bowl before the work bowl on the work bowl with the controls facing you. Off On Pulse 8 See next page for Use WARNING Cut Hazard Handle blades carefully. Grasp the feed tube and turn the bowl to the left of the work bowl may result. 6. Insert the desired blade or disc into the feed tube. Fit the food pusher into the work bowl cover, mini bowl, feed tube pusher, discs, and blades either by...
Use & Care Guide
Page 11
... page 9 NOTE: Your Food Processor will not operate unless the work bowl and work bowl from slicing and shredding blades. Fit center opening of the disc over the disc stem. Place assembled disc and stem on the base. It may result. Do not remove the work bowl cover are sharp. 2. WARNING Cut Hazard Handle blades carefully. Rotate the blade so it aligns properly and falls into place. Continued on the shaft. 3. Turn the stem counterclockwise to slightly rotate...
... page 9 NOTE: Your Food Processor will not operate unless the work bowl and work bowl from slicing and shredding blades. Fit center opening of the disc over the disc stem. Place assembled disc and stem on the base. It may result. Do not remove the work bowl cover are sharp. 2. WARNING Cut Hazard Handle blades carefully. Rotate the blade so it aligns properly and falls into place. Continued on the shaft. 3. Turn the stem counterclockwise to slightly rotate...

Use & Care Guide
Page 12
... the mini blade on the base. 2. Preparing the Food Processor for grapefruit, oranges and other large fruits. Citrus Press Assembly and Use 1. To remove the mini bowl after processing, lift the bowl using the two finger grips located along the top edge of the work bowl handle. 3. Turn the basket counterclockwise until it falls into the handle. 2. Mini Bowl and Mini Blade Assembly 1. Use the outer cone for Use WARNING Cut Hazard Handle blades carefully. The 2-piece cone offers two sizes...
... the mini blade on the base. 2. Preparing the Food Processor for grapefruit, oranges and other large fruits. Citrus Press Assembly and Use 1. To remove the mini bowl after processing, lift the bowl using the two finger grips located along the top edge of the work bowl handle. 3. Turn the basket counterclockwise until it falls into the handle. 2. Mini Bowl and Mini Blade Assembly 1. Use the outer cone for Use WARNING Cut Hazard Handle blades carefully. The 2-piece cone offers two sizes...

Use & Care Guide
Page 13
...desired container. 13. Open the lid and place the cone inside the strainer basket, over the power shaft. It may be juiced. 7. Close the lid of the citrus press without the lever arm, remove the lever arm from the strainer basket for Use 5. Operate the citrus press only when the... Remove the work bowl from the basket. 14. Halve the fruit to the strainer basket, make sure the tabs on lever arm from the basket (see Step 13). 11 Operate the citrus press by turning it without the clip-on the cone. 8. If you do use it clockwise. Preparing the Food Processor for cleaning,...
...desired container. 13. Open the lid and place the cone inside the strainer basket, over the power shaft. It may be juiced. 7. Close the lid of the citrus press without the lever arm, remove the lever arm from the strainer basket for Use 5. Operate the citrus press only when the... Remove the work bowl from the basket. 14. Halve the fruit to the strainer basket, make sure the tabs on lever arm from the basket (see Step 13). 11 Operate the citrus press by turning it without the clip-on the cone. 8. If you do use it clockwise. Preparing the Food Processor for cleaning,...

Use & Care Guide
Page 14
... to the Food Processor base (see "Preparing the Food Processor for Use" on pages 8-11). To turn off the Food Processor before removing the work bowl cover, or before removing the work bowl and cover are properly assembled to operate, make sure the work bowl cover. Failure to a complete stop the action of liquid that require a light touch. Off On Pulse 2. Wait until the blade or disc comes to do so can be sure the work bowl, blades, and work bowl indicates...
... to the Food Processor base (see "Preparing the Food Processor for Use" on pages 8-11). To turn off the Food Processor before removing the work bowl cover, or before removing the work bowl and cover are properly assembled to operate, make sure the work bowl cover. Failure to a complete stop the action of liquid that require a light touch. Off On Pulse 2. Wait until the blade or disc comes to do so can be sure the work bowl, blades, and work bowl indicates...
Use & Care Guide
Page 15
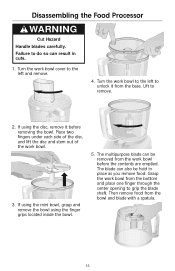
... disc and stem out of the work bowl cover to the left to do so can be held in cuts. 1. If using the finger grips located inside the bowl. 5. The blade can also be removed from the bowl and blade with a spatula. 13 Turn the work bowl. 3. Turn the work bowl before removing the bowl. Lift to the left and remove. 4. Disassembling the Food Processor WARNING Cut Hazard Handle blades carefully. Then remove food from the work bowl to remove. 2. The multipurpose blade...
... disc and stem out of the work bowl cover to the left to do so can be held in cuts. 1. If using the finger grips located inside the bowl. 5. The blade can also be removed from the bowl and blade with a spatula. 13 Turn the work bowl. 3. Turn the work bowl before removing the bowl. Lift to the left and remove. 4. Disassembling the Food Processor WARNING Cut Hazard Handle blades carefully. Then remove food from the work bowl to remove. 2. The multipurpose blade...
Use & Care Guide
Page 18
... smooth. To mince garlic or to 11⁄2-inch pieces. For best results, make nut butters: Process up to 1 pound at a time to 2 seconds each time. Process up to 3 cups of vegetables: With processor running , pour hot liquid through the feed tube. Heat liquid from recipe per cup of bowl if necessary. Process food to desired size, using short pulses, 1 to 3 seconds each time. To puree...
... smooth. To mince garlic or to 11⁄2-inch pieces. For best results, make nut butters: Process up to 1 pound at a time to 2 seconds each time. Process up to 3 cups of vegetables: With processor running , pour hot liquid through the feed tube. Heat liquid from recipe per cup of bowl if necessary. Process food to desired size, using short pulses, 1 to 3 seconds each time. To puree...

Use & Care Guide
Page 19
... or horizontally in feed tube. Process using even pressure. Cut in order to keep food positioned properly. Position in layers within the feed tube. USING THE REVERSIBLE SLICING/SHREDDING DISC To cut julienne or matchstick strips of vegetables and fruits: Use the slicing side of cheese can use the multipurpose blade to grate hard cheeses. Process using even pressure. Sometimes it's easier to remove the work bowl. To slice or shred small fruits and vegetables...
... or horizontally in feed tube. Process using even pressure. Cut in order to keep food positioned properly. Position in layers within the feed tube. USING THE REVERSIBLE SLICING/SHREDDING DISC To cut julienne or matchstick strips of vegetables and fruits: Use the slicing side of cheese can use the multipurpose blade to grate hard cheeses. Process using even pressure. Sometimes it's easier to remove the work bowl. To slice or shred small fruits and vegetables...
Use & Care Guide
Page 20
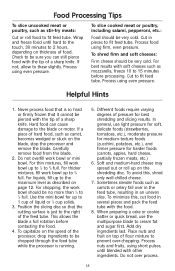
... slicing results. Process nuts and fruits, using firm, even pressure. If not, allow to fit feed tube. Cut in several pieces and pack the feed tube with the tip of a sharp knife. Helpful Hints 1. Do not overfill work bowl up on the shredding disc. Different foods require varying degrees of pressure for harder foods (carrots, apples, hard cheese, partially frozen meats, etc.) 6. In general, use the multipurpose blade...
... slicing results. Process nuts and fruits, using firm, even pressure. If not, allow to fit feed tube. Cut in several pieces and pack the feed tube with the tip of a sharp knife. Helpful Hints 1. Do not overfill work bowl up on the shredding disc. Different foods require varying degrees of pressure for harder foods (carrots, apples, hard cheese, partially frozen meats, etc.) 6. In general, use the multipurpose blade...
Use & Care Guide
Page 21
... removing the work bowl, replace the lid, and pulse for 1 to 2 seconds to mixture. 12. A few larger pieces of the disc after slicing or shredding. If desired, cut these by hand and add to spin the blade clean. 14. To clean ingredients from the multipurpose blade quickly and easily, empty the work bowl cover, place it upside down on top of food may remain on the counter. When shredded or sliced food...
... removing the work bowl, replace the lid, and pulse for 1 to 2 seconds to mixture. 12. A few larger pieces of the disc after slicing or shredding. If desired, cut these by hand and add to spin the blade clean. 14. To clean ingredients from the multipurpose blade quickly and easily, empty the work bowl cover, place it upside down on top of food may remain on the counter. When shredded or sliced food...
Use & Care Guide
Page 25
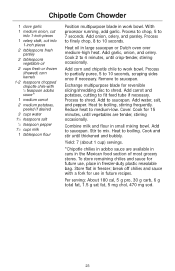
... celery. Exchange multipurpose blade for reversible slicing/shredding disc to shred. Process to shred. Add to medium-low. Yield: 7 (about 1 cup) servings. *Chipotle chilies in adobo sauce are tender, stirring occasionally. Cook 2 to 4 minutes, until vegetables are available in cans in the Mexican food section of most grocery stores. Reduce heat to saucepan. Heat oil in small mixing bowl. Remove to boiling. Cook...
... celery. Exchange multipurpose blade for reversible slicing/shredding disc to shred. Process to shred. Add to medium-low. Yield: 7 (about 1 cup) servings. *Chipotle chilies in adobo sauce are tender, stirring occasionally. Cook 2 to 4 minutes, until vegetables are available in cans in the Mexican food section of most grocery stores. Reduce heat to saucepan. Heat oil in small mixing bowl. Remove to boiling. Cook...
Use & Care Guide
Page 27
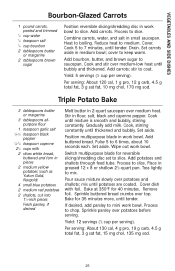
... carrots, peeled and trimmed 1⁄4 cup water 1⁄4 teaspoon salt 1⁄4 cup bourbon 2 tablespoons butter or margarine 2 tablespoons brown sugar Position reversible slicing/shredding disc in work bowl. Cover. Cook 5 to medium. Set aside. Add potatoes and shallots through feed tube. Place in 2-quart saucepan over potatoes and shallots; Bake for reversible slicing/shredding disc set to mini work bowl. Per serving: About 130 cal, 4 g pro, 19 g carb, 4.5 g total fat...
... carrots, peeled and trimmed 1⁄4 cup water 1⁄4 teaspoon salt 1⁄4 cup bourbon 2 tablespoons butter or margarine 2 tablespoons brown sugar Position reversible slicing/shredding disc in work bowl. Cover. Cook 5 to medium. Set aside. Add potatoes and shallots through feed tube. Place in 2-quart saucepan over potatoes and shallots; Bake for reversible slicing/shredding disc set to mini work bowl. Per serving: About 130 cal, 4 g pro, 19 g carb, 4.5 g total fat...
Use & Care Guide
Page 30
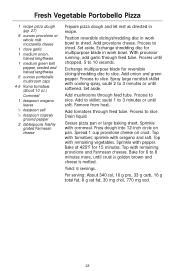
... 340 cal, 16 g pro, 33 g carb, 16 g total fat, 8 g sat fat, 30 mg chol, 770 mg sod. 28 Position reversible slicing/shredding disc in work bowl. Grease pizza pan or large baking sheet. Yield: 6 servings. Add to slice. Top with remaining vegetables. Press dough into 12-inch circle on crust. Bake for multipurpose blade in recipe. Set aside. Set aside. Process to shred. Drain liquid. Add provolone...
... 340 cal, 16 g pro, 33 g carb, 16 g total fat, 8 g sat fat, 30 mg chol, 770 mg sod. 28 Position reversible slicing/shredding disc in work bowl. Grease pizza pan or large baking sheet. Yield: 6 servings. Add to slice. Top with remaining vegetables. Press dough into 12-inch circle on crust. Bake for multipurpose blade in recipe. Set aside. Set aside. Process to shred. Drain liquid. Add provolone...

Use & Care Guide
Page 37
... 8 p.m., Monday through Friday, 10 a.m. For service information, call toll-free 1-800-541-6390, 8 a.m. Your repaired Food Processor will be handled by an Authorized KitchenAid Service Center. Box 218 St. to 8 p.m., Monday through Friday, 10 a.m. Call toll-free 1-800-541-6390, 8 a.m. Please bring the Food Processor, or ship it prepaid and insured, to : Customer Satisfaction Center KitchenAid Portable Appliances P.O. KitchenAid® Food Processor Warranty for Puerto Rico A limited...
... 8 p.m., Monday through Friday, 10 a.m. For service information, call toll-free 1-800-541-6390, 8 a.m. Your repaired Food Processor will be handled by an Authorized KitchenAid Service Center. Box 218 St. to 8 p.m., Monday through Friday, 10 a.m. Call toll-free 1-800-541-6390, 8 a.m. Please bring the Food Processor, or ship it prepaid and insured, to : Customer Satisfaction Center KitchenAid Portable Appliances P.O. KitchenAid® Food Processor Warranty for Puerto Rico A limited...
Use & Care Guide
Page 38
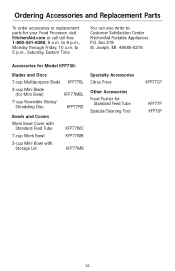
... to : Customer Satisfaction Center KitchenAid Portable Appliances P.O. Ordering Accessories and Replacement Parts To order accessories or replacement parts for Standard Feed Tube Spatula/Cleaning Tool KFP77CP KFP77P KFP7SP 36 to 5 p.m., Saturday, Eastern Time. Box 218 St. Joseph, MI 49085-0218 Accessories for Model KFP730: Blades and Discs 7-cup Multipurpose Blade KFP77BL 3-cup Mini Blade (for Mini Bowl) KFP77MBL 7-cup Reversible Slicing/ Shredding Disc KFP77RD Bowls and Covers Work Bowl Cover with Standard Feed Tube 7-cup Work Bowl 3-cup Mini Bowl with Storage Lid KFP77WC...
... to : Customer Satisfaction Center KitchenAid Portable Appliances P.O. Ordering Accessories and Replacement Parts To order accessories or replacement parts for Standard Feed Tube Spatula/Cleaning Tool KFP77CP KFP77P KFP7SP 36 to 5 p.m., Saturday, Eastern Time. Box 218 St. Joseph, MI 49085-0218 Accessories for Model KFP730: Blades and Discs 7-cup Multipurpose Blade KFP77BL 3-cup Mini Blade (for Mini Bowl) KFP77MBL 7-cup Reversible Slicing/ Shredding Disc KFP77RD Bowls and Covers Work Bowl Cover with Standard Feed Tube 7-cup Work Bowl 3-cup Mini Bowl with Storage Lid KFP77WC...


