

Use & Care Guide
Page 2
... appliance, keep this guide handy. Remember to use and care for recipes, tips, and more. To help ensure the longevity and performance of KitchenAid®. Join us in the kitchen at www.kitchenaid.com, or by mail using the attached Product Registration Card. We're committed to the world of your mobile device for your product online at www.proline...
... appliance, keep this guide handy. Remember to use and care for recipes, tips, and more. To help ensure the longevity and performance of KitchenAid®. Join us in the kitchen at www.kitchenaid.com, or by mail using the attached Product Registration Card. We're committed to the world of your mobile device for your product online at www.proline...
Use & Care Guide
Page 3
...16 Installing/removing the multipurpose blade 17 Installing/removing the prep bowl 18 Installing/removing the shredding, julienne, and parmesan discs 19 Installing/removing the slicing disc 20 Adjusting the slicing thickness 20 Installing/removing the mini-bowl and mini-blade 21 Installing/removing the egg whip or dough blade 22 Installing/removing the citrus press 23 Removing accessories and work bowl 12 Attaching the lid and safety lock 12 Using the 3-in-1 feed tube 13 Using the speed controls 14 Using YOUR Accessories Preparing the dicing kit for first use your Food Processor...
...16 Installing/removing the multipurpose blade 17 Installing/removing the prep bowl 18 Installing/removing the shredding, julienne, and parmesan discs 19 Installing/removing the slicing disc 20 Adjusting the slicing thickness 20 Installing/removing the mini-bowl and mini-blade 21 Installing/removing the egg whip or dough blade 22 Installing/removing the citrus press 23 Removing accessories and work bowl 12 Attaching the lid and safety lock 12 Using the 3-in-1 feed tube 13 Using the speed controls 14 Using YOUR Accessories Preparing the dicing kit for first use your Food Processor...

Use & Care Guide
Page 4
... plug, or after the appliance malfunctions, or is securely locked in use outdoors. 9. Avoid contacting moving blades or discs while processing food to reduce the risk of injury, and tell you how to defeat the cover interlock mechanism. 16. Do not use , before putting on or taking off parts, and before operating appliance. 14. Do not attempt to reduce the...
... plug, or after the appliance malfunctions, or is securely locked in use outdoors. 9. Avoid contacting moving blades or discs while processing food to reduce the risk of injury, and tell you how to defeat the cover interlock mechanism. 16. Do not use , before putting on or taking off parts, and before operating appliance. 14. Do not attempt to reduce the...
Use & Care Guide
Page 5
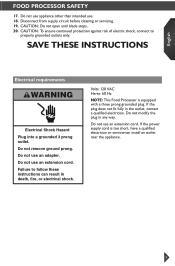
.... Do not use appliance other than intended use an adapter. Do not use an extension cord. Do not use an extension cord. English Food Processor Safety 17. Do not remove ground prong. Volts: 120 VAC Hertz: 60 Hz NOTE: This Food Processor is too short, have a qualified electrician or serviceman install an outlet near the appliance. 5 SAVE THESE INSTRUCTIONS Electrical requirements WARNING...
.... Do not use appliance other than intended use an adapter. Do not use an extension cord. Do not use an extension cord. English Food Processor Safety 17. Do not remove ground prong. Volts: 120 VAC Hertz: 60 Hz NOTE: This Food Processor is too short, have a qualified electrician or serviceman install an outlet near the appliance. 5 SAVE THESE INSTRUCTIONS Electrical requirements WARNING...

Use & Care Guide
Page 6
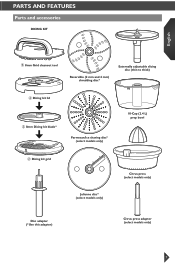
Parts and Features Parts and accessories 3-piece food pusher Accessory case Work bowl cover with 3-in-1 feed tube Ultratight seal 16-Cup (4 L) work bowl Externally adjustable blade control Die-cast base 4-Cup (1 L) mini-bowl and mini-blade Dough blade Stainless steel multipurpose blade Spatula 6 Egg whip (select models only)
Parts and Features Parts and accessories 3-piece food pusher Accessory case Work bowl cover with 3-in-1 feed tube Ultratight seal 16-Cup (4 L) work bowl Externally adjustable blade control Die-cast base 4-Cup (1 L) mini-bowl and mini-blade Dough blade Stainless steel multipurpose blade Spatula 6 Egg whip (select models only)
Use & Care Guide
Page 7
Parts and Features Parts and accessories DICING KIT English ➄ 8mm Grid cleanout tool Reversible (2 mm and 4 mm) shredding disc* Externally adjustable slicing disc (thin to thick) ➃ Dicing kit lid ➂ 8mm Dicing kit blade* Parmesan/Ice shaving disc* (select models only) 10-Cup (2.4 L) prep bowl ➁ Dicing kit grid Citrus press (select models only) Julienne disc* (select models only) Disc adapter (*Use this adapter) Citrus press adapter (select models only) 7
Parts and Features Parts and accessories DICING KIT English ➄ 8mm Grid cleanout tool Reversible (2 mm and 4 mm) shredding disc* Externally adjustable slicing disc (thin to thick) ➃ Dicing kit lid ➂ 8mm Dicing kit blade* Parmesan/Ice shaving disc* (select models only) 10-Cup (2.4 L) prep bowl ➁ Dicing kit grid Citrus press (select models only) Julienne disc* (select models only) Disc adapter (*Use this adapter) Citrus press adapter (select models only) 7
Use & Care Guide
Page 12
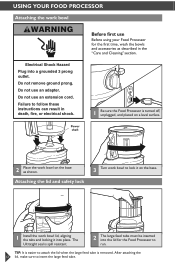
... Food Processor is removed. After attaching the 12 lid, make sure to insert the large feed tube. Electrical Shock Hazard Plug into the lid for the first time, wash the bowls and accessories as shown. Do not remove ground prong. Do not use an extension cord. Failure to follow these instructions can result in the "Care and Cleaning" section. Power shaft 2 Place the work bowl lid, aligning the tabs and locking it on the base. 1 Install...
... Food Processor is removed. After attaching the 12 lid, make sure to insert the large feed tube. Electrical Shock Hazard Plug into the lid for the first time, wash the bowls and accessories as shown. Do not remove ground prong. Do not use an extension cord. Failure to follow these instructions can result in the "Care and Cleaning" section. Power shaft 2 Place the work bowl lid, aligning the tabs and locking it on the base. 1 Install...

Use & Care Guide
Page 13
... slice or shred the smallest, thinnest items. TIP: The drizzle hole flow rate is ideal for making mayonnaise. Drizzle hole 4 Use the drizzle hole in the feed tube to process smaller items. Small food pusher 3 Use the small food pusher to slowly drizzle oil or other liquid ingredients into the work bowl cover are properly assembled on the Food Processor base. English Using Your Food Processor Using the 3-in-1 feed tube Before use Before operating the Food Processor, be sure the work bowl, blades...
... slice or shred the smallest, thinnest items. TIP: The drizzle hole flow rate is ideal for making mayonnaise. Drizzle hole 4 Use the drizzle hole in the feed tube to process smaller items. Small food pusher 3 Use the small food pusher to slowly drizzle oil or other liquid ingredients into the work bowl cover are properly assembled on the Food Processor base. English Using Your Food Processor Using the 3-in-1 feed tube Before use Before operating the Food Processor, be sure the work bowl, blades...

Use & Care Guide
Page 14
... Food Processor fails to stop , turn the dial to change speeds. 14 the dial will automatically go back to OFF position to operate, make sure the work bowl and cover are properly locked on , flip the speed lever to High or Low, then turn the dial to PULSE to ON. The pulse control allows precise control of the duration and frequency of processing...
... Food Processor fails to stop , turn the dial to change speeds. 14 the dial will automatically go back to OFF position to operate, make sure the work bowl and cover are properly locked on , flip the speed lever to High or Low, then turn the dial to PULSE to ON. The pulse control allows precise control of the duration and frequency of processing...
Use & Care Guide
Page 16
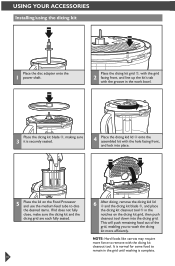
... each fully seated. 16 6 After dicing, remove the dicing kid lid ➃ and the dicing kit blade ➂, and place the dicing kit cleanout tool ➄ in the work bowl. Using Your Accessories Installing/using the dicing kit Place the disc adapter onto the 1 power shaft. Place the dicing kit blade ➂, making sure 3 it is complete. NOTE: Hard foods like carrots may require more force...
... each fully seated. 16 6 After dicing, remove the dicing kid lid ➃ and the dicing kit blade ➂, and place the dicing kit cleanout tool ➄ in the work bowl. Using Your Accessories Installing/using the dicing kit Place the disc adapter onto the 1 power shaft. Place the dicing kit blade ➂, making sure 3 it is complete. NOTE: Hard foods like carrots may require more force...

Use & Care Guide
Page 17
... secure the work bowl, or removed before the contents are emptied. 1 Place the blade on the power shaft. 2 Press down firmly on the side of the bowl indicate the maximum recommended levels for thick and thin liquids in the Food Processor. 3 The multipurpose blade has a leak resistant seal, so you may leave the blade in work bowl with one hand, using the handle, not the...
... secure the work bowl, or removed before the contents are emptied. 1 Place the blade on the power shaft. 2 Press down firmly on the side of the bowl indicate the maximum recommended levels for thick and thin liquids in the Food Processor. 3 The multipurpose blade has a leak resistant seal, so you may leave the blade in work bowl with one hand, using the handle, not the...
Use & Care Guide
Page 18
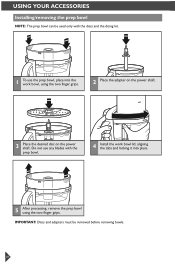
Do not use any blades with the discs and the dicing kit. 1 To use the prep bowl, place into place. 5 After processing, remove the prep bowl using the two finger grips. 2 Place the adapter on the power shaft. 3 Place the desired disc on the power shaft. IMPORTANT: Discs and adapters must be used only with the prep bowl. 4 Install the work bowl lid, aligning the tabs and locking it into the work bowl, using the two finger grips. Using Your Accessories Installing/removing the prep bowl NOTE: The prep bowl can be removed before removing bowls. 18
Do not use any blades with the discs and the dicing kit. 1 To use the prep bowl, place into place. 5 After processing, remove the prep bowl using the two finger grips. 2 Place the adapter on the power shaft. 3 Place the desired disc on the power shaft. IMPORTANT: Discs and adapters must be used only with the prep bowl. 4 Install the work bowl lid, aligning the tabs and locking it into the work bowl, using the two finger grips. Using Your Accessories Installing/removing the prep bowl NOTE: The prep bowl can be removed before removing bowls. 18
Use & Care Guide
Page 20
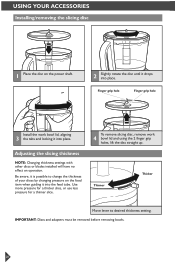
... slice, or use less pressure for a thinner slice. IMPORTANT: Discs and adapters must be removed before removing bowls. 20 Thinner Thicker Move lever to change the thickness of your slices by changing pressure on the food item when guiding it into the feed tube. Finger grip hole Finger grip hole Install the work 4 bowl lid and using the 2 finger grip holes, lift the disc straight up. To remove slicing disc, remove work bowl lid, aligning 3 the tabs and locking...
... slice, or use less pressure for a thinner slice. IMPORTANT: Discs and adapters must be removed before removing bowls. 20 Thinner Thicker Move lever to change the thickness of your slices by changing pressure on the food item when guiding it into the feed tube. Finger grip hole Finger grip hole Install the work 4 bowl lid and using the 2 finger grip holes, lift the disc straight up. To remove slicing disc, remove work bowl lid, aligning 3 the tabs and locking...
Use & Care Guide
Page 22
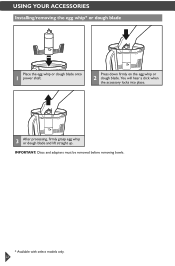
Using Your Accessories Installing/removing the egg whip* or dough blade Place the egg whip or dough blade onto 1 power shaft. IMPORTANT: Discs and adapters must be removed before removing bowls. * Available with select models only. 22 Press down firmly on the egg whip or 2 dough blade. You will hear a click when the accessory locks into place. 3 After processing, firmly grasp egg whip or dough blade and lift straight up.
Using Your Accessories Installing/removing the egg whip* or dough blade Place the egg whip or dough blade onto 1 power shaft. IMPORTANT: Discs and adapters must be removed before removing bowls. * Available with select models only. 22 Press down firmly on the egg whip or 2 dough blade. You will hear a click when the accessory locks into place. 3 After processing, firmly grasp egg whip or dough blade and lift straight up.

Use & Care Guide
Page 24
... To remove disc accessories: Hold the disc by the 2 finger grips; Then remove the adapter. 3 To remove blade accessories: Grasp blade and pull straight up . If work bowl is off and unplugged before disassembling. 1 To remove work bowl from Food Processor before removing work bowl from Food Processor: Turn the work bowl cover to unlock, as shown, and lift the lid to remove, continuing next steps with bowl still attached to Food Processor. Using Your Accessories Removing accessories and work bowl IMPORTANT: Be sure the Food Processor is still attached to 4 Food Processor: Turn the work...
... To remove disc accessories: Hold the disc by the 2 finger grips; Then remove the adapter. 3 To remove blade accessories: Grasp blade and pull straight up . If work bowl is off and unplugged before disassembling. 1 To remove work bowl from Food Processor before removing work bowl from Food Processor: Turn the work bowl cover to unlock, as shown, and lift the lid to remove, continuing next steps with bowl still attached to Food Processor. Using Your Accessories Removing accessories and work bowl IMPORTANT: Be sure the Food Processor is still attached to 4 Food Processor: Turn the work...
Use & Care Guide
Page 25
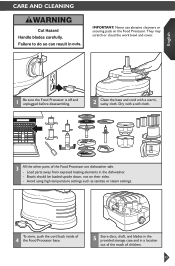
... the work bowl and cover. CARE AND CLEANING IMPORTANT: Never use abrasive cleansers or scouring pads on their sides. -- English 1 Be sure the Food Processor is off and unplugged before disassembling. 2 Clean the base and cord with a soft cloth. 3 All the other parts of children. 25 Dry with a warm, sudsy cloth. To store, push the cord back inside of 4 the Food Processor base. 5 Store discs, shaft, and blades...
... the work bowl and cover. CARE AND CLEANING IMPORTANT: Never use abrasive cleansers or scouring pads on their sides. -- English 1 Be sure the Food Processor is off and unplugged before disassembling. 2 Clean the base and cord with a soft cloth. 3 All the other parts of children. 25 Dry with a warm, sudsy cloth. To store, push the cord back inside of 4 the Food Processor base. 5 Store discs, shaft, and blades...
Use & Care Guide
Page 26
... (2.5-4 cm) pieces. To chop nuts or make nut butters: Process up to 1 pound (455 g) at a time to desired size, using short pulses, 1 to 2 seconds each time. To melt chocolate in a recipe: Combine chocolate and sugar from recipe in work bowl. To puree cooked fruits and vegetables (except potatoes): Add 1/4 cup (60 ml) liquid from recipe per 1 cup (235 ml) of cheese can use the multi-purpose blade to...
... (2.5-4 cm) pieces. To chop nuts or make nut butters: Process up to 1 pound (455 g) at a time to desired size, using short pulses, 1 to 2 seconds each time. To melt chocolate in a recipe: Combine chocolate and sugar from recipe in work bowl. To puree cooked fruits and vegetables (except potatoes): Add 1/4 cup (60 ml) liquid from recipe per 1 cup (235 ml) of cheese can use the multi-purpose blade to...
Use & Care Guide
Page 27
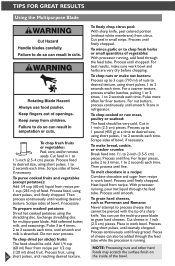
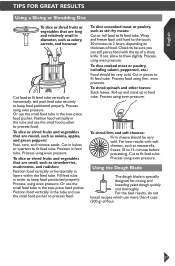
... processing. Using the Dough Blade The dough blade is specially designed for mixing and kneading yeast dough quickly and thoroughly. Process using firm, even pressure. For the best results, do not knead recipes which use the small feed tube in the two-piece food pusher. English TIPS FOR GREAT RESULTS Using a Slicing or Shredding Disc To slice or shred fruits or vegetables that are long and relatively small in feed tube. Or use more than 4 cups (500 g) of food...
... processing. Using the Dough Blade The dough blade is specially designed for mixing and kneading yeast dough quickly and thoroughly. Process using firm, even pressure. For the best results, do not knead recipes which use the small feed tube in the two-piece food pusher. English TIPS FOR GREAT RESULTS Using a Slicing or Shredding Disc To slice or shred fruits or vegetables that are long and relatively small in feed tube. Or use more than 4 cups (500 g) of food...
Use & Care Guide
Page 28
..., the small feed tube in several pieces and pack the feed tube with lemon juice. 28 If desired, cut food in the two piece food pusher will help keep the counter clean. • Use the spatula to remove ingredients from the work bowl. • Your Food Processor is just to the right of pressure for best shredding and slicing results. Grind bones or other ingredients. Slice hard-cooked eggs or unchilled...
..., the small feed tube in several pieces and pack the feed tube with lemon juice. 28 If desired, cut food in the two piece food pusher will help keep the counter clean. • Use the spatula to remove ingredients from the work bowl. • Your Food Processor is just to the right of pressure for best shredding and slicing results. Grind bones or other ingredients. Slice hard-cooked eggs or unchilled...

Use & Care Guide
Page 29
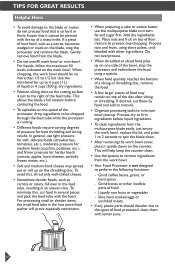
... properly aligned and locked in place and the large food pusher is inserted in the feed tube. • When using the adjustable slicing blade, make sure the dial is in the Off position. • For easy lid rotation, it is possible to remove the seal, or just apply vegetable oil to the Food Processor in the circuit to the seal. If the problem is not due...
... properly aligned and locked in place and the large food pusher is inserted in the feed tube. • When using the adjustable slicing blade, make sure the dial is in the Off position. • For easy lid rotation, it is possible to remove the seal, or just apply vegetable oil to the Food Processor in the circuit to the seal. If the problem is not due...


