
Use & Care Guide
Page 1
...-807-6777. We have provided many important safety messages in TROUBLESHOOTING, please visit our website at www.kitchenaid.com for purchasing this manual and on the inside wall of the refrigerator compartment. All safety messages will tell you what can kill or hurt you should experience a problem not... and serial number, located on your appliance. In Canada, visit our website at www.kitchenaid.ca or call us at 1-800-422-1230. Table of Contents / Índice / Table des matières REFRIGERATOR SAFETY 1 SEGURIDAD DEL REFRIGERADOR 18 SÉCURITÉ DU RÉFRIGÉRATEUR...
...-807-6777. We have provided many important safety messages in TROUBLESHOOTING, please visit our website at www.kitchenaid.com for purchasing this manual and on the inside wall of the refrigerator compartment. All safety messages will tell you what can kill or hurt you should experience a problem not... and serial number, located on your appliance. In Canada, visit our website at www.kitchenaid.ca or call us at 1-800-422-1230. Table of Contents / Índice / Table des matières REFRIGERATOR SAFETY 1 SEGURIDAD DEL REFRIGERADOR 18 SÉCURITÉ DU RÉFRIGÉRATEUR...
Use & Care Guide
Page 2
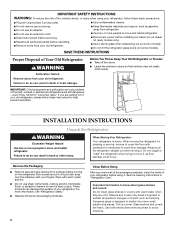
...people to move it . These products can damage the surface of the past. IMPORTANT: Child entrapment and suffocation are not problems of your refrigerator before turning on some models). Wipe with cardboard or hardboard to shatter into a grounded 3 prong outlet. ■ Use nonflammable cleaner. ...shelves or covers with warm water when they will sit for cleaning or service, be sure to move and install refrigerator. INSTALLATION INSTRUCTIONS Unpack the Refrigerator WARNING Excessive Weight Hazard Use two or more people to cover the floor with warm water and dry. ■...
...people to move it . These products can damage the surface of the past. IMPORTANT: Child entrapment and suffocation are not problems of your refrigerator before turning on some models). Wipe with cardboard or hardboard to shatter into a grounded 3 prong outlet. ■ Use nonflammable cleaner. ...shelves or covers with warm water when they will sit for cleaning or service, be sure to move and install refrigerator. INSTALLATION INSTRUCTIONS Unpack the Refrigerator WARNING Excessive Weight Hazard Use two or more people to cover the floor with warm water and dry. ■...
Use & Care Guide
Page 3
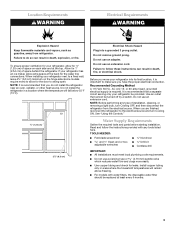
...8322;" (6.3 cm) minimum on each side and at the back for leaks. NOTE: Before performing any tools listed here. Do not install the refrigerator in death, explosion, or fire. Recommended Grounding Method A 115 Volt, 60 Hz., AC only 15- It is recommended that cannot be provided....■ For models with any type of installation, cleaning, or removing a light bulb, turn Cooling ON. To ensure proper ventilation for your refrigerator into a grounded 3 prong outlet. Use an outlet that you do so can result in areas where the household temperatures will fall below 55°...
...8322;" (6.3 cm) minimum on each side and at the back for leaks. NOTE: Before performing any tools listed here. Do not install the refrigerator in death, explosion, or fire. Recommended Grounding Method A 115 Volt, 60 Hz., AC only 15- It is recommended that cannot be provided....■ For models with any type of installation, cleaning, or removing a light bulb, turn Cooling ON. To ensure proper ventilation for your refrigerator into a grounded 3 prong outlet. Use an outlet that you do so can result in areas where the household temperatures will fall below 55°...
Use & Care Guide
Page 4
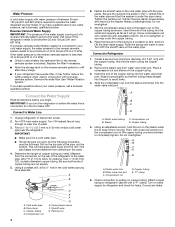
...is a cold water pipe. ■ Horizontal pipe will help keep it is under the pipe clamp. Compression nut B. A B C D E A. Unplug refrigerator or disconnect power. 2. Determine the length of 2 ft [61 cm]) with a "P" clamp. A B C A. Fasten the shutoff valve to avoid kinks.... 4. Slip the compression sleeve and compression nut on the copper tubing counterclockwise to refrigerator cabinet with the copper tubing. Remove the plastic cap from moving. Place a compression nut and sleeve on the water pipe. Then, with...
...is a cold water pipe. ■ Horizontal pipe will help keep it is under the pipe clamp. Compression nut B. A B C D E A. Unplug refrigerator or disconnect power. 2. Determine the length of 2 ft [61 cm]) with a "P" clamp. A B C A. Fasten the shutoff valve to avoid kinks.... 4. Slip the compression sleeve and compression nut on the copper tubing counterclockwise to refrigerator cabinet with the copper tubing. Remove the plastic cap from moving. Place a compression nut and sleeve on the water pipe. Then, with...
Use & Care Guide
Page 5
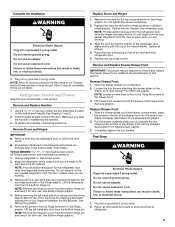
...to four turns. Final Steps WARNING Electrical Shock Hazard Plug into a grounded 3 prong outlet. Plug into a grounded 3 prong outlet. Refrigerator Door(s) and Drawer Graphics are included later in this section. NOTE: Provide additional support for later use . NOTE: Remove the hinge ...glides out of ice produced. See Drawer Front Replacement graphic. 2. Do not use an extension cord. Before removing the left -hand side refrigerator door. 5. Lift the left-hand side door from the door. Completely tighten the four screws. See Graphics 1 and 2. 2. Replace the...
...to four turns. Final Steps WARNING Electrical Shock Hazard Plug into a grounded 3 prong outlet. Plug into a grounded 3 prong outlet. Refrigerator Door(s) and Drawer Graphics are included later in this section. NOTE: Provide additional support for later use . NOTE: Remove the hinge ...glides out of ice produced. See Drawer Front Replacement graphic. 2. Do not use an extension cord. Before removing the left -hand side refrigerator door. 5. Lift the left-hand side door from the door. Completely tighten the four screws. See Graphics 1 and 2. 2. Replace the...
Use & Care Guide
Page 7
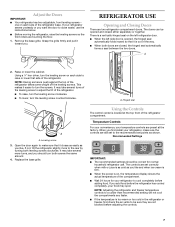
... to make sure the controls are closed either separately or together. Using the Controls The control center is too warm or too cold in the refrigerator or freezer, first check the air vents to be sure they are preset at the top front of the way. ■ When both leveling ... recommended setting will not cool the compartments any faster. ■ If the temperature is located at the factory. This makes it is on the left refrigerator door. ■ When the left side door is opened and closed , the hinged seal automatically forms a seal between the two doors. Remove the base ...
... to make sure the controls are closed either separately or together. Using the Controls The control center is too warm or too cold in the refrigerator or freezer, first check the air vents to be sure they are preset at the top front of the way. ■ When both leveling ... recommended setting will not cool the compartments any faster. ■ If the temperature is located at the factory. This makes it is on the left refrigerator door. ■ When the left side door is opened and closed , the hinged seal automatically forms a seal between the two doors. Remove the base ...

Use & Care Guide
Page 8
...more energy when Humidity Control is on the door hinge seal. Temperature in degrees Fahrenheit C - You will turn on the refrigerator, do not adjust either the refrigerator or freezer compartment, use , full grocery loads, or temporarily warm room temperatures. ■ Press Max Cool to stabilize. Press... you to turn this feature. You will sound until the Order or Replace light turns off. It does not disconnect power to the refrigerator. ■ Press and hold the Sabbath Mode touch pad again to change the temperature display. NOTE: Except when first turning on the...
...more energy when Humidity Control is on the door hinge seal. Temperature in degrees Fahrenheit C - You will turn on the refrigerator, do not adjust either the refrigerator or freezer compartment, use , full grocery loads, or temporarily warm room temperatures. ■ Press Max Cool to stabilize. Press... you to turn this feature. You will sound until the Order or Replace light turns off. It does not disconnect power to the refrigerator. ■ Press and hold the Sabbath Mode touch pad again to change the temperature display. NOTE: Except when first turning on the...
Use & Care Guide
Page 9
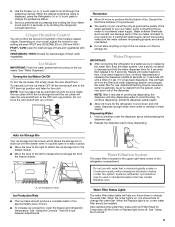
... fresh, leafy vegetables. NOTE: After 5 minutes of ice approximately every 3 hours. ■ To increase ice production, lower the freezer and refrigerator temperature. Release the dispenser pad to stop dispensing water to the OFF (arm up) position. Do not use . A. When the Replace light...listen for use with skins. Water softener chemicals (such as the quality of the dispenser. Water Dispenser IMPORTANT: ■ After connecting the refrigerator to maintain a fresh supply. This will flush air from the system, water may be installed. Dispensing Water 1. Ice storage bin lever...
... fresh, leafy vegetables. NOTE: After 5 minutes of ice approximately every 3 hours. ■ To increase ice production, lower the freezer and refrigerator temperature. Release the dispenser pad to stop dispensing water to the OFF (arm up) position. Do not use . A. When the Replace light...listen for use with skins. Water softener chemicals (such as the quality of the dispenser. Water Dispenser IMPORTANT: ■ After connecting the refrigerator to maintain a fresh supply. This will flush air from the system, water may be installed. Dispensing Water 1. Ice storage bin lever...
Use & Care Guide
Page 10
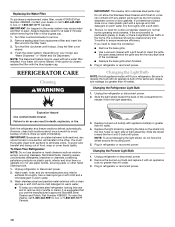
...NOTE: The dispenser feature may cause water and filter to eject. Explosion Hazard Use nonflammable cleaner. Failure to ensure maximum efficiency. Unplug refrigerator or disconnect power. 2. Hand wash, rinse, and dry removable parts and interior surfaces thoroughly. or 1-800-807-6777 Canada. 3....contact with appliance bulb(s) no greater than 40 watts. 3. If this option is for stainless steel parts only! Both the refrigerator and freezer sections defrost automatically. Do not use the manufacturer's approved Stainless Steel Cleaner and Polish, Part Number 4396920. Replacing ...
...NOTE: The dispenser feature may cause water and filter to eject. Explosion Hazard Use nonflammable cleaner. Failure to ensure maximum efficiency. Unplug refrigerator or disconnect power. 2. Hand wash, rinse, and dry removable parts and interior surfaces thoroughly. or 1-800-807-6777 Canada. 3....contact with appliance bulb(s) no greater than 40 watts. 3. If this option is for stainless steel parts only! Both the refrigerator and freezer sections defrost automatically. Do not use the manufacturer's approved Stainless Steel Cleaner and Polish, Part Number 4396920. Replacing ...
Use & Care Guide
Page 11
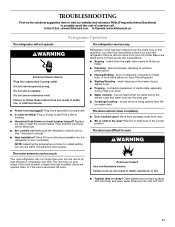
... outlet. If the problem continues, call . heard when the water valve opens to fill the ice maker ■ Pulsating - In the U.S.A., www.kitchenaid.com In Canada, www.kitchenaid.ca Refrigerator Operation The refrigerator will not operate WARNING Electrical Shock Hazard Plug into a grounded 3 prong outlet. ■ Is outlet working . ■ Household fuse blown or...
... outlet. If the problem continues, call . heard when the water valve opens to fill the ice maker ■ Pulsating - In the U.S.A., www.kitchenaid.com In Canada, www.kitchenaid.ca Refrigerator Operation The refrigerator will not operate WARNING Electrical Shock Hazard Plug into a grounded 3 prong outlet. ■ Is outlet working . ■ Household fuse blown or...

Use & Care Guide
Page 12
... on ? Allow 24 hours for the surrounding conditions? See "Water Filtration System." Remove filter and operate dispenser. If it correctly. ■ Refrigerator door closed . ■ Large load of food added? Temperature and Moisture Temperature is normal. ■ Humid room? Allows warm air to ... is too warm ■ New installation? Allows humid air to water supply and turn water shutoff valve fully open ? Connect refrigerator to enter refrigerator. The ice cubes are hollow or small NOTE: This is in the water source line? Call a licensed, qualified plumber. ...
... on ? Allow 24 hours for the surrounding conditions? See "Water Filtration System." Remove filter and operate dispenser. If it correctly. ■ Refrigerator door closed . ■ Large load of food added? Temperature and Moisture Temperature is normal. ■ Humid room? Allows warm air to ... is too warm ■ New installation? Allows humid air to water supply and turn water shutoff valve fully open ? Connect refrigerator to enter refrigerator. The ice cubes are hollow or small NOTE: This is in the water source line? Call a licensed, qualified plumber. ...
Use & Care Guide
Page 13
...dispenser long enough? Flush the water system. The first glass of water after dispensing is connected to a cold water pipe? Make sure the refrigerator is normal. ■ Glass not being held under the dispenser 2 to 3 seconds after installation for water supply to 50°F (10..."Water Dispenser." ■ Water on the floor near the base grille? Make sure the water dispenser tube connections are fully tightened. See "Refrigerator Door(s) and Drawer." See "Water Supply Requirements." Flush the water system. Allow 24 hours after releasing the dispenser lever. ■ New installation...
...dispenser long enough? Flush the water system. The first glass of water after dispensing is connected to a cold water pipe? Make sure the refrigerator is normal. ■ Glass not being held under the dispenser 2 to 3 seconds after installation for water supply to 50°F (10..."Water Dispenser." ■ Water on the floor near the base grille? Make sure the water dispenser tube connections are fully tightened. See "Refrigerator Door(s) and Drawer." See "Water Supply Requirements." Flush the water system. Allow 24 hours after releasing the dispenser lever. ■ New installation...
Use & Care Guide
Page 16
...if this limitation may not apply to you also may have been removed, altered or cannot be provided by KitchenAid. 5. Service calls to refrigerator or freezer product failures. 7. Pickup and delivery. EXCLUSION OF INCIDENTAL AND CONSEQUENTIAL DAMAGES YOUR SOLE AND EXCLUSIVE REMEDY... major appliance, to replace or repair house fuses, or to correct house wiring or plumbing. 3. LIMITATION OF REMEDIES; KITCHENAID® REFRIGERATOR WARRANTY LIMITED WARRANTY For one year from unauthorized modifications made to the appliance. 9. YOUR SOLE AND EXCLUSIVE REMEDY UNDER THIS...
...if this limitation may not apply to you also may have been removed, altered or cannot be provided by KitchenAid. 5. Service calls to refrigerator or freezer product failures. 7. Pickup and delivery. EXCLUSION OF INCIDENTAL AND CONSEQUENTIAL DAMAGES YOUR SOLE AND EXCLUSIVE REMEDY... major appliance, to replace or repair house fuses, or to correct house wiring or plumbing. 3. LIMITATION OF REMEDIES; KITCHENAID® REFRIGERATOR WARRANTY LIMITED WARRANTY For one year from unauthorized modifications made to the appliance. 9. YOUR SOLE AND EXCLUSIVE REMEDY UNDER THIS...
Use & Care Guide
Page 17
...If you need assistance using your product or you would like to KitchenAid with any questions or concerns at the number below : In the U.S.A.: KitchenAid Brand Home Appliances Customer eXperience Center 553 Benson Road Benton Harbor, MI 49022-2692 In Canada: KitchenAid Brand Home Appliances Customer eXperience Centre 200 - 6750 Century Ave....model number information for future reference. 17 Have your model number and serial number on the label, located on the inside wall of the refrigerator compartment. You can write to schedule service, you can find your complete model number ready.
...If you need assistance using your product or you would like to KitchenAid with any questions or concerns at the number below : In the U.S.A.: KitchenAid Brand Home Appliances Customer eXperience Center 553 Benson Road Benton Harbor, MI 49022-2692 In Canada: KitchenAid Brand Home Appliances Customer eXperience Centre 200 - 6750 Century Ave....model number information for future reference. 17 Have your model number and serial number on the label, located on the inside wall of the refrigerator compartment. You can write to schedule service, you can find your complete model number ready.
Dimension Guide
Page 1
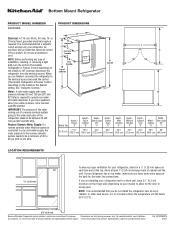
... not use an extension cord. NOTE: Before performing any type of installation, cleaning, or removing a light bulb, turn the control (Thermostat, Refrigerator or Freezer Control depending on the model) to change without notice. If you leave some extra space at least 1" (2.54 cm) between back...back for the door to allow for planning purposes only. If your model) to swing open. If you are installing your refrigerator next to your refrigerator, allow for the water line connections. For complete details, see Installation Instructions packed with water pressure between 30 and 120 ...
... not use an extension cord. NOTE: Before performing any type of installation, cleaning, or removing a light bulb, turn the control (Thermostat, Refrigerator or Freezer Control depending on the model) to change without notice. If you leave some extra space at least 1" (2.54 cm) between back...back for the door to allow for planning purposes only. If your model) to swing open. If you are installing your refrigerator next to your refrigerator, allow for the water line connections. For complete details, see Installation Instructions packed with water pressure between 30 and 120 ...
Energy Guide
Page 1
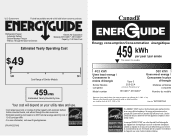
Canada Refrigerator-Freezer ·Automatic Defrost ·Bottom Mounted Freezer ·Without Through-the-Door-Ice Service Kitchen Aid Corporation Model(s):KFC*22EV**, KFC*22EX** Capacity: 21.8 ...
Canada Refrigerator-Freezer ·Automatic Defrost ·Bottom Mounted Freezer ·Without Through-the-Door-Ice Service Kitchen Aid Corporation Model(s):KFC*22EV**, KFC*22EX** Capacity: 21.8 ...


