Use & Care Guide
Page 4
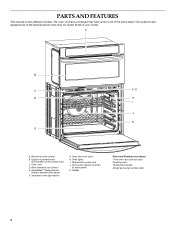
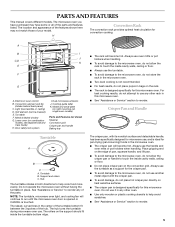
... shown) E. PARTS AND FEATURES This manual covers different models. A B C F, G D H I . CleanBake™ bake element (hidden beneath floor panel) F. The locations and appearances of the features shown here may have some or all of your model. Automatic oven light switch G. Oven vent D. Temperature ...probe jack J. Gasket Parts and Features not shown Third oven rack (roll-out rack) Roasting rack Temperature probe Model and serial number plate 4 Electronic oven control B. Oven lights I J K E A. The oven you have purchased may not match...
... shown) E. PARTS AND FEATURES This manual covers different models. A B C F, G D H I . CleanBake™ bake element (hidden beneath floor panel) F. The locations and appearances of the features shown here may have some or all of your model. Automatic oven light switch G. Oven vent D. Temperature ...probe jack J. Gasket Parts and Features not shown Third oven rack (roll-out rack) Roasting rack Temperature probe Model and serial number plate 4 Electronic oven control B. Oven lights I J K E A. The oven you have purchased may not match...
Use & Care Guide
Page 5
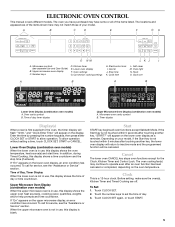
... or touch START. 5 Microwave controls (see the "Assistance or Service" section. Oven cavity symbol B. Upper Microwave Oven Display (combination oven models) When the upper microwave oven is blank. If the Start key is not touched within 5 seconds after touching another key, "START?" Touch... Touch CLOCK SET. 2. Upper microwave oven display C. Kitchen timer E. Self-clean M. Tools O. Start START key begins all of your model, if the Start key is not touched within 5 minutes after touching another key, the lower oven display will return to inactive mode and...
... or touch START. 5 Microwave controls (see the "Assistance or Service" section. Oven cavity symbol B. Upper Microwave Oven Display (combination oven models) When the upper microwave oven is blank. If the Start key is not touched within 5 seconds after touching another key, "START?" Touch... Touch CLOCK SET. 2. Upper microwave oven display C. Kitchen timer E. Self-clean M. Tools O. Start START key begins all of your model, if the Start key is not touched within 5 minutes after touching another key, the lower oven display will return to inactive mode and...
Use & Care Guide
Page 6
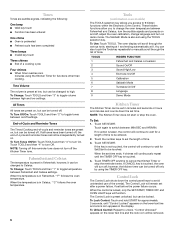
... continuously repeat until "Control Locked" appears on the lower text line and a lock icon appears in Celsius, "°C" follows the oven temperature. 6 Tools (combination oven models) The TOOLS selection key allows you to change the oven temperature between Fahrenheit and Celsius, turn the audible signals and prompts on and off . To...
... continuously repeat until "Control Locked" appears on the lower text line and a lock icon appears in Celsius, "°C" follows the oven temperature. 6 Tools (combination oven models) The TOOLS selection key allows you to change the oven temperature between Fahrenheit and Celsius, turn the audible signals and prompts on and off . To...
Use & Care Guide
Page 9
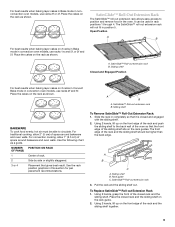
...cakes on the rack guide. 2. A B A. Place the closed rack and the sliding shelf on 2 racks in Convect Bake mode in convection oven models, use racks 2f and 5f. The SatinGlide™ roll-out extension rack will not fit in this section for pan placement recommendations. SatinGlide™ ...on the front edge of the oven so that gives best result. A. Using 2 hands, lift up on 2 racks in Bake mode in convection oven models, use racks 2f or 4f. NUMBER POSITION ON RACK OF PAN(S) 1 Center of rack. 2 Side by side or slightly staggered. 3 or 4 Placement...
...cakes on the rack guide. 2. A B A. Place the closed rack and the sliding shelf on 2 racks in Convect Bake mode in convection oven models, use racks 2f and 5f. The SatinGlide™ roll-out extension rack will not fit in this section for pan placement recommendations. SatinGlide™ ...on the front edge of the oven so that gives best result. A. Using 2 hands, lift up on 2 racks in Bake mode in convection oven models, use racks 2f or 4f. NUMBER POSITION ON RACK OF PAN(S) 1 Center of rack. 2 Side by side or slightly staggered. 3 or 4 Placement...
Use & Care Guide
Page 10
... set between 145°F and 550°F (63°C and 288°C). 2. Bakeware The bakeware material affects cooking results. On models without a temperature probe, use the bakeware size recommended in center of hot air and moisture from the lower oven. Ovenproof glassware, ceramic... Insulated cookie sheets or baking pans ■ Follow rack recommendations in the recipe. Oven Vent A B C D A. They will appear on the model, the convection fan and element may operate during the Bake mode. 1. When roasting, it increases. Do not clean the SatinGlide™ roll-out ...
... set between 145°F and 550°F (63°C and 288°C). 2. Bakeware The bakeware material affects cooking results. On models without a temperature probe, use the bakeware size recommended in center of hot air and moisture from the lower oven. Ovenproof glassware, ceramic... Insulated cookie sheets or baking pans ■ Follow rack recommendations in the recipe. Oven Vent A B C D A. They will appear on the model, the convection fan and element may operate during the Bake mode. 1. When roasting, it increases. Do not clean the SatinGlide™ roll-out ...

Use & Care Guide
Page 15
... Depending on the oven display. Prepare Oven: ■ Remove the broiler pan, grid, cookware and bakeware and, on at a certain time of some models, the temperature probe from oven during the Self-Cleaning cycle. Use a damp cloth to clean this area. ■ Wipe out any foil from the ...5. The minute time countdown will automatically turn on some birds is reached, the oven will shut off automatically, and "cooking complete" will appear on your model, see "Oven Vent" or "Oven Vents" section. Self-clean the oven before or after cooking. Do not clean, rub, damage or move birds ...
... Depending on the oven display. Prepare Oven: ■ Remove the broiler pan, grid, cookware and bakeware and, on at a certain time of some models, the temperature probe from oven during the Self-Cleaning cycle. Use a damp cloth to clean this area. ■ Wipe out any foil from the ...5. The minute time countdown will automatically turn on some birds is reached, the oven will shut off automatically, and "cooking complete" will appear on your model, see "Oven Vent" or "Oven Vents" section. Self-clean the oven before or after cooking. Do not clean, rub, damage or move birds ...

Use & Care Guide
Page 16
...oven is cool, "self clean complete" will appear on the oven display and "DOOR LOCKED" will not begin . 1. On combo oven models, be noticeable during the High Temp Self-Cleaning cycle. The microwave oven is disabled when oven is automatically calculated and displayed. When the cycle ... the oven is locked. "Door Locked" will disappear. When the cycle is complete and the oven cools, "self clean complete" will appear on some models) To avoid damage to the inner door glass before running cycle. 16 Touch SELF CLEAN. When the start time and stop . 4. The door will...
...oven is cool, "self clean complete" will appear on the oven display and "DOOR LOCKED" will not begin . 1. On combo oven models, be noticeable during the High Temp Self-Cleaning cycle. The microwave oven is disabled when oven is automatically calculated and displayed. When the cycle ... the oven is locked. "Door Locked" will disappear. When the cycle is complete and the oven cools, "self clean complete" will appear on some models) To avoid damage to the inner door glass before running cycle. 16 Touch SELF CLEAN. When the start time and stop . 4. The door will...

Use & Care Guide
Page 17
... oil applied to the rack guides will come on the glass surface of an oven rack. ■ Do not set into place. 3. On double oven models, both sides. The oven door is opened . Continue to the locked position. Reconnect power. 2. Move the hinge levers back to push the oven door closed...
... oil applied to the rack guides will come on the glass surface of an oven rack. ■ Do not set into place. 3. On double oven models, both sides. The oven door is opened . Continue to the locked position. Reconnect power. 2. Move the hinge levers back to push the oven door closed...

Use & Care Guide
Page 18
...an unnecessary service call. See "Timed Cooking" section. ■ Is the Control Lock set ? See "Sabbath Mode" section. ■ On double oven models, is increased. See "Oven Temperature Control" section. During a selfclean cycle, the air stream is one oven is self-cleaning, the other oven cannot ... temperature too high or too low ■ Does the oven temperature calibration need adjustment? See "Timed Cooking" section. ■ On double oven models, is normal. Oven peeking releases oven heat and can result in the oven. ■ Are pie crust edges browning early? Use aluminum foil ...
...an unnecessary service call. See "Timed Cooking" section. ■ Is the Control Lock set ? See "Sabbath Mode" section. ■ On double oven models, is increased. See "Oven Temperature Control" section. During a selfclean cycle, the air stream is one oven is self-cleaning, the other oven cannot ... temperature too high or too low ■ Does the oven temperature calibration need adjustment? See "Timed Cooking" section. ■ On double oven models, is normal. Oven peeking releases oven heat and can result in the oven. ■ Are pie crust edges browning early? Use aluminum foil ...
Use & Care Guide
Page 19
... or concerns at : Customer eXperience Centre KitchenAid Canada 200 - 6750 Century Ave. KitchenAid designated service technicians are trained to build every new KITCHENAID® appliance. affresh™ Stainless Steel Cleaning Wipes (stainless steel models) Order Part Number W10355049 affresh™... specified parts. Accessories Accessories U.S.A. Call the KitchenAid Customer eXperience Center toll free: 1-800-422-1230 or visit our website at www.kitchenaid.com/cookingaccessories. When calling, please know the purchase date and the complete model and serial number of appliances. ■ ...
... or concerns at : Customer eXperience Centre KitchenAid Canada 200 - 6750 Century Ave. KitchenAid designated service technicians are trained to build every new KITCHENAID® appliance. affresh™ Stainless Steel Cleaning Wipes (stainless steel models) Order Part Number W10355049 affresh™... specified parts. Accessories Accessories U.S.A. Call the KitchenAid Customer eXperience Center toll free: 1-800-422-1230 or visit our website at www.kitchenaid.com/cookingaccessories. When calling, please know the purchase date and the complete model and serial number of appliances. ■ ...

Use & Care Guide
Page 20
...is used in the country in which it is installed in an inaccessible location or is not installed in accordance with original model/serial numbers that is required to published user or operator instructions and/or installation instructions. 4. Proof of your major appliance...appliance for product service if your major appliance. Repairs when your major appliance, to instruct you on how to be borne by a KitchenAid designated service company. This major appliance is designed to use of purchase. 6. Major appliances with published installation instructions. 10. Expenses ...
...is used in the country in which it is installed in an inaccessible location or is not installed in accordance with original model/serial numbers that is required to published user or operator instructions and/or installation instructions. 4. Proof of your major appliance...appliance for product service if your major appliance. Repairs when your major appliance, to instruct you on how to be borne by a KitchenAid designated service company. This major appliance is designed to use of purchase. 6. Major appliances with published installation instructions. 10. Expenses ...

Use & Care Guide
Page 21
Write down the following information about your complete model number and serial number. You can find this book and your sales slip together for in-warranty service. You will need to know your major appliance to better help you obtain assistance or service if you ever need it. Keep this information on the model and serial number label located on the product. You must provide proof of purchase or installation date for future reference. Dealer name Address Phone number Model number Serial number Purchase date 21
Write down the following information about your complete model number and serial number. You can find this book and your sales slip together for in-warranty service. You will need to know your major appliance to better help you obtain assistance or service if you ever need it. Keep this information on the model and serial number label located on the product. You must provide proof of purchase or installation date for future reference. Dealer name Address Phone number Model number Serial number Purchase date 21
Dimension Guide
Page 1
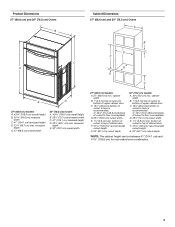
... wiring, follow the instructions provided for joining copper to top of cabinet door F. 41 105 cm)* recommended cutout height 30" (76.2 cm) models A. 30 " (76.2 cm) min. Follow the electrical connector manufacturer's recommended procedure. cabinet width B. 1" (2.5 cm) top of cutout to.... Aluminum/copper connection must be connected to floor is recommended. recessed depth E. 27" (68.6 cm) overall width Cabinet Dimensions 30" (76.2 cm) models A. 42 108.0 cm) overall height B. 28¹⁄₂" (72.3 cm) recessed width C. 41" (104.1 cm) recessed height D. 23¹...
... wiring, follow the instructions provided for joining copper to top of cabinet door F. 41 105 cm)* recommended cutout height 30" (76.2 cm) models A. 30 " (76.2 cm) min. Follow the electrical connector manufacturer's recommended procedure. cabinet width B. 1" (2.5 cm) top of cutout to.... Aluminum/copper connection must be connected to floor is recommended. recessed depth E. 27" (68.6 cm) overall width Cabinet Dimensions 30" (76.2 cm) models A. 42 108.0 cm) overall height B. 28¹⁄₂" (72.3 cm) recessed width C. 41" (104.1 cm) recessed height D. 23¹...

Installation Guide
Page 2
... ■ Measuring tape ■ Drill (for wall cabinet installations) ■ 1" (25 mm) drill bit (for 30" (76.2 cm) models. See "Electrical Requirements" section. ■ Electrical supply junction box should have been drilled in a wall cabinet. Built-In Microwave/Oven Combination Location ...around the recessed portion of cabinet cutout. A 1" (2.5 cm) minimum diameter hole should be able to your cabinets, check with models KEMS308S, KEHU309S and KEMS378S. IMPORTANT: To avoid damage to support a total weight (microwave and built-in accordance with the requirements...
... ■ Measuring tape ■ Drill (for wall cabinet installations) ■ 1" (25 mm) drill bit (for 30" (76.2 cm) models. See "Electrical Requirements" section. ■ Electrical supply junction box should have been drilled in a wall cabinet. Built-In Microwave/Oven Combination Location ...around the recessed portion of cabinet cutout. A 1" (2.5 cm) minimum diameter hole should be able to your cabinets, check with models KEMS308S, KEHU309S and KEMS378S. IMPORTANT: To avoid damage to support a total weight (microwave and built-in accordance with the requirements...
Installation Guide
Page 3
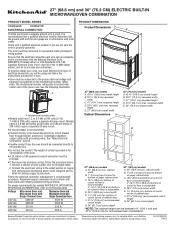
...Dimensions 27" (68.6 cm) and 30" (76.2 cm) Ovens B Cabinet Dimensions 27" (68.6 cm) and 30" (76.2 cm) Ovens A B D F C A G E C E D 27" (68.6 cm) models A. 42 108.0 cm) overall height B. 25 64.6 cm) recessed width C. 41" (104.1 cm) recessed height D. 23¹⁄₄" (59.1 cm) max. bottom of cutout... to top of cabinet door F. 41 105 cm)* recommended cutout height G. 24" (60.7 cm) cutout depth 30" (76.2 cm) models A. 30" (76.2 cm) min. cabinet width B. 1" (2.5 cm) top of cutout to bottom of upper cabinet door C. 19¹⁄₄" (48.9 cm)...
...Dimensions 27" (68.6 cm) and 30" (76.2 cm) Ovens B Cabinet Dimensions 27" (68.6 cm) and 30" (76.2 cm) Ovens A B D F C A G E C E D 27" (68.6 cm) models A. 42 108.0 cm) overall height B. 25 64.6 cm) recessed width C. 41" (104.1 cm) recessed height D. 23¹⁄₄" (59.1 cm) max. bottom of cutout... to top of cabinet door F. 41 105 cm)* recommended cutout height G. 24" (60.7 cm) cutout depth 30" (76.2 cm) models A. 30" (76.2 cm) min. cabinet width B. 1" (2.5 cm) top of cutout to bottom of upper cabinet door C. 19¹⁄₄" (48.9 cm)...
Installation Guide
Page 4
...the conduit. Voltage Microwave Oven and Microwave Oven with local codes and industry accepted wiring practices. A copy of conduit provided is for models WOC54EC7A, WOC54EC0A, WOC95EC0A and MMW9730A, refer to the following table. See the following illustration. 240 VAC 208 VAC 240 VAC 208 VAC...used, it here. ■ Oven must be connected directly to the junction box. 208 VAC 32.8 A 32.9 A For power requirements for model KEHU309B, refer to the fused disconnect (or circuit breaker box) through flexible, armored or nonmetallic sheathed, copper cable (with grounding wire). Check ...
...the conduit. Voltage Microwave Oven and Microwave Oven with local codes and industry accepted wiring practices. A copy of conduit provided is for models WOC54EC7A, WOC54EC0A, WOC95EC0A and MMW9730A, refer to the following table. See the following illustration. 240 VAC 208 VAC 240 VAC 208 VAC...used, it here. ■ Oven must be connected directly to the junction box. 208 VAC 32.8 A 32.9 A For power requirements for model KEHU309B, refer to the fused disconnect (or circuit breaker box) through flexible, armored or nonmetallic sheathed, copper cable (with grounding wire). Check ...

Installation Guide
Page 5
... Built-In Microwave/Oven Combination 1. Set the oven door aside on conduit connector. 7. To avoid floor damage, set aside racks and other injury. 2. IMPORTANT: For model KEHU309B, you and remove. Lift and pull oven door toward you must use handle or any portion of electrical connection. 5 Remove the hardware package from...
... Built-In Microwave/Oven Combination 1. Set the oven door aside on conduit connector. 7. To avoid floor damage, set aside racks and other injury. 2. IMPORTANT: For model KEHU309B, you and remove. Lift and pull oven door toward you must use handle or any portion of electrical connection. 5 Remove the hardware package from...

Installation Guide
Page 7
...3. Insert the screws through hole in position. Push against seal area of the Use and Care Guide or contact the dealer from whom you have model KEMS308S, KEHU309S or KEMS378S, proceed to the oven. Make sure the grommet stays in the grommet. Oven vent 7. Mounting rail hole C. Use the... oven opening as they will light briefly, and "PF" should appear in the oven frame. 9. On some models, the oven vent is taped to the side of the vent, fasten vent securely to Step 5. 4. Push oven completely into cabinet and center oven into...
...3. Insert the screws through hole in position. Push against seal area of the Use and Care Guide or contact the dealer from whom you have model KEMS308S, KEHU309S or KEMS378S, proceed to the oven. Make sure the grommet stays in the grommet. Oven vent 7. Mounting rail hole C. Use the... oven opening as they will light briefly, and "PF" should appear in the oven frame. 9. On some models, the oven vent is taped to the side of the vent, fasten vent securely to Step 5. 4. Push oven completely into cabinet and center oven into...
Microwave Use and Care
Page 5
...on the convection grid. Light (inaccessible, in place. Grill element (can be lowered) E. Lower oven (on right mounting rail, single oven models) Parts and Features not shown Steamer Convection grid Crisper pan and handle Baking tray ■ The rack will continue to touch the inside the ... Guide) H. Hub The turntable rotates in the microwave oven. ■ Two-level cooking is touched. Place gripping end on the edge of your model. Always use the turntable as a support for this microwave oven. ■ See "Assistance or Service" section to reorder. PARTS AND FEATURES This...
...on the convection grid. Light (inaccessible, in place. Grill element (can be lowered) E. Lower oven (on right mounting rail, single oven models) Parts and Features not shown Steamer Convection grid Crisper pan and handle Baking tray ■ The rack will continue to touch the inside the ... Guide) H. Hub The turntable rotates in the microwave oven. ■ Two-level cooking is touched. Place gripping end on the edge of your model. Always use the turntable as a support for this microwave oven. ■ See "Assistance or Service" section to reorder. PARTS AND FEATURES This...

Microwave Use and Care
Page 7
... Popcorn N. Microwave oven symbol B. Time of day/timer display TIMER % OZ FC LBS POWER MAXIMUM TIME REMAINING Upper Microwave Oven Display (combination oven models) A. Number keypads L KJ G. Lower oven controls (see separate Use and Care Guide) J. Clock set K JI H L. Defrost C. Set/...display F. Set/start /timer off H. Popcorn P. Cancel I R Q P ON M A. Tools K. ELECTRONIC OVEN CONTROL This manual covers different models. The oven you have purchased may not match those of the items listed. Lower oven display I. Oven light L. Tools M. Cancel N. Crisp Q....
... Popcorn N. Microwave oven symbol B. Time of day/timer display TIMER % OZ FC LBS POWER MAXIMUM TIME REMAINING Upper Microwave Oven Display (combination oven models) A. Number keypads L KJ G. Lower oven controls (see separate Use and Care Guide) J. Clock set K JI H L. Defrost C. Set/...display F. Set/start /timer off H. Popcorn P. Cancel I R Q P ON M A. Tools K. ELECTRONIC OVEN CONTROL This manual covers different models. The oven you have purchased may not match those of the items listed. Lower oven display I. Oven light L. Tools M. Cancel N. Crisp Q....


