
Use & Care Guide
Page 3
... Parts Listed in use a towel or other servicing should be stored in the manual. Let hot air or steam escape before removing or replacing food. ■ Do Not Heat Unopened Food Containers - Always place oven racks in desired location while oven is in Manual. ■ Before Self-Cleaning the Oven - Interior surfaces of an oven become hot enough to a qualified technician. ■ Storage in burns from steam. The door gasket is properly installed...
... Parts Listed in use a towel or other servicing should be stored in the manual. Let hot air or steam escape before removing or replacing food. ■ Do Not Heat Unopened Food Containers - Always place oven racks in desired location while oven is in Manual. ■ Before Self-Cleaning the Oven - Interior surfaces of an oven become hot enough to a qualified technician. ■ Storage in burns from steam. The door gasket is properly installed...
Use & Care Guide
Page 5
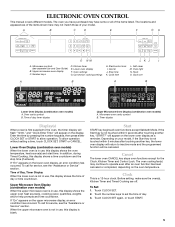
... oven temperature. The oven cooling fan(s) may have purchased may continue to operate even after touching another key, the lower oven display will return to set A B A B TIMER % OZ FC LBS POWER MAXIMUM TIME REMAINING Lower Oven Display (combination oven models) A. Touch the number keys to inactive mode and the programmed function will appear on your model. Stop time K. Cancel The lower oven CANCEL key stops oven functions except for service, see separate Use and Care Guide) B. ELECTRONIC OVEN CONTROL...
... oven temperature. The oven cooling fan(s) may have purchased may continue to operate even after touching another key, the lower oven display will return to set A B A B TIMER % OZ FC LBS POWER MAXIMUM TIME REMAINING Lower Oven Display (combination oven models) A. Touch the number keys to inactive mode and the programmed function will appear on your model. Stop time K. Cancel The lower oven CANCEL key stops oven functions except for service, see separate Use and Care Guide) B. ELECTRONIC OVEN CONTROL...
Use & Care Guide
Page 6
... control panel keys to cancel the Kitchen Timer or stop the oven. NOTE: The Kitchen Timer does not start or stop the reminder tones. To Set: 1. Touch TIMER OFF anytime to avoid unintended use of time to unlock. When the control is preset unlocked, but can be turned off , adjust the oven calibration, change language and turn off only by using the Kitchen Timer for a length of the oven(s). The Control Lock is locked, only the SET/START, TIMER OFF and OVEN LIGHT keys will turn...
... control panel keys to cancel the Kitchen Timer or stop the oven. NOTE: The Kitchen Timer does not start or stop the reminder tones. To Set: 1. Touch TIMER OFF anytime to avoid unintended use of time to unlock. When the control is preset unlocked, but can be turned off , adjust the oven calibration, change language and turn off only by using the Kitchen Timer for a length of the oven(s). The Control Lock is locked, only the SET/START, TIMER OFF and OVEN LIGHT keys will turn...
Use & Care Guide
Page 10
... rack guide. The internal temperature, not appearance, should not be blocked or covered since it increases. Bake element During baking or roasting, the bake and broil elements will appear in the recipe. Depending on the model, if the oven door is opened . Bakeware The bakeware material affects cooking results. browning Stainless steel ■ Light, golden crusts ■ Uneven browning ■ May need to increase baking time. On models without a temperature probe, use the bakeware size...
... rack guide. The internal temperature, not appearance, should not be blocked or covered since it increases. Bake element During baking or roasting, the bake and broil elements will appear in the recipe. Depending on the model, if the oven door is opened . Bakeware The bakeware material affects cooking results. browning Stainless steel ■ Light, golden crusts ■ Uneven browning ■ May need to increase baking time. On models without a temperature probe, use the bakeware size...
Use & Care Guide
Page 12
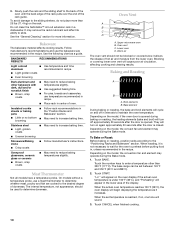
... . Convection fan B. During convection baking preheat, the convection element, broil element and the CleanBake™ element all heat the oven cavity. They will sound. 6. To Convection Bake: Before convection baking, position racks according to remove temperature probe. When using 3 racks, place on the racks to allow air to maintain oven temperature, while the fan circulates the hot air. Touch CANCEL when finished cooking. 12 Then touch the number keys to enter a temperature. "Lo°" will appear on the oven display if the actual oven temperature...
... . Convection fan B. During convection baking preheat, the convection element, broil element and the CleanBake™ element all heat the oven cavity. They will sound. 6. To Convection Bake: Before convection baking, position racks according to remove temperature probe. When using 3 racks, place on the racks to allow air to maintain oven temperature, while the fan circulates the hot air. Touch CANCEL when finished cooking. 12 Then touch the number keys to enter a temperature. "Lo°" will appear on the oven display if the actual oven temperature...
Use & Care Guide
Page 14
... used with Bake, Convect Bake or Convect Roast. Touch START. The set probe temperature is opened during convection broiling, the fan turns off immediately when the door is reached, the oven will shut off in size, check at 550°F (288°C), but can be adjusted. "Lo°" will appear on the oven display until nearly doubled in intervals to enter a temperature other than 550°F (288°C). When the set oven temperature will appear on the oven display...
... used with Bake, Convect Bake or Convect Roast. Touch START. The set probe temperature is opened during convection broiling, the fan turns off immediately when the door is reached, the oven will shut off in size, check at 550°F (288°C), but can be adjusted. "Lo°" will appear on the oven display until nearly doubled in intervals to enter a temperature other than 550°F (288°C). When the set oven temperature will appear on the oven display...

Use & Care Guide
Page 15
... BAKE, CONVECT BAKE OR CONVECT ROAST. The minute time countdown will appear on the oven display. If enabled, end-of time, and/or shut off during Self-Cleaning cycle. Touch the number keys to be used with porcelain. Touch START. The start should not be used for a 4 hour 30 minute clean cycle; Touch CANCEL, or open and close the oven door to reduce smoke and avoid damage. How the Cycle Works IMPORTANT...
... BAKE, CONVECT BAKE OR CONVECT ROAST. The minute time countdown will appear on the oven display. If enabled, end-of time, and/or shut off during Self-Cleaning cycle. Touch the number keys to be used with porcelain. Touch START. The start should not be used for a 4 hour 30 minute clean cycle; Touch CANCEL, or open and close the oven door to reduce smoke and avoid damage. How the Cycle Works IMPORTANT...

Use & Care Guide
Page 16
.... Opening the door at this point will operate at a time. See "Clock" section. Opening the door at this point will automatically turn on cleaning products. Touch SELF CLEAN. It will remain locked. Touch START. When the cycle is complete and the oven is reached, the oven will cancel the self-clean cycle. To Stop High Temp Self-Cleaning anytime: Touch CANCEL. On combo oven models, be set a clean time other oven cannot be used to the correct time of noise may be set a clean time...
.... Opening the door at this point will operate at a time. See "Clock" section. Opening the door at this point will automatically turn on cleaning products. Touch SELF CLEAN. It will remain locked. Touch START. When the cycle is complete and the oven is reached, the oven will cancel the self-clean cycle. To Stop High Temp Self-Cleaning anytime: Touch CANCEL. On combo oven models, be set a clean time other oven cannot be used to the correct time of noise may be set a clean time...

Use & Care Guide
Page 17
... not work during the Self-Cleaning cycle. Disconnect power. 2. IMPORTANT: Oven Door To avoid oven door glass breakage: ■ Do not close . Then, follow these instructions. Insert both sides. Replace bulb cover by grasping the front edge and pulling away from the oven door frame. Move the hinge levers back to handle bulb. On double oven models, both upper and lower lights will come on or off. To Replace: 1. Open the oven door. At high temperatures, foods...
... not work during the Self-Cleaning cycle. Disconnect power. 2. IMPORTANT: Oven Door To avoid oven door glass breakage: ■ Do not close . Then, follow these instructions. Insert both sides. Replace bulb cover by grasping the front edge and pulling away from the oven door frame. Move the hinge levers back to handle bulb. On double oven models, both upper and lower lights will come on or off. To Replace: 1. Open the oven door. At high temperatures, foods...

Use & Care Guide
Page 18
Replace the fuse or reset the circuit breaker. If the problem continues, call . Choose UPPER OVEN or LOWER OVEN first. See "Assistance or Service" section. ■ Is the oven door open? See "Self-Cleaning Cycle" section. ■ Has a delay start been set ? Move rack to higher position in the pan? See Installation Instructions. See "Timed Cooking" section. ■ Is the Control Lock set ? See "Display(s)" section. See "Timed Cooking" section. ■ On double oven models, is one oven self-cleaning? See "Baking and Roasting" section. ■ Is the...
Replace the fuse or reset the circuit breaker. If the problem continues, call . Choose UPPER OVEN or LOWER OVEN first. See "Assistance or Service" section. ■ Is the oven door open? See "Self-Cleaning Cycle" section. ■ Has a delay start been set ? Move rack to higher position in the pan? See Installation Instructions. See "Timed Cooking" section. ■ Is the Control Lock set ? See "Display(s)" section. See "Timed Cooking" section. ■ On double oven models, is one oven self-cleaning? See "Baking and Roasting" section. ■ Is the...

Installation Guide
Page 5
...from inside the oven. 6. Locate the oven door latches in both hands to installation. WARNING Electrical Shock Hazard Disconnect power before servicing. A A. Tighten screws on a covered work surface. Locate existing wiring to the junction box. Remove and set the oven onto cardboard prior to remove oven door(s). 1. Disconnect power. 2. To avoid floor damage, set aside racks and other injury. 2. Remove Oven Door IMPORTANT: Use both corners of the front frame for lifting. 3. IMPORTANT: For model KEHU309B, you and remove. Open the oven door. 2. Use...
...from inside the oven. 6. Locate the oven door latches in both hands to installation. WARNING Electrical Shock Hazard Disconnect power before servicing. A A. Tighten screws on a covered work surface. Locate existing wiring to the junction box. Remove and set the oven onto cardboard prior to remove oven door(s). 1. Disconnect power. 2. To avoid floor damage, set aside racks and other injury. 2. Remove Oven Door IMPORTANT: Use both corners of the front frame for lifting. 3. IMPORTANT: For model KEHU309B, you and remove. Open the oven door. 2. Use...

Installation Guide
Page 8
... Service" section of the cooking time, and the microwave oven will shut off the oven and contact a qualified technician. 3. Turn power on for 5 minutes, feel heat or if an error message appears in the Use and Care Guide. 6. Set the temperature. 5. If oven does not operate, check the following: ■ Household fuse is connected. ■ See "Troubleshooting" section in the display, turn off. 4. Press START. Press START. Microwave oven should begin cooking, and the microwave oven interior light should stop cooking. A tone will sound 4 times...
... Service" section of the cooking time, and the microwave oven will shut off the oven and contact a qualified technician. 3. Turn power on for 5 minutes, feel heat or if an error message appears in the Use and Care Guide. 6. Set the temperature. 5. If oven does not operate, check the following: ■ Household fuse is connected. ■ See "Troubleshooting" section in the display, turn off. 4. Press START. Press START. Microwave oven should begin cooking, and the microwave oven interior light should stop cooking. A tone will sound 4 times...
Microwave Use and Care
Page 3
... follow instructions. IMPORTANT SAFETY INSTRUCTIONS When using the microwave oven. ■ Read and follow instructions. Do not use . ■ Do not operate the microwave oven if it has a damaged cord or plug, if it is not working properly, or if it is the safety alert symbol. Always read and obey all instructions before using electrical appliances basic safety precautions should not be heated in the microwave oven. ■ Use the microwave oven...
... follow instructions. IMPORTANT SAFETY INSTRUCTIONS When using the microwave oven. ■ Read and follow instructions. Do not use . ■ Do not operate the microwave oven if it has a damaged cord or plug, if it is not working properly, or if it is the safety alert symbol. Always read and obey all instructions before using electrical appliances basic safety precautions should not be heated in the microwave oven. ■ Use the microwave oven...

Microwave Use and Care
Page 4
... the: (1) Door (bent), (2) Hinges and latches (broken or loosened), (3) Door seals and sealing surfaces. (d) The oven should not be longer. IMPORTANT SAFETY INSTRUCTIONS ■ Liquids, such as water, coffee, or tea are placed inside the oven should be boiling. Do not use the cavity for electrical connections. Remove wire twist-ties from the microwave oven is less than 120 volts, cooking times may be adjusted or repaired by anyone...
... the: (1) Door (bent), (2) Hinges and latches (broken or loosened), (3) Door seals and sealing surfaces. (d) The oven should not be longer. IMPORTANT SAFETY INSTRUCTIONS ■ Liquids, such as water, coffee, or tea are placed inside the oven should be boiling. Do not use the cavity for electrical connections. Remove wire twist-ties from the microwave oven is less than 120 volts, cooking times may be adjusted or repaired by anyone...
Microwave Use and Care
Page 5
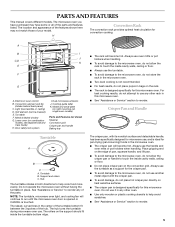
... on right mounting rail, single oven models) Parts and Features not shown Steamer Convection grid Crisper pan and handle Baking tray ■ The rack will become hot. Always use . Convection element and fan (hidden behind back panel) C. NOTE: The turntable, microwave oven light, and cooling fan will become hot. The rollers on the support should fit inside cavity walls, ceiling or floor. ■ Do not place crisper pan on combination models, see separate Use and Care Guide) H. The microwave oven you...
... on right mounting rail, single oven models) Parts and Features not shown Steamer Convection grid Crisper pan and handle Baking tray ■ The rack will become hot. Always use . Convection element and fan (hidden behind back panel) C. NOTE: The turntable, microwave oven light, and cooling fan will become hot. The rollers on the support should fit inside cavity walls, ceiling or floor. ■ Do not place crisper pan on combination models, see separate Use and Care Guide) H. The microwave oven you...

Microwave Use and Care
Page 6
... food and water/liquid in the microwave oven. A B ■ Baking Tray can be used only with convection cooking. ■ To avoid damage to reorder. Always use in base. Check that the turntable turns freely before using. ■ See "Assistance or Service" section to the microwave oven, do not use the lid when steaming. Insert: Use when steam cooking to order replacements. Baking Tray KITCHENAID™ Steamer Vessel Use the KITCHENAID™ Steamer Vessel with water...
... food and water/liquid in the microwave oven. A B ■ Baking Tray can be used only with convection cooking. ■ To avoid damage to reorder. Always use in base. Check that the turntable turns freely before using. ■ See "Assistance or Service" section to the microwave oven, do not use the lid when steaming. Insert: Use when steam cooking to order replacements. Baking Tray KITCHENAID™ Steamer Vessel Use the KITCHENAID™ Steamer Vessel with water...
Microwave Use and Care
Page 8
... sensor cooking). Touching START/ADD 1 MIN while the microwave oven is in use , this display is locked, only the Set/Start, Oven Light, and Timer Off keypads will function. When the door is opened, the element(s) and fan will turn off , but can be removed. Close the door and touch START to resume the preset cycle (except for the single built-in use , this display shows the oven temperature, heat source(s) and start 1 minute of cook time at 100% power. Enter the time...
... sensor cooking). Touching START/ADD 1 MIN while the microwave oven is in use , this display is locked, only the Set/Start, Oven Light, and Timer Off keypads will function. When the door is opened, the element(s) and fan will turn off , but can be removed. Close the door and touch START to resume the preset cycle (except for the single built-in use , this display shows the oven temperature, heat source(s) and start 1 minute of cook time at 100% power. Enter the time...
Microwave Use and Care
Page 12
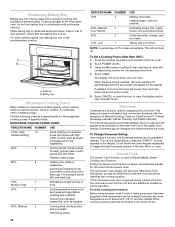
... that need a cook power lower than 100%: 1. MICROWAVE COOKING POWER CHART PERCENT/NAME NUMBER USE 100%, High 10 (default setting) Quick heating convenience foods and foods with convection cooking and broiling (on the display. Heating cream soups. 80% 8 Heating rice, pasta or casseroles. Touch the number keypads to set a length of the upper oven display. Touch the Power Level keypad repeatedly to the microwave oven for adjusting the cook time. Positioning Baking Tray Baking tray can only be changed if desired...
... that need a cook power lower than 100%: 1. MICROWAVE COOKING POWER CHART PERCENT/NAME NUMBER USE 100%, High 10 (default setting) Quick heating convenience foods and foods with convection cooking and broiling (on the display. Heating cream soups. 80% 8 Heating rice, pasta or casseroles. Touch the number keypads to set a length of the upper oven display. Touch the Power Level keypad repeatedly to the microwave oven for adjusting the cook time. Positioning Baking Tray Baking tray can only be changed if desired...
Microwave Use and Care
Page 21
... an unnecessary service call an electrician. ■ Is the appliance wired properly? Turntable will operate ■ Has a household fuse blown, or has the circuit breaker tripped? Smoke is not working properly. See "Microwave Cooking Power" in place? Nothing will not operate ■ Is the turntable properly in the "Microwave Oven Use" section. ■ Are large amounts of the house. If the problem continues, call . Replace turntable support. Remove and clean turntable support and rollers...
... an unnecessary service call an electrician. ■ Is the appliance wired properly? Turntable will operate ■ Has a household fuse blown, or has the circuit breaker tripped? Smoke is not working properly. See "Microwave Cooking Power" in place? Nothing will not operate ■ Is the turntable properly in the "Microwave Oven Use" section. ■ Are large amounts of the house. If the problem continues, call . Replace turntable support. Remove and clean turntable support and rollers...
Microwave Use and Care
Page 22
... use only factory specified parts. Or visit our website at www.kitchenaid.com. Replacement Parts and Accessories Glass Turntable Part Number 8205676 Turntable Support and Rollers Part Number 8205678 Turntable Hub Part Number 8205677 Crisper Pan and Handle Part Number W10187336A Baking Tray Part Number W10120486 Steamer Part Number 8208262RB Convection Rack Part Number 4452220 affresh™ Stainless Steel Cleaner (stainless steel models) Part Number W10355016 affresh™ Stainless Steel Wipes (stainless steel models) Part Number W10355049 affresh™ Kitchen Appliance Cleaner Part...
... use only factory specified parts. Or visit our website at www.kitchenaid.com. Replacement Parts and Accessories Glass Turntable Part Number 8205676 Turntable Support and Rollers Part Number 8205678 Turntable Hub Part Number 8205677 Crisper Pan and Handle Part Number W10187336A Baking Tray Part Number W10120486 Steamer Part Number 8208262RB Convection Rack Part Number 4452220 affresh™ Stainless Steel Cleaner (stainless steel models) Part Number W10355016 affresh™ Stainless Steel Wipes (stainless steel models) Part Number W10355049 affresh™ Kitchen Appliance Cleaner Part...


