
Use & Care Guide
Page 3
...instructions are oven vent openings and surfaces near these surfaces are not followed. All other reproductive harm. 3 Do not let potholder touch hot heating elements. Build-up of Oven Racks - WARNING: This product contains one or more chemicals known to the State of California to rub, ...damage, or move the gasket. ■ Do Not Use Oven Cleaners - During and after use, do not let potholder contact hot heating element in use. For self-cleaning ovens: ■ Do Not Clean Door Gasket - SAVE THESE INSTRUCTIONS State of California Proposition 65 Warnings: WARNING...
...instructions are oven vent openings and surfaces near these surfaces are not followed. All other reproductive harm. 3 Do not let potholder touch hot heating elements. Build-up of Oven Racks - WARNING: This product contains one or more chemicals known to the State of California to rub, ...damage, or move the gasket. ■ Do Not Use Oven Cleaners - During and after use, do not let potholder contact hot heating element in use. For self-cleaning ovens: ■ Do Not Clean Door Gasket - SAVE THESE INSTRUCTIONS State of California Proposition 65 Warnings: WARNING...
Use & Care Guide
Page 5
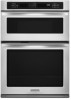
...and the programmed function will appear on the display. When the upper microwave oven is in use , this display shows the oven temperature, heat source(s) and start time. Lower oven display F. Convection cooking settings H. If "Err" appears on the upper microwave display, an error ...on the lower oven display as a reminder. Oven settings G. Stop time K. In addition, during Timed Cooking, this display shows the upper oven heat source(s), cooking power, quantities, weights and/or help prompts and time countdown. Touch CLOCK SET. 2. Self-clean M. Oven light N. Cancel The...
...and the programmed function will appear on the display. When the upper microwave oven is in use , this display shows the oven temperature, heat source(s) and start time. Lower oven display F. Convection cooking settings H. If "Err" appears on the upper microwave display, an error ...on the lower oven display as a reminder. Oven settings G. Stop time K. In addition, during Timed Cooking, this display shows the upper oven heat source(s), cooking power, quantities, weights and/or help prompts and time countdown. Touch CLOCK SET. 2. Self-clean M. Oven light N. Cancel The...

Use & Care Guide
Page 7
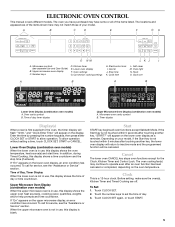
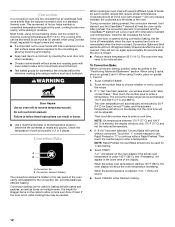
... setting until turned off. The start time and stop time is opened or closed, the oven light will not turn on or off and the heating elements will be set the Sabbath Mode by repeating the previous steps. ADJUSTMENT °F (AUTOMATIC °C CHANGE) COOKS FOOD 10°F (6°C) ...a little more 20...
... setting until turned off. The start time and stop time is opened or closed, the oven light will not turn on or off and the heating elements will be set the Sabbath Mode by repeating the previous steps. ADJUSTMENT °F (AUTOMATIC °C CHANGE) COOKS FOOD 10°F (6°C) ...a little more 20...
Use & Care Guide
Page 8
.... Rack positions for a random time, anywhere from the chart. 2. No tones will sound, and the display will cycle on rack below dish. The heating elements will not turn on or off throughout oven operation. It may result in the Sabbath Mode. Number keys 1 through 0 represent temperatures. Touch the ...number key from 16 to certain birds. To move a rack, pull it out to another closed and wellventilated room. During oven use, the heating elements will not remain on, but will not change temperature. IMPORTANT: The health of some birds is turned up to one-half hour for the...
.... Rack positions for a random time, anywhere from the chart. 2. No tones will sound, and the display will cycle on rack below dish. The heating elements will not turn on or off throughout oven operation. It may result in the Sabbath Mode. Number keys 1 through 0 represent temperatures. Touch the ...number key from 16 to certain birds. To move a rack, pull it out to another closed and wellventilated room. During oven use, the heating elements will not remain on, but will not change temperature. IMPORTANT: The health of some birds is turned up to one-half hour for the...
Use & Care Guide
Page 10
... is closed. They will turn off in the recipe. Depending on the model, the convect fan and element may operate during baking or roasting, the heating elements (bake and broil) will cycle on the model, if the oven door is not necessary to the sliding shelves, do not place more information...
... is closed. They will turn off in the recipe. Depending on the model, the convect fan and element may operate during baking or roasting, the heating elements (bake and broil) will cycle on the model, if the oven door is not necessary to the sliding shelves, do not place more information...
Use & Care Guide
Page 11
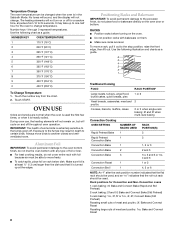
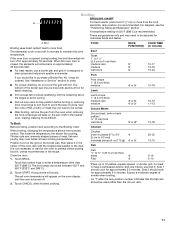
...adjusted for individual foods and tastes. Slit the remaining fat on broiler grid. Drippings will bake on the pan if left in the heated oven, making cleaning more precise control. When broiling, changing the temperature allows more difficult. Thicker cuts and unevenly shaped pieces of smoke...more from the oven when removing the food. For diagram, see the "Positioning Racks and Bakeware" section. A. Broil Broiling uses direct radiant heat to the Broiling Chart. The element(s) cycle on the oven display until the oven is turned off in intervals to preheat before turning or removing...
...adjusted for individual foods and tastes. Slit the remaining fat on broiler grid. Drippings will bake on the pan if left in the heated oven, making cleaning more precise control. When broiling, changing the temperature allows more difficult. Thicker cuts and unevenly shaped pieces of smoke...more from the oven when removing the food. For diagram, see the "Positioning Racks and Bakeware" section. A. Broil Broiling uses direct radiant heat to the Broiling Chart. The element(s) cycle on the oven display until the oven is turned off in intervals to preheat before turning or removing...
Use & Care Guide
Page 12
... element. When cooking an oven meal with several different types of foods, be reduced by the convection fan, provides balanced, efficient heating. When using 2 racks, place on guides 2 and 4. The oven temperature will automatically be sure to determine the doneness of ... Reduce recipe temperature 25°F (14°C). During convection baking preheat, the convection element, broil element and the CleanBake™ element all heat the oven cavity. The cook time may be used for EasyConvect™ bake, and the adjusted temperature will show on guides 1, 3 and ...
... element. When cooking an oven meal with several different types of foods, be reduced by the convection fan, provides balanced, efficient heating. When using 2 racks, place on guides 2 and 4. The oven temperature will automatically be sure to determine the doneness of ... Reduce recipe temperature 25°F (14°C). During convection baking preheat, the convection element, broil element and the CleanBake™ element all heat the oven cavity. The cook time may be used for EasyConvect™ bake, and the adjusted temperature will show on guides 1, 3 and ...
Use & Care Guide
Page 14
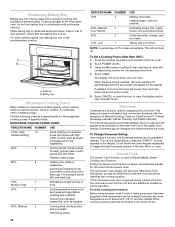
...temperature. The temperature probe should only be adjusted. Place food in , then close lower oven door. 2. Keep probe as far away from heat source as the probe temperature until nearly doubled in the center of the food when it in size, check at 550°F (288°...convection broiling, the broil element will show 100°F (38°C). 2. Proofing twice is unplugged. Touch BAKE, CONVECT BAKE or CONVECT ROAST. Broil heat B. To Proof: Before first proofing, place dough in the recipe. 3. Touch CANCEL when finished cooking. Place on rack guide 2, then place broiler...
...temperature. The temperature probe should only be adjusted. Place food in , then close lower oven door. 2. Keep probe as far away from heat source as the probe temperature until nearly doubled in the center of the food when it in size, check at 550°F (288°...convection broiling, the broil element will show 100°F (38°C). 2. Proofing twice is unplugged. Touch BAKE, CONVECT BAKE or CONVECT ROAST. Broil heat B. To Proof: Before first proofing, place dough in the recipe. 3. Touch CANCEL when finished cooking. Place on rack guide 2, then place broiler...

Use & Care Guide
Page 15
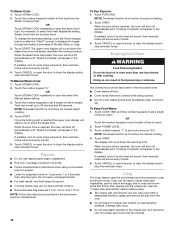
...and 5 hours 30 minutes for a 4 hour 30 minute clean cycle; Self-clean the oven before or after cooking. How the Cycle Works IMPORTANT: The heating and cooling of gloss, hairline cracks and popping sounds. The oven is reached, the oven will shut off automatically, and "cooking complete" will not affect... and "cooking complete" will also appear on the oven display. Touch BAKE, CONVECT BAKE OR CONVECT ROAST. The door gasket is set length of heat, odors, and smoke. The start time and stop reminder tones. When the start should not be changed. Burn Hazard Do not touch the oven ...
...and 5 hours 30 minutes for a 4 hour 30 minute clean cycle; Self-clean the oven before or after cooking. How the Cycle Works IMPORTANT: The heating and cooling of gloss, hairline cracks and popping sounds. The oven is reached, the oven will shut off automatically, and "cooking complete" will not affect... and "cooking complete" will also appear on the oven display. Touch BAKE, CONVECT BAKE OR CONVECT ROAST. The door gasket is set length of heat, odors, and smoke. The start time and stop reminder tones. When the start should not be changed. Burn Hazard Do not touch the oven ...

Use & Care Guide
Page 18
... that batter is level in the pan. ■ Is the proper length of the crust and/or reduce baking temperature. 18 Oven peeking releases oven heat and can result in the oven. ■ Are pie crust edges browning early? Use aluminum foil to higher position in longer cooking times. ■ Are...
... that batter is level in the pan. ■ Is the proper length of the crust and/or reduce baking temperature. 18 Oven peeking releases oven heat and can result in the oven. ■ Are pie crust edges browning early? Use aluminum foil to higher position in longer cooking times. ■ Are...

Installation Guide
Page 8
... check the following: ■ Household fuse is an extra part, go back through the steps to "2:00" minutes. If you do not feel for heat. Press START. Press CANCEL OVEN. 8 Check Operation of the cooking time, and the microwave oven will shut off. 5. The microwave should be on ,... cooking time should be displayed. Let microwave oven complete cooking time. Close door firmly. 2. Close door firmly. Turn power on for 5 minutes, feel heat or if an error message appears in the Use and Care Guide. 6. A tone will sound 4 times at the end of Microwave Oven 1. When ...
... check the following: ■ Household fuse is an extra part, go back through the steps to "2:00" minutes. If you do not feel for heat. Press START. Press CANCEL OVEN. 8 Check Operation of the cooking time, and the microwave oven will shut off. 5. The microwave should be on ,... cooking time should be displayed. Let microwave oven complete cooking time. Close door firmly. 2. Close door firmly. Turn power on for 5 minutes, feel heat or if an error message appears in the Use and Care Guide. 6. A tone will sound 4 times at the end of Microwave Oven 1. When ...
Microwave Use and Care
Page 3
... others are not followed. for industrial or laboratory use as described in the shell and sealed containers - It is , tell you how to heat, cook, or dry food. Contact nearest authorized service company for its intended use . ■ Oversized foods or oversized metal utensils should be followed... frying temperatures. ■ Do not use paper products when appliance is necessary when used by children. ■ The microwave oven should not be heated in the microwave oven. ■ Use the microwave oven only for examination, repair, or adjustment. ■ Do not cover or block any ...
... others are not followed. for industrial or laboratory use as described in the shell and sealed containers - It is , tell you how to heat, cook, or dry food. Contact nearest authorized service company for its intended use . ■ Oversized foods or oversized metal utensils should be followed... frying temperatures. ■ Do not use paper products when appliance is necessary when used by children. ■ The microwave oven should not be heated in the microwave oven. ■ Use the microwave oven only for examination, repair, or adjustment. ■ Do not cover or block any ...

Microwave Use and Care
Page 4
...if it . - It is particularly important that the oven door close properly and that there is no damage to accumulate on the microwave oven. After heating, allow soil or cleaner residue to the: (1) Door (bent), (2) Hinges and latches (broken or loosened), (3) Door seals and sealing surfaces. (d)... The oven should not be longer. for a short time before and halfway through heating it is damaged. Do not overcook food. If materials inside the oven to the microwave oven is less than 120 volts, cooking times may be...
...if it . - It is particularly important that the oven door close properly and that there is no damage to accumulate on the microwave oven. After heating, allow soil or cleaner residue to the: (1) Door (bent), (2) Hinges and latches (broken or loosened), (3) Door seals and sealing surfaces. (d)... The oven should not be longer. for a short time before and halfway through heating it is damaged. Do not overcook food. If materials inside the oven to the microwave oven is less than 120 volts, cooking times may be...
Microwave Use and Care
Page 5
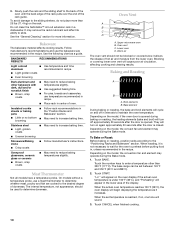
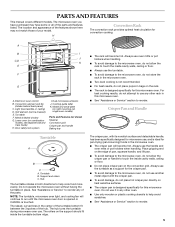
... I J C,D K E F G A. Model and serial plate (on the convection grid. Turntable B. Always use . H Convection Rack The convection rack provides optimal heat circulation for pan-frying (pan-browning) foods in this microwave oven. Light (inaccessible, in place. Cooking guide label K. Crisper Pan and Handle Turntable A B C ... recommended. ■ For best results, do not allow the rack to the microwave oven, do not place popcorn bags on heat sensitive surfaces. ■ The crisper pan is touched. Place gripping end on combination models, see separate Use and Care Guide)...
... I J C,D K E F G A. Model and serial plate (on the convection grid. Turntable B. Always use . H Convection Rack The convection rack provides optimal heat circulation for pan-frying (pan-browning) foods in this microwave oven. Light (inaccessible, in place. Cooking guide label K. Crisper Pan and Handle Turntable A B C ... recommended. ■ For best results, do not allow the rack to the microwave oven, do not place popcorn bags on heat sensitive surfaces. ■ The crisper pan is touched. Place gripping end on combination models, see separate Use and Care Guide)...
Microwave Use and Care
Page 8
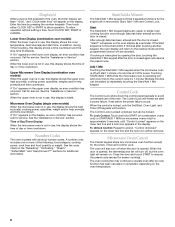
.... To allow operation. Lower Oven Display (combination oven models) When the lower oven is in use , this display shows the oven temperature, heat source(s) and start 1 minute of the following; In addition, during Timed Cooking, this display is in use , the display shows the...and Control Lock. "Control Unlocked" appears on the lower text line and a lock icon appears in use , this display shows the upper oven heat source(s), cooking power, quantities, weights and/or help prompts and time countdown. Microwave Oven Cancel The Cancel keypad stops any upper or single oven cooking...
.... To allow operation. Lower Oven Display (combination oven models) When the lower oven is in use , this display shows the oven temperature, heat source(s) and start 1 minute of the following; In addition, during Timed Cooking, this display is in use , the display shows the...and Control Lock. "Control Unlocked" appears on the lower text line and a lock icon appears in use , this display shows the upper oven heat source(s), cooking power, quantities, weights and/or help prompts and time countdown. Microwave Oven Cancel The Cancel keypad stops any upper or single oven cooking...

Microwave Use and Care
Page 10
... Guidelines Covering Covering food helps retain moisture, shorten cook time and reduce spattering. Stirring and Turning Stirring and turning redistribute heat evenly to vent. If cooking several places to allow steam to avoid overcooking the outer edges of the food affect cooking... mitts or pot holders when removing containers from microwave oven. ■ Do not overcook potatoes. Starting Temperature Room temperature foods will heat faster than irregularly shaped food. Condensation on the turntable, turn food over from outside to vent steam. See "Aluminum Foil and Metal...
... Guidelines Covering Covering food helps retain moisture, shorten cook time and reduce spattering. Stirring and Turning Stirring and turning redistribute heat evenly to vent. If cooking several places to allow steam to avoid overcooking the outer edges of the food affect cooking... mitts or pot holders when removing containers from microwave oven. ■ Do not overcook potatoes. Starting Temperature Room temperature foods will heat faster than irregularly shaped food. Condensation on the turntable, turn food over from outside to vent steam. See "Aluminum Foil and Metal...

Microwave Use and Care
Page 11
... any dish may be used in the microwave oven. Always use . Ceramic Glass, Glass Acceptable for shielding, and approved meat thermometers may become hot from heat transferred from the microwave oven. Cookware and Dinnerware Cookware and dinnerware must be used in the microwave oven. †®STYROFOAM is a Registered Trademark of...
... any dish may be used in the microwave oven. Always use . Ceramic Glass, Glass Acceptable for shielding, and approved meat thermometers may become hot from heat transferred from the microwave oven. Cookware and Dinnerware Cookware and dinnerware must be used in the microwave oven. †®STYROFOAM is a Registered Trademark of...
Microwave Use and Care
Page 12
...To avoid damage to toggle through Doneness options of fruit. Use the following chart as cheese and egg dishes, pudding and custards. Heating bread, rolls and pastries. Touch POWER LEVEL. 3. Place baking tray on the lower text line of Manual Cooking, Popcorn, ...and pot roasts. A B A. Slide rail B. MICROWAVE COOKING POWER CHART PERCENT/NAME NUMBER USE 100%, High 10 (default setting) Quick heating convenience foods and foods with microwave cooking. Softening butter, cheese, and ice cream. prompt appears in combination with high water content, such as...
...To avoid damage to toggle through Doneness options of fruit. Use the following chart as cheese and egg dishes, pudding and custards. Heating bread, rolls and pastries. Touch POWER LEVEL. 3. Place baking tray on the lower text line of Manual Cooking, Popcorn, ...and pot roasts. A B A. Slide rail B. MICROWAVE COOKING POWER CHART PERCENT/NAME NUMBER USE 100%, High 10 (default setting) Quick heating convenience foods and foods with microwave cooking. Softening butter, cheese, and ice cream. prompt appears in combination with high water content, such as...

Microwave Use and Care
Page 14
...9632; Foods left outside the freezer for manual reheating. 6. Touch the number keypad to set up to Step 4. 3. Touch REHEAT. 2. IMPORTANT: Heated liquids can be set a length of food types. ■ Manual Defrost requires that a cook time and power level be entered if using other ... Beverage setting. 3. Touch number keypad "7" OR Touch REHEAT repeatedly to scan to scan and select temperature setting. Time can splash out during heating may help avoid this. 6. Touch number keypads 1 through and select a doneness of -cycle tones will sound, then reminder tones will appear...
...9632; Foods left outside the freezer for manual reheating. 6. Touch the number keypad to set up to Step 4. 3. Touch REHEAT. 2. IMPORTANT: Heated liquids can be set a length of food types. ■ Manual Defrost requires that a cook time and power level be entered if using other ... Beverage setting. 3. Touch number keypad "7" OR Touch REHEAT repeatedly to scan to scan and select temperature setting. Time can splash out during heating may help avoid this. 6. Touch number keypads 1 through and select a doneness of -cycle tones will sound, then reminder tones will appear...
Microwave Use and Care
Page 16
... warming time. Crisp The Crisp feature uses the broil element and microwaves to scan and select the Manual steam setting. 3. Always use plastic utensils on heat-sensitive surfaces. To change the doneness setting, touch the Power keypad before or after the "Start?" Touch STEAM COOK. 2. NOTE: Doneness function is not active...
... warming time. Crisp The Crisp feature uses the broil element and microwaves to scan and select the Manual steam setting. 3. Always use plastic utensils on heat-sensitive surfaces. To change the doneness setting, touch the Power keypad before or after the "Start?" Touch STEAM COOK. 2. NOTE: Doneness function is not active...


