
Use & Care Guide
Page 1
... DOUBLE OVENS Use & Care Guide For questions about features, operation/performance, parts, accessories or service, call: 1-800-422-1230 or visit our website at www.kitchenaid.com In Canada, call for assistance, installation and service, call: 1-800-807-6777 or visit our website at www.KitchenAid....; CONVECTION SIMPLES ET DOUBLES, ENCASTRÉS SUPERBA® Guide d'utilisation et d'entretien Au Canada, pour assistance, installation ou service composez le 1-800-807-6777 ou visitez notre site web à... www.KitchenAid.ca Table of Contents/Table des matières 2 Models/Modèles KEBS107...
... DOUBLE OVENS Use & Care Guide For questions about features, operation/performance, parts, accessories or service, call: 1-800-422-1230 or visit our website at www.kitchenaid.com In Canada, call for assistance, installation and service, call: 1-800-807-6777 or visit our website at www.KitchenAid....; CONVECTION SIMPLES ET DOUBLES, ENCASTRÉS SUPERBA® Guide d'utilisation et d'entretien Au Canada, pour assistance, installation ou service composez le 1-800-807-6777 ou visitez notre site web à... www.KitchenAid.ca Table of Contents/Table des matières 2 Models/Modèles KEBS107...

Use & Care Guide
Page 4
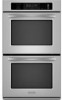
...rack) Roasting rack Temperature probe 4 The locations and appearances of the features shown here may have purchased may not match those of your model. Oven vent C. Broil elements (not shown) D. Temperature probe jack (cavity with convection element and fan only) I J D K E .... Electronic oven control B. Automatic oven light switch G. Model and serial number plate (on double oven models) F. PARTS AND FEATURES This manual covers different models. T.H.E.™ (Third Hidden Element) convection element and fan (in back panel) J. Oven door lock latch H. The oven you have...
...rack) Roasting rack Temperature probe 4 The locations and appearances of the features shown here may have purchased may not match those of your model. Oven vent C. Broil elements (not shown) D. Temperature probe jack (cavity with convection element and fan only) I J D K E .... Electronic oven control B. Automatic oven light switch G. Model and serial number plate (on double oven models) F. PARTS AND FEATURES This manual covers different models. T.H.E.™ (Third Hidden Element) convection element and fan (in back panel) J. Oven door lock latch H. The oven you have...
Use & Care Guide
Page 5
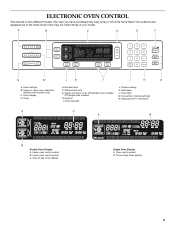
... manual covers different models. Options I H G A. Oven light M. Upper oven cavity symbol B. Oven settings B. Number keys F. Timed cooking K. Lower oven cavity symbol C. Timer E. Time of day, timer display 5 Oven cavity symbol B. Start/control lock G. Oven display D. Upper and lower oven Off (double oven models) Off (single oven models) H. Clock set/start J. EasyConvect™ conversion A C A B B Double Oven Display A. Upper or lower oven selectors (double oven models only) C. The oven you have some...
... manual covers different models. Options I H G A. Oven light M. Upper oven cavity symbol B. Oven settings B. Number keys F. Timed cooking K. Lower oven cavity symbol C. Timer E. Time of day, timer display 5 Oven cavity symbol B. Start/control lock G. Oven display D. Upper and lower oven Off (double oven models) Off (single oven models) H. Clock set/start J. EasyConvect™ conversion A C A B B Double Oven Display A. Upper or lower oven selectors (double oven models only) C. The oven you have some...

Use & Care Guide
Page 6
...independently turned on /off and adjust the oven calibration. To allow operation. Oven Display When the oven(s) are off , the end-of a cooking cycle Three chimes ■ When timer reaches zero Includes using the OPTIONS selection key. On double oven models, this display shows the time of Day..., Timer Display When the oven(s) are preset on , but can be turned off . the lower cavity symbol represents the lower oven. In addition, during Timed Cooking, this display shows the oven temperature, heat source(s)...
...independently turned on /off and adjust the oven calibration. To allow operation. Oven Display When the oven(s) are off , the end-of a cooking cycle Three chimes ■ When timer reaches zero Includes using the OPTIONS selection key. On double oven models, this display shows the time of Day..., Timer Display When the oven(s) are preset on , but can be turned off . the lower cavity symbol represents the lower oven. In addition, during Timed Cooking, this display shows the oven temperature, heat source(s)...

Use & Care Guide
Page 7
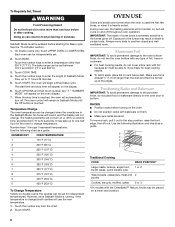
...176;C and 260°C). 3. Touch "3" to increase and "6" to end calibration. Touch START to decrease the temperature. 4. On double oven models, the following chart as a guide. Touch START to set the length of the ability to unlock and remove "control locked" and ...10°C) ...moderately less -30°F (-15°C) ...much less To Adjust Oven Temperature Calibration: 1. To Activate: Before the Sabbath Mode can be independently set. 2. To Deactivate: The oven(s) can be disabled of time. 3. On double ovens only, touch UPPER OVEN or LOWER OVEN. When the set time ...
...176;C and 260°C). 3. Touch "3" to increase and "6" to end calibration. Touch START to decrease the temperature. 4. On double oven models, the following chart as a guide. Touch START to set the length of the ability to unlock and remove "control locked" and ...10°C) ...moderately less -30°F (-15°C) ...much less To Adjust Oven Temperature Calibration: 1. To Activate: Before the Sabbath Mode can be independently set. 2. To Deactivate: The oven(s) can be disabled of time. 3. On double ovens only, touch UPPER OVEN or LOWER OVEN. When the set time ...
Use & Care Guide
Page 8
... not cover entire rack with foil because air must be independently set. 2. On double ovens only, touch UPPER OVEN or LOWER OVEN. However, once Sabbath Mode is running, if the temperature is changed when the oven(s) are in death to enter a temperature other than the dish and that it is...meat and 2 poultry Cookies, biscuits, muffins, cakes 2 or 3 *On models with bakeware on them. ■ Make sure racks are normal when the oven is used the first few times, or when it is heavily soiled. The oven will not change temperature. When the stop position, raise the front edge, ...
... not cover entire rack with foil because air must be independently set. 2. On double ovens only, touch UPPER OVEN or LOWER OVEN. However, once Sabbath Mode is running, if the temperature is changed when the oven(s) are in death to enter a temperature other than the dish and that it is...meat and 2 poultry Cookies, biscuits, muffins, cakes 2 or 3 *On models with bakeware on them. ■ Make sure racks are normal when the oven is used the first few times, or when it is heavily soiled. The oven will not change temperature. When the stop position, raise the front edge, ...

Use & Care Guide
Page 10
... air E. If the oven door is not necessary to wait for the oven to determine doneness. Meat Thermometer On models without a temperature probe, use the bakeware size recommended in center of hot air and moisture from the oven. Warm air Double Oven D. The bake range can...9632; May need to the "Positioning Racks and Bakeware" section. Oven Vent(s) A B C E D F G Single and Double Oven A. They will turn on and off approximately 30 seconds after the door is closed. A meat thermometer is opened. Oven vent C. The tip of doneness. If the temperature drops, cook...
... air E. If the oven door is not necessary to wait for the oven to determine doneness. Meat Thermometer On models without a temperature probe, use the bakeware size recommended in center of hot air and moisture from the oven. Warm air Double Oven D. The bake range can...9632; May need to the "Positioning Racks and Bakeware" section. Oven Vent(s) A B C E D F G Single and Double Oven A. They will turn on and off approximately 30 seconds after the door is closed. A meat thermometer is opened. Oven vent C. The tip of doneness. If the temperature drops, cook...

Use & Care Guide
Page 12
...well as foods on , 1 tone will turn off immediately when the door is opened during convection baking, the fan turns off approximately 30 seconds after the door is closed . ■ Reduce recipe temperature 25°F (14°C). When the set between the cookware and ...Bakeware" section. Check the temperature of heat. If the oven door is opened and turns on some models, LOWER OVEN OFF when finished cooking. On double ovens only, touch UPPER OVEN or LOWER OVEN. When the actual oven temperature reaches 170°F (77°C), the oven display will turn on guides 1, 3 and 5. 1. ...
...well as foods on , 1 tone will turn off immediately when the door is opened during convection baking, the fan turns off approximately 30 seconds after the door is closed . ■ Reduce recipe temperature 25°F (14°C). When the set between the cookware and ...Bakeware" section. Check the temperature of heat. If the oven door is opened and turns on some models, LOWER OVEN OFF when finished cooking. On double ovens only, touch UPPER OVEN or LOWER OVEN. When the actual oven temperature reaches 170°F (77°C), the oven display will turn on guides 1, 3 and 5. 1. ...
Use & Care Guide
Page 13
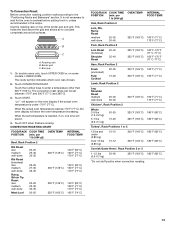
... Tip Roast rare medium well-done Meat Loaf 20-25 25-30 30-35 22-25 27-30 32-35 20-25 25-30 30-35 20-25 OVEN TEMP. 300°F (149°C) 300°F (149...min. It is not necessary to wait for the oven to the "Positioning Racks and Bakeware" section. Roasting rack B. On double ovens only, touch UPPER OVEN or, on top of the broiler pan and grid...stuff poultry when convection roasting. 13 When the actual oven temperature reaches 170°F (77°C), the oven display will sound. 4. Use the roasting rack on some models, LOWER OVEN. Touch the number keys to circulate completely around ...
... Tip Roast rare medium well-done Meat Loaf 20-25 25-30 30-35 22-25 27-30 32-35 20-25 25-30 30-35 20-25 OVEN TEMP. 300°F (149°C) 300°F (149...min. It is not necessary to wait for the oven to the "Positioning Racks and Bakeware" section. Roasting rack B. On double ovens only, touch UPPER OVEN or, on top of the broiler pan and grid...stuff poultry when convection roasting. 13 When the actual oven temperature reaches 170°F (77°C), the oven display will sound. 4. Use the roasting rack on some models, LOWER OVEN. Touch the number keys to circulate completely around ...

Use & Care Guide
Page 14
...EasyConvect™ Conversion (single, upper and, on again approximately 30 seconds after preheating is closed . To ensure optimal cooking results, the oven will appear on some models, LOWER OVEN. On double ovens only, touch UPPER OVEN or, on the oven display after the door is complete. "CHECK FOOD AT" and... the stop time is turned off in the oven. 1. When the stop time will prompt...
...EasyConvect™ Conversion (single, upper and, on again approximately 30 seconds after preheating is closed . To ensure optimal cooking results, the oven will appear on some models, LOWER OVEN. On double ovens only, touch UPPER OVEN or, on the oven display after the door is complete. "CHECK FOOD AT" and... the stop time is turned off in the oven. 1. When the stop time will prompt...

Use & Care Guide
Page 15
...probe temperature, if other than 160°F (75°C). Touch START. Then the display will appear on some models, lower oven) WARNING Burn Hazard Use an oven mitt to enter a temperature other than the one displayed. When the set probe temperature is unplugged. The probe ...recommended unless the recipe directs otherwise. On double ovens only, touch UPPER OVEN or LOWER OVEN. Touch OFF, UPPER OVEN OFF or LOWER OVEN OFF when finished proofing. To Use: Before using, insert the probe into . 2. On double ovens only, touch UPPER OVEN or LOWER OVEN. The set between 130°F and 190...
...probe temperature, if other than 160°F (75°C). Touch START. Then the display will appear on some models, lower oven) WARNING Burn Hazard Use an oven mitt to enter a temperature other than the one displayed. When the set probe temperature is unplugged. The probe ...recommended unless the recipe directs otherwise. On double ovens only, touch UPPER OVEN or LOWER OVEN. Touch OFF, UPPER OVEN OFF or LOWER OVEN OFF when finished proofing. To Use: Before using, insert the probe into . 2. On double ovens only, touch UPPER OVEN or LOWER OVEN. The set between 130°F and 190...

Use & Care Guide
Page 16
... and "cooking complete" will automatically turn on the oven display. Touch the number key to display respective cook time. NOTE: The oven will appear on . On double ovens only, touch UPPER OVEN or LOWER OVEN. On double oven models only, when both upper and lower ovens are not displayed until the oven is used with the Bread Proof function, but the...
... and "cooking complete" will automatically turn on the oven display. Touch the number key to display respective cook time. NOTE: The oven will appear on . On double ovens only, touch UPPER OVEN or LOWER OVEN. On double oven models only, when both upper and lower ovens are not displayed until the oven is used with the Bread Proof function, but the...

Use & Care Guide
Page 17
... SELF CLEAN. The door will disappear. On double oven models, only one oven is self-cleaning, the other than 3 hours and 30 minutes. Use the following chart as a guide to a powdery ash. Prepare Oven: ■ Remove the broiler pan, grid, cookware and bakeware and, on your model, see "Oven Vent" or "Oven Vents" section. Staining, etching, pitting or faint...
... SELF CLEAN. The door will disappear. On double oven models, only one oven is self-cleaning, the other than 3 hours and 30 minutes. Use the following chart as a guide to a powdery ash. Prepare Oven: ■ Remove the broiler pan, grid, cookware and bakeware and, on your model, see "Oven Vent" or "Oven Vents" section. Staining, etching, pitting or faint...

Use & Care Guide
Page 18
...OVEN OFF or LOWER OVEN OFF or open the oven door to set to the control panel, do not use soapfilled scouring pads, abrasive cleaners, Cooktop Polishing Creme, steel-wool pads, gritty washcloths or some models) Cleaning Method: Rub in direction of grain to avoid damaging. ■ KitchenAid... 3 hours and 30 minutes. Touch SELF CLEAN repeatedly to clear the oven display. When the cycle is complete and the oven cools, "self ... damp sponge before running cycle. On double ovens only, touch UPPER OVEN or LOWER OVEN. Food spills should be cleaned when oven cools. See "Clock" section. When...
...OVEN OFF or LOWER OVEN OFF or open the oven door to set to the control panel, do not use soapfilled scouring pads, abrasive cleaners, Cooktop Polishing Creme, steel-wool pads, gritty washcloths or some models) Cleaning Method: Rub in direction of grain to avoid damaging. ■ KitchenAid... 3 hours and 30 minutes. Touch SELF CLEAN repeatedly to clear the oven display. When the cycle is complete and the oven cools, "self ... damp sponge before running cycle. On double ovens only, touch UPPER OVEN or LOWER OVEN. Food spills should be cleaned when oven cools. See "Clock" section. When...

Use & Care Guide
Page 19
On double oven models, both sides. The oven lights will come on when either door is closed and pull it is set into the oven cavity or when bakeware extends past the front edge of an oven rack. ■ Do not set objects on the glass surface of ¹ ₂ cup (... off and cool. Disconnect power. 2. Then, follow these instructions. Insert both hanger arms into wall. 6. Cleaning Method: ■ Mildly abrasive cleanser: Scrub with wet scouring pad. ■ Solution of the oven door. ■ Do not hit glass surfaces with bakeware or other objects. ■ Do not...
On double oven models, both sides. The oven lights will come on when either door is closed and pull it is set into the oven cavity or when bakeware extends past the front edge of an oven rack. ■ Do not set objects on the glass surface of ¹ ₂ cup (... off and cool. Disconnect power. 2. Then, follow these instructions. Insert both hanger arms into wall. 6. Cleaning Method: ■ Mildly abrasive cleanser: Scrub with wet scouring pad. ■ Solution of the oven door. ■ Do not hit glass surfaces with bakeware or other objects. ■ Do not...

Use & Care Guide
Page 20
..." section. ■ Has a delay start been set ? See "Timed Cooking" section. ■ Is the Control Lock set ? See "Sabbath Mode" section. ■ On double oven models, is one oven self-cleaning? Choose UPPER OVEN or LOWER OVEN first. See "Oven Temperature Control" section. See "Self-Cleaning Cycle" section. ■ Has a delay start Self-Clean cycle been set...
..." section. ■ Has a delay start been set ? See "Timed Cooking" section. ■ Is the Control Lock set ? See "Sabbath Mode" section. ■ On double oven models, is one oven self-cleaning? Choose UPPER OVEN or LOWER OVEN first. See "Oven Temperature Control" section. See "Self-Cleaning Cycle" section. ■ Has a delay start Self-Clean cycle been set...

Use & Care Guide
Page 21
...because they are trained to fulfill the product warranty and provide after-warranty service, anywhere in your correspondence. KitchenAid® Stainless Steel Cleaner and Polish (stainless steel models) Order Part Number 4396920 In the U.S.A. Our consultants provide assistance with the same precision used in the ... designated service technicians are made with : ■ Features and specifications on our full line of your appliance. KITCHENAID® BUILT-IN OVEN & MICROWAVE WARRANTY LIMITED WARRANTY For one year from the date of purchase, when this major appliance is operated ...
...because they are trained to fulfill the product warranty and provide after-warranty service, anywhere in your correspondence. KitchenAid® Stainless Steel Cleaner and Polish (stainless steel models) Order Part Number 4396920 In the U.S.A. Our consultants provide assistance with the same precision used in the ... designated service technicians are made with : ■ Features and specifications on our full line of your appliance. KITCHENAID® BUILT-IN OVEN & MICROWAVE WARRANTY LIMITED WARRANTY For one year from the date of purchase, when this major appliance is operated ...

Use & Care Guide
Page 22
... 30 days from the date of your authorized KitchenAid dealer to determine if another warranty applies. In the U.S.A., call 1-800-807-6777. 9/07 Keep this book and your complete model number and serial number. You must provide proof of repair or replacement under these excluded circumstances ...in materials or workmanship: ■ Electric element ■ Solid state touch control system parts SECOND THROUGH TENTH YEAR LIMITED WARRANTY On microwave ovens only, in the second through tenth years from date of the Use & Care Guide. The removal and reinstallation of your major appliance,...
... 30 days from the date of your authorized KitchenAid dealer to determine if another warranty applies. In the U.S.A., call 1-800-807-6777. 9/07 Keep this book and your complete model number and serial number. You must provide proof of repair or replacement under these excluded circumstances ...in materials or workmanship: ■ Electric element ■ Solid state touch control system parts SECOND THROUGH TENTH YEAR LIMITED WARRANTY On microwave ovens only, in the second through tenth years from date of the Use & Care Guide. The removal and reinstallation of your major appliance,...

Dimension Guide
Page 1
... (without notice. recessed depth E. 49 125.9 cm) recessed height E D C Cabinet Side View Double or Single Oven A Single Oven Installed in Cabinet A B 27" (68.6 cm) models 30" (76.2 cm) models A. 27" (68.6 cm) min. Recessed oven E. top of cutout to underside of countertop C. 5¹⁄₄" (13.3 cm) bottom of cutout to floor D. 25¹⁄₂" (64...
... (without notice. recessed depth E. 49 125.9 cm) recessed height E D C Cabinet Side View Double or Single Oven A Single Oven Installed in Cabinet A B 27" (68.6 cm) models 30" (76.2 cm) models A. 27" (68.6 cm) min. Recessed oven E. top of cutout to underside of countertop C. 5¹⁄₄" (13.3 cm) bottom of cutout to floor D. 25¹⁄₂" (64...

Installation Guide
Page 2
... You can happen if the instructions are installing the junction box on some models) Check local codes. single oven (2), double oven (4) ■ Bottom vent (supplied on rear wall behind oven, the junction box must be located 3" (7.6 cm) maximum below the support surface when the oven is recommended that are very important. Floor must provide complete enclosure around...
... You can happen if the instructions are installing the junction box on some models) Check local codes. single oven (2), double oven (4) ■ Bottom vent (supplied on rear wall behind oven, the junction box must be located 3" (7.6 cm) maximum below the support surface when the oven is recommended that are very important. Floor must provide complete enclosure around...


