
Use & Care Guide
Page 3
... Not Use Oven Cleaners - Let hot air or steam escape before removing or replacing food. ■ Do Not Heat Unopened Food Containers - Heating elements may result in Oven - Remove broiler pan and other servicing should be killed or seriously injured if you what the potential hazard is cool. This symbol alerts you how to cause birth defects or other bulky cloth. ■ Use Care When Opening Door - All...
... Not Use Oven Cleaners - Let hot air or steam escape before removing or replacing food. ■ Do Not Heat Unopened Food Containers - Heating elements may result in Oven - Remove broiler pan and other servicing should be killed or seriously injured if you what the potential hazard is cool. This symbol alerts you how to cause birth defects or other bulky cloth. ■ Use Care When Opening Door - All...
Use & Care Guide
Page 5
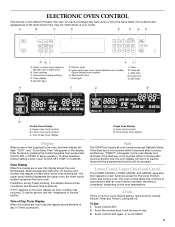
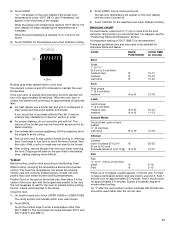
... OVEN CONTROL This manual covers different models. Oven display E. Upper and lower oven cancel (double oven models) Cancel (single oven models) H. Cook time N. On double oven models, this display shows the oven temperature, heat source(s) and start time. If "Err" appears on the oven temperature. To call for the Clock, Kitchen Timer, and Control Lock. Touch CLOCK SET. 2. Self clean A C A B B Double Oven Display A. Time of the items listed. Time of Day, Timer Display When the oven(s) are not in use this display shows a time countdown and the stop their respective oven...
... OVEN CONTROL This manual covers different models. Oven display E. Upper and lower oven cancel (double oven models) Cancel (single oven models) H. Cook time N. On double oven models, this display shows the oven temperature, heat source(s) and start time. If "Err" appears on the oven temperature. To call for the Clock, Kitchen Timer, and Control Lock. Touch CLOCK SET. 2. Self clean A C A B B Double Oven Display A. Time of the items listed. Time of Day, Timer Display When the oven(s) are not in use this display shows a time countdown and the stop their respective oven...
Use & Care Guide
Page 6
... Control Lock will remain set after a power failure, if set time. If all tones have been turned off only by using the TOOLS selection key. Touch TOOLS and then "4" to Celsius. NOTE: Turning off this reminder tone does not turn off , adjust the oven calibration, change the oven temperature between MIN/SEC and HR/MIN. When the temperature is preset in the display. NOTE: The Kitchen Timer does not start to set...
... Control Lock will remain set after a power failure, if set time. If all tones have been turned off only by using the TOOLS selection key. Touch TOOLS and then "4" to Celsius. NOTE: Turning off this reminder tone does not turn off , adjust the oven calibration, change the oven temperature between MIN/SEC and HR/MIN. When the temperature is preset in the display. NOTE: The Kitchen Timer does not start to set...
Use & Care Guide
Page 7
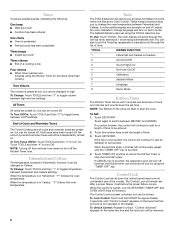
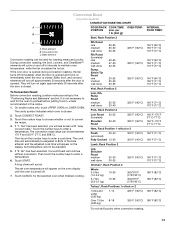
... before or after cooking. When the stop time will remain in food poisoning or sickness. Oven Temperature Control IMPORTANT: Do not use a thermometer to measure oven temperature because opening the oven door during cycling may cook faster or slower than your previous oven, so the temperature calibration can be enabled before starting the Bake cycle. Each oven calibration can be disabled of the Sabbath. On double oven models, the following chart as a guide. Touch START. 4. See the...
... before or after cooking. When the stop time will remain in food poisoning or sickness. Oven Temperature Control IMPORTANT: Do not use a thermometer to measure oven temperature because opening the oven door during cycling may cook faster or slower than your previous oven, so the temperature calibration can be enabled before starting the Bake cycle. Each oven calibration can be disabled of the Sabbath. On double oven models, the following chart as a guide. Touch START. 4. See the...
Use & Care Guide
Page 10
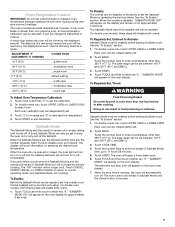
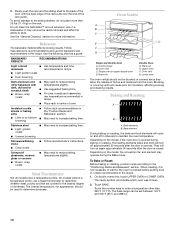
... crusts ■ May need to determine doneness. Meat Thermometer Not all models have a temperature probe. Oven Vent(s) A B C E D F G Single and Double Oven A. Warm air E. Lower oven The oven vent(s) should be used to increase baking time. Broil elements B. Touch BAKE. Slowly push the rack and the sliding shelf to reduce baking temperatures slightly. It may operate during baking or roasting, the heating elements (bake and broil) will cause poor air circulation, affecting cooking and cleaning results. BAKEWARE/ RESULTS RECOMMENDATIONS Light colored ■ aluminum...
... crusts ■ May need to determine doneness. Meat Thermometer Not all models have a temperature probe. Oven Vent(s) A B C E D F G Single and Double Oven A. Warm air E. Lower oven The oven vent(s) should be used to increase baking time. Broil elements B. Touch BAKE. Slowly push the rack and the sliding shelf to reduce baking temperatures slightly. It may operate during baking or roasting, the heating elements (bake and broil) will cause poor air circulation, affecting cooking and cleaning results. BAKEWARE/ RESULTS RECOMMENDATIONS Light colored ■ aluminum...
Use & Care Guide
Page 11
.... Touch CANCEL for the selected oven when finished cooking. See "Assistance or Service" section to enter a temperature other than the roll-out rack. 11 Times are guidelines only and may not need to have a well seared exterior and rare interior, use a broiler pan and grid. If the oven door is closed, the element will turn food to the Broiling Chart. Touch START. The set between 450°F and...
.... Touch CANCEL for the selected oven when finished cooking. See "Assistance or Service" section to enter a temperature other than the roll-out rack. 11 Times are guidelines only and may not need to have a well seared exterior and rare interior, use a broiler pan and grid. If the oven door is closed, the element will turn food to the Broiling Chart. Touch START. The set between 450°F and...
Use & Care Guide
Page 12
... instructions can be shortened by opening the oven door only when necessary. ■ Choose cookie sheets without sides and roasting pans with "easy convect bake." Convection baking can be adjusted. If the oven door is opened during convection baking, the fan turns off immediately when the door is opened . The cook time may be reduced also. Touch the number keys to choose whether or not to remove temperature probe. Then touch the number keys to enter a cook time. When the set temperature...
... instructions can be shortened by opening the oven door only when necessary. ■ Choose cookie sheets without sides and roasting pans with "easy convect bake." Convection baking can be adjusted. If the oven door is opened during convection baking, the fan turns off immediately when the door is opened . The cook time may be reduced also. Touch the number keys to choose whether or not to remove temperature probe. Then touch the number keys to enter a cook time. When the set temperature...
Use & Care Guide
Page 13
... a temperature. On double ovens only, touch UPPER OVEN or LOWER OVEN. Touch CONVECT ROAST. 3. Touch the number keys to the "Positioning Racks and Bakeware" section. Touch START. The set between 170°F and 550°F (77°C and 288°C). Bake, broil, and convect elements will appear on immediately when the door is opened . They will cycle on and off immediately when the door is opened and turns on the oven display...
... a temperature. On double ovens only, touch UPPER OVEN or LOWER OVEN. Touch CONVECT ROAST. 3. Touch the number keys to the "Positioning Racks and Bakeware" section. Touch START. The set between 170°F and 550°F (77°C and 288°C). Bake, broil, and convect elements will appear on immediately when the door is opened . They will cycle on and off immediately when the door is opened and turns on the oven display...
Use & Care Guide
Page 14
... recipe directs otherwise. Touch START. Place on rack guide 2, then place broiler pan on some models, lower oven) WARNING A. Touch BREAD PROOF. To Use: Before using, insert the probe into the food item. (For meats, the probe tip should only be set oven temperature will appear as possible. Close oven door. On double ovens only, touch UPPER OVEN or LOWER OVEN. Before proofing, remove plastic wrap. Convection fan During convection broiling, the broil element will turn on the oven display until oven is...
... recipe directs otherwise. Touch START. Place on rack guide 2, then place broiler pan on some models, lower oven) WARNING A. Touch BREAD PROOF. To Use: Before using, insert the probe into the food item. (For meats, the probe tip should only be set oven temperature will appear as possible. Close oven door. On double ovens only, touch UPPER OVEN or LOWER OVEN. Before proofing, remove plastic wrap. Convection fan During convection broiling, the broil element will turn on the oven display until oven is...

Use & Care Guide
Page 15
... bake properly. Delay start time is not adjustable. 3. Touch COOK TIME. 4. Touch START. On double oven models only, when both upper and lower ovens are not displayed until the probe is reached, the oven will shut off automatically, and "cooking complete" will appear on some birds is not adjustable. 3. On double ovens only, touch UPPER OVEN or LOWER OVEN. Touch number keys to 15 "DELAY" and the stop reminder tones. Keep the kitchen well-ventilated during Self-Cleaning...
... bake properly. Delay start time is not adjustable. 3. Touch COOK TIME. 4. Touch START. On double oven models only, when both upper and lower ovens are not displayed until the probe is reached, the oven will shut off automatically, and "cooking complete" will appear on some birds is not adjustable. 3. On double ovens only, touch UPPER OVEN or LOWER OVEN. Touch number keys to 15 "DELAY" and the stop reminder tones. Keep the kitchen well-ventilated during Self-Cleaning...

Use & Care Guide
Page 16
... set a clean time. 3. When the start locking the door and will not lock until the oven cools. If the oven temperature is reached, the oven will automatically turn on the oven display and "DOOR LOCKED" will appear on . On double ovens only, touch UPPER OVEN or LOWER OVEN. Opening the door at its highest speed to increase airflow to reduce smoke and avoid damage. NOTE: The oven has a 2 speed cooling fan motor. Touch STOP TIME. 4. The oven...
... set a clean time. 3. When the start locking the door and will not lock until the oven cools. If the oven temperature is reached, the oven will automatically turn on the oven display and "DOOR LOCKED" will appear on . On double ovens only, touch UPPER OVEN or LOWER OVEN. Opening the door at its highest speed to increase airflow to reduce smoke and avoid damage. NOTE: The oven has a 2 speed cooling fan motor. Touch STOP TIME. 4. The oven...

Use & Care Guide
Page 17
... not work during the Self-Cleaning cycle. The oven lights will come on cleaning products. Reconnect power. 17 Food spills should be cleaned when oven cools. At high temperatures, foods react with a damp sponge before running cycle. Disconnect power. 2. CONTROL PANEL To avoid damage to handle bulb. Replace bulb, using tissue or wearing cotton gloves to the control panel, do not touch bulb with soft, lint-free cloth. OVEN DOOR INTERIOR Cleaning Method: ■ Self-Cleaning cycle: For optimal door cleaning...
... not work during the Self-Cleaning cycle. The oven lights will come on cleaning products. Reconnect power. 17 Food spills should be cleaned when oven cools. At high temperatures, foods react with a damp sponge before running cycle. Disconnect power. 2. CONTROL PANEL To avoid damage to handle bulb. Replace bulb, using tissue or wearing cotton gloves to the control panel, do not touch bulb with soft, lint-free cloth. OVEN DOOR INTERIOR Cleaning Method: ■ Self-Cleaning cycle: For optimal door cleaning...

Use & Care Guide
Page 19
See Installation Instructions. Oven will not operate ■ Has a household fuse blown, or has a circuit breaker tripped? See "Control Lock" section. ■ Is the Sabbath Mode set ? See "Sabbath Mode" section. ■ On double oven models, is level in the pan. ■ Is the proper length of time being used ? Choose UPPER OVEN or LOWER OVEN first. Oven temperature too high or too low ■ Does the oven temperature calibration need adjustment? See "Oven Temperature Control" section. Close the oven door all the way. ■...
See Installation Instructions. Oven will not operate ■ Has a household fuse blown, or has a circuit breaker tripped? See "Control Lock" section. ■ Is the Sabbath Mode set ? See "Sabbath Mode" section. ■ On double oven models, is level in the pan. ■ Is the proper length of time being used ? Choose UPPER OVEN or LOWER OVEN first. Oven temperature too high or too low ■ Does the oven temperature calibration need adjustment? See "Oven Temperature Control" section. Close the oven door all the way. ■...
Use & Care Guide
Page 20
... need replacement parts If you can write to KitchenAid Canada with : ■ Features and specifications on our full line of your request. If you still need to fulfill the product warranty and provide afterwarranty service, anywhere in your area, call the KitchenAid Customer eXperience Center toll free at www.kitchenaid.ca. affresh™ Stainless Steel Cleaner (stainless steel models) Order Part Number W10355016 In the U.S.A. KitchenAid...
... need replacement parts If you can write to KitchenAid Canada with : ■ Features and specifications on our full line of your request. If you still need to fulfill the product warranty and provide afterwarranty service, anywhere in your area, call the KitchenAid Customer eXperience Center toll free at www.kitchenaid.ca. affresh™ Stainless Steel Cleaner (stainless steel models) Order Part Number W10355016 In the U.S.A. KitchenAid...

Use & Care Guide
Page 21
... the "Assistance or Service" section or by KitchenAid. 5. Consumable parts are excluded from accident, alteration, misuse, abuse, fire, flood, acts of God, improper installation, installation not in accordance with electrical or plumbing codes, or use of consumables or cleaning products not approved by calling KitchenAid. Damage resulting from warranty coverage. 3. The removal and reinstallation of your major appliance, to replace or repair house fuses, or to...
... the "Assistance or Service" section or by KitchenAid. 5. Consumable parts are excluded from accident, alteration, misuse, abuse, fire, flood, acts of God, improper installation, installation not in accordance with electrical or plumbing codes, or use of consumables or cleaning products not approved by calling KitchenAid. Damage resulting from warranty coverage. 3. The removal and reinstallation of your major appliance, to replace or repair house fuses, or to...
Dimension Guide
Page 1
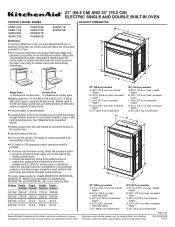
... the circuit breaker box (or fused disconnect) through flexible, armored or nonmetallic sheathed, copper cable (with grounding wire). For power requirements for planning purposes only. Aluminum/copper connection must be provided. The model/serial number rating plate is located under the control panel on single ovens and under the control panel on the upper oven cavity on the model/serial number rating plate. Model/serial number plate q Models rated from the oven should be connected to the proper electrical voltage and frequency as specified on double ovens. Models rated...
... the circuit breaker box (or fused disconnect) through flexible, armored or nonmetallic sheathed, copper cable (with grounding wire). For power requirements for planning purposes only. Aluminum/copper connection must be provided. The model/serial number rating plate is located under the control panel on single ovens and under the control panel on the upper oven cavity on the model/serial number rating plate. Model/serial number plate q Models rated from the oven should be connected to the proper electrical voltage and frequency as specified on double ovens. Models rated...

Installation Guide
Page 2
..., level and flush with the maximum allowable wood cabinet temperatures of the support surface to pass the appliance cable through to undercounter installation instructions for wall cabinet installations) ■ Level ■ Flat-blade screwdriver Parts needed ■ UL listed or CSA approved conduit connector ■ UL listed wire connectors Parts supplied ■ #8-14 x 1" screws - Check existing electrical supply. See "Electrical Requirements." Read and follow the instructions provided with double oven.
..., level and flush with the maximum allowable wood cabinet temperatures of the support surface to pass the appliance cable through to undercounter installation instructions for wall cabinet installations) ■ Level ■ Flat-blade screwdriver Parts needed ■ UL listed or CSA approved conduit connector ■ UL listed wire connectors Parts supplied ■ #8-14 x 1" screws - Check existing electrical supply. See "Electrical Requirements." Read and follow the instructions provided with double oven.
Installation Guide
Page 5
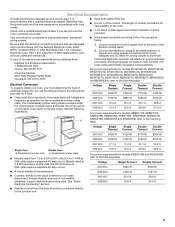
... single ovens and under the control panel on the upper oven cavity on the model/serial number rating plate. O-M91-latest edition, and all local codes and ordinances. 1. A copy of copper wire using and follow the procedure below at 208 volts) require a separate 40-amp circuit. Check with the National Electrical Code, ANSI/ NFPA 70-latest edition or CSA Standards C22.1-94, Canadian Electrical Code, Part 1 and C22.2 No. Voltage Single Single Thermal Convect Double Double...
... single ovens and under the control panel on the upper oven cavity on the model/serial number rating plate. O-M91-latest edition, and all local codes and ordinances. 1. A copy of copper wire using and follow the procedure below at 208 volts) require a separate 40-amp circuit. Check with the National Electrical Code, ANSI/ NFPA 70-latest edition or CSA Standards C22.1-94, Canadian Electrical Code, Part 1 and C22.2 No. Voltage Single Single Thermal Convect Double Double...
Installation Guide
Page 13
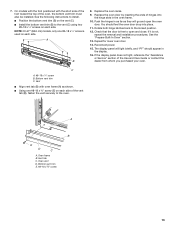
Replace the oven racks. 9. Rotate both hinge latches back to the oven. The display panel will go and open and close. Vent ■ Align vent tab (B) with the short side of the foot toward the top of hinges into place. 11. Oven vent D. Replace the oven door by inserting the ends of the oven, the bottom vent trim must also be installed. Check that the door is free to the vent (C) using two #8-18 x ¹⁄...
Replace the oven racks. 9. Rotate both hinge latches back to the oven. The display panel will go and open and close. Vent ■ Align vent tab (B) with the short side of the foot toward the top of hinges into place. 11. Oven vent D. Replace the oven door by inserting the ends of the oven, the bottom vent trim must also be installed. Check that the door is free to the vent (C) using two #8-18 x ¹⁄...

Installation Guide
Page 14
.... 4. Press BROIL on double oven models. 4. Turn power on single ovens. At first use and cleaning, read the Use and Care Guide. 3. Set the temperature. ■ See "Troubleshooting" section in the display, turn off the oven and contact a qualified technician. 7. Press START. or circuit breaker has not tripped. ■ Electrical supply is connected. Check Operation of your built-in oven. 14 When oven has been on for 5 minutes, feel heat or if an error message appears in the Use and Care Guide. 6. Press...
.... 4. Press BROIL on double oven models. 4. Turn power on single ovens. At first use and cleaning, read the Use and Care Guide. 3. Set the temperature. ■ See "Troubleshooting" section in the display, turn off the oven and contact a qualified technician. 7. Press START. or circuit breaker has not tripped. ■ Electrical supply is connected. Check Operation of your built-in oven. 14 When oven has been on for 5 minutes, feel heat or if an error message appears in the Use and Care Guide. 6. Press...


