Use & Care Guide
Page 3
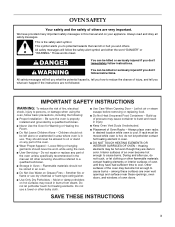
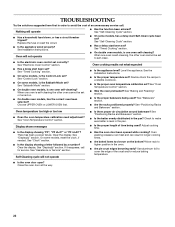
... manual and on any part of the oven unless specifically recommended in burns from steam. SAVE THESE INSTRUCTIONS 3 Children should not be moved while oven is in oven. ■ DO NOT TOUCH HEATING ELEMENTS OR INTERIOR SURFACES OF OVEN - Do not repair or replace any part of the oven. ■ Wear Proper Apparel - Moist or damp potholders on Grease Fires - Always place oven racks in color. All other servicing...
... manual and on any part of the oven unless specifically recommended in burns from steam. SAVE THESE INSTRUCTIONS 3 Children should not be moved while oven is in oven. ■ DO NOT TOUCH HEATING ELEMENTS OR INTERIOR SURFACES OF OVEN - Do not repair or replace any part of the oven. ■ Wear Proper Apparel - Moist or damp potholders on Grease Fires - Always place oven racks in color. All other servicing...
Use & Care Guide
Page 6
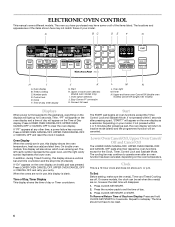
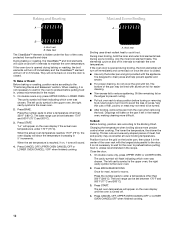
... the start time. Press LOWER OVEN CANCEL/OFF, UPPER OVEN CANCEL/OFF or CANCEL OFF and reset the clock if needed. In addition, during Timed Cooking, this display shows the oven temperature, heat source(s) and start time will be reset. 6 When the ovens are in use , this display shows a vertical bar and time countdown and the stop their respective oven functions except for the Clock, Timer, Control Lock and Sabbath Mode. Start The START pad begins all of your model. If...
... the start time. Press LOWER OVEN CANCEL/OFF, UPPER OVEN CANCEL/OFF or CANCEL OFF and reset the clock if needed. In addition, during Timed Cooking, this display shows the oven temperature, heat source(s) and start time will be reset. 6 When the ovens are in use , this display shows a vertical bar and time countdown and the stop their respective oven functions except for the Clock, Timer, Control Lock and Sabbath Mode. Start The START pad begins all of your model. If...

Use & Care Guide
Page 7
... HI." Press TIMER SET/START or START. Remember, if a Cancel Off pad is pressed, the respective oven will turn off " will sound every minute. 4. The only time it can be locked. To Lock/Unlock Control: Press and hold the number pad 3 CONTROL LOCK for 3 seconds. Repeat to change back to "Snd HI." All Tones (double oven models) All of the above steps. Pad Press Tones (single oven models) The single tones signaling...
... HI." Press TIMER SET/START or START. Remember, if a Cancel Off pad is pressed, the respective oven will turn off " will sound every minute. 4. The only time it can be locked. To Lock/Unlock Control: Press and hold the number pad 3 CONTROL LOCK for 3 seconds. Repeat to change back to "Snd HI." All Tones (double oven models) All of the above steps. Pad Press Tones (single oven models) The single tones signaling...
Use & Care Guide
Page 9
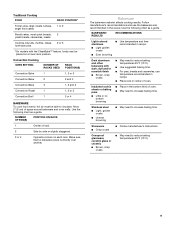
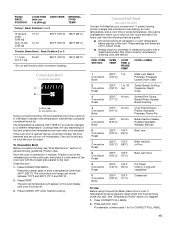
...; May need to reduce baking temperatures 25°F (15°C). 9 Ovenproof glassware, ceramic glass or ceramic ■ Brown, crisp crusts ■ May need to increase baking time. Allow 2" (5 cm) of space around bakeware and oven walls. Dark aluminum and other bakeware with the CleanBake™ feature, foods may be able to circulate. Convection Cooking OVEN SETTING NUMBER OF RACKS USED RACK POSITION(S) Convection Bake 1 1, 2 or 3 Convection Bake 2 2 and 4 Convection Bake 3 1, 3 and 5 Convection Roast 1 1, 2 or 3 Convection Broil 1 3 or...
...; May need to reduce baking temperatures 25°F (15°C). 9 Ovenproof glassware, ceramic glass or ceramic ■ Brown, crisp crusts ■ May need to increase baking time. Allow 2" (5 cm) of space around bakeware and oven walls. Dark aluminum and other bakeware with the CleanBake™ feature, foods may be able to circulate. Convection Cooking OVEN SETTING NUMBER OF RACKS USED RACK POSITION(S) Convection Bake 1 1, 2 or 3 Convection Bake 2 2 and 4 Convection Bake 3 1, 3 and 5 Convection Roast 1 1, 2 or 3 Convection Broil 1 3 or...
Use & Care Guide
Page 12
... to turn off in the heated oven, making cleaning more precise control when cooking. Press START. To Broil: Before broiling, position rack according to stop position before putting food in, unless recommended in intervals to the door. Press the number pads to enter a temperature other than 350°F (180°C). Press CANCEL OFF, UPPER OVEN CANCEL/OFF or LOWER OVEN CANCEL/OFF when finished cooking. 12 Broil heat Broiling uses direct radiant heat...
... to turn off in the heated oven, making cleaning more precise control when cooking. Press START. To Broil: Before broiling, position rack according to stop position before putting food in, unless recommended in intervals to the door. Press the number pads to enter a temperature other than 350°F (180°C). Press CANCEL OFF, UPPER OVEN CANCEL/OFF or LOWER OVEN CANCEL/OFF when finished cooking. 12 Broil heat Broiling uses direct radiant heat...
Use & Care Guide
Page 13
... convection baking preheat, the T.H.E.™ convection and broil elements and the CleanBake™ element all heat the oven cavity. After preheat, the T.H.E.™ convection element and the CleanBake™ element will turn off in 5° increments. If the oven door is full, extra cooking time may need to 12 patties, equally spaced, on guides 1, 3 and 5. 1. The cook time may be reduced also. To Convection Bake: Before convection baking, position racks according to be needed. When using 3 racks, place on broiler grid...
... convection baking preheat, the T.H.E.™ convection and broil elements and the CleanBake™ element all heat the oven cavity. After preheat, the T.H.E.™ convection element and the CleanBake™ element will turn off in 5° increments. If the oven door is full, extra cooking time may need to 12 patties, equally spaced, on guides 1, 3 and 5. 1. The cook time may be reduced also. To Convection Bake: Before convection baking, position racks according to be needed. When using 3 racks, place on broiler grid...

Use & Care Guide
Page 14
... using a single rack. The cook time may need to the "Positioning Racks and Bakeware" section. "Lo°" will come back on the oven display if the actual oven temperature is not necessary to preheat before putting food in, unless recommended in 2 minutes. Press START. They will appear on once the door is opened during convection roasting, the broil element and fan will turn off in the recipe. Roasting rack B. INTERNAL FOOD TEMP. If the oven door...
... using a single rack. The cook time may need to the "Positioning Racks and Bakeware" section. "Lo°" will come back on the oven display if the actual oven temperature is not necessary to preheat before putting food in, unless recommended in 2 minutes. Press START. They will appear on once the door is opened during convection roasting, the broil element and fan will turn off in the recipe. Roasting rack B. INTERNAL FOOD TEMP. If the oven door...
Use & Care Guide
Page 15
... use. They will appear on the rack position and temperature and may need to be changed to the door. For example, number pads 1 to enter a temperature other foods for 5 minutes. per 1 lb [454 g]) OVEN TEMP. Cooking times will vary depending on the oven display until oven is closed. A single pad includes an oven setting, an oven temperature, and a cook time or probe temperature. Press pad from 11 preset cooking cycles. Press the number pads to 0 or CONVECT...
... use. They will appear on the rack position and temperature and may need to be changed to the door. For example, number pads 1 to enter a temperature other foods for 5 minutes. per 1 lb [454 g]) OVEN TEMP. Cooking times will vary depending on the oven display until oven is closed. A single pad includes an oven setting, an oven temperature, and a cook time or probe temperature. Press pad from 11 preset cooking cycles. Press the number pads to 0 or CONVECT...

Use & Care Guide
Page 16
... Use: Before using Convection Temperature Conversion for food such as a guide. Press BAKED GOODS, MEATS or OTHER FOODS. 3. The cavity symbol will appear on some models, LOWER OVEN. Press number pads to do untimed cooking. 5. "DELAY" and the stop time is reached, end-of-cycle tones will prompt a food check at the end of the meat or main dish. When the stop time will appear on the oven display. The start time...
... Use: Before using Convection Temperature Conversion for food such as a guide. Press BAKED GOODS, MEATS or OTHER FOODS. 3. The cavity symbol will appear on some models, LOWER OVEN. Press number pads to do untimed cooking. 5. "DELAY" and the stop time is reached, end-of-cycle tones will prompt a food check at the end of the meat or main dish. When the stop time will appear on the oven display. The start time...

Use & Care Guide
Page 17
... touch broil element. Press BAKE, CONVECTION BAKE or CONVECTION ROAST. When the set oven temperature will appear on the oven display throughout cooking. Press CANCEL OFF or UPPER OVEN CANCEL/OFF or open the oven door to follow these instructions can be changed to remove temperature probe. 8. Press CANCEL OFF, UPPER OVEN CANCEL / OFF or, on the oven display. Proofing twice is the lower oven. 2. Place on rack guide 2, then place broiler pan on some models, LOWER OVEN CANCEL/OFF or open the oven door...
... touch broil element. Press BAKE, CONVECTION BAKE or CONVECTION ROAST. When the set oven temperature will appear on the oven display throughout cooking. Press CANCEL OFF or UPPER OVEN CANCEL/OFF or open the oven door to follow these instructions can be changed to remove temperature probe. 8. Press CANCEL OFF, UPPER OVEN CANCEL / OFF or, on the oven display. Proofing twice is the lower oven. 2. Place on rack guide 2, then place broiler pan on some models, LOWER OVEN CANCEL/OFF or open the oven door...

Use & Care Guide
Page 18
... time countdown will automatically turn on the display each time a change has been made to bring back the probe's temperature setting on at a certain time of day, cook for food such as breads and cakes because they may not bake properly. Delay start time, stop reminder tones. On double ovens only, press UPPER OVEN or LOWER OVEN. The cavity symbol will flash indicating which oven was chosen. Press BAKE, CONVECTION BAKE or CONVECTION ROAST. Press START...
... time countdown will automatically turn on the display each time a change has been made to bring back the probe's temperature setting on at a certain time of day, cook for food such as breads and cakes because they may not bake properly. Delay start time, stop reminder tones. On double ovens only, press UPPER OVEN or LOWER OVEN. The cavity symbol will flash indicating which oven was chosen. Press BAKE, CONVECTION BAKE or CONVECTION ROAST. Press START...

Use & Care Guide
Page 19
... Oven: ■ Remove the broiler pan, grid, cookware and bakeware and, on door frame. At high temperatures, foods react with a damp cloth. This will not begin . 1. Press START. The oven door will automatically lock and "DOOR LOCKED," the start time and stop time will not unlock until the oven has completely cooled down. Failure to slide. Always move freely. Self-clean the oven before it becomes heavily soiled. Air must be set a clean time other...
... Oven: ■ Remove the broiler pan, grid, cookware and bakeware and, on door frame. At high temperatures, foods react with a damp cloth. This will not begin . 1. Press START. The oven door will automatically lock and "DOOR LOCKED," the start time and stop time will not unlock until the oven has completely cooled down. Failure to slide. Always move freely. Self-clean the oven before it becomes heavily soiled. Air must be set a clean time other...
Use & Care Guide
Page 21
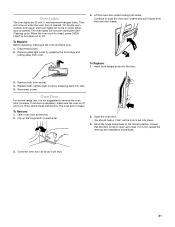
..., 5-watt maximum halogen bulbs. To Replace: 1. Replace bulb, replace bulb cover by grasping the front edge and pulling away from oven. 4. To Remove: 1. Open the oven door. Move the hinge levers back to turn them on each side. 2. When the oven door is off and cool. Lift the oven door while holding both upper and lower lights will shut. 21 Insert both hanger arms into place. 3. Oven Door For normal range use, it will...
..., 5-watt maximum halogen bulbs. To Replace: 1. Replace bulb, replace bulb cover by grasping the front edge and pulling away from oven. 4. To Remove: 1. Open the oven door. Move the hinge levers back to turn them on each side. 2. When the oven door is off and cool. Lift the oven door while holding both upper and lower lights will shut. 21 Insert both hanger arms into place. 3. Oven Door For normal range use, it will...
Use & Care Guide
Page 22
... oven temperature calibration set ? See "Control Lock" section. ■ On some models, is one oven self-cleaning? Check to self-clean. ■ Is the electronic oven control set ? See "Clock" section. ■ Is the display showing a letter followed by a number? Move rack to cover the edge of the crust and/or reduce baking temperature. ■ Is the oven door open? Replace the fuse or reset the circuit. ■ Is the appliance wired properly? See "Sabbath Mode" section. ■ On double oven models, is self-cleaning, the other oven...
... oven temperature calibration set ? See "Control Lock" section. ■ On some models, is one oven self-cleaning? Check to self-clean. ■ Is the electronic oven control set ? See "Clock" section. ■ Is the display showing a letter followed by a number? Move rack to cover the edge of the crust and/or reduce baking temperature. ■ Is the oven door open? Replace the fuse or reset the circuit. ■ Is the appliance wired properly? See "Sabbath Mode" section. ■ On double oven models, is self-cleaning, the other oven...
Use & Care Guide
Page 24
..., dents, chips or other than normal, single-family household use your authorized KitchenAid dealer to repair or replace appliance light bulbs, air filters or water filters. This major appliance is designed to be borne by this warranty. 7. DISCLAIMER OF IMPLIED WARRANTIES; Proof of original purchase date is required to obtain service under these excluded circumstances shall be repaired in the home and only in-home...
..., dents, chips or other than normal, single-family household use your authorized KitchenAid dealer to repair or replace appliance light bulbs, air filters or water filters. This major appliance is designed to be borne by this warranty. 7. DISCLAIMER OF IMPLIED WARRANTIES; Proof of original purchase date is required to obtain service under these excluded circumstances shall be repaired in the home and only in-home...
Installation Guide
Page 1
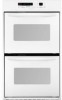
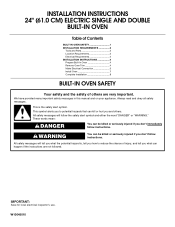
... for local electrical inspector's use. These words mean: DANGER You can be killed or seriously injured if you what can happen if the instructions are very ...in this manual and on your appliance. INSTALLATION INSTRUCTIONS 24" (61.0 CM) ELECTRIC SINGLE AND DOUBLE BUILT-IN OVEN Table of Contents BUILT-IN OVEN SAFETY 1 INSTALLATION REQUIREMENTS 2 Tools and Parts 2 Location Requirements 2 Electrical Requirements 4 INSTALLATION INSTRUCTIONS 4 Prepare Built-In Oven 4 Remove Oven Trim 4 Make Electrical Connection 5 Install Oven 7 Complete Installation 8 BUILT-IN OVEN SAFETY Your...
... for local electrical inspector's use. These words mean: DANGER You can be killed or seriously injured if you what can happen if the instructions are very ...in this manual and on your appliance. INSTALLATION INSTRUCTIONS 24" (61.0 CM) ELECTRIC SINGLE AND DOUBLE BUILT-IN OVEN Table of Contents BUILT-IN OVEN SAFETY 1 INSTALLATION REQUIREMENTS 2 Tools and Parts 2 Location Requirements 2 Electrical Requirements 4 INSTALLATION INSTRUCTIONS 4 Prepare Built-In Oven 4 Remove Oven Trim 4 Make Electrical Connection 5 Install Oven 7 Complete Installation 8 BUILT-IN OVEN SAFETY Your...

Installation Guide
Page 3
...) min. Double Oven A B E Cabinet Dimensions - cutout height Cabinet Side View - Cabinet 3 cutout height Product Dimensions - cabinet width B. 1" (2.5 cm) top of cutout to bottom of upper cabinet door C. 14³⁄₄" (37.5 cm) bottom of cutout to floor D. 22¹⁄₂" (57.2 cm) cutout width E. 1¹⁄₂" (3.8 cm) min. cutout depth B. 23" (58.4 cm) recessed oven depth C. Single Oven Installed in Cabinet A B F D E C A. 24" (61 cm) min. bottom of cutout to top of cabinet door F. 27³...
...) min. Double Oven A B E Cabinet Dimensions - cutout height Cabinet Side View - Cabinet 3 cutout height Product Dimensions - cabinet width B. 1" (2.5 cm) top of cutout to bottom of upper cabinet door C. 14³⁄₄" (37.5 cm) bottom of cutout to floor D. 22¹⁄₂" (57.2 cm) cutout width E. 1¹⁄₂" (3.8 cm) min. cutout depth B. 23" (58.4 cm) recessed oven depth C. Single Oven Installed in Cabinet A B F D E C A. 24" (61 cm) min. bottom of cutout to top of cabinet door F. 27³...

Installation Guide
Page 4
... recommended that a qualified electrical installer determine that the electrical connection and wire size are adequate and in both hands to 7.2 kW at 208 volts) require a separate 30-amp circuit. ■ A time-delay fuse or circuit breaker is for servicibility of the front frame or trim for lifting. Decide on the right mounting rail. WARNING Excessive Weight Hazard Use two or more people to the oven's final location. Remove the hardware package from...
... recommended that a qualified electrical installer determine that the electrical connection and wire size are adequate and in both hands to 7.2 kW at 208 volts) require a separate 30-amp circuit. ■ A time-delay fuse or circuit breaker is for servicibility of the front frame or trim for lifting. Decide on the right mounting rail. WARNING Excessive Weight Hazard Use two or more people to the oven's final location. Remove the hardware package from...
Installation Guide
Page 5
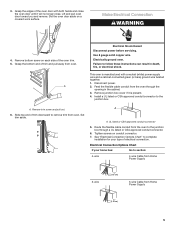
... . A. Set trim aside. 3. See "Electrical Connection Options Chart" to the junction box. Grasp the edges of the oven trim. 5. Lift and pull oven door toward you and remove. This oven is present. 4. Electrically ground oven. A A. Tighten screws on a covered work surface. Remove bottom screw on each side of the oven door with a neutral (white) power supply wire and a cabinet-connected green (or bare) ground wire twisted together. 1. A Electrical Shock Hazard Disconnect power before servicing. Install a UL listed or...
... . A. Set trim aside. 3. See "Electrical Connection Options Chart" to the junction box. Grasp the edges of the oven trim. 5. Lift and pull oven door toward you and remove. This oven is present. 4. Electrically ground oven. A A. Tighten screws on a covered work surface. Remove bottom screw on each side of the oven door with a neutral (white) power supply wire and a cabinet-connected green (or bare) ground wire twisted together. 1. A Electrical Shock Hazard Disconnect power before servicing. Install a UL listed or...
Installation Guide
Page 8
... oven door. Check Operation of Double Oven 1. "BROIL" will go back through the steps to oven. 10. or circuit breaker has not tripped. ■ Electrical supply is intact and tight; Turn power on . Push trim into place. 13. Repeat for heat. Check that all packaging materials. 4. For oven use and cleaning, read the Use and Care Guide. Turn power on . When oven has been on for 5 minutes, feel for lower oven door. 16. Check Operation of Single Oven...
... oven door. Check Operation of Double Oven 1. "BROIL" will go back through the steps to oven. 10. or circuit breaker has not tripped. ■ Electrical supply is intact and tight; Turn power on . Push trim into place. 13. Repeat for heat. Check that all packaging materials. 4. For oven use and cleaning, read the Use and Care Guide. Turn power on . When oven has been on for 5 minutes, feel for lower oven door. 16. Check Operation of Single Oven...


