Use & Care Guide
Page 3
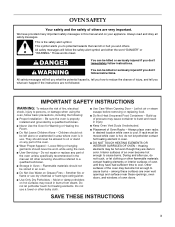
...extinguisher. ■ Use Only Dry Potholders - Moist or damp potholders on your appliance. Heating elements may be stored in burns from steam. Smother fire or flame or use . Interior surfaces of the oven. ■ Wear Proper Apparel - All safety messages will tell you what can... instructions. We have had sufficient time to burst and result in injury. ■ Keep Oven Vent Ducts Unobstructed. ■ Placement of the oven may result in an oven. ■ Do Not Use Water on any part of fire, electrical shock, injury to reduce the chance of others .
...extinguisher. ■ Use Only Dry Potholders - Moist or damp potholders on your appliance. Heating elements may be stored in burns from steam. Smother fire or flame or use . Interior surfaces of the oven. ■ Wear Proper Apparel - All safety messages will tell you what can... instructions. We have had sufficient time to burst and result in injury. ■ Keep Oven Vent Ducts Unobstructed. ■ Placement of the oven may result in an oven. ■ Do Not Use Water on any part of fire, electrical shock, injury to reduce the chance of others .

Use & Care Guide
Page 4
... is essential for a good seal. Care should be taken not to cause cancer, birth defects, or other reproductive harm. This appliance can cause low-level exposure to such substances. Remove broiler pan and other reproductive harm, and requires businesses to warn of potential exposure... and toluene. 4 WARNING: This product contains a chemical known to the State of the oven. ■ Clean Only Parts Listed in Manual. ■ Before Self-Cleaning the Oven - No commercial oven cleaner or oven liner protective coating of any kind should be used in or around any part of California to...
... is essential for a good seal. Care should be taken not to cause cancer, birth defects, or other reproductive harm. This appliance can cause low-level exposure to such substances. Remove broiler pan and other reproductive harm, and requires businesses to warn of potential exposure... and toluene. 4 WARNING: This product contains a chemical known to the State of the oven. ■ Clean Only Parts Listed in Manual. ■ Before Self-Cleaning the Oven - No commercial oven cleaner or oven liner protective coating of any kind should be used in or around any part of California to...
Use & Care Guide
Page 6
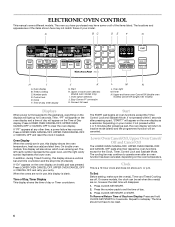
... canceled, depending on the Time of day or Timer countdown. or p.m. ELECTRONIC OVEN CONTROL This manual covers different models. Oven option selectors J. On double oven models, this display is a 12-hour clock and does not show which oven is first supplied to the appliance, everything on the displays will appear on , however the start time. The...
... canceled, depending on the Time of day or Timer countdown. or p.m. ELECTRONIC OVEN CONTROL This manual covers different models. Oven option selectors J. On double oven models, this display is a 12-hour clock and does not show which oven is first supplied to the appliance, everything on the displays will appear on , however the start time. The...
Use & Care Guide
Page 10
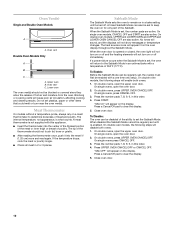
... air and moisture from the oven. A meat thermometer is not supplied with this appliance. ■ Insert the thermometer into the meat ½" (1.25 cm) more and read again. On single ovens press CANCEL OFF. 3. Close oven door. 10 Oven vent Double Oven Models Only A B C A. "SAb On" will enable both ovens. 1. To Disable: The oven can be blocked or covered...
... air and moisture from the oven. A meat thermometer is not supplied with this appliance. ■ Insert the thermometer into the meat ½" (1.25 cm) more and read again. On single ovens press CANCEL OFF. 3. Close oven door. 10 Oven vent Double Oven Models Only A B C A. "SAb On" will enable both ovens. 1. To Disable: The oven can be blocked or covered...
Use & Care Guide
Page 12
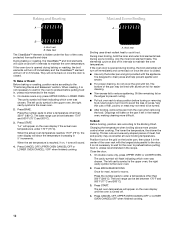
...appliance. Press BAKE. Press CANCEL OFF, UPPER OVEN CANCEL/OFF or LOWER OVEN CANCEL / OFF when finished cooking. During maxi broiling, both the inner and outer broil elements heat. Very thin cuts of meat, fish and poultry may cook better at lower broiling temperatures. On double ovens only, press UPPER OVEN or LOWER OVEN.... The left cavity symbol is the upper oven, the right cavity symbol is designed to drain juices and help prevent spatter and smoke...
...appliance. Press BAKE. Press CANCEL OFF, UPPER OVEN CANCEL/OFF or LOWER OVEN CANCEL / OFF when finished cooking. During maxi broiling, both the inner and outer broil elements heat. Very thin cuts of meat, fish and poultry may cook better at lower broiling temperatures. On double ovens only, press UPPER OVEN or LOWER OVEN.... The left cavity symbol is the upper oven, the right cavity symbol is designed to drain juices and help prevent spatter and smoke...
Use & Care Guide
Page 22
...or turned on the bottom? Level the appliance. Clear the display. Oven peeking releases oven heat and can result in longer cooking times. ■ Are baked items too brown on . ■ On double oven models, has the correct oven been selected? There has been a power ...and Bakeware" section. ■ Is there proper air circulation around bakeware? See "Electronic Oven Control" section. Choose UPPER OVEN or LOWER OVEN first. See "Oven Temperature Control" section. ■ Is the appliance level? See "Baking and Roasting" section. ■ Is the proper bakeware being used...
...or turned on the bottom? Level the appliance. Clear the display. Oven peeking releases oven heat and can result in longer cooking times. ■ Are baked items too brown on . ■ On double oven models, has the correct oven been selected? There has been a power ...and Bakeware" section. ■ Is there proper air circulation around bakeware? See "Electronic Oven Control" section. Choose UPPER OVEN or LOWER OVEN first. See "Oven Temperature Control" section. ■ Is the appliance level? See "Baking and Roasting" section. ■ Is the proper bakeware being used...
Use & Care Guide
Page 23
... every new KITCHENAID® appliance. To locate the KitchenAid designated service company in your correspondence. Portable appliances, bakeware, cookware, gadgets and textiles are trained to KitchenAid Canada with any questions or concerns at : KitchenAid Brand Home Appliances Customer eXperience Center... Referrals to order replacement parts, we recommend that you the cost of appliances. ■ Referrals to KitchenAid with any questions or concerns at : Customer Interaction Center KitchenAid Canada 1901 Minnesota Court Mississauga, Ontario L5N 3A7 Please include a daytime phone...
... every new KITCHENAID® appliance. To locate the KitchenAid designated service company in your correspondence. Portable appliances, bakeware, cookware, gadgets and textiles are trained to KitchenAid Canada with any questions or concerns at : KitchenAid Brand Home Appliances Customer eXperience Center... Referrals to order replacement parts, we recommend that you the cost of appliances. ■ Referrals to KitchenAid with any questions or concerns at : Customer Interaction Center KitchenAid Canada 1901 Minnesota Court Mississauga, Ontario L5N 3A7 Please include a daytime phone...
Use & Care Guide
Page 24
... REPAIR AS PROVIDED HEREIN. If outside the 50 United States and Canada, contact your major appliance if it is used in accordance with electrical or plumbing codes, or use your major appliance. Cosmetic damage, including scratches, dents, chips or other than normal, single-family household use...the second through due to or furnished with the removal from the date of your authorized KitchenAid dealer to the appliance. 8. Expenses for travel and transportation for the stainless steel oven cavity/inner door if the part rusts through fifth years from the date of purchase, when...
... REPAIR AS PROVIDED HEREIN. If outside the 50 United States and Canada, contact your major appliance if it is used in accordance with electrical or plumbing codes, or use your major appliance. Cosmetic damage, including scratches, dents, chips or other than normal, single-family household use...the second through due to or furnished with the removal from the date of your authorized KitchenAid dealer to the appliance. 8. Expenses for travel and transportation for the stainless steel oven cavity/inner door if the part rusts through fifth years from the date of purchase, when...
Installation Guide
Page 1
... to reduce the chance of others . INSTALLATION INSTRUCTIONS 24" (61.0 CM) ELECTRIC SINGLE AND DOUBLE BUILT-IN OVEN Table of Contents BUILT-IN OVEN SAFETY 1 INSTALLATION REQUIREMENTS 2 Tools and Parts 2 Location Requirements 2 Electrical Requirements 4 INSTALLATION INSTRUCTIONS 4 Prepare Built-In Oven 4 Remove Oven Trim 4 Make Electrical Connection 5 Install Oven 7 Complete Installation 8 BUILT-IN OVEN SAFETY Your safety and the safety of injury...
... to reduce the chance of others . INSTALLATION INSTRUCTIONS 24" (61.0 CM) ELECTRIC SINGLE AND DOUBLE BUILT-IN OVEN Table of Contents BUILT-IN OVEN SAFETY 1 INSTALLATION REQUIREMENTS 2 Tools and Parts 2 Location Requirements 2 Electrical Requirements 4 INSTALLATION INSTRUCTIONS 4 Prepare Built-In Oven 4 Remove Oven Trim 4 Make Electrical Connection 5 Install Oven 7 Complete Installation 8 BUILT-IN OVEN SAFETY Your safety and the safety of injury...
Installation Guide
Page 2
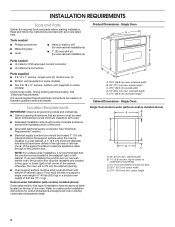
... required tools and parts before starting installation. single oven (2), double oven (4) ■ Bottom vent (supplied on rear wall behind oven, the junction box must be able to undercounter installation instructions for wall cabinet installations) Parts needed ■ Phillips screwdriver ■ Measuring tape ■ Level ■ Hand or electric drill (for wall cabinet installations) ■ 1" (25 mm) drill bit...
... required tools and parts before starting installation. single oven (2), double oven (4) ■ Bottom vent (supplied on rear wall behind oven, the junction box must be able to undercounter installation instructions for wall cabinet installations) Parts needed ■ Phillips screwdriver ■ Measuring tape ■ Level ■ Hand or electric drill (for wall cabinet installations) ■ 1" (25 mm) drill bit...
