
Use & Care Guide
Page 5
... should work properly once it . ■ The microwave oven should be grounded. Do not use of the grounding plug can result in a risk of the trim kits listed in back or other injury. Allow a few inches of any needed repairs. Empty the microwave oven of space at a temperature above 50°F (10...
... should work properly once it . ■ The microwave oven should be grounded. Do not use of the grounding plug can result in a risk of the trim kits listed in back or other injury. Allow a few inches of any needed repairs. Empty the microwave oven of space at a temperature above 50°F (10...

Use & Care Guide
Page 15
... Black MK2167AS / Stainless 30" (76.2 cm) MK2160AW / White MK2160AB / Black MK2160AS / Stainless *The built-in trim kits can be covered by kit model number. KITCHENAID® COUNTERTOP MICROWAVE LIMITED WARRANTY ONE YEAR LIMITED WARRANTY For one of appliances. ■ Installation information. ■ Use and... on our full line of the following trim kits*. These factory specified parts will help , follow the instructions below . Call the KitchenAid Customer eXperience Center toll free: 1-800-422-1230. To locate the KitchenAid designated service company in materials or workmanship ...
... Black MK2167AS / Stainless 30" (76.2 cm) MK2160AW / White MK2160AB / Black MK2160AS / Stainless *The built-in trim kits can be covered by kit model number. KITCHENAID® COUNTERTOP MICROWAVE LIMITED WARRANTY ONE YEAR LIMITED WARRANTY For one of appliances. ■ Installation information. ■ Use and... on our full line of the following trim kits*. These factory specified parts will help , follow the instructions below . Call the KitchenAid Customer eXperience Center toll free: 1-800-422-1230. To locate the KitchenAid designated service company in materials or workmanship ...

Installation Guide
Page 1
...be killed or seriously injured if you and others are not followed. MICROWAVE OVEN BUILT-IN TRIM KIT INSTALLATION INSTRUCTIONS Built-In Trim Kit Models MK2167, MK2160 UL listed for use over any electric or gas built-in this manual ... 1 INSTALLATION INSTRUCTIONS 2 Tools and Parts 2 Location Requirements 2 Required Cutout Dimensions 2 Trim Kit Frame Dimensions 2 Electrical Requirements 3 Prepare Microwave Oven 3 Prepare Cutout/Cabinet Opening 3 Install the Microwave Oven 4 Install Trim Kit Frame 5 SÉCURITÉ DU FOUR À MICRO-ONDES 7 INSTRUCTIONS D'INSTALLATION...
...be killed or seriously injured if you and others are not followed. MICROWAVE OVEN BUILT-IN TRIM KIT INSTALLATION INSTRUCTIONS Built-In Trim Kit Models MK2167, MK2160 UL listed for use over any electric or gas built-in this manual ... 1 INSTALLATION INSTRUCTIONS 2 Tools and Parts 2 Location Requirements 2 Required Cutout Dimensions 2 Trim Kit Frame Dimensions 2 Electrical Requirements 3 Prepare Microwave Oven 3 Prepare Cutout/Cabinet Opening 3 Install the Microwave Oven 4 Install Trim Kit Frame 5 SÉCURITÉ DU FOUR À MICRO-ONDES 7 INSTRUCTIONS D'INSTALLATION...

Installation Guide
Page 2
...), and a clearance of 36" (91.4 cm) from lower oven cutout ceiling to microwave oven cutout floor. ■ Trim kit frame extends 1 2.7 cm) above a built-in oven. Trim kit frame overhang B. Read and follow the instructions provided with any tools listed here. ■ Measuring tape ■ Pencil &#... the floor to the cutout floor. Make sure the surrounding cabinetry has clearance to scale Rails (2) Bottom duct Trim kit frame Short screws (14) (11 + 3 extra) Long wood screws (6 - Trim Kit Frame Dimensions 26 68.2 cm)** 29 ³⁄₄" (75.6 cm)** 19 ¹⁄₈"...
...), and a clearance of 36" (91.4 cm) from lower oven cutout ceiling to microwave oven cutout floor. ■ Trim kit frame extends 1 2.7 cm) above a built-in oven. Trim kit frame overhang B. Read and follow the instructions provided with any tools listed here. ■ Measuring tape ■ Pencil &#... the floor to the cutout floor. Make sure the surrounding cabinetry has clearance to scale Rails (2) Bottom duct Trim kit frame Short screws (14) (11 + 3 extra) Long wood screws (6 - Trim Kit Frame Dimensions 26 68.2 cm)** 29 ³⁄₄" (75.6 cm)** 19 ¹⁄₈"...
Installation Guide
Page 5
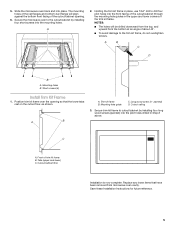
... into the pilot holes drilled in Step 2 above. A 2. C A. Cutout/cabinet floor Installation is now complete. Short screws (4) Install Trim Kit Frame 1. Secure trim kit frame to the cutout/cabinet by installing four long wood screws (painted) into the mounting holes. Replace any loose items that the lower tabs... rest on the cutout floor, as shown. Holding the trim kit frame in the upper and lower corners of the cutout/cabinet opening so that have been removed from the bottom at an angle ...
... into the pilot holes drilled in Step 2 above. A 2. C A. Cutout/cabinet floor Installation is now complete. Short screws (4) Install Trim Kit Frame 1. Secure trim kit frame to the cutout/cabinet by installing four long wood screws (painted) into the mounting holes. Replace any loose items that the lower tabs... rest on the cutout floor, as shown. Holding the trim kit frame in the upper and lower corners of the cutout/cabinet opening so that have been removed from the bottom at an angle ...


