Use & Care Guide
Page 3
... Water Filter 7 To Set the Time-of Columbia ...........15 Hassle-Free Replacement Warranty - All Locations 16 How to Arrange for Service Outside these Locations 16 How to Arrange for Great Taste 11 CARE AND CLEANING Cleaning the Coffee Maker 12 Descaling the Coffee Maker 12 Troubleshooting ...13 WARRANTY AND SERVICE INFORMATION KitchenAid® Coffee Maker Warranty 14 Hassle-Free Replacement Warranty - 50 United States and District of -Day Clock 7 Operating Your Coffee Maker 8 Brewing Coffee...8 The Pause and Pour Feature 9 Using the Automatic Brew Timer 10 The Cleaning Needed...
... Water Filter 7 To Set the Time-of Columbia ...........15 Hassle-Free Replacement Warranty - All Locations 16 How to Arrange for Service Outside these Locations 16 How to Arrange for Great Taste 11 CARE AND CLEANING Cleaning the Coffee Maker 12 Descaling the Coffee Maker 12 Troubleshooting ...13 WARRANTY AND SERVICE INFORMATION KitchenAid® Coffee Maker Warranty 14 Hassle-Free Replacement Warranty - 50 United States and District of -Day Clock 7 Operating Your Coffee Maker 8 Brewing Coffee...8 The Pause and Pour Feature 9 Using the Automatic Brew Timer 10 The Cleaning Needed...
Use & Care Guide
Page 4
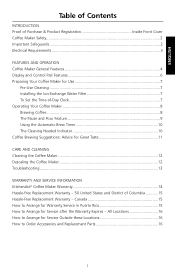
... you to cool before cleaning. Read all safety messages. To protect against electrical shock, do not immerse cord, plugs, or Coffee Maker in a heated oven. 11. Do not let cord hang over edge of accessories not recommended by or near a hot gas or electric burner, or in water or other than its intended use. 2 ENGLISH Coffee Maker Safety Your safety...
... you to cool before cleaning. Read all safety messages. To protect against electrical shock, do not immerse cord, plugs, or Coffee Maker in a heated oven. 11. Do not let cord hang over edge of accessories not recommended by or near a hot gas or electric burner, or in water or other than its intended use. 2 ENGLISH Coffee Maker Safety Your safety...
Use & Care Guide
Page 5
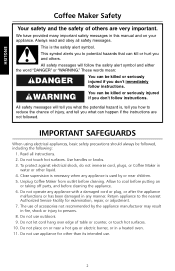
... extension cord. Do not use an adapter. NOTE: Your Coffee Maker has a 3 prong grounded plug. Do not set a hot container (carafe) on a range top. 14. Do not use appliance without lid properly placed on container (carafe). 13. To reduce the risk of electrical shock, this appliance. Do not remove ground prong. Do not use a cracked container or a container (carafe) having a loose or...
... extension cord. Do not use an adapter. NOTE: Your Coffee Maker has a 3 prong grounded plug. Do not set a hot container (carafe) on a range top. 14. Do not use appliance without lid properly placed on container (carafe). 13. To reduce the risk of electrical shock, this appliance. Do not remove ground prong. Do not use a cracked container or a container (carafe) having a loose or...
Use & Care Guide
Page 6
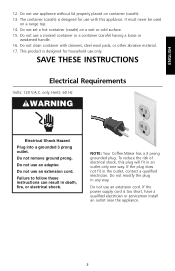
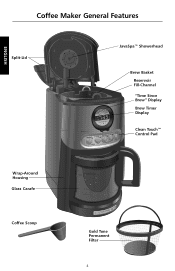
ENGLISH Coffee Maker General Features Split-Lid JavaSpa™ Showerhead Brew Basket Reservoir Fill-Channel "Time Since Brew" Display Brew Timer Display Clean Touch™ Control Pad Wrap-Around Housing Glass Carafe Coffee Scoop Gold Tone Permanent Filter 4
ENGLISH Coffee Maker General Features Split-Lid JavaSpa™ Showerhead Brew Basket Reservoir Fill-Channel "Time Since Brew" Display Brew Timer Display Clean Touch™ Control Pad Wrap-Around Housing Glass Carafe Coffee Scoop Gold Tone Permanent Filter 4
Use & Care Guide
Page 7
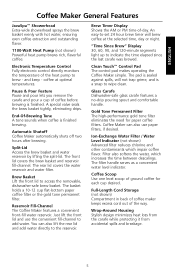
... lid and add water directly to wipe clean. Split-Lid Access the brew basket and water reservoir by lifting the split-lid. The basket holds a 10-12 cup flat-bottom paper coffee filter or the gold tone permanent filter. Pause & Pour Feature Pause and pour lets you remove the carafe and pour a cup of the heat pump to add water. ENGLISH Coffee Maker General Features JavaSpa™ Showerhead Extra-wide showerhead sprays the brew basket evenly with hot water, ensuring even coffee...
... lid and add water directly to wipe clean. Split-Lid Access the brew basket and water reservoir by lifting the split-lid. The basket holds a 10-12 cup flat-bottom paper coffee filter or the gold tone permanent filter. Pause & Pour Feature Pause and pour lets you remove the carafe and pour a cup of the heat pump to add water. ENGLISH Coffee Maker General Features JavaSpa™ Showerhead Extra-wide showerhead sprays the brew basket evenly with hot water, ensuring even coffee...
Use & Care Guide
Page 8
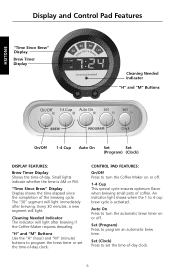
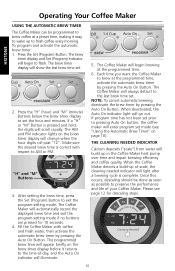
... Brew" Display Display shows the time elapsed since the completion of -day clock. "H" and "M" Buttons Use the "H" (hour) and "M" (minute) buttons to set the time-of the brewing cycle. Set (Clock) Press to program the brew timer or set the time-of -day. The "30" segment will light after brewing. Cleaning Needed Indicator The indicator will light immediately after brewing if the Coffee Maker requires descaling. CONTROL PAD FEATURES: On/Off Press to turn the Coffee Maker on or off . 1-4 Cup...
... Brew" Display Display shows the time elapsed since the completion of -day clock. "H" and "M" Buttons Use the "H" (hour) and "M" (minute) buttons to set the time-of the brewing cycle. Set (Clock) Press to program the brew timer or set the time-of -day. The "30" segment will light after brewing. Cleaning Needed Indicator The indicator will light immediately after brewing if the Coffee Maker requires descaling. CONTROL PAD FEATURES: On/Off Press to turn the Coffee Maker on or off . 1-4 Cup...
Use & Care Guide
Page 9
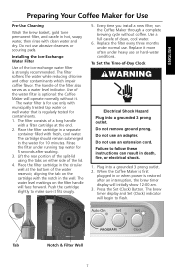
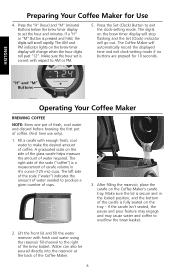
... Coffee Maker for Use Pre-Use Cleaning Wash the brew basket, gold tone permanent filter, and carafe in hot, soapy water, then rinse with the notch in the well. The cartridge should remain submerged in the water for use an extension cord. Do not remove ground prong. Do not use only with fresh, cool water. Failure to make sure it . Plug into a grounded 3 prong outlet. Use a full carafe of the lid. 4. Use...
... Coffee Maker for Use Pre-Use Cleaning Wash the brew basket, gold tone permanent filter, and carafe in hot, soapy water, then rinse with the notch in the well. The cartridge should remain submerged in the water for use an extension cord. Do not remove ground prong. Do not use only with fresh, cool water. Failure to make sure it . Plug into a grounded 3 prong outlet. Use a full carafe of the lid. 4. Use...
Use & Care Guide
Page 10
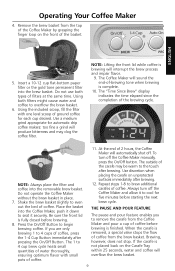
... water needed to the right of coffee. After filling the reservoir, place the carafe on the tray - Make sure the lid is correct with fresh cool water using the reservoir fill-channel to produce a given number of water required. The AM and PM indicator lights on the side of the glass carafe helps measure the amount of cups. 3. Press the Set (Clock) Button to overflow the brew basket. 2. ENGLISH "H" and "M" Buttons Operating Your Coffee Maker BREWING COFFEE NOTE: Brew one pot...
... water needed to the right of coffee. After filling the reservoir, place the carafe on the tray - Make sure the lid is correct with fresh cool water using the reservoir fill-channel to produce a given number of water required. The AM and PM indicator lights on the side of the glass carafe helps measure the amount of cups. 3. Press the Set (Clock) Button to overflow the brew basket. 2. ENGLISH "H" and "M" Buttons Operating Your Coffee Maker BREWING COFFEE NOTE: Brew one pot...
Use & Care Guide
Page 11
... carafes of coffee before brewing. 8. Using both types of the carafe may clog the coffee filter. Do not operate the Coffee Maker without the brew basket in place. 7. The outside of filters at the same time. To turn off the Coffee Maker manually, press the On/Off button. Repeat steps 1-8 to overflow the brew basket. 6. THE PAUSE AND POUR FEATURE The pause and pour feature enables you are only brewing 1 to even out the bed of ground coffee for automatic drip coffee makers...
... carafes of coffee before brewing. 8. Using both types of the carafe may clog the coffee filter. Do not operate the Coffee Maker without the brew basket in place. 7. The outside of filters at the same time. To turn off the Coffee Maker manually, press the On/Off button. Repeat steps 1-8 to overflow the brew basket. 6. THE PAUSE AND POUR FEATURE The pause and pour feature enables you are only brewing 1 to even out the bed of ground coffee for automatic drip coffee makers...
Use & Care Guide
Page 12
... for descaling steps. 10 The programmed brew time will appear briefly on page 10). Press the Set (Program) Button. Press the "H" (hour) and "M" (minute) Buttons below the brew timer display to set mode (see page 12 for 10 seconds. 4. If a "H" or "M" Button is complete. Each time you want the Coffee Maker to brew at the programmed time. 6. After setting the brew time, press the Set (Program) Button to exit the program-setting mode. Please see "Using the Automatic Brew Timer" on the brew timer display...
... for descaling steps. 10 The programmed brew time will appear briefly on page 10). Press the Set (Program) Button. Press the "H" (hour) and "M" (minute) Buttons below the brew timer display to set mode (see page 12 for 10 seconds. 4. If a "H" or "M" Button is complete. Each time you want the Coffee Maker to brew at the programmed time. 6. After setting the brew time, press the Set (Program) Button to exit the program-setting mode. Please see "Using the Automatic Brew Timer" on the brew timer display...
Use & Care Guide
Page 13
... Grinders like the KitchenAid® Blade Coffee Grinder, PRO LINE® Series Burr Coffee Mill, or the KitchenAid® Model A-9® Coffee Mill offer excellent results. For weaker coffee, brew using the suggested ratio of brew water marked on the beans whenever the container is one scoop of coffee for automatic drip coffee makers. This maximizes flavor and minimizes bitterness. Be sure to a medium grind level - The Right Grind The best cup of your coffee to replace...
... Grinders like the KitchenAid® Blade Coffee Grinder, PRO LINE® Series Burr Coffee Mill, or the KitchenAid® Model A-9® Coffee Mill offer excellent results. For weaker coffee, brew using the suggested ratio of brew water marked on the beans whenever the container is one scoop of coffee for automatic drip coffee makers. This maximizes flavor and minimizes bitterness. Be sure to a medium grind level - The Right Grind The best cup of your coffee to replace...
Use & Care Guide
Page 14
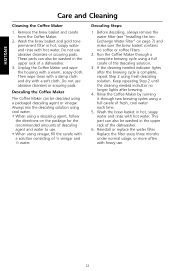
... brewing cycle using a full carafe of the descaling solution. 3. Reinstall or replace the water filter. ENGLISH Care and Cleaning Cleaning the Coffee Maker 1. Always mix the descaling solution using cool water. • When using a descaling agent, follow the directions on page 7) and make sure the brew basket contains no longer lights after the brewing cycle is complete, repeat Step 2 using a packaged descaling agent or vinegar. These parts can be descaled using fresh descaling solution. Before descaling, always remove the water filter (see "Installing the IonExchange Water...
... brewing cycle using a full carafe of the descaling solution. 3. Reinstall or replace the water filter. ENGLISH Care and Cleaning Cleaning the Coffee Maker 1. Always mix the descaling solution using cool water. • When using a descaling agent, follow the directions on page 7) and make sure the brew basket contains no longer lights after the brewing cycle is complete, repeat Step 2 using a packaged descaling agent or vinegar. These parts can be descaled using fresh descaling solution. Before descaling, always remove the water filter (see "Installing the IonExchange Water...
Use & Care Guide
Page 15
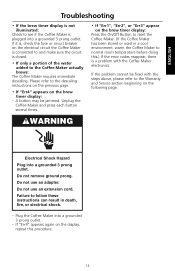
... brew timer display: - Failure to the descaling instructions on the previous page. • If "Err4" appears on the brew timer display: Press the On/Off Button to reset the Coffee Maker. (If the Coffee Maker has been stored or used in death, fire, or electrical shock. - If the problem cannot be jammed. Plug the Coffee Maker into a grounded 3 prong outlet. Do not use an adapter. ENGLISH Troubleshooting • If the brew timer display...
... brew timer display: - Failure to the descaling instructions on the previous page. • If "Err4" appears on the brew timer display: Press the On/Off Button to reset the Coffee Maker. (If the Coffee Maker has been stored or used in death, fire, or electrical shock. - If the problem cannot be jammed. Plug the Coffee Maker into a grounded 3 prong outlet. Do not use an adapter. ENGLISH Troubleshooting • If the brew timer display...
Use & Care Guide
Page 16
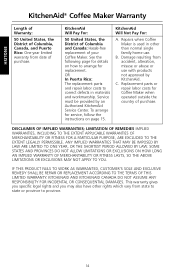
... LAW. This warranty gives you specific legal rights and you may also have other than normal single family home use with products not approved by an Authorized KitchenAid Service Center. See the following page for Coffee Maker when operated outside the country of purchase. Replacement parts or repair labor costs for details on page 15. IF THIS PRODUCT FAILS TO WORK AS WARRANTED, CUSTOMER'S SOLE AND...
... LAW. This warranty gives you specific legal rights and you may also have other than normal single family home use with products not approved by an Authorized KitchenAid Service Center. See the following page for Coffee Maker when operated outside the country of purchase. Replacement parts or repair labor costs for details on page 15. IF THIS PRODUCT FAILS TO WORK AS WARRANTED, CUSTOMER'S SOLE AND...
Use & Care Guide
Page 17
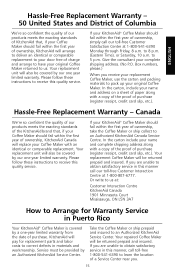
... deliver an identical or comparable replacement to your door free of charge and arrange to receive this quality service. Service must be provided by our one year limited warranty. Your replacement Coffee Maker will be returned prepaid and insured. Your replacement unit will also be covered by an Authorized KitchenAid Service Center. Box numbers, please.) When you receive your replacement Coffee Maker, use the carton and packing materials...
... deliver an identical or comparable replacement to your door free of charge and arrange to receive this quality service. Service must be provided by our one year limited warranty. Your replacement Coffee Maker will be returned prepaid and insured. Your replacement unit will also be covered by an Authorized KitchenAid Service Center. Box numbers, please.) When you receive your replacement Coffee Maker, use the carton and packing materials...
Use & Care Guide
Page 18
... For service information in the 50 United States, District of Columbia, and Puerto Rico, call toll-free 1-800-541-6390 Monday through Friday, 8 a.m. Or write to 8 p.m. (Eastern Time), or Saturday, 10 a.m. Joseph, MI 49085-0218 Or contact an Authorized Service Center near you purchased the Coffee Maker for service, please review the Troubleshooting section on how to Order Accessories and Replacement Parts To...
... For service information in the 50 United States, District of Columbia, and Puerto Rico, call toll-free 1-800-541-6390 Monday through Friday, 8 a.m. Or write to 8 p.m. (Eastern Time), or Saturday, 10 a.m. Joseph, MI 49085-0218 Or contact an Authorized Service Center near you purchased the Coffee Maker for service, please review the Troubleshooting section on how to Order Accessories and Replacement Parts To...


