
Instruction Manual
Page 1
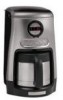
JAVASTUDIO™ COLLECTION COFFEE MAKERS WITH THERMAL CARAFE INSTRUCTIONS CAFETIÈRES COLLECTION JAVASTUDIO™ AVEC CARAFE THERMIQUE INSTRUCTIONS COLECCIÓN JAVASTUDIO™ CAFETERAS ELÉCTRICAS CON JARRA TÉRMICA INSTRUCCIONES KCM515, KCM525 USA: 1-800-541-6390 Canada: 1-800-807-6777 KitchenAid.com KitchenAid.ca
JAVASTUDIO™ COLLECTION COFFEE MAKERS WITH THERMAL CARAFE INSTRUCTIONS CAFETIÈRES COLLECTION JAVASTUDIO™ AVEC CARAFE THERMIQUE INSTRUCTIONS COLECCIÓN JAVASTUDIO™ CAFETERAS ELÉCTRICAS CON JARRA TÉRMICA INSTRUCCIONES KCM515, KCM525 USA: 1-800-541-6390 Canada: 1-800-807-6777 KitchenAid.com KitchenAid.ca
Instruction Manual
Page 3
... Your Coffee Maker for Use 7 Pre-Use Cleaning ...7 Installing the Ion-Exchange Water Filter 7 To Set the Time-of-Day Clock 7 Operating Your Coffee Maker 8 Using the Thermal Carafe 8 Brewing Coffee...9 The Pause and Pour Feature 10 Using the Automatic Brew Timer 10 The Cleaning Needed Indicator 11 Coffee Brewing Suggestions: Advice for Great Taste 11 CARE AND CLEANING Cleaning the Coffee Maker 12 Descaling the Coffee Maker 12 Troubleshooting ...13 WARRANTY AND SERVICE INFORMATION KitchenAid® Coffee Maker Warranty 14 Hassle-Free Replacement Warranty - 50 United States and...
... Your Coffee Maker for Use 7 Pre-Use Cleaning ...7 Installing the Ion-Exchange Water Filter 7 To Set the Time-of-Day Clock 7 Operating Your Coffee Maker 8 Using the Thermal Carafe 8 Brewing Coffee...9 The Pause and Pour Feature 10 Using the Automatic Brew Timer 10 The Cleaning Needed Indicator 11 Coffee Brewing Suggestions: Advice for Great Taste 11 CARE AND CLEANING Cleaning the Coffee Maker 12 Descaling the Coffee Maker 12 Troubleshooting ...13 WARRANTY AND SERVICE INFORMATION KitchenAid® Coffee Maker Warranty 14 Hassle-Free Replacement Warranty - 50 United States and...

Instruction Manual
Page 4
...immediately follow instructions. All safety messages will follow instructions. To protect against electrical shock, do not immerse cord, plugs, or Coffee Maker in this manual and on your appliance. Allow to reduce the chance of others . Do not use appliance for examination, repair, or ...Coffee Maker from outlet before cleaning the appliance. 6. Close supervision is the safety alert symbol. Do not place on or taking off parts, and before cleaning. Always read and obey all instructions. 2. Do not let cord hang over edge of accessories not recommended by or near a hot...
...immediately follow instructions. All safety messages will follow instructions. To protect against electrical shock, do not immerse cord, plugs, or Coffee Maker in this manual and on your appliance. Allow to reduce the chance of others . Do not use appliance for examination, repair, or ...Coffee Maker from outlet before cleaning the appliance. 6. Close supervision is the safety alert symbol. Do not place on or taking off parts, and before cleaning. Always read and obey all instructions. 2. Do not let cord hang over edge of accessories not recommended by or near a hot...
Instruction Manual
Page 5
..., or electrical shock. This product is designed for use appliance without lid properly placed on container. 13. Do not use an adapter. Failure to follow these instructions can result in the outlet, contact a qualified electrician. Do not modify the plug in an outlet only one way. Do not remove ground prong. NOTE: Your Coffee Maker has a 3 prong grounded plug...
..., or electrical shock. This product is designed for use appliance without lid properly placed on container. 13. Do not use an adapter. Failure to follow these instructions can result in the outlet, contact a qualified electrician. Do not modify the plug in an outlet only one way. Do not remove ground prong. NOTE: Your Coffee Maker has a 3 prong grounded plug...
Instruction Manual
Page 6
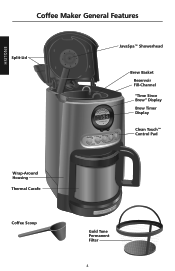
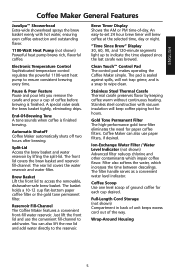
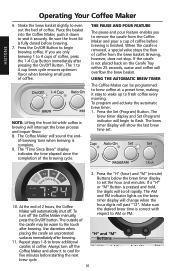
ENGLISH Coffee Maker General Features Split-Lid JavaSpa™ Showerhead Brew Basket Reservoir Fill-Channel "Time Since Brew" Display Brew Timer Display Clean Touch™ Control Pad Wrap-Around Housing Thermal Carafe Coffee Scoop Gold Tone Permanent Filter 4
ENGLISH Coffee Maker General Features Split-Lid JavaSpa™ Showerhead Brew Basket Reservoir Fill-Channel "Time Since Brew" Display Brew Timer Display Clean Touch™ Control Pad Wrap-Around Housing Thermal Carafe Coffee Scoop Gold Tone Permanent Filter 4
Instruction Manual
Page 7
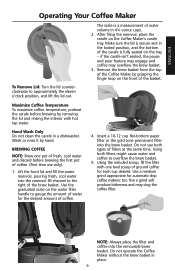
... remove the carafe and pour a cup of ground coffee for each cup desired. Split-Lid Access the brew basket and water reservoir by keeping coffee warm without continuous heating. Brew Basket Lift the front lid to ensure consistent brewing every time. Coffee Maker can also lift the rear lid and add water directly to the reservoir. Filter also softens the water, which impair coffee flavor. End-Of-Brewing Tone A tone sounds when coffee is a snap to -set 24 hour brew timer will keep coffee piping hot...
... remove the carafe and pour a cup of ground coffee for each cup desired. Split-Lid Access the brew basket and water reservoir by keeping coffee warm without continuous heating. Brew Basket Lift the front lid to ensure consistent brewing every time. Coffee Maker can also lift the rear lid and add water directly to the reservoir. Filter also softens the water, which impair coffee flavor. End-Of-Brewing Tone A tone sounds when coffee is a snap to -set 24 hour brew timer will keep coffee piping hot...
Instruction Manual
Page 8
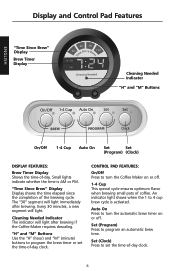
... light immediately after brewing if the Coffee Maker requires descaling. "H" and "M" Buttons Use the "H" (hour) and "M" (minute) buttons to turn the automatic brew timer on or off . CONTROL PAD FEATURES: On/Off Press to program the brew timer or set the time-of-day clock. 6 Set (Program) Press to 4 cup brew cycle is AM or PM. Small lights indicate whether the time is activated. Auto On Press to set the time-of coffee. Cleaning Needed Indicator The indicator will light after brewing...
... light immediately after brewing if the Coffee Maker requires descaling. "H" and "M" Buttons Use the "H" (hour) and "M" (minute) buttons to turn the automatic brew timer on or off . CONTROL PAD FEATURES: On/Off Press to program the brew timer or set the time-of-day clock. 6 Set (Program) Press to 4 cup brew cycle is AM or PM. Small lights indicate whether the time is activated. Auto On Press to set the time-of coffee. Cleaning Needed Indicator The indicator will light after brewing...
Instruction Manual
Page 9
... remove ground prong. Plug into a grounded 3 prong outlet. The water filter is optional: the Coffee Maker will face forward. Replace it more often under heavy use . Press the Set (Clock) Button. The filter consists of clean, cool water. 6. Use a full carafe of a long handle with a filter cartridge at the bottom of the lid. 4. Replace the filter every three months under running tap water for Use Pre-Use Cleaning Wash the brew basket, gold tone permanent filter, and carafe...
... remove ground prong. Plug into a grounded 3 prong outlet. The water filter is optional: the Coffee Maker will face forward. Replace it more often under heavy use . Press the Set (Clock) Button. The filter consists of clean, cool water. 6. Use a full carafe of a long handle with a filter cartridge at the bottom of the lid. 4. Replace the filter every three months under running tap water for Use Pre-Use Cleaning Wash the brew basket, gold tone permanent filter, and carafe...
Instruction Manual
Page 10
... Serve: Make sure the pouring indentation in the carafe lid is on the brew timer display will stop flashing and the Set (Clock) indicator will change when the hour digits roll past "12". The AM and PM indicator lights on unprotected surfaces immediately after brewing. "H" and "M" Buttons Operating Your Coffee Maker USING THE THERMAL CARAFE: The stainless steel thermal carafe features a double-walled, vacuum-insulated design that the carafe will automatically record the displayed time and exit clock-setting mode...
... Serve: Make sure the pouring indentation in the carafe lid is on the brew timer display will stop flashing and the Set (Clock) indicator will change when the hour digits roll past "12". The AM and PM indicator lights on unprotected surfaces immediately after brewing. "H" and "M" Buttons Operating Your Coffee Maker USING THE THERMAL CARAFE: The stainless steel thermal carafe features a double-walled, vacuum-insulated design that the carafe will automatically record the displayed time and exit clock-setting mode...
Instruction Manual
Page 11
... use only). 1. Using the included scoop, fill the filter with hot tap water. NOTE: Always place the filter and coffee into the brew basket. Do not operate the Coffee Maker without the brew basket in a dishwasher. After filing the reservoir, place the carafe on the water filter handle to overflow the brew basket. 5. Make sure the lid is secure and in 41⁄4 ounce cups. 2. Lift the front lid and fill the water reservoir, pouring fresh, cool water into the reservoir...
... use only). 1. Using the included scoop, fill the filter with hot tap water. NOTE: Always place the filter and coffee into the brew basket. Do not operate the Coffee Maker without the brew basket in a dishwasher. After filing the reservoir, place the carafe on the water filter handle to overflow the brew basket. 5. Make sure the lid is secure and in 41⁄4 ounce cups. 2. Lift the front lid and fill the water reservoir, pouring fresh, cool water into the reservoir...
Instruction Manual
Page 12
... carafe is removed, a special valve stops the flow of the brewing cycle. The AM and PM indicator lights on the brew timer display will overflow the brew basket. ENGLISH Operating Your Coffee Maker 6. THE PAUSE AND POUR FEATURE The pause and pour feature enables you are only brewing 1 to cool for five minutes before starting the next brew cycle. 2. Press the Set (Program) Button. To turn off the Coffee Maker and allow it to 4 cups of coffee...
... carafe is removed, a special valve stops the flow of the brewing cycle. The AM and PM indicator lights on the brew timer display will overflow the brew basket. ENGLISH Operating Your Coffee Maker 6. THE PAUSE AND POUR FEATURE The pause and pour feature enables you are only brewing 1 to cool for five minutes before starting the next brew cycle. 2. Press the Set (Program) Button. To turn off the Coffee Maker and allow it to 4 cups of coffee...
Instruction Manual
Page 13
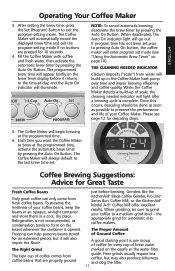
... bitterness and clog the filter. 11 the appropriate grind for every cup of your Coffee Maker. When deactivated, the Auto On indicator light will automatically record the displayed brew time and exit the program-setting mode if no buttons are properly ground just before it will begin brewing at the programmed time, activate the automatic brew timer by pressing the Auto On Button. Once this occurs, descaling should be sure to grind your coffee beans, keep the...
... bitterness and clog the filter. 11 the appropriate grind for every cup of your Coffee Maker. When deactivated, the Auto On indicator light will automatically record the displayed brew time and exit the program-setting mode if no buttons are properly ground just before it will begin brewing at the programmed time, activate the automatic brew timer by pressing the Auto On Button. Once this occurs, descaling should be sure to grind your coffee beans, keep the...
Instruction Manual
Page 14
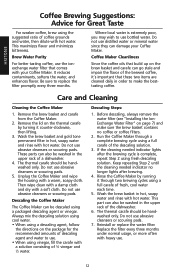
... water filter. Keep repeating Step 2 until the cleaning needed indicator lights after brewing. 4. This maximizes flavor and minimizes bitterness. Remove the lid on page 7) and make the besttasting coffee. Do not use bottled water. Replace the filter every three months under normal usage, or more often with hot water. Do not use . 12 Wash the brew basket in hot, soapy water and rinse with heavy use abrasive cleansers or scouring pads. 5. The thermal carafe should be descaled using...
... water filter. Keep repeating Step 2 until the cleaning needed indicator lights after brewing. 4. This maximizes flavor and minimizes bitterness. Remove the lid on page 7) and make the besttasting coffee. Do not use bottled water. Replace the filter every three months under normal usage, or more often with hot water. Do not use . 12 Wash the brew basket in hot, soapy water and rinse with heavy use abrasive cleansers or scouring pads. 5. The thermal carafe should be descaled using...
Instruction Manual
Page 15
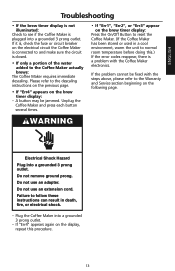
If the problem cannot be jammed. Do not remove ground prong. ENGLISH Troubleshooting • If the brew timer display is not illuminated: Check to the Warranty and Service section beginning on the following page. If "Err4" appears again on the electrical circuit the Coffee Maker is connected to and make sure the circuit is closed. • If only a portion of the water added...
If the problem cannot be jammed. Do not remove ground prong. ENGLISH Troubleshooting • If the brew timer display is not illuminated: Check to the Warranty and Service section beginning on the following page. If "Err4" appears again on the electrical circuit the Coffee Maker is connected to and make sure the circuit is closed. • If only a portion of the water added...
Instruction Manual
Page 16
See the following page for replacement. KitchenAid Will Not Pay For: A. B. C. Replacement parts or repair labor costs for service, follow the instructions on how to province. 14 This warranty gives you specific legal rights and you may also have other than normal single family home use with products not approved by an Authorized KitchenAid Service Center. ANY IMPLIED WARRANTIES THAT MAY BE IMPOSED BY LAW ARE...
See the following page for replacement. KitchenAid Will Not Pay For: A. B. C. Replacement parts or repair labor costs for service, follow the instructions on how to province. 14 This warranty gives you specific legal rights and you may also have other than normal single family home use with products not approved by an Authorized KitchenAid Service Center. ANY IMPLIED WARRANTIES THAT MAY BE IMPOSED BY LAW ARE...
Instruction Manual
Page 17
... Arrange for replacement parts and labor costs to obtain satisfactory service in Puerto Rico Your KitchenAid® Coffee Maker is covered by our one year limited warranty. to 8 p.m. (Eastern Time), or Saturday, 10 a.m. If your complete shipping address. (No P.O. Please follow these instructions to us at 1-800-807-6777. If your original Coffee Maker returned to receive this quality service. Your replacement unit will also...
... Arrange for replacement parts and labor costs to obtain satisfactory service in Puerto Rico Your KitchenAid® Coffee Maker is covered by our one year limited warranty. to 8 p.m. (Eastern Time), or Saturday, 10 a.m. If your complete shipping address. (No P.O. Please follow these instructions to us at 1-800-807-6777. If your original Coffee Maker returned to receive this quality service. Your replacement unit will also...
Instruction Manual
Page 18
... L5N 3A7 To order accessories or replacement parts for Service after the Warranty Expires - Joseph, MI 49085-0218 To order accessories or replacement parts for service, please review the Troubleshooting section on how to : Customer Satisfaction Center KitchenAid Portable Appliances P.O. All Locations ENGLISH Before calling for your Coffee Maker in Canada, call toll-free 1-800-541-6390. to 8 p.m. (Eastern Time), or Saturday, 10 a.m. to 5 p.m. Or...
... L5N 3A7 To order accessories or replacement parts for Service after the Warranty Expires - Joseph, MI 49085-0218 To order accessories or replacement parts for service, please review the Troubleshooting section on how to : Customer Satisfaction Center KitchenAid Portable Appliances P.O. All Locations ENGLISH Before calling for your Coffee Maker in Canada, call toll-free 1-800-541-6390. to 8 p.m. (Eastern Time), or Saturday, 10 a.m. to 5 p.m. Or...


