

Instruction Manual
Page 2
... of a product safety notification and assist us . Your replacement unit will enable us to contact you use the carton and packing materials to arrange for your complete shipping address. (No P.O. Please follow these instructions to 8 p.m. (Eastern Time), or Saturday, 10 a.m. Box Numbers, please.) When you of your KitchenAid® Coffee Maker should fail within the first year of warranty terms and...
... of a product safety notification and assist us . Your replacement unit will enable us to contact you use the carton and packing materials to arrange for your complete shipping address. (No P.O. Please follow these instructions to 8 p.m. (Eastern Time), or Saturday, 10 a.m. Box Numbers, please.) When you of your KitchenAid® Coffee Maker should fail within the first year of warranty terms and...

Instruction Manual
Page 3
... Replacement Warranty Inside Front Cover Product Registration Card Inside Front Cover Coffee Maker Safety 2 Electrical Requirements 2 Important Safeguards 3 FEATURES AND OPERATION Coffee Maker General Features 4 Display and Control Pad Features 6 Pre-Use Cleaning 8 Installing the Water Filter 8 To Set the Time-of-Day Clock 9 Brewing Coffee 10 Using the Thermal Carafe 11 The Pause and Pour Feature 12 Using the Automatic Brew Timer 12 The Cleaning Needed Indicator 13 Coffee Brewing Suggestions: Advice for Great Taste 14 CARE AND CLEANING Cleaning the Coffee Maker 15 Descaling...
... Replacement Warranty Inside Front Cover Product Registration Card Inside Front Cover Coffee Maker Safety 2 Electrical Requirements 2 Important Safeguards 3 FEATURES AND OPERATION Coffee Maker General Features 4 Display and Control Pad Features 6 Pre-Use Cleaning 8 Installing the Water Filter 8 To Set the Time-of-Day Clock 9 Brewing Coffee 10 Using the Thermal Carafe 11 The Pause and Pour Feature 12 Using the Automatic Brew Timer 12 The Cleaning Needed Indicator 13 Coffee Brewing Suggestions: Advice for Great Taste 14 CARE AND CLEANING Cleaning the Coffee Maker 15 Descaling...
Instruction Manual
Page 4
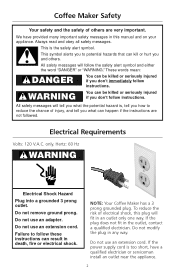
... use an extension cord. All safety messages will fit in an outlet only one way. WARNING You can result in this plug will follow instructions. Electrical Requirements Volts: 120 V.A.C. To reduce the risk of electrical shock, this manual and on your appliance. Do not modify the plug in the outlet, contact a qualified electrician. Do not remove...
... use an extension cord. All safety messages will fit in an outlet only one way. WARNING You can result in this plug will follow instructions. Electrical Requirements Volts: 120 V.A.C. To reduce the risk of electrical shock, this manual and on your appliance. Do not modify the plug in the outlet, contact a qualified electrician. Do not remove...
Instruction Manual
Page 5
... taking off parts, and before cleaning. Do not set a hot container on or near children. 5. This product has been UL Listed for household use appliance without lid properly placed on a range top. 14. Do not touch hot surfaces. Close supervision is necessary when any appliance is designed for use appliance for examination, repair, or adjustment. 7. Do not use . Do not use outdoors. 9. Use handles...
... taking off parts, and before cleaning. Do not set a hot container on or near children. 5. This product has been UL Listed for household use appliance without lid properly placed on a range top. 14. Do not touch hot surfaces. Close supervision is necessary when any appliance is designed for use appliance for examination, repair, or adjustment. 7. Do not use . Do not use outdoors. 9. Use handles...

Instruction Manual
Page 6
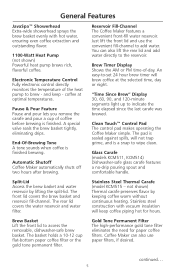
Split-Lid General Features JavaSpa™ Showerhead Brew Basket Reservoir Fill-Channel "Time Since Brew" Display Brew Timer Display Clean Touch™ Control Pad Wrap-Around Housing Glass Carafe Coffee Scoop Gold Tone Permanent Filter 4
Split-Lid General Features JavaSpa™ Showerhead Brew Basket Reservoir Fill-Channel "Time Since Brew" Display Brew Timer Display Clean Touch™ Control Pad Wrap-Around Housing Glass Carafe Coffee Scoop Gold Tone Permanent Filter 4
Instruction Manual
Page 7
...-drip pouring spout and comfortable handle. The rear lid covers the water reservoir and water filter. Stainless steel construction with hot water, ensuring even coffee extraction and outstanding flavor. 1100-Watt Heat Pump (not shown) Powerful heat pump brews rich, flavorful coffee. coffee at the selected time, day or night. Automatic Shutoff Coffee Maker automatically shuts off two hours after brewing. You can also use the convenient fill-channel to add water. The front lid covers the brew basket and reservoir fill-channel. Brew Basket Lift...
...-drip pouring spout and comfortable handle. The rear lid covers the water reservoir and water filter. Stainless steel construction with hot water, ensuring even coffee extraction and outstanding flavor. 1100-Watt Heat Pump (not shown) Powerful heat pump brews rich, flavorful coffee. coffee at the selected time, day or night. Automatic Shutoff Coffee Maker automatically shuts off two hours after brewing. You can also use the convenient fill-channel to add water. The front lid covers the brew basket and reservoir fill-channel. Brew Basket Lift...

Instruction Manual
Page 8
... (not shown) Compartment in back of unit keeps excess cord out of ground coffee for each cup desired. Coffee Scoop Use one rounded scoop of the way. The filter handle serves as a convenient water level indicator. Display and Control Pad Features "Time Since Brew" Display Brew Timer Display Cleaning Needed Indicator "H" and "M" Buttons On/Off 1-4 Cup Auto On Set Set (Program) (Clock) 6 Wrap-Around Housing Stylish design minimizes heat loss from the carafe while protecting it from accidental spills and...
... (not shown) Compartment in back of unit keeps excess cord out of ground coffee for each cup desired. Coffee Scoop Use one rounded scoop of the way. The filter handle serves as a convenient water level indicator. Display and Control Pad Features "Time Since Brew" Display Brew Timer Display Cleaning Needed Indicator "H" and "M" Buttons On/Off 1-4 Cup Auto On Set Set (Program) (Clock) 6 Wrap-Around Housing Stylish design minimizes heat loss from the carafe while protecting it from accidental spills and...

Instruction Manual
Page 9
... time is pressed, the ... • Brew timer display will flash • Set (Clock) indicator will flash • "H" (hour) and "M" (minute) Buttons can be used to set a brew time Set (Clock) Press to set the time-of coffee. This special cycle heats small quantities of water thoroughly, ensuring optimum flavor when brewing small pots of -day clock. Cleaning Needed Indicator The indicator will light immediately after brewing if the Coffee Maker requires descaling. CONTROL PAD FEATURES: On/Off Press to turn the automatic brew timer...
... time is pressed, the ... • Brew timer display will flash • Set (Clock) indicator will flash • "H" (hour) and "M" (minute) Buttons can be used to set a brew time Set (Clock) Press to set the time-of coffee. This special cycle heats small quantities of water thoroughly, ensuring optimum flavor when brewing small pots of -day clock. Cleaning Needed Indicator The indicator will light immediately after brewing if the Coffee Maker requires descaling. CONTROL PAD FEATURES: On/Off Press to turn the automatic brew timer...
Instruction Manual
Page 10
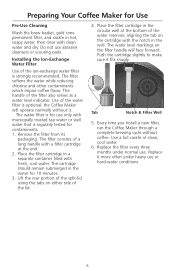
Preparing Your Coffee Maker for Use Pre-Use Cleaning Wash the brew basket, gold tone permanent filter, and carafe in a separate container filled with fresh, cool water. Do not use only with a filter cartridge at the bottom of clean, cool water. 6. Installing the Ion-Exchange Water Filter Use of a long handle with municipally treated tap water or well water that is optional: the Coffee Maker will face forward. Remove the filter from its packaging. The filter consists...
Preparing Your Coffee Maker for Use Pre-Use Cleaning Wash the brew basket, gold tone permanent filter, and carafe in a separate container filled with fresh, cool water. Do not use only with a filter cartridge at the bottom of clean, cool water. 6. Installing the Ion-Exchange Water Filter Use of a long handle with municipally treated tap water or well water that is optional: the Coffee Maker will face forward. Remove the filter from its packaging. The filter consists...

Instruction Manual
Page 11
... outlet. 2. Make sure the hour set the hour and minutes. The Coffee Maker will begin to follow these instructions can result in or when power is first plugged in death, fire or electrical shock. 1. Do not use an extension cord. Press the Set (Clock) Button to AM or PM. The AM and PM indicator lights on the brew timer display will stop flashing and the Set (Clock) indicator...
... outlet. 2. Make sure the hour set the hour and minutes. The Coffee Maker will begin to follow these instructions can result in or when power is first plugged in death, fire or electrical shock. 1. Do not use an extension cord. Press the Set (Clock) Button to AM or PM. The AM and PM indicator lights on the brew timer display will stop flashing and the Set (Clock) indicator...
Instruction Manual
Page 12
... permanent filter into the removable brew basket. A graduated scale on the Coffee Maker warming plate. For thermal carafe model KCM515, the scale on the water filter handle can also be used to gauge the amount of water to the right of water required. Water can be poured directly into the reservoir at the same time - After filling the reservoir, place the carafe on the side of the glass carafe helps measure the amount of the brew basket. using the reservoir...
... permanent filter into the removable brew basket. A graduated scale on the Coffee Maker warming plate. For thermal carafe model KCM515, the scale on the water filter handle can also be used to gauge the amount of water to the right of water required. Water can be poured directly into the reservoir at the same time - After filling the reservoir, place the carafe on the side of the glass carafe helps measure the amount of the brew basket. using the reservoir...

Instruction Manual
Page 13
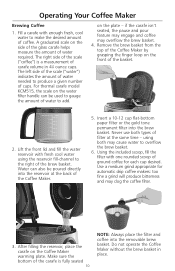
... pots of 2 hours, the Coffee Maker and warming plate will keep coffee hot - The Coffee Maker will sound the end-of water thoroughly, ensuring optimum flavor with hot tap water. 11 At the end of coffee. The special lid and spout design doesn't require you to turn off the Coffee Maker manually, press the On/Off button. Shake the brew basket slightly to 4 cups of coffee. and flavorful - If you set the carafe upright, the lid...
... pots of 2 hours, the Coffee Maker and warming plate will keep coffee hot - The Coffee Maker will sound the end-of water thoroughly, ensuring optimum flavor with hot tap water. 11 At the end of coffee. The special lid and spout design doesn't require you to turn off the Coffee Maker manually, press the On/Off button. Shake the brew basket slightly to 4 cups of coffee. and flavorful - If you set the carafe upright, the lid...

Instruction Manual
Page 14
... ground coffee differ at a preset time, making it returns to exit the program-setting mode. Using pause and pour will automatically record the displayed brew time and exit the programsetting mode if no buttons are pressed for those in a hurry. If a "H" or "M" Button is finished. The digits on the brew timer display before brewing is pressed and held, the digits will overflow the brew basket and spill onto the warming plate. Operating Your Coffee Maker...
... ground coffee differ at a preset time, making it returns to exit the program-setting mode. Using pause and pour will automatically record the displayed brew time and exit the programsetting mode if no buttons are pressed for those in a hurry. If a "H" or "M" Button is finished. The digits on the brew timer display before brewing is pressed and held, the digits will overflow the brew basket and spill onto the warming plate. Operating Your Coffee Maker...

Instruction Manual
Page 15
... scale, the cleaning needed indicator will build up of your Coffee Maker. Please see page 15 for descaling steps. 13 Once this occurs, descaling should be done as soon as possible to the last brew time set. The Coffee Maker will begin brewing at the programmed time, activate the automatic brew timer by pressing the Auto On Button. NOTE: To cancel automatic brewing, deactivate the brew timer by pressing the Auto On Button. The Coffee Maker will go...
... scale, the cleaning needed indicator will build up of your Coffee Maker. Please see page 15 for descaling steps. 13 Once this occurs, descaling should be done as soon as possible to the last brew time set. The Coffee Maker will begin brewing at the programmed time, activate the automatic brew timer by pressing the Auto On Button. NOTE: To cancel automatic brewing, deactivate the brew timer by pressing the Auto On Button. The Coffee Maker will go...

Instruction Manual
Page 16
... Coffee Maker. and replace it 's best to brew using too fine a grind will maximize flavor and minimize bitterness. The best cup of ground coffee and then dilute the result with your brew water. For great tasting coffee, be sure to overflow the brew basket. Over time, these oils will always come from coffee beans that means using a quality grinder like the KitchenAid® Blade Coffee Grinder, PRO LINE™ Series Burr Coffee Mill, or the KitchenAid...
... Coffee Maker. and replace it 's best to brew using too fine a grind will maximize flavor and minimize bitterness. The best cup of ground coffee and then dilute the result with your brew water. For great tasting coffee, be sure to overflow the brew basket. Over time, these oils will always come from coffee beans that means using a quality grinder like the KitchenAid® Blade Coffee Grinder, PRO LINE™ Series Burr Coffee Mill, or the KitchenAid...

Instruction Manual
Page 17
... or replace the water filter. Care and Cleaning Cleaning the Coffee Maker 1. Keep repeating Step 2 until the cleaning needed indicator lights after brewing. 4. Before descaling, always remove the water filter (see "Installing the Water Filter" on the thermal carafe by running it through a complete brewing cycle using fresh descaling solution. Rinse the Coffee Maker by turning it to preserve the performance and life of the descaling solution. 3. Remove the brew basket and carafe from water will build up of scale, the cleaning needed indicator will light after a brewing...
... or replace the water filter. Care and Cleaning Cleaning the Coffee Maker 1. Keep repeating Step 2 until the cleaning needed indicator lights after brewing. 4. Before descaling, always remove the water filter (see "Installing the Water Filter" on the thermal carafe by running it through a complete brewing cycle using fresh descaling solution. Rinse the Coffee Maker by turning it to preserve the performance and life of the descaling solution. 3. Remove the brew basket and carafe from water will build up of scale, the cleaning needed indicator will light after a brewing...

Instruction Manual
Page 18
... be fixed with the Coffee Maker electronics. If it into a grounded 3 prong outlet. If the error codes reappear, there is plugged into the same outlet again. Troubleshooting and Error Codes • If the brew timer display is not illuminated: Check to see if the Coffee Maker is a problem with the steps above, please refer to the Coffee Maker actually brews: The Coffee Maker requires immediate descaling. If the unit still does not work...
... be fixed with the Coffee Maker electronics. If it into a grounded 3 prong outlet. If the error codes reappear, there is plugged into the same outlet again. Troubleshooting and Error Codes • If the brew timer display is not illuminated: Check to see if the Coffee Maker is a problem with the steps above, please refer to the Coffee Maker actually brews: The Coffee Maker requires immediate descaling. If the unit still does not work...

Instruction Manual
Page 19
... than normal single family home use. OR The replacement parts and repair labor costs to the purchaser and any succeeding owner for Coffee Makers operated in the 50 United States and District of Columbia. KitchenAid Will Pay For Your Choice of: Hassle-Free Replacement of your Coffee Maker to state. 17 Repairs when Coffee Maker is used in other rights which vary from state to an Authorized Service Center. D. B. Damage...
... than normal single family home use. OR The replacement parts and repair labor costs to the purchaser and any succeeding owner for Coffee Makers operated in the 50 United States and District of Columbia. KitchenAid Will Pay For Your Choice of: Hassle-Free Replacement of your Coffee Maker to state. 17 Repairs when Coffee Maker is used in other rights which vary from state to an Authorized Service Center. D. B. Damage...

Instruction Manual
Page 20
... 50 United States and Puerto Rico Consult your local KitchenAid dealer Coffee Maker for your Coffee Maker, visit KitchenAid.com or call toll-free 1-800-541-6390, 8 a.m. You can result in Puerto Rico. Your repaired Coffee Maker will be handled by an Authorized KitchenAid Service Center. For service information, call toll-free 1-800-541-6390, 8 a.m. Ordering Accessories and Replacement Parts To order accessories or replacement parts for information on Saturday (Eastern Time...
... 50 United States and Puerto Rico Consult your local KitchenAid dealer Coffee Maker for your Coffee Maker, visit KitchenAid.com or call toll-free 1-800-541-6390, 8 a.m. You can result in Puerto Rico. Your repaired Coffee Maker will be handled by an Authorized KitchenAid Service Center. For service information, call toll-free 1-800-541-6390, 8 a.m. Ordering Accessories and Replacement Parts To order accessories or replacement parts for information on Saturday (Eastern Time...
Parts List
Page 3
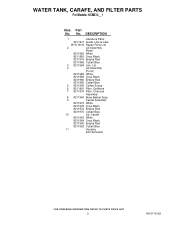
DESCRIPTION 1 Literature Parts 8211971 Guide, Use & Care W10174152 Repair Parts List 2 Lid Assembly (Rear) 8211983 White 8211981 Onyx Black 8211979 Empire Red 8211985 Cobalt Blue 3 8211999 Link, Lid 4 Lid Assembly (Front) 8211984 White 8211982 Onyx Black 8211980 Empire Red 8211986 Cobalt Blue 5 8211546 Coffee Scoop 6 8211961 Filter, Goldtone 7 8211970 Filter, Charcoal Assembly 8 8211960 Brew Basket Assy. 9 Carafe Assembly 8211973 White 8211972 Onyx Black 8211974 Empire Red 8211975 Cobalt Blue 10 Lid, Carafe 8211963 White 8211964 Onyx Black...
DESCRIPTION 1 Literature Parts 8211971 Guide, Use & Care W10174152 Repair Parts List 2 Lid Assembly (Rear) 8211983 White 8211981 Onyx Black 8211979 Empire Red 8211985 Cobalt Blue 3 8211999 Link, Lid 4 Lid Assembly (Front) 8211984 White 8211982 Onyx Black 8211980 Empire Red 8211986 Cobalt Blue 5 8211546 Coffee Scoop 6 8211961 Filter, Goldtone 7 8211970 Filter, Charcoal Assembly 8 8211960 Brew Basket Assy. 9 Carafe Assembly 8211973 White 8211972 Onyx Black 8211974 Empire Red 8211975 Cobalt Blue 10 Lid, Carafe 8211963 White 8211964 Onyx Black...


