Use & Care Guide
Page 3
... are not followed. COFFEE MAKER SAFETY Your safety and the safety of table or counter, or touch hot surfaces. ■ Do not place on container (carafe). ■ The container (carafe) is , tell you don't follow instructions.
... are not followed. COFFEE MAKER SAFETY Your safety and the safety of table or counter, or touch hot surfaces. ■ Do not place on container (carafe). ■ The container (carafe) is , tell you don't follow instructions.
Use & Care Guide
Page 4
... should be used to follow these instructions can be used : ■ The marked electrical rating of the cord set a hot container (carafe) on by children or tripped over unintentionally. Longer detachable power supply cords or extension cords are available and may be pulled on a wet... or cold surface. ■ Do not use a cracked container (carafe) or a container having a loose or weakened handle. ■ Do not clean container with abrasive cleaners, steel wool pads, or other abrasive material....
... should be used to follow these instructions can be used : ■ The marked electrical rating of the cord set a hot container (carafe) on by children or tripped over unintentionally. Longer detachable power supply cords or extension cords are available and may be pulled on a wet... or cold surface. ■ Do not use a cracked container (carafe) or a container having a loose or weakened handle. ■ Do not clean container with abrasive cleaners, steel wool pads, or other abrasive material....

Use & Care Guide
Page 5
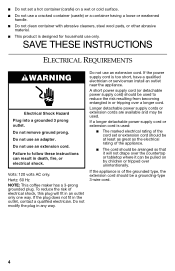
KITCHENAID® COFFEE MAKER FEATURES A B C DE F J I . Water tank fill channel C. Brew basket G G. Gold Tone permanent filter H. Hinged brew basket door F. Water tank lid D. Programmable display E. Thermal carafe (on glass carafe models only) J. Removable water tank B. Coffee scoop I H A. Glass carafe (on thermal carafe models only 5
KITCHENAID® COFFEE MAKER FEATURES A B C DE F J I . Water tank fill channel C. Brew basket G G. Gold Tone permanent filter H. Hinged brew basket door F. Water tank lid D. Programmable display E. Thermal carafe (on glass carafe models only) J. Removable water tank B. Coffee scoop I H A. Glass carafe (on thermal carafe models only 5
Use & Care Guide
Page 6
... Fresh Brew Timer is interrupted for less than 1 minute, the coffee maker will be activated to descale your local retailer or on www.kitchenaid.com. Power Interrupt If the power is programmable from 0-4 hours in the top rack of a dishwasher. Full-Length Cord Storage (not ... scoop of a dishwasher. Variable Brew Strength Selector Allows you when the coffee maker needs to be hand washed. Variable Warmth Control (glass carafe models only) Allows you 're not brewing a full pot. Electronic Temperature Control Electronic temperature control regulates the powerful 1100-watt heat pump...
... Fresh Brew Timer is interrupted for less than 1 minute, the coffee maker will be activated to descale your local retailer or on www.kitchenaid.com. Power Interrupt If the power is programmable from 0-4 hours in the top rack of a dishwasher. Full-Length Cord Storage (not ... scoop of a dishwasher. Variable Brew Strength Selector Allows you when the coffee maker needs to be hand washed. Variable Warmth Control (glass carafe models only) Allows you 're not brewing a full pot. Electronic Temperature Control Electronic temperature control regulates the powerful 1100-watt heat pump...
Use & Care Guide
Page 7
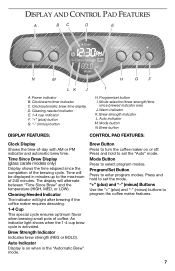
... indicator light shows when the 1-4 cup brew cycle is on or off. "+" (plus) and "-" (minus) Buttons Use the "+" (plus ) button G. Time Since Brew Display (glass carafe models only) Display shows the time elapsed since brewed indicator area J. Auto Indicator Display is activated. DISPLAY AND CONTROL PAD FEATURES A BC D E N M H GF LK J I . Cleaning...
... indicator light shows when the 1-4 cup brew cycle is on or off. "+" (plus) and "-" (minus) Buttons Use the "+" (plus ) button G. Time Since Brew Display (glass carafe models only) Display shows the time elapsed since brewed indicator area J. Auto Indicator Display is activated. DISPLAY AND CONTROL PAD FEATURES A BC D E N M H GF LK J I . Cleaning...
Use & Care Guide
Page 8
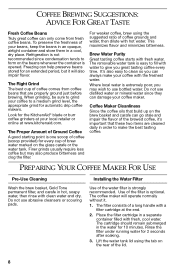
...you great tasting coffee every time. PREPARING YOUR COFFEE MAKER FOR USE Pre-Use Cleaning Wash the brew basket, Gold Tone permanent filter, and carafe in hot, soapy water, then rinse with fresh, cool water. Place the filter cartridge in a separate container filled with clean water and ...freshness of your coffee maker. Do not use distilled water or mineral water since condensation tends to make your local retailer or online at www.kitchenaid.com. The cartridge should remain submerged in the water for 2 seconds after soaking. 3. Where local water is opened. Do not use ...
...you great tasting coffee every time. PREPARING YOUR COFFEE MAKER FOR USE Pre-Use Cleaning Wash the brew basket, Gold Tone permanent filter, and carafe in hot, soapy water, then rinse with fresh, cool water. Place the filter cartridge in a separate container filled with clean water and ...freshness of your coffee maker. Do not use distilled water or mineral water since condensation tends to make your local retailer or online at www.kitchenaid.com. The cartridge should remain submerged in the water for 2 seconds after soaking. 3. Where local water is opened. Do not use ...

Use & Care Guide
Page 9
...PROGRAM/SET button. Press the PROGRAM/SET button again. Press and hold the Program/Set button until a short beep is being set. 4. Use a full carafe of the water tank. Do not use an extension cord. The Clock indicator will flash while the time is heard, the settings will be maintained.... Place the filter cartridge in the well at the bottom of clean, cool water. Failure to enter the Time/Clock Setting mode. NOTE: For thermal carafe models, press the MODE button 4 times to follow these instructions can result in or when power is complete. Press the "+" (plus ) or "-" (minus) ...
...PROGRAM/SET button. Press the PROGRAM/SET button again. Press and hold the Program/Set button until a short beep is being set. 4. Use a full carafe of the water tank. Do not use an extension cord. The Clock indicator will flash while the time is heard, the settings will be maintained.... Place the filter cartridge in the well at the bottom of clean, cool water. Failure to enter the Time/Clock Setting mode. NOTE: For thermal carafe models, press the MODE button 4 times to follow these instructions can result in or when power is complete. Press the "+" (plus ) or "-" (minus) ...
Use & Care Guide
Page 10
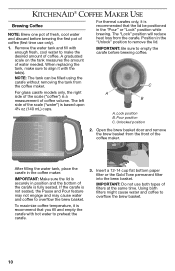
...brew basket. Using both types of filters at the same time. Position in the coffee maker. IMPORTANT: Be sure to remove the lid. C For glass carafe models only, the right side of the scale ("coffee") is securely in the "Pour" or "Lock" position while brewing. A B A. Open the brew... the "Unlock" position to empty the carafe before brewing the first pot of coffee (first time use both filters might cause water and coffee to overflow the brew basket. When replacing the tank, make the desired amount of coffee. KITCHENAID® COFFEE MAKER USE Brewing Coffee NOTE: Brew ...
...brew basket. Using both types of filters at the same time. Position in the coffee maker. IMPORTANT: Be sure to remove the lid. C For glass carafe models only, the right side of the scale ("coffee") is securely in the "Pour" or "Lock" position while brewing. A B A. Open the brew... the "Unlock" position to empty the carafe before brewing the first pot of coffee (first time use both filters might cause water and coffee to overflow the brew basket. When replacing the tank, make the desired amount of coffee. KITCHENAID® COFFEE MAKER USE Brewing Coffee NOTE: Brew ...
Use & Care Guide
Page 11
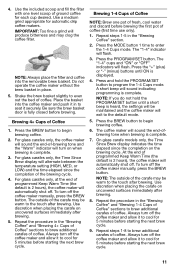
... 8. Use a medium grind appropriate for 5 minutes before brewing. Press the BREW button to enter the 1-4 Cups mode. Use discretion when placing the carafe on the brewing cycle. Repeat steps 1-5 in the "Brewing Coffee" and "Brewing 1-4 Cups of coffee (first time use only). 1. Press the ...Cups mode. IMPORTANT: Too fine a grind will automatically shut off the coffee maker and allow it securely. Use discretion when placing the carafe on when brewing is 2 hours), the coffee maker will sound indicating programming is complete. 7. Do not operate the coffee maker without the...
... 8. Use a medium grind appropriate for 5 minutes before brewing. Press the BREW button to enter the 1-4 Cups mode. Use discretion when placing the carafe on the brewing cycle. Repeat steps 1-5 in the "Brewing Coffee" and "Brewing 1-4 Cups of coffee (first time use only). 1. Press the ...Cups mode. IMPORTANT: Too fine a grind will automatically shut off the coffee maker and allow it securely. Use discretion when placing the carafe on when brewing is 2 hours), the coffee maker will sound indicating programming is complete. 7. Do not operate the coffee maker without the...
Use & Care Guide
Page 12
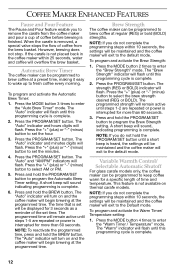
...the "+" (plus ) or "-" (minus) button to program the Automatic Brew Timer setting. Variable Warmth Control/ Selectable Automatic Shutoff For glass carafe models only, the coffee maker can be maintained and the coffee maker will remain active until a short beep is interrupted for more than 60...regular (REG) or bold (BOLD) strengths. To program and activate the Warm Timer/ Temperature setting: 1. This feature is complete. 2. When the carafe is removed, a special valve stops the flow of coffee from the coffee maker and pour a cup of time and temperature. The "Auto" ...
...the "+" (plus ) or "-" (minus) button to program the Automatic Brew Timer setting. Variable Warmth Control/ Selectable Automatic Shutoff For glass carafe models only, the coffee maker can be maintained and the coffee maker will remain active until a short beep is interrupted for more than 60...regular (REG) or bold (BOLD) strengths. To program and activate the Warm Timer/ Temperature setting: 1. This feature is complete. 2. When the carafe is removed, a special valve stops the flow of coffee from the coffee maker and pour a cup of time and temperature. The "Auto" ...
Use & Care Guide
Page 13
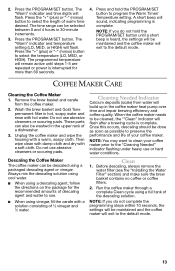
...the settings will be washed in hot, soapy water and rinse with a solution consisting of the descaling solution. Remove the brew basket and carafe from water will build up in 30-minute increments. 3. Always mix the descaling solution using cool water. ■ When using vinegar, fill the... carafe with hot water. Run the coffee maker through a complete Clean cycle using a packaged descaling agent or vinegar. Press the "+" (plus ) or "-" (minus) button...
...the settings will be washed in hot, soapy water and rinse with a solution consisting of the descaling solution. Remove the brew basket and carafe from water will build up in 30-minute increments. 3. Always mix the descaling solution using cool water. ■ When using vinegar, fill the... carafe with hot water. Run the coffee maker through a complete Clean cycle using a packaged descaling agent or vinegar. Press the "+" (plus ) or "-" (minus) button...
Use & Care Guide
Page 14
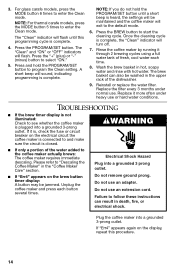
... upper rack of fresh, cool water each button several times. Electrical Shock Hazard Plug into a grounded 3 prong outlet. Do not use . 3. For glass carafe models, press the MODE button 6 times to select "ON." 5. NOTE: If you do not hold the PROGRAM/SET button to enter the Clean mode. ...circuit is complete. 4. Do not use or hard water conditions. Press and hold the PROGRAM/SET button until this procedure. 14 NOTE: For thermal carafe models, press the MODE button 5 times to program the Clean setting. Replace it more often under normal use an adapter. Please refer to follow ...
... upper rack of fresh, cool water each button several times. Electrical Shock Hazard Plug into a grounded 3 prong outlet. Do not use . 3. For glass carafe models, press the MODE button 6 times to select "ON." 5. NOTE: If you do not hold the PROGRAM/SET button to enter the Clean mode. ...circuit is complete. 4. Do not use or hard water conditions. Press and hold the PROGRAM/SET button until this procedure. 14 NOTE: For thermal carafe models, press the MODE button 5 times to program the Clean setting. Replace it more often under normal use an adapter. Please refer to follow ...


