Owners Manual
Page 1
R Coffee Maker KCM1209 W11418578A.indb 1 2/19/2020 2:21:13 PM
R Coffee Maker KCM1209 W11418578A.indb 1 2/19/2020 2:21:13 PM
Owners Manual
Page 2
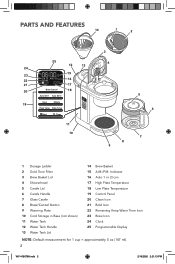
... 2 Gold Tone Filter 3 Brew Basket Lid 4 Showerhead 5 Carafe Lid 6 Carafe Handle 7 Glass Carafe 8 Brew/Cancel Button 9 Warming Plate 10 Cord Storage in Base (not shown) 11 Water Tank 12 Water Tank Handle 13 Water Tank Lid 14 Brew Basket 15 A.M./P.M. Indicator 16 Auto 1 or 2 Icon 17 High Plate Temperature 18 Low Plate Temperature 19 Control Panel 20 Clean Icon 21 Bold Icon 22 Remaining Keep Warm Time Icon 23 Brew Icon 24 Clock 25 Programmable Display NOTE: Default measurement for 1 cup = approximately...
... 2 Gold Tone Filter 3 Brew Basket Lid 4 Showerhead 5 Carafe Lid 6 Carafe Handle 7 Glass Carafe 8 Brew/Cancel Button 9 Warming Plate 10 Cord Storage in Base (not shown) 11 Water Tank 12 Water Tank Handle 13 Water Tank Lid 14 Brew Basket 15 A.M./P.M. Indicator 16 Auto 1 or 2 Icon 17 High Plate Temperature 18 Low Plate Temperature 19 Control Panel 20 Clean Icon 21 Bold Icon 22 Remaining Keep Warm Time Icon 23 Brew Icon 24 Clock 25 Programmable Display NOTE: Default measurement for 1 cup = approximately...
Owners Manual
Page 3
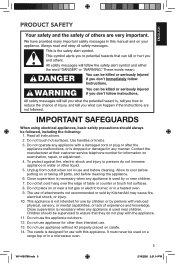
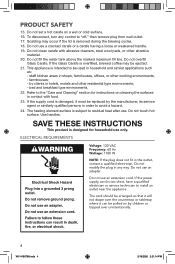
... sold by KitchenAid may cause fire, electrical shock, or injury. 10. This appliance is not intended for use with the appliance. 11. Contact the manufacturer at their customer service telephone number for other liquid. 5. Do not use appliance for information on a range top or in a microwave oven. 3 W11418578A.indb 3 2/19/2020 2:21:14 PM Read all instructions. 2. PRODUCT SAFETY...
... sold by KitchenAid may cause fire, electrical shock, or injury. 10. This appliance is not intended for use with the appliance. 11. Contact the manufacturer at their customer service telephone number for other liquid. 5. Do not use appliance for information on a range top or in a microwave oven. 3 W11418578A.indb 3 2/19/2020 2:21:14 PM Read all instructions. 2. PRODUCT SAFETY...
Owners Manual
Page 4
... the water tank above the marked maximum fill line. Refer to install an outlet near the appliance. If the Glass Carafe is removed during the brewing cycles. 18. farmhouses; - This appliance is too short, have a qualified electrician or service technician to the "Care and Cleaning" section for household use an adapter. Do not use only. To disconnect, turn any way. Scalding may occur if the lid...
... the water tank above the marked maximum fill line. Refer to install an outlet near the appliance. If the Glass Carafe is removed during the brewing cycles. 18. farmhouses; - This appliance is too short, have a qualified electrician or service technician to the "Care and Cleaning" section for household use an adapter. Do not use only. To disconnect, turn any way. Scalding may occur if the lid...
Owners Manual
Page 5
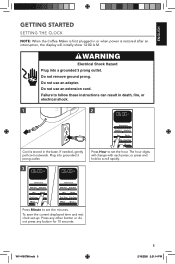
... Auto 12 12 x Brew/Cancel Auto Set 1 Auto Set 2 Hour Minute Plate Temp Plate Timer Bold Clean Press Minute to set -up: Press any other button or do not press any button for 10 seconds. W11418578A.indb 5 5 2/19/2020 2:21:14 PM The hour digits will initially show 12:00 A.M. ENGLISH GETTING STARTED SETTING THE CLOCK NOTE: When the Coffee Maker is restored after an interruption, the display will change...
... Auto 12 12 x Brew/Cancel Auto Set 1 Auto Set 2 Hour Minute Plate Temp Plate Timer Bold Clean Press Minute to set -up: Press any other button or do not press any button for 10 seconds. W11418578A.indb 5 5 2/19/2020 2:21:14 PM The hour digits will initially show 12:00 A.M. ENGLISH GETTING STARTED SETTING THE CLOCK NOTE: When the Coffee Maker is restored after an interruption, the display will change...
Owners Manual
Page 6
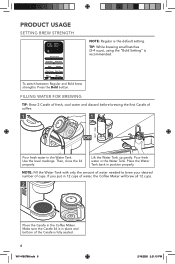
... desired number of the Carafe is in the Water Tank. Then, close the lid properly. PRODUCT USAGE SETTING BREW STRENGTH AM PM Auto 12 12 x Brew/Cancel Auto Set 1 Auto Set 2 Hour Minute Plate Temp Plate Timer Bold Clean To switch between Regular and Bold brew strengths: Press the Bold button. FILLING WATER FOR BREWING TIP: Brew 2 Carafe of fresh, cool water and discard before brewing the first Carafe of coffee. 1 1 OR Pour fresh water in place and bottom of cups...
... desired number of the Carafe is in the Water Tank. Then, close the lid properly. PRODUCT USAGE SETTING BREW STRENGTH AM PM Auto 12 12 x Brew/Cancel Auto Set 1 Auto Set 2 Hour Minute Plate Temp Plate Timer Bold Clean To switch between Regular and Bold brew strengths: Press the Bold button. FILLING WATER FOR BREWING TIP: Brew 2 Carafe of fresh, cool water and discard before brewing the first Carafe of coffee. 1 1 OR Pour fresh water in place and bottom of cups...
Owners Manual
Page 7
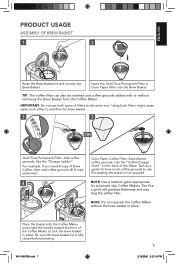
... Permanent Filter or Cone Paper Filter into the Coffee Maker and rotate the handle toward the front of Brew Coffee, then add coffee grounds till 8 cups scale level. 4 Auto AM 12PM Minute Clean Auto AM 12PM x Brew/Cancel Place the basket into the Brew Basket. Using both types of the Water Tank as a guide for automatic drip Coffee Makers. Use the "Dosage Ladder". Use the "Coffee Dosage Chart" on the back of filters at the same time. ENGLISH PRODUCT USAGE ASSEMBLY OF BREW BASKET...
... Permanent Filter or Cone Paper Filter into the Coffee Maker and rotate the handle toward the front of Brew Coffee, then add coffee grounds till 8 cups scale level. 4 Auto AM 12PM Minute Clean Auto AM 12PM x Brew/Cancel Place the basket into the Brew Basket. Using both types of the Water Tank as a guide for automatic drip Coffee Makers. Use the "Dosage Ladder". Use the "Coffee Dosage Chart" on the back of filters at the same time. ENGLISH PRODUCT USAGE ASSEMBLY OF BREW BASKET...
Owners Manual
Page 8
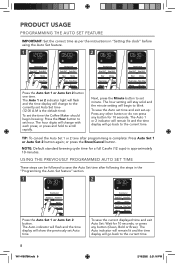
... set minute. USING THE PREVIOUSLY PROGRAMMED AUTO SET TIME These steps can be followed to the current time. To save the Auto set time and exit set hour. The Auto indicator will flash and the time display will go back to blink. PRODUCT USAGE PROGRAMMING THE AUTO SET FEATURE IMPORTANT: Set the correct time as per the instructions in the "Programming the Auto Set feature" section. 1 AM PM Auto 12 12 x Brew/Cancel Auto Set 1 Auto Set 2 Hour Minute Plate Temp Plate Timer Bold Clean 2 AM PM Auto...
... set minute. USING THE PREVIOUSLY PROGRAMMED AUTO SET TIME These steps can be followed to the current time. To save the Auto set time and exit set hour. The Auto indicator will flash and the time display will go back to blink. PRODUCT USAGE PROGRAMMING THE AUTO SET FEATURE IMPORTANT: Set the correct time as per the instructions in the "Programming the Auto Set feature" section. 1 AM PM Auto 12 12 x Brew/Cancel Auto Set 1 Auto Set 2 Hour Minute Plate Temp Plate Timer Bold Clean 2 AM PM Auto...
Owners Manual
Page 9
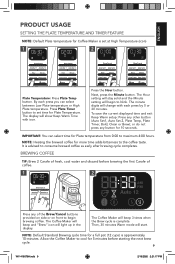
... button (Auto Set1, Auto Set 2, Plate Temp, Plate Timer, Bold, Clean or Brew); Press Plate Timer button to blink. The Hour setting will stay solid and the Minute setting will show Keep Warm Time with each press you can select time for a full pot (12 cups) is complete. NOTE: Heating the brewed coffee for more time adds bitterness to cool for 5 minutes before brewing the first Carafe of coffee. 1 AM PM Auto 12 12 x Brew/Cancel Auto Set 1 Auto Set 2 Hour Minute Plate Temp Plate Timer Bold Clean 2 Auto...
... button (Auto Set1, Auto Set 2, Plate Temp, Plate Timer, Bold, Clean or Brew); Press Plate Timer button to blink. The Hour setting will stay solid and the Minute setting will show Keep Warm Time with each press you can select time for a full pot (12 cups) is complete. NOTE: Heating the brewed coffee for more time adds bitterness to cool for 5 minutes before brewing the first Carafe of coffee. 1 AM PM Auto 12 12 x Brew/Cancel Auto Set 1 Auto Set 2 Hour Minute Plate Temp Plate Timer Bold Clean 2 Auto...
Owners Manual
Page 10
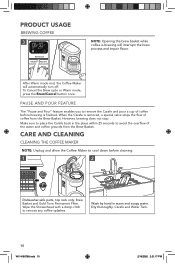
... x Auto H Min Dishwasher-safe parts, top rack only: Brew Basket and Gold Tone Permanent Filter. To Cancel the Brew cycle or Warm mode, press the Brew/Cancel button once. When the Carafe is removed, a special valve stops the flow of the water and coffee grounds from the Brew Basket. PAUSE AND POUR FEATURE The "Pause and Pour" feature enables you to avoid the overflow of coffee from the Brew Basket. CARE AND CLEANING CLEANING THE COFFEE MAKER...
... x Auto H Min Dishwasher-safe parts, top rack only: Brew Basket and Gold Tone Permanent Filter. To Cancel the Brew cycle or Warm mode, press the Brew/Cancel button once. When the Carafe is removed, a special valve stops the flow of the water and coffee grounds from the Brew Basket. PAUSE AND POUR FEATURE The "Pause and Pour" feature enables you to avoid the overflow of coffee from the Brew Basket. CARE AND CLEANING CLEANING THE COFFEE MAKER...
Owners Manual
Page 11
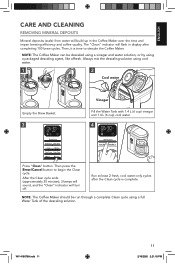
... brew cycles. NOTE: The Coffee Maker can be run through a complete Clean cycle using cool water. 1 2 Cool water Auto 12 x Auto Min AAuutoto1122 xx AAuutoto HH Min Vinegar Empty the Brew Basket. Fill the Water Tank with 1.4 L (6 cup) vinegar and 1.4 L (6 cup) cool water. 3 AM PM Auto 12 12 x Brew/Cancel Auto Set 1 Auto Set 2 Hour Minute Plate Temp Plate Timer Bold Clean Press "Clean" button. The "Clean" indicator will build up in display after the Clean cycle is time to begin the Clean...
... brew cycles. NOTE: The Coffee Maker can be run through a complete Clean cycle using cool water. 1 2 Cool water Auto 12 x Auto Min AAuutoto1122 xx AAuutoto HH Min Vinegar Empty the Brew Basket. Fill the Water Tank with 1.4 L (6 cup) vinegar and 1.4 L (6 cup) cool water. 3 AM PM Auto 12 12 x Brew/Cancel Auto Set 1 Auto Set 2 Hour Minute Plate Temp Plate Timer Bold Clean Press "Clean" button. The "Clean" indicator will build up in display after the Clean cycle is time to begin the Clean...
Owners Manual
Page 12
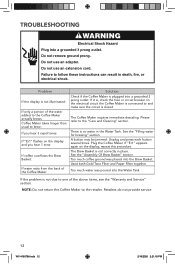
... "Assembly Of Brew Basket" section. Do not use an adapter. Too much coffee ground was poured into the Brew Basket. Retailers do not provide service. 12 W11418578A.indb 12 2/19/2020 2:21:18 PM A button may be jammed. Plug the Coffee Maker. Do not use an extension cord. Too much water was placed into the Water Tank. NOTE: Do not return the Coffee Maker to the "Care and Cleaning" section...
... "Assembly Of Brew Basket" section. Do not use an adapter. Too much coffee ground was poured into the Brew Basket. Retailers do not provide service. 12 W11418578A.indb 12 2/19/2020 2:21:18 PM A button may be jammed. Plug the Coffee Maker. Do not use an extension cord. Too much water was placed into the Water Tank. NOTE: Do not return the Coffee Maker to the "Care and Cleaning" section...
Owners Manual
Page 13
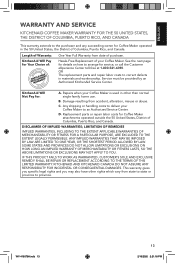
... provided by an Authorized KitchenAid Service Center. Replacement parts or repair labor costs for Your Choice of: One Year Full Warranty from date of Columbia, Puerto Rico, and Canada. This warranty gives you specific legal rights and you may also have other than normal single family home use. Length of Warranty: KitchenAid Will Pay for Coffee Maker attachments operated outside the 50 United States, District of...
... provided by an Authorized KitchenAid Service Center. Replacement parts or repair labor costs for Your Choice of: One Year Full Warranty from date of Columbia, Puerto Rico, and Canada. This warranty gives you specific legal rights and you may also have other than normal single family home use. Length of Warranty: KitchenAid Will Pay for Coffee Maker attachments operated outside the 50 United States, District of...
Owners Manual
Page 14
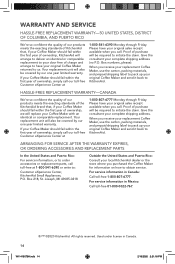
... receive your replacement Coffee Maker, use the carton, packing materials, and prepaid shipping label to pack up your original Coffee Maker and send it back to KitchenAid. When you call. For service information in Mexico: Call toll-free 01-800-0022-767. ®/™ ©2020 KitchenAid. Your replacement unit will be covered by our one year limited warranty. Box 218, St. If your Coffee Maker should...
... receive your replacement Coffee Maker, use the carton, packing materials, and prepaid shipping label to pack up your original Coffee Maker and send it back to KitchenAid. When you call. For service information in Mexico: Call toll-free 01-800-0022-767. ®/™ ©2020 KitchenAid. Your replacement unit will be covered by our one year limited warranty. Box 218, St. If your Coffee Maker should...


