Owners Manual
Page 2
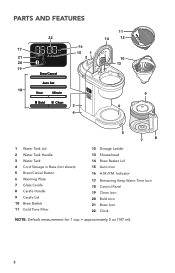
... Clean 3 4 Auto AM 12PM x Brew/Cancel Auto Hour Set Bold Minute Clean 9 6 Brew/Cancel 5 7 8 1 Water Tank Lid 2 Water Tank Handle 3 Water Tank 4 Cord Storage in Base (not shown) 5 Brew/Cancel Button 6 Warming Plate 7 Glass Carafe 8 Carafe Handle 9 Carafe Lid 10 Brew Basket 11 Gold Tone Filter 12 Dosage Ladder 13 Showerhead 14 Brew Basket Lid 15 Auto Icon 16 A.M./P.M. Indicator 17 Remaining Keep Warm Time Icon 18 Control Panel 19 Clean Icon 20 Bold Icon 21 Brew Icon 22 Clock NOTE: Default measurement for 1 cup...
... Clean 3 4 Auto AM 12PM x Brew/Cancel Auto Hour Set Bold Minute Clean 9 6 Brew/Cancel 5 7 8 1 Water Tank Lid 2 Water Tank Handle 3 Water Tank 4 Cord Storage in Base (not shown) 5 Brew/Cancel Button 6 Warming Plate 7 Glass Carafe 8 Carafe Handle 9 Carafe Lid 10 Brew Basket 11 Gold Tone Filter 12 Dosage Ladder 13 Showerhead 14 Brew Basket Lid 15 Auto Icon 16 A.M./P.M. Indicator 17 Remaining Keep Warm Time Icon 18 Control Panel 19 Clean Icon 20 Bold Icon 21 Brew Icon 22 Clock NOTE: Default measurement for 1 cup...

Owners Manual
Page 3
... not use appliance without lid properly placed on a range top or in any manner. Contact the manufacturer at their safety. 11. Allow to persons do not immerse appliance in water or other than intended use of the appliance by a person responsible for their customer service telephone number for use and before cleaning the appliance. 6. Close supervision is designed for information...
... not use appliance without lid properly placed on a range top or in any manner. Contact the manufacturer at their safety. 11. Allow to persons do not immerse appliance in water or other than intended use of the appliance by a person responsible for their customer service telephone number for use and before cleaning the appliance. 6. Close supervision is designed for information...
Owners Manual
Page 4
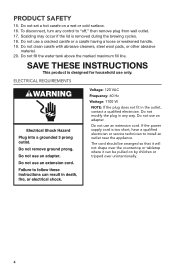
To disconnect, turn any way. Do not fill the water tank above the marked maximum fill line. SAVE THESE INSTRUCTIONS This product is designed for household use a cracked carafe or a carafe having a loose or weakened handle. 19. Do not modify the plug in the outlet...install an outlet near the appliance. Scalding may occur if the lid is too short, have a qualified electrician or service technician to "off," then remove plug from wall outlet. 17. Do not use only. Do not use an extension cord. If the power supply cord is removed during the brewing cycles. 18. Do not clean carafe...
To disconnect, turn any way. Do not fill the water tank above the marked maximum fill line. SAVE THESE INSTRUCTIONS This product is designed for household use a cracked carafe or a carafe having a loose or weakened handle. 19. Do not modify the plug in the outlet...install an outlet near the appliance. Scalding may occur if the lid is too short, have a qualified electrician or service technician to "off," then remove plug from wall outlet. 17. Do not use only. Do not use an extension cord. If the power supply cord is removed during the brewing cycles. 18. Do not clean carafe...
Owners Manual
Page 5
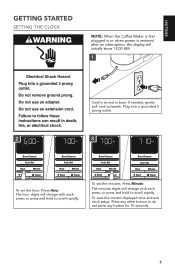
The hour digits will change with each press; or press and hold to scroll rapidly. 3 AM PM x Brew/Cancel Auto Set Hour Bold Minute Clean AM PM x Brew/Cancel Auto Set Hour Bold Minute Clean To set the hour: Press Hour. To save the current displayed time and exit clock setup: Press any other button or do not press any button for 10 seconds. 5 Plug into a grounded...
The hour digits will change with each press; or press and hold to scroll rapidly. 3 AM PM x Brew/Cancel Auto Set Hour Bold Minute Clean AM PM x Brew/Cancel Auto Set Hour Bold Minute Clean To set the hour: Press Hour. To save the current displayed time and exit clock setup: Press any other button or do not press any button for 10 seconds. 5 Plug into a grounded...
Owners Manual
Page 6
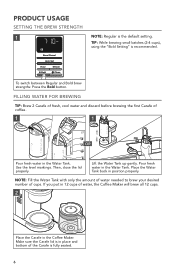
... setting. Pour fresh water in the Water Tank. Make sure the Carafe lid is in place and bottom of coffee. 1 1 OR Pour fresh water in the Water Tank. PRODUCT USAGE SETTING THE BREW STRENGTH 1 AM PM x Brew/Cancel Auto Set Hour Bold Minute Clean NOTE: Regular is fully seated. 6 Then, close the lid properly. NOTE: Fill the Water Tank with only the amount of water needed to brew your desired number of water, the Coffee Maker will brew all 12 cups. 2 AM Brew...
... setting. Pour fresh water in the Water Tank. Make sure the Carafe lid is in place and bottom of coffee. 1 1 OR Pour fresh water in the Water Tank. PRODUCT USAGE SETTING THE BREW STRENGTH 1 AM PM x Brew/Cancel Auto Set Hour Bold Minute Clean NOTE: Regular is fully seated. 6 Then, close the lid properly. NOTE: Fill the Water Tank with only the amount of water needed to brew your desired number of water, the Coffee Maker will brew all 12 cups. 2 AM Brew...
Owners Manual
Page 7
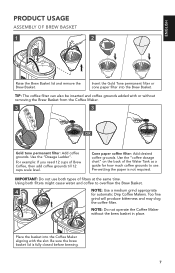
... need 12 cups of the Water Tank as a guide for automatic Drip Coffee Makers. Cone paper coffee filter: Add desired coffee grounds. IMPORTANT: Do not use . NOTE: Do not operate the Coffee Maker without removing the Brew Basket from the Coffee Maker. 3 3 OR Gold tone permanent filter: Add coffee grounds. Insert the Gold Tone permanent filter or cone paper filter into the Coffee Maker aligning with or without the brew basket in place. Using both filters might cause water and coffee to overflow the Brew Basket. 4 NOTE: Use a medium grind...
... need 12 cups of the Water Tank as a guide for automatic Drip Coffee Makers. Cone paper coffee filter: Add desired coffee grounds. IMPORTANT: Do not use . NOTE: Do not operate the Coffee Maker without removing the Brew Basket from the Coffee Maker. 3 3 OR Gold tone permanent filter: Add coffee grounds. Insert the Gold Tone permanent filter or cone paper filter into the Coffee Maker aligning with or without the brew basket in place. Using both filters might cause water and coffee to overflow the Brew Basket. 4 NOTE: Use a medium grind...
Owners Manual
Page 8
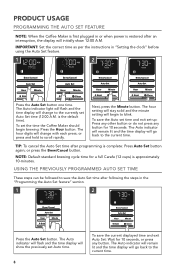
... PM Auto 12 x Brew/Cancel Auto Set Hour Bold Minute Clean 2 AM PM Auto x Brew/Cancel Auto Set Hour Bold Minute Clean Press the Auto Set button. The hour digits will change with each press; The hour setting will stay solid and the minute setting will go back to blink. The Auto indicator will remain lit and the time display will begin brewing: Press the Hour button. To set Auto Set time (12:00 A.M. USING THE PREVIOUSLY PROGRAMMED AUTO SET TIME These steps...
... PM Auto 12 x Brew/Cancel Auto Set Hour Bold Minute Clean 2 AM PM Auto x Brew/Cancel Auto Set Hour Bold Minute Clean Press the Auto Set button. The hour digits will change with each press; The hour setting will stay solid and the minute setting will go back to blink. The Auto indicator will remain lit and the time display will begin brewing: Press the Hour button. To set Auto Set time (12:00 A.M. USING THE PREVIOUSLY PROGRAMMED AUTO SET TIME These steps...
Owners Manual
Page 9
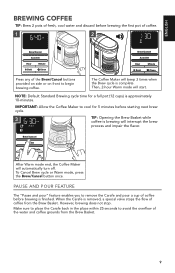
... x Brew/Cancel Auto Set Hour Minute Bold Clean Press any of the Brew/Cancel buttons provided on side or on front to avoid the overflow of the water and coffee grounds from the Brew Basket. NOTE: Default Standard Brewing cycle time for 5 minutes before starting next brew cycle. However, brewing does not stop. The Coffee Maker will start. Then, 2-hour Warm mode will beep 3 times when the Brew cycle is removed, a special valve stops the...
... x Brew/Cancel Auto Set Hour Minute Bold Clean Press any of the Brew/Cancel buttons provided on side or on front to avoid the overflow of the water and coffee grounds from the Brew Basket. NOTE: Default Standard Brewing cycle time for 5 minutes before starting next brew cycle. However, brewing does not stop. The Coffee Maker will start. Then, 2-hour Warm mode will beep 3 times when the Brew cycle is removed, a special valve stops the...
Owners Manual
Page 10
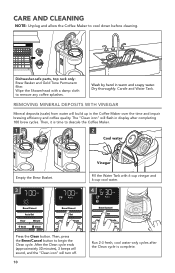
... the Clean cycle is time to remove any coffee splashes. Then, it is complete. Then, press the Brew/Cancel button to cool down before cleaning. CARE AND CLEANING NOTE: Unplug and allow the Coffee Maker to begin the Clean cycle. Auto 12 x Auto H Min Dishwasher-safe parts, top rack only: Brew Basket and Gold Tone Permanent filter. Dry thoroughly: Carafe and Water Tank. REMOVING MINERAL DEPOSITS WITH VINEGAR Mineral deposits (scale) from water will flash...
... the Clean cycle is time to remove any coffee splashes. Then, it is complete. Then, press the Brew/Cancel button to cool down before cleaning. CARE AND CLEANING NOTE: Unplug and allow the Coffee Maker to begin the Clean cycle. Auto 12 x Auto H Min Dishwasher-safe parts, top rack only: Brew Basket and Gold Tone Permanent filter. Dry thoroughly: Carafe and Water Tank. REMOVING MINERAL DEPOSITS WITH VINEGAR Mineral deposits (scale) from water will flash...
Owners Manual
Page 11
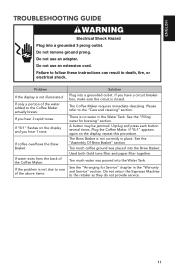
... Water Tank. The Coffee Maker requires immediate descaling. See the "Assembly Of Brew Basket" section. Do not remove ground prong. Do not use an adapter. There is closed. Too much coffee ground was poured into the Brew Basket. The Brew Basket is not due to the "Care and cleaning" section. Used both Gold tone filter and paper filter together. Do not return the Espresso Machine to follow these instructions can result in the "Warranty and Service...
... Water Tank. The Coffee Maker requires immediate descaling. See the "Assembly Of Brew Basket" section. Do not remove ground prong. Do not use an adapter. There is closed. Too much coffee ground was poured into the Brew Basket. The Brew Basket is not due to the "Care and cleaning" section. Used both Gold tone filter and paper filter together. Do not return the Espresso Machine to follow these instructions can result in the "Warranty and Service...
Owners Manual
Page 12
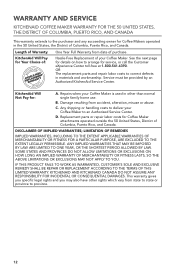
WARRANTY AND SERVICE KITCHENAID COFFEE MAKER WARRANTY FOR THE 50 UNITED STATES, THE DISTRICT OF COLUMBIA, PUERTO RICO, AND CANADA This warranty extends to the purchaser and any succeeding owner for Coffee Makers operated in the 50 United States, the District of Columbia, Puerto Rico, and Canada. C. IF THIS PRODUCT FAILS TO WORK AS WARRANTED, CUSTOMER'S SOLE AND EXCLUSIVE REMEDY SHALL BE REPAIR OR REPLACEMENT ACCORDING TO THE TERMS...
WARRANTY AND SERVICE KITCHENAID COFFEE MAKER WARRANTY FOR THE 50 UNITED STATES, THE DISTRICT OF COLUMBIA, PUERTO RICO, AND CANADA This warranty extends to the purchaser and any succeeding owner for Coffee Makers operated in the 50 United States, the District of Columbia, Puerto Rico, and Canada. C. IF THIS PRODUCT FAILS TO WORK AS WARRANTED, CUSTOMER'S SOLE AND EXCLUSIVE REMEDY SHALL BE REPAIR OR REPLACEMENT ACCORDING TO THE TERMS...
Owners Manual
Page 13
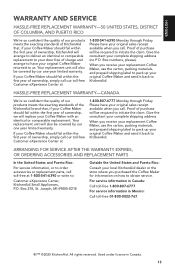
..., MI 49085-0218 Outside the United States and Puerto Rico: Consult your original Coffee Maker and send it back to : Customer eXperience Center, KitchenAid Small Appliances, P.O. For service information in Canada. 13 Your replacement unit will also be covered by our one year limited warranty. Please have your original sales receipt available when you receive your replacement Coffee Maker, use the carton, packing materials, and...
..., MI 49085-0218 Outside the United States and Puerto Rico: Consult your original Coffee Maker and send it back to : Customer eXperience Center, KitchenAid Small Appliances, P.O. For service information in Canada. 13 Your replacement unit will also be covered by our one year limited warranty. Please have your original sales receipt available when you receive your replacement Coffee Maker, use the carton, packing materials, and...


