Use & Care Guide
Page 5
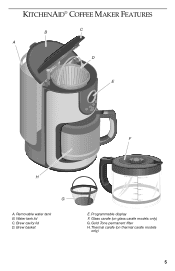
Brew basket E. KITCHENAID® COFFEE MAKER FEATURES B C A D E F H G A. Water tank lid C. Glass carafe (on thermal carafe models only) 5 Brew cavity lid D. Programmable display F. Gold Tone permanent filter H. Removable water tank B. Thermal carafe (on glass carafe models only) G.
Brew basket E. KITCHENAID® COFFEE MAKER FEATURES B C A D E F H G A. Water tank lid C. Glass carafe (on thermal carafe models only) 5 Brew cavity lid D. Programmable display F. Gold Tone permanent filter H. Removable water tank B. Thermal carafe (on glass carafe models only) G.
Use & Care Guide
Page 6
... . Coffee maker can be hand washed. 6 Variable Brew Strength Selector Allows you when the coffee maker needs to be washed in use paper filters, if desired. Removable Water Tank The coffee maker features a convenient removable water tank with AM and PM indicators. Automatic Brew Timer An easy ...to select between REG and BOLD brew strengths. The Gold Tone filter can be cleaned. Clean Alert The Clean Alert indicator reminds you to set 24 hour brew timer will brew coffee at the selected time...
... . Coffee maker can be hand washed. 6 Variable Brew Strength Selector Allows you when the coffee maker needs to be washed in use paper filters, if desired. Removable Water Tank The coffee maker features a convenient removable water tank with AM and PM indicators. Automatic Brew Timer An easy ...to select between REG and BOLD brew strengths. The Gold Tone filter can be cleaned. Clean Alert The Clean Alert indicator reminds you to set 24 hour brew timer will brew coffee at the selected time...
Use & Care Guide
Page 8
...can help preserve beans stored for automatic drip coffee makers. This maximizes flavor and minimizes bitterness. 8 To preserve the freshness of coffee for the KitchenAid® blade or burr coffee grinders at your coffee with water to a medium grind level, the appropriate grind for an extended period, but...keep the beans in an opaque, airtight container and store them in order to clean so you may also produce bitterness and clog the filter. Look for every cup of coffee grounds and water, then dilute with fresh water. The removable water tank is extremely poor, you ...
...can help preserve beans stored for automatic drip coffee makers. This maximizes flavor and minimizes bitterness. 8 To preserve the freshness of coffee for the KitchenAid® blade or burr coffee grinders at your coffee with water to a medium grind level, the appropriate grind for an extended period, but...keep the beans in an opaque, airtight container and store them in order to clean so you may also produce bitterness and clog the filter. Look for every cup of coffee grounds and water, then dilute with fresh water. The removable water tank is extremely poor, you ...
Use & Care Guide
Page 9
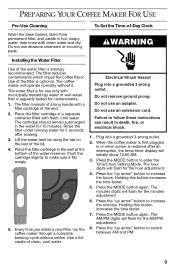
...the MODE button again. Lift the water tank lid using the tab on the rear of clean, cool water. Every time you install a new filter, run the coffee maker through a complete brewing cycle without it fits snugly. 5. Failure to enter the Time/Clock Setting Mode. Holding this button ..., the brew timer display will flash for the hour adjustment. 4. Do not remove ground prong. Use of the water reservoir. Rinse the filter under running water for use abrasive cleansers or scouring pads. Push the cartridge slightly to increase the hours. PREPARING YOUR COFFEE MAKER FOR USE ...
...the MODE button again. Lift the water tank lid using the tab on the rear of clean, cool water. Every time you install a new filter, run the coffee maker through a complete brewing cycle without it fits snugly. 5. Failure to enter the Time/Clock Setting Mode. Holding this button ..., the brew timer display will flash for the hour adjustment. 4. Do not remove ground prong. Use of the water reservoir. Rinse the filter under running water for use abrasive cleansers or scouring pads. Push the cartridge slightly to increase the hours. PREPARING YOUR COFFEE MAKER FOR USE ...
Use & Care Guide
Page 10
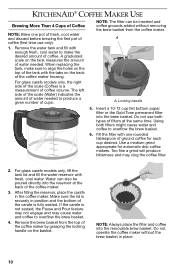
... the water tank and fill with one pot of fresh, cool water and discard before brewing the first pot of coffee (first time use both filters might cause water and coffee to make sure to align the holes on the top of the tank with fresh, cool water. Do not use... the top of the coffee maker by grasping the locking handle on the tank measures the amount of water needed to overflow the brew basket. 4. KITCHENAID® COFFEE MAKER USE Brewing More Than 4 Cups of Coffee NOTE: Brew one rounded tablespoon of ground coffee for automatic drip coffee makers. When replacing...
... the water tank and fill with one pot of fresh, cool water and discard before brewing the first pot of coffee (first time use both filters might cause water and coffee to make sure to align the holes on the top of the tank with fresh, cool water. Do not use... the top of the coffee maker by grasping the locking handle on the tank measures the amount of water needed to overflow the brew basket. 4. KITCHENAID® COFFEE MAKER USE Brewing More Than 4 Cups of Coffee NOTE: Brew one rounded tablespoon of ground coffee for automatic drip coffee makers. When replacing...
Use & Care Guide
Page 13
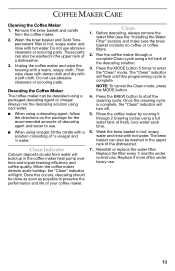
... mode. Once the cleaning cycle is complete. The brew basket can also be washed in the upper rack of the descaling solution. 3. Replace the filter every 3 months under heavy use . ■ When using vinegar, fill the carafe with a warm, soapy cloth. COFFEE MAKER CARE Cleaning the... rack of descaling agent and water to preserve the performance and life of fresh, cool water each time. 6. Reinstall or replace the water filter. Replace it through a complete Clean cycle using a descaling agent, follow the directions on the package for the recommended amounts of a dishwasher....
... mode. Once the cleaning cycle is complete. The brew basket can also be washed in the upper rack of the descaling solution. 3. Replace the filter every 3 months under heavy use . ■ When using vinegar, fill the carafe with a warm, soapy cloth. COFFEE MAKER CARE Cleaning the... rack of descaling agent and water to preserve the performance and life of fresh, cool water each time. 6. Reinstall or replace the water filter. Replace it through a complete Clean cycle using a descaling agent, follow the directions on the package for the recommended amounts of a dishwasher....


