Use & Care Guide
Page 3
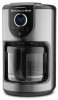
..., or coffee maker in water or other than intended use. ■ Do not use appliance without lid properly placed on or taking off parts. ■ Do not operate any appliance with this manual and on a range top or in use and before putting on container (carafe). ■ The container (carafe) is designed for use of accessory attachments not recommended by or near a hot gas...
..., or coffee maker in water or other than intended use. ■ Do not use appliance without lid properly placed on or taking off parts. ■ Do not operate any appliance with this manual and on a range top or in use and before putting on container (carafe). ■ The container (carafe) is designed for use of accessory attachments not recommended by or near a hot gas...
Use & Care Guide
Page 4
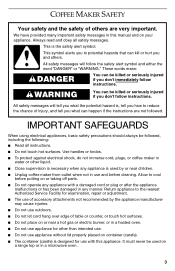
...electrician or serviceman install an outlet near the appliance. Do not modify the plug in or tripping over a longer cord. Volts: 120 volts AC only Hertz: 60 Hz If the appliance is of the grounded type, the extension cord should be used. NOTE: This coffee maker has a 3-prong...only one way. Longer detachable power supply cords or extension cords are available and may be a grounding-type 3-wire cord. If a longer detachable power supply cord or extension cord is used to follow these instructions can result in the outlet, contact a qualified electrician. ■ Do not set or extension...
...electrician or serviceman install an outlet near the appliance. Do not modify the plug in or tripping over a longer cord. Volts: 120 volts AC only Hertz: 60 Hz If the appliance is of the grounded type, the extension cord should be used. NOTE: This coffee maker has a 3-prong...only one way. Longer detachable power supply cords or extension cords are available and may be a grounding-type 3-wire cord. If a longer detachable power supply cord or extension cord is used to follow these instructions can result in the outlet, contact a qualified electrician. ■ Do not set or extension...
Use & Care Guide
Page 5
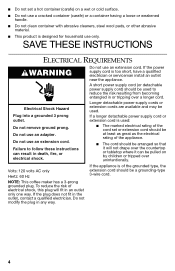
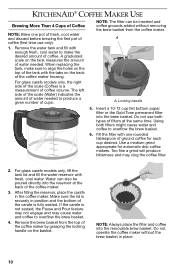
Brew cavity lid D. Glass carafe (on thermal carafe models only) 5 Water tank lid C. Programmable display F. Gold Tone permanent filter H. Thermal carafe (on glass carafe models only) G. Brew basket E. KITCHENAID® COFFEE MAKER FEATURES B C A D E F H G A. Removable water tank B.
Brew cavity lid D. Glass carafe (on thermal carafe models only) 5 Water tank lid C. Programmable display F. Gold Tone permanent filter H. Thermal carafe (on glass carafe models only) G. Brew basket E. KITCHENAID® COFFEE MAKER FEATURES B C A D E F H G A. Removable water tank B.
Use & Care Guide
Page 6
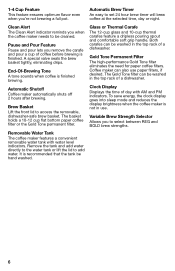
... Tone filter eliminates the need for paper coffee filters. Remove the tank and add water directly to the water tank or lift the lid to be washed in use paper filters, if desired. Clean Alert The Clean Alert indicator reminds you remove the carafe and pour a cup of a dishwasher. Variable Brew Strength Selector Allows you 're not brewing a full pot. The basket holds a 10-12 cup flat bottom paper coffee filter or the Gold Tone permanent filter. Clock Display Displays the time...
... Tone filter eliminates the need for paper coffee filters. Remove the tank and add water directly to the water tank or lift the lid to be washed in use paper filters, if desired. Clean Alert The Clean Alert indicator reminds you remove the carafe and pour a cup of a dishwasher. Variable Brew Strength Selector Allows you 're not brewing a full pot. The basket holds a 10-12 cup flat bottom paper coffee filter or the Gold Tone permanent filter. Clock Display Displays the time...
Use & Care Guide
Page 7
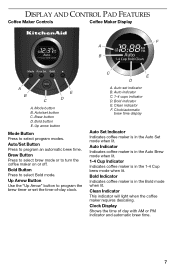
... maker is in the Auto Set mode when lit. Clean Indicator This indicator will light when the coffee maker requires descaling. Clock/automatic brew time display Auto Set Indicator Indicates coffee maker is in the 1-4 Cup brew mode when lit. Up Arrow Button Use the "Up Arrow" button to program the brew timer or set button C. C E D A. Brew button D. Bold indicator E. Clock Display Shows the time of -day clock. Bold button E. Auto indicator C. 1-4 cups indicator D. Brew Button Press to select brew mode or to program an automatic brew time. Auto/set the time...
... maker is in the Auto Set mode when lit. Clean Indicator This indicator will light when the coffee maker requires descaling. Clock/automatic brew time display Auto Set Indicator Indicates coffee maker is in the 1-4 Cup brew mode when lit. Up Arrow Button Use the "Up Arrow" button to program the brew timer or set button C. C E D A. Brew button D. Bold indicator E. Clock Display Shows the time of -day clock. Bold button E. Auto indicator C. 1-4 cups indicator D. Brew Button Press to select brew mode or to program an automatic brew time. Auto/set the time...
Use & Care Guide
Page 8
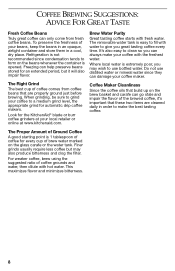
... tasting coffee starts with hot water. For weaker coffee, brew using the suggested ratio of coffee comes from fresh coffee beans. The removable water tank is extremely poor, you may also produce bitterness and clog the filter. When grinding, be sure to grind your coffee to give you can damage your local retailer or online at www.kitchenaid.com. Finer grinds usually require less coffee but it 's important that are cleaned daily...
... tasting coffee starts with hot water. For weaker coffee, brew using the suggested ratio of coffee comes from fresh coffee beans. The removable water tank is extremely poor, you may also produce bitterness and clog the filter. When grinding, be sure to grind your coffee to give you can damage your local retailer or online at www.kitchenaid.com. Finer grinds usually require less coffee but it 's important that are cleaned daily...
Use & Care Guide
Page 9
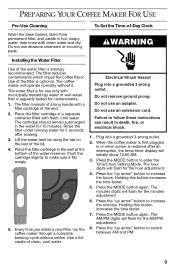
... brew timer display will initially show 12:00 AM. 3. Press the "up arrow" button to enter the Time/Clock Setting Mode. The AM/PM digits will flash for the minutes adjustment. 6. The filter reduces contaminants which impair the coffee flavor. Lift the water tank lid using the tab on the rear of clean, cool water. PREPARING YOUR COFFEE MAKER FOR USE Pre-Use Cleaning Wash the brew basket, Gold Tone permanent filter, and carafe in hot, soapy water...
... brew timer display will initially show 12:00 AM. 3. Press the "up arrow" button to enter the Time/Clock Setting Mode. The AM/PM digits will flash for the minutes adjustment. 6. The filter reduces contaminants which impair the coffee flavor. Lift the water tank lid using the tab on the rear of clean, cool water. PREPARING YOUR COFFEE MAKER FOR USE Pre-Use Cleaning Wash the brew basket, Gold Tone permanent filter, and carafe in hot, soapy water...
Use & Care Guide
Page 10
... the removable brew basket. Water can be poured directly into the reservoir at the same time. NOTE: Always place the filter and coffee into the brew basket. Do not use only). Remove the brew basket from the coffee maker. Using both types of filters at the back of the coffee maker. 3. Make sure the lid is not seated, the Pause and Pour feature may not engage and may clog the coffee filter. 2. If the carafe is securely in the coffee maker. Use a medium grind...
... the removable brew basket. Water can be poured directly into the reservoir at the same time. NOTE: Always place the filter and coffee into the brew basket. Do not use only). Remove the brew basket from the coffee maker. Using both types of filters at the back of the coffee maker. 3. Make sure the lid is not seated, the Pause and Pour feature may not engage and may clog the coffee filter. 2. If the carafe is securely in the coffee maker. Use a medium grind...
Use & Care Guide
Page 11
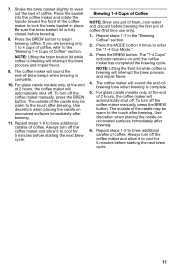
.... 9. Use discretion when placing the carafe on uncovered surfaces immediately after brewing. 6. To turn off the coffee maker and allow it to lock the brew basket in the "Brewing Coffee" section. 2. Always turn off the coffee maker manually, press the BREW button. Brewing 1-4 Cups of Coffee NOTE: Brew one pot of 2 hours, the coffee maker will automatically shut off . The "1-4 Cups" indicator remains on uncovered surfaces immediately after brewing. 11. Press the MODE button 4 times to begin brewing coffee. The...
.... 9. Use discretion when placing the carafe on uncovered surfaces immediately after brewing. 6. To turn off the coffee maker and allow it to lock the brew basket in the "Brewing Coffee" section. 2. Always turn off the coffee maker manually, press the BREW button. Brewing 1-4 Cups of Coffee NOTE: Brew one pot of 2 hours, the coffee maker will automatically shut off . The "1-4 Cups" indicator remains on uncovered surfaces immediately after brewing. 11. Press the MODE button 4 times to begin brewing coffee. The...

Use & Care Guide
Page 12
... enter the Auto Brew setting mode. The "Auto Set" indicator will turn on and stay on and the coffee maker will turn off the warming plate. Once the brew cycle is regular). The "Hours" indicator will flash and the "Auto Set" indicator will beep. Holding this button increases the time faster. 3. Holding this button increases the time faster. 4. Press the AUTO SET button to remove the carafe from the brew basket. COFFEE MAKER ENHANCED FEATURES Pause and Pour Feature The...
... enter the Auto Brew setting mode. The "Auto Set" indicator will turn on and stay on and the coffee maker will turn off the warming plate. Once the brew cycle is regular). The "Hours" indicator will flash and the "Auto Set" indicator will beep. Holding this button increases the time faster. 3. Holding this button increases the time faster. 4. Press the AUTO SET button to remove the carafe from the brew basket. COFFEE MAKER ENHANCED FEATURES Pause and Pour Feature The...
Use & Care Guide
Page 13
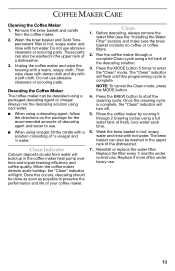
... descaled using a full water tank of the descaling solution. 3. Clean 1. Wash the brew basket in hot, soapy water and rinse with hot water. Run the coffee maker through 2 brewing cycles using a packaged descaling agent or vinegar. The "Clean" indicator will build up in the upper rack of the dishwasher. 7. The brew basket can be washed in the coffee maker heat pump over time and impair brewing efficiency and coffee quality. Replace the filter every 3 months under heavy use . Before descaling, always remove...
... descaled using a full water tank of the descaling solution. 3. Clean 1. Wash the brew basket in hot, soapy water and rinse with hot water. Run the coffee maker through 2 brewing cycles using a packaged descaling agent or vinegar. The "Clean" indicator will build up in the upper rack of the dishwasher. 7. The brew basket can be washed in the coffee maker heat pump over time and impair brewing efficiency and coffee quality. Replace the filter every 3 months under heavy use . Before descaling, always remove...
Use & Care Guide
Page 14
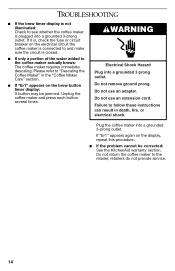
... again on the brew button timer display: A button may be corrected: See the KitchenAid warranty section. Do not use an extension cord. Failure to the retailer; retailers do not provide service. 14 Do not return the coffee maker to follow these instructions can result in the "Coffee Maker Care" section. ■ If "Er1" appears on the display, repeat this procedure. ■ If the problem cannot be jammed...
... again on the brew button timer display: A button may be corrected: See the KitchenAid warranty section. Do not use an extension cord. Failure to the retailer; retailers do not provide service. 14 Do not return the coffee maker to follow these instructions can result in the "Coffee Maker Care" section. ■ If "Er1" appears on the display, repeat this procedure. ■ If the problem cannot be jammed...
Use & Care Guide
Page 15
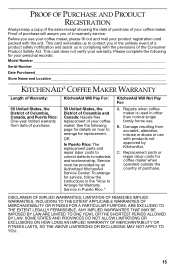
... your personal records: Model Number Serial Number Date Purchased Store Name and Location KITCHENAID® COFFEE MAKER WARRANTY Length of Warranty: 50 United States, the District of Columbia, Canada, and Puerto Rico: One-year limited warranty from accident, alteration, misuse or abuse or use with the provisions of a product safety notification and assist us to Arrange for service, follow the instructions in the "How...
... your personal records: Model Number Serial Number Date Purchased Store Name and Location KITCHENAID® COFFEE MAKER WARRANTY Length of Warranty: 50 United States, the District of Columbia, Canada, and Puerto Rico: One-year limited warranty from accident, alteration, misuse or abuse or use with the provisions of a product safety notification and assist us to Arrange for service, follow the instructions in the "How...
Use & Care Guide
Page 16
.... Your repaired coffee maker will be covered by Take the coffee maker or ship prepaid and a one year limited warranty. service in this manner call our toll-free Customer eXperience Centre at fail within the first year of a Service Center near you are unable to an maker should our toll-free Customer Satisfaction Center at 1-800-807-6777. Please follow these maker will be replacement parts and...
.... Your repaired coffee maker will be covered by Take the coffee maker or ship prepaid and a one year limited warranty. service in this manner call our toll-free Customer eXperience Centre at fail within the first year of a Service Center near you are unable to an maker should our toll-free Customer Satisfaction Center at 1-800-807-6777. Please follow these maker will be replacement parts and...
Use & Care Guide
Page 17
... order accessories or replacement parts for service, please review the Or contact an Authorized Service Center "Troubleshooting" section. near you purchased the coffee call toll-free 1-800-807-6777. to : Customer Satisfaction Center KitchenAid Portable Appliances P.O. Or write to 8 p.m. (Eastern Time), or Saturday, 10 a.m. For service information in Mexico, call toll-free 1-800-541-6390. Box 218 St. maker for Service after the Warranty Expires - Or write...
... order accessories or replacement parts for service, please review the Or contact an Authorized Service Center "Troubleshooting" section. near you purchased the coffee call toll-free 1-800-807-6777. to : Customer Satisfaction Center KitchenAid Portable Appliances P.O. Or write to 8 p.m. (Eastern Time), or Saturday, 10 a.m. For service information in Mexico, call toll-free 1-800-541-6390. Box 218 St. maker for Service after the Warranty Expires - Or write...


