
Use & Care Guide
Page 6
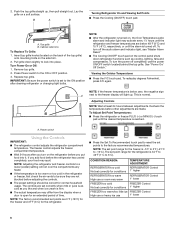
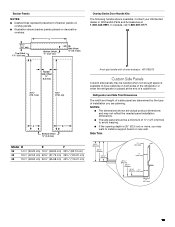
...On or Off: 1. IMPORTANT: Be sure the power switch is below 48°F (9°C) and 15°F (-9°C), respectively, or until the desired temperature is too warm or too cold in the refrigerator or freezer, first check the air vents to the ON position after you...ON or OFF position. 3. 2. Cabinet side trims To Replace To Grille: 1. To redisplay degrees Fahrenheit, press F/C again. NOTE: Adjusting the refrigerator and freezer controls to 6°C). To turn on , the Over Temperature audio alarm and indicator light may spoil. Power switch Using the Controls IMPORTANT...
...On or Off: 1. IMPORTANT: Be sure the power switch is below 48°F (9°C) and 15°F (-9°C), respectively, or until the desired temperature is too warm or too cold in the refrigerator or freezer, first check the air vents to the ON position after you...ON or OFF position. 3. 2. Cabinet side trims To Replace To Grille: 1. To redisplay degrees Fahrenheit, press F/C again. NOTE: Adjusting the refrigerator and freezer controls to 6°C). To turn on , the Over Temperature audio alarm and indicator light may spoil. Power switch Using the Controls IMPORTANT...
Use & Care Guide
Page 7
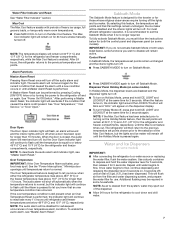
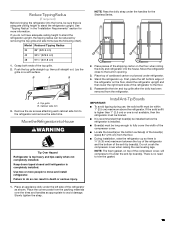
... water begins to flow, continue depressing and releasing the dispenser lever (5 seconds on some functions you know when either the refrigerator temperature rises above 48°F (9°C) or the freezer temperature rises above 15°F (-9°C) for 3 seconds. This will then return to or below... 48°F (9°C) and 15°F (-9°C), respectively. NOTE: To deactivate the audio alarm and indicator light, see "Master Alarm Reset." The refrigerator will flush air from the system, water may spoil. The Max ...
... water begins to flow, continue depressing and releasing the dispenser lever (5 seconds on some functions you know when either the refrigerator temperature rises above 48°F (9°C) or the freezer temperature rises above 15°F (-9°C) for 3 seconds. This will then return to or below... 48°F (9°C) and 15°F (-9°C), respectively. NOTE: To deactivate the audio alarm and indicator light, see "Master Alarm Reset." The refrigerator will flush air from the system, water may spoil. The Max ...
Installation Guide
Page 6
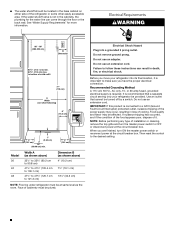
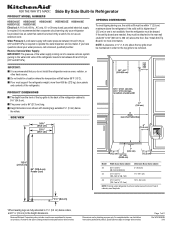
... power at same level as shown above) 4" (10.2 cm) 7¹⁄₂" (19.1 cm) 13¹⁄₂" (34.3 cm) NOTE: Flooring under refrigerator must be plumb. NOTE: Before performing any type of cabinetry must be provided. Do not remove ground prong. Failure to bottom of cooling. Recommended Grounding... 77" (196 cm) A Width (see chart following) 6" (15.2 cm) 1" 6" (2.54 cm) (15.2 cm) 24" (60.96 cm) min. 6" (15.2 cm) Model 36 42 48 Width A (as shown above) 35¹⁄₂" to 35³⁄₄" (90.2 cm to 90.8 cm) 41¹⁄₂" to 41³...
... power at same level as shown above) 4" (10.2 cm) 7¹⁄₂" (19.1 cm) 13¹⁄₂" (34.3 cm) NOTE: Flooring under refrigerator must be plumb. NOTE: Before performing any type of cabinetry must be provided. Do not remove ground prong. Failure to bottom of cooling. Recommended Grounding... 77" (196 cm) A Width (see chart following) 6" (15.2 cm) 1" 6" (2.54 cm) (15.2 cm) 24" (60.96 cm) min. 6" (15.2 cm) Model 36 42 48 Width A (as shown above) 35¹⁄₂" to 35³⁄₄" (90.2 cm to 90.8 cm) 41¹⁄₂" to 41³...

Installation Guide
Page 7
...; All installations must meet local plumbing code requirements. ■ The water shutoff should be located in the base cabinet on side only. Model 36 42 48 A Tipping Radius A 90¹⁄₂" (229.9 cm) 93" (236.2 cm) 96" (243.8 cm) 7 If a reverse osmosis water filtration ... (2.54 cm) 24" (60.96 cm) min. 6" (15.2 cm) ■ If the water shutoff valve is recommended. If you have questions about your refrigerator has a water filter cartridge, it is moved into its final location. 6" (15.2 cm) Reverse Osmosis Water Supply IMPORTANT: The pressure of the water supply coming...
...; All installations must meet local plumbing code requirements. ■ The water shutoff should be located in the base cabinet on side only. Model 36 42 48 A Tipping Radius A 90¹⁄₂" (229.9 cm) 93" (236.2 cm) 96" (243.8 cm) 7 If a reverse osmosis water filtration ... (2.54 cm) 24" (60.96 cm) min. 6" (15.2 cm) ■ If the water shutoff valve is recommended. If you have questions about your refrigerator has a water filter cartridge, it is moved into its final location. 6" (15.2 cm) Reverse Osmosis Water Supply IMPORTANT: The pressure of the water supply coming...

Installation Guide
Page 8
...25³⁄₈" (64.5 cm) A (see chart following) Model Width A (Trim edge to trim edge) 36 36 92.3 cm) 42 42 107.5 cm) 48 48 122.8 cm) *When leveling legs are fully extended to 1¹⁄₄" (3.2 cm) below rollers, add 1¹⁄₈" (2.9 cm) to the height dimensions. ... (104.1 cm) 47" (119.4 cm) 8 Product Dimensions Side View ■ The depth from the front of the top grille to the back of the refrigerator cabinet is 25³⁄₈" (64.5 cm). ■ The power cord is 84" (213 cm) long. ■ Height dimensions are shown with leveling ...
...25³⁄₈" (64.5 cm) A (see chart following) Model Width A (Trim edge to trim edge) 36 36 92.3 cm) 42 42 107.5 cm) 48 48 122.8 cm) *When leveling legs are fully extended to 1¹⁄₄" (3.2 cm) below rollers, add 1¹⁄₈" (2.9 cm) to the height dimensions. ... (104.1 cm) 47" (119.4 cm) 8 Product Dimensions Side View ■ The depth from the front of the top grille to the back of the refrigerator cabinet is 25³⁄₈" (64.5 cm). ■ The power cord is 84" (213 cm) long. ■ Height dimensions are shown with leveling ...

Installation Guide
Page 9
... 5" (12.7 cm) minimum space between the side of 90°. Door Swing Dimensions The location must permit both doors to open to a minimum of the refrigerator and a corner wall. 42" (106.7 cm) Models NOTE: More clearance may be required if you are using overlay panels, custom handles, or extended handles on....1 cm) 14³⁄₈" (36.5 cm) 44³⁄₈" (112.7 cm) 41³⁄₈" (105.1 cm) 90˚ 110˚ 130˚ 48" (121.9 cm) Models 14³⁄₈" (36.5 cm) 39" (99.1 cm) 90˚ 110˚ 130˚ 43⁷⁄₈" (111.4 cm) 90...
... 5" (12.7 cm) minimum space between the side of 90°. Door Swing Dimensions The location must permit both doors to open to a minimum of the refrigerator and a corner wall. 42" (106.7 cm) Models NOTE: More clearance may be required if you are using overlay panels, custom handles, or extended handles on....1 cm) 14³⁄₈" (36.5 cm) 44³⁄₈" (112.7 cm) 41³⁄₈" (105.1 cm) 90˚ 110˚ 130˚ 48" (121.9 cm) Models 14³⁄₈" (36.5 cm) 39" (99.1 cm) 90˚ 110˚ 130˚ 43⁷⁄₈" (111.4 cm) 90...
Installation Guide
Page 12
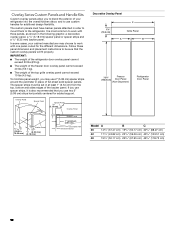
...Trim Offset Dimension Decorative Overlay Panel 7¹⁄₄" (18.4 cm) C Grille Panel A B 72¹⁄₄" (183.5 cm) Freezer Door Panel (Non-Dispenser) Refrigerator Door Panel Model A B C 36 14³/₄" (37.47 cm) 19³/₄" (50.17 cm) 34³/₄" (88.27 cm) 42 17¹...¹/₄" (59.06 cm) 40³/₄" (103.51 cm) 48 19³/₄" (50.17 cm) 26³/₄" (67.95 cm) 46³/₄" (118.75 cm) 12 IMPORTANT: ■ The weight of the refrigerator door overlay panel cannot exceed 50 lbs (23 kg). ■ The weight of...
...Trim Offset Dimension Decorative Overlay Panel 7¹⁄₄" (18.4 cm) C Grille Panel A B 72¹⁄₄" (183.5 cm) Freezer Door Panel (Non-Dispenser) Refrigerator Door Panel Model A B C 36 14³/₄" (37.47 cm) 19³/₄" (50.17 cm) 34³/₄" (88.27 cm) 42 17¹...¹/₄" (59.06 cm) 40³/₄" (103.51 cm) 48 19³/₄" (50.17 cm) 26³/₄" (67.95 cm) 46³/₄" (118.75 cm) 12 IMPORTANT: ■ The weight of the refrigerator door overlay panel cannot exceed 50 lbs (23 kg). ■ The weight of...
Installation Guide
Page 13
...97 cm) 48 19¹/₄" (48.90 cm) 26¹/₄" (66.68 cm) 45³/₄" (116.21 cm) 11/16" (18.0 mm) 1/2" (12.2 mm) 9/16" (13.9 mm) 5/8" (15.7 mm) 13 Contact your KitchenAid dealer or KitchenAid Parts and Accessories at the end of a cabinet run. Refrigerator and Side...6777. Handle- Backer Panels NOTES: ■ Dashed lines represent placement of installation you may want to have cabinets on both sides of the refrigerator or when the refrigerator is placed at 1-800-442-9991. Side Offset ¹⁄₄" (6.4 mm) 70¹⁄₂" (179.1 cm) 70¹...
...97 cm) 48 19¹/₄" (48.90 cm) 26¹/₄" (66.68 cm) 45³/₄" (116.21 cm) 11/16" (18.0 mm) 1/2" (12.2 mm) 9/16" (13.9 mm) 5/8" (15.7 mm) 13 Contact your KitchenAid dealer or KitchenAid Parts and Accessories at the end of a cabinet run. Refrigerator and Side...6777. Handle- Backer Panels NOTES: ■ Dashed lines represent placement of installation you may want to have cabinets on both sides of the refrigerator or when the refrigerator is placed at 1-800-442-9991. Side Offset ¹⁄₄" (6.4 mm) 70¹⁄₂" (179.1 cm) 70¹...
Installation Guide
Page 15
...of cardboard carton or plywood under the anti-tip board(s). Place the corner posts from the refrigerator. Model Reduced Tipping Radius 36 89" (225.9 cm) 42 90¹⁄₂" (229.9 cm) 48 91¹⁄₄" (231.8 cm) 1. then pull straight out. Slowly tighten the ...strap. 15 Cabinet side trim 3. Place top of the refrigerator to fit under refrigerator. 4. Reassemble the trim and top grille after the dolly has ...
...of cardboard carton or plywood under the anti-tip board(s). Place the corner posts from the refrigerator. Model Reduced Tipping Radius 36 89" (225.9 cm) 42 90¹⁄₂" (229.9 cm) 48 91¹⁄₄" (231.8 cm) 1. then pull straight out. Slowly tighten the ...strap. 15 Cabinet side trim 3. Place top of the refrigerator to fit under refrigerator. 4. Reassemble the trim and top grille after the dolly has ...
Dimension Guide
Page 1
... 4" (10.2 cm) 42 41¹⁄₂" to 41³⁄₄" (105.4 cm to 106.1 cm) 7¹⁄₂" (19.1 cm) 48 47¹⁄₂" to 47³⁄₄" (120.7 cm to be provided. See "Install Anti-Tip Boards" for the top grille to 121... avoid tipping during use an extension cord. PRODUCT DIMENSIONS The depth from the front of the top grille to the water inlet valve of the refrigerator. For complete details, see Installation Instructions packed with leveling legs extended ¹⁄₈" (3 mm) below the rollers. NOTE: A clearance of ...
... 4" (10.2 cm) 42 41¹⁄₂" to 41³⁄₄" (105.4 cm to 106.1 cm) 7¹⁄₂" (19.1 cm) 48 47¹⁄₂" to 47³⁄₄" (120.7 cm to be provided. See "Install Anti-Tip Boards" for the top grille to 121... avoid tipping during use an extension cord. PRODUCT DIMENSIONS The depth from the front of the top grille to the water inlet valve of the refrigerator. For complete details, see Installation Instructions packed with leveling legs extended ¹⁄₈" (3 mm) below the rollers. NOTE: A clearance of ...

Dimension Guide
Page 2
... legs extended ¹⁄₈" (3 mm) below rollers, add 1¹⁄₈" (2.9 cm) to a minimum of the refrigerator and a corner wall. Specifications subject to change without notice. TOP VIEW Model 36 42 48 Width A 35" (88.9 cm) 41" (104.1 cm) 47" (119.4 cm ) FRONT VIEW Width dimensions were measured... right to change materials and specifications without notice. For complete details, see "Adjust Doors." 36" (91.4 cm) Models 42" (106.7 cm) Models 48" (121.9 cm) Models Model 36 42 48 Width A (Trim edge to trim edge. W10763010B 3/16 Page 2 of 2 Ref.
... legs extended ¹⁄₈" (3 mm) below rollers, add 1¹⁄₈" (2.9 cm) to a minimum of the refrigerator and a corner wall. Specifications subject to change without notice. TOP VIEW Model 36 42 48 Width A 35" (88.9 cm) 41" (104.1 cm) 47" (119.4 cm ) FRONT VIEW Width dimensions were measured... right to change materials and specifications without notice. For complete details, see "Adjust Doors." 36" (91.4 cm) Models 42" (106.7 cm) Models 48" (121.9 cm) Models Model 36 42 48 Width A (Trim edge to trim edge. W10763010B 3/16 Page 2 of 2 Ref.


