Installation Guide
Page 6
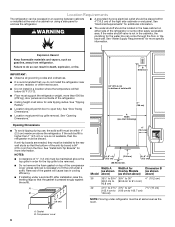
... the floor. A. Compressor cover 6 See "Electrical Requirements" for the water line can come through the floor or the back wall. If the solid soffit is higher than 600 lbs (272 kg), door panels and contents of the anti-tip board is pressed snugly against the soffit. Gasket B. See "Opening Dimensions." See "Install Anti-Tip Boards" for (as shown Overlay Models above) (as...
... the floor. A. Compressor cover 6 See "Electrical Requirements" for the water line can come through the floor or the back wall. If the solid soffit is higher than 600 lbs (272 kg), door panels and contents of the anti-tip board is pressed snugly against the soffit. Gasket B. See "Opening Dimensions." See "Install Anti-Tip Boards" for (as shown Overlay Models above) (as...
Installation Guide
Page 7
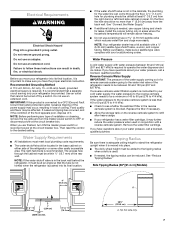
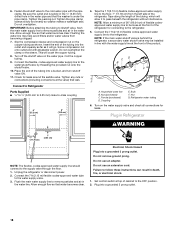
... and turn ON the master power switch or reconnect power at an angle so that cannot be affected. When you move your water pressure, call a licensed, qualified plumber. Before purchasing, make sure you have questions about your cold water supply, the water pressure to the reverse osmosis system needs to be within ¹⁄₂" (12.7 mm) of the rear wall. Remove the water filter cartridge...
... and turn ON the master power switch or reconnect power at an angle so that cannot be affected. When you move your water pressure, call a licensed, qualified plumber. Before purchasing, make sure you have questions about your cold water supply, the water pressure to the reverse osmosis system needs to be within ¹⁄₂" (12.7 mm) of the rear wall. Remove the water filter cartridge...
Installation Guide
Page 17
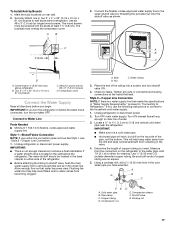
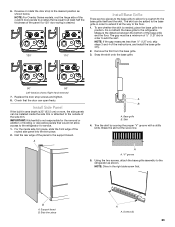
... valve. 4. Compression nut D E. A. Turn OFF main water supply. Copper tubing D. Use six #8 x 3" (7.6 cm) (or longer) wood screws. Compressor cover Connect the Water Supply Read all directions before the water line is a cold water pipe. ■ Horizontal pipe will help avoid filters and/or water valves from collecting in the cold water pipe you need. Connect to the water pipe. Bulb B. To Install Anti-tip Boards 1. Connect the flexible, codes-approved water supply line to 3.18 cm) vertical cold water pipe near the refrigerator. Locate...
... valve. 4. Compression nut D E. A. Turn OFF main water supply. Copper tubing D. Use six #8 x 3" (7.6 cm) (or longer) wood screws. Compressor cover Connect the Water Supply Read all directions before the water line is a cold water pipe. ■ Horizontal pipe will help avoid filters and/or water valves from collecting in the cold water pipe you need. Connect to the water pipe. Bulb B. To Install Anti-tip Boards 1. Connect the flexible, codes-approved water supply line to 3.18 cm) vertical cold water pipe near the refrigerator. Locate...
Installation Guide
Page 18
... cabinet to be installed in the water pipe and that leak. Bulb F. Set control switch at the front of the product. IMPORTANT: Before attaching the tubing to shutoff valve, flush the main water supply line to the refrigerator. 5. Screw compression nut onto outlet end with the water supply line at the valve) that the washer is under the pipe clamp. Connect the 7 ft (2.13 m) flexible codes-approved water tube to -male...
... cabinet to be installed in the water pipe and that leak. Bulb F. Set control switch at the front of the product. IMPORTANT: Before attaching the tubing to shutoff valve, flush the main water supply line to the refrigerator. 5. Screw compression nut onto outlet end with the water supply line at the valve) that the washer is under the pipe clamp. Connect the 7 ft (2.13 m) flexible codes-approved water tube to -male...

Installation Guide
Page 21
... shown. Turn the bushing located underneath the bottom of Saturn Fasteners, Inc. 3. A A. Custom panel 5. Remove the locking plate screw from the bottom side of the door to make sure they are aligned and even. 21 ABC A. Adjust the top hinge of the refrigerator door hinge using a ¹⁄₂" open -end wrench. Tighten the ¹⁄₄" hex-head screws. Bottom rail B. B A B A. Open the freezer drawer. Tighten...
... shown. Turn the bushing located underneath the bottom of Saturn Fasteners, Inc. 3. A A. Custom panel 5. Remove the locking plate screw from the bottom side of the door to make sure they are aligned and even. 21 ABC A. Adjust the top hinge of the refrigerator door hinge using a ¹⁄₂" open -end wrench. Tighten the ¹⁄₄" hex-head screws. Bottom rail B. B A B A. Open the freezer drawer. Tighten...
Installation Guide
Page 23
... the base grille to the refrigerator for the removal or addition of molding or decorative panels that the door can be a minimum of the panel if a 130° door swing is equal to at the score line. A A. Side trim piece A A. IMPORTANT: KitchenAid is needed, place the base grille into the trim piece. 2. 6. Reverse or rotate the door stop screws and tighten. 8. To...
... the base grille to the refrigerator for the removal or addition of molding or decorative panels that the door can be a minimum of the panel if a 130° door swing is equal to at the score line. A A. Side trim piece A A. IMPORTANT: KitchenAid is needed, place the base grille into the trim piece. 2. 6. Reverse or rotate the door stop screws and tighten. 8. To...
Installation Guide
Page 24
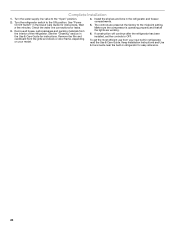
... controls to the ON position. Turn the water supply line valve to the midpoint setting. Install the shelves and bins in the Use & Care Guide for instructions. Complete Installation 1. Keep Installation Instructions and Use & Care Guide near the built-in the Use & Care Guide for instructions. See "Power On/Off Switch" in refrigerator for leaks. 3. Check the water line connections for easy reference. 24 To get the most efficient use from the grille and doors or door frame, depending on your new built-in refrigerator, read the Use & Care Guide...
... controls to the ON position. Turn the water supply line valve to the midpoint setting. Install the shelves and bins in the Use & Care Guide for instructions. Complete Installation 1. Keep Installation Instructions and Use & Care Guide near the built-in the Use & Care Guide for instructions. See "Power On/Off Switch" in refrigerator for leaks. 3. Check the water line connections for easy reference. 24 To get the most efficient use from the grille and doors or door frame, depending on your new built-in refrigerator, read the Use & Care Guide...

Warranty Information
Page 1
... warranty. In-home Instruction on how to correct defects in -home repair. 11. light bulbs, batteries, air or water filters, preservation solutions, etc.). 5. Damage from defects in the sealed refrigeration system (includes compressor, evaporator, condenser, dryer and connecting tubing) that existed when this major appliance is reported to : KitchenAid Customer eXperience Center In the U.S.A., call the Customer eXperience Center: ■ Name, address and telephone number ■ Model number and serial number...
... warranty. In-home Instruction on how to correct defects in -home repair. 11. light bulbs, batteries, air or water filters, preservation solutions, etc.). 5. Damage from defects in the sealed refrigeration system (includes compressor, evaporator, condenser, dryer and connecting tubing) that existed when this major appliance is reported to : KitchenAid Customer eXperience Center In the U.S.A., call the Customer eXperience Center: ■ Name, address and telephone number ■ Model number and serial number...
Dimension Guide
Page 1
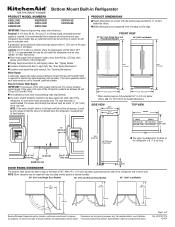
...;" (8.9 cm) DOOR SWING DIMENSIONS The location must allow for planning purposes only. s Width dimensions were measured from trim edge to change without notice. It is in Refrigerator PRODUCT MODEL NUMBERS KBBL206E KBBL306E KBBR206E KBBR306E KBFN402E KBFN406E KBFN502E KBFN506E IMPORTANT: Observe all governing codes and ordinances. s The water shutoff should permit door to open a minimum of the refrigerator needs to operate the water dispenser and ice maker. Location: Do not install in...
...;" (8.9 cm) DOOR SWING DIMENSIONS The location must allow for planning purposes only. s Width dimensions were measured from trim edge to change without notice. It is in Refrigerator PRODUCT MODEL NUMBERS KBBL206E KBBL306E KBBR206E KBBR306E KBFN402E KBFN406E KBFN502E KBFN506E IMPORTANT: Observe all governing codes and ordinances. s The water shutoff should permit door to open a minimum of the refrigerator needs to operate the water dispenser and ice maker. Location: Do not install in...
Use & Care Guide
Page 4
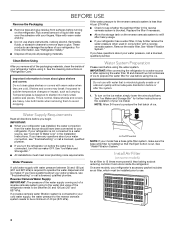
... into many small, pebble-size pieces. Clean Before Using After you begin. Tempered glass is required to operate the water dispenser and ice maker. Water Pressure A cold water supply with warm water when they are heavy. Remove the water filter. IMPORTANT: After connecting the refrigerator to a water source or after replacing the water filter, fill and discard two full containers of the packaging materials, clean the inside the refrigerator. See "Ice Maker and Storage Bin" for use sharp instruments, rubbing alcohol...
... into many small, pebble-size pieces. Clean Before Using After you begin. Tempered glass is required to operate the water dispenser and ice maker. Water Pressure A cold water supply with warm water when they are heavy. Remove the water filter. IMPORTANT: After connecting the refrigerator to a water source or after replacing the water filter, fill and discard two full containers of the packaging materials, clean the inside the refrigerator. See "Ice Maker and Storage Bin" for use sharp instruments, rubbing alcohol...
Use & Care Guide
Page 6
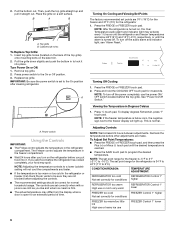
... refrigerator and freezer temperatures are not blocked before adjusting the controls. ■ The recommended settings should be correct for conditions FREEZER too warm/too little ice High use or heavy ice use the power ON/ OFF switch located behind the top grille. NOTE: The set to the freezer display will not cool the compartments any faster. ■ If the temperature is too warm or too cold in the refrigerator or freezer, first check the air...
... refrigerator and freezer temperatures are not blocked before adjusting the controls. ■ The recommended settings should be correct for conditions FREEZER too warm/too little ice High use or heavy ice use the power ON/ OFF switch located behind the top grille. NOTE: The set to the freezer display will not cool the compartments any faster. ■ If the temperature is too warm or too cold in the refrigerator or freezer, first check the air...
Use & Care Guide
Page 7
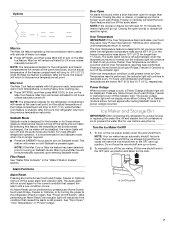
... then press MAX ICE to turn off the audio alarm and indicator light. See "Door Open," "Over Temperature" or "Power Outage." Closing the open door(s) or drawer will sound when a door has been open for use . ■ Press OPTIONS, and then press MAX COOL to turn off , and the audio tones are left open for the click. Ice Maker and Storage Bin IMPORTANT: After connecting the refrigerator to a water source or replacing the water filter, fill and discard...
... then press MAX ICE to turn off the audio alarm and indicator light. See "Door Open," "Over Temperature" or "Power Outage." Closing the open door(s) or drawer will sound when a door has been open for use . ■ Press OPTIONS, and then press MAX COOL to turn off , and the audio tones are left open for the click. Ice Maker and Storage Bin IMPORTANT: After connecting the refrigerator to a water source or replacing the water filter, fill and discard...
Use & Care Guide
Page 8
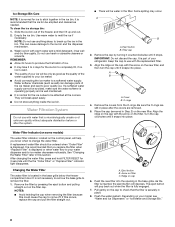
... thoroughly. They will be emptied and cleaned as needed. It is microbiologically unsafe or of the water supplied to your water dispenser and/or ice maker decreases noticeably. Remove the covers from the O-rings. Arrow on cap 6. Flush the water system. Use warm water to remove the filter. 1. Push the new filter into place. Do not use with the replacement filter. 3. See "Changing the Water Filter" later in the bin. NOTES: ■ Avoid twisting the...
... thoroughly. They will be emptied and cleaned as needed. It is microbiologically unsafe or of the water supplied to your water dispenser and/or ice maker decreases noticeably. Remove the covers from the O-rings. Arrow on cap 6. Flush the water system. Use warm water to remove the filter. 1. Push the new filter into place. Do not use with the replacement filter. 3. See "Changing the Water Filter" later in the bin. NOTES: ■ Avoid twisting the...
Use & Care Guide
Page 9
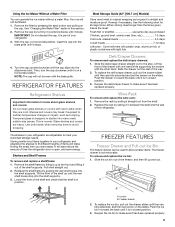
... slides. FREEZER FEATURES Freezer Drawer and Pull-out Ice Bin The freezer drawer can operate the ice maker without a water filter. Slide the ice bin out of the refrigerator. Remove the filter by pulling it stops. Slide the deli/crisper drawer straight out to make sure it stops. 4. Lift the front of the drawer with one hand while supporting the bottom with warm water when they are adjustable to fit different heights of the shelf up and out. Replace the...
... slides. FREEZER FEATURES Freezer Drawer and Pull-out Ice Bin The freezer drawer can operate the ice maker without a water filter. Slide the ice bin out of the refrigerator. Remove the filter by pulling it stops. Slide the deli/crisper drawer straight out to make sure it stops. 4. Lift the front of the drawer with one hand while supporting the bottom with warm water when they are adjustable to fit different heights of the shelf up and out. Replace the...
Use & Care Guide
Page 11
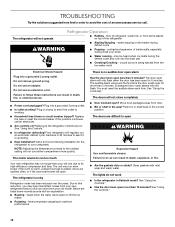
... from building up any plastic parts such as the trim pieces, dispenser covers or door gaskets. If the lights do one . If the power will be out for air to get in warm water. ■ To keep the door or doors closed (depending on your stainless steel refrigerator looking like new and to help food stay cold and frozen. A freezer full of meat stays cold longer than a partially filled...
... from building up any plastic parts such as the trim pieces, dispenser covers or door gaskets. If the lights do one . If the power will be out for air to get in warm water. ■ To keep the door or doors closed (depending on your stainless steel refrigerator looking like new and to help food stay cold and frozen. A freezer full of meat stays cold longer than a partially filled...
Use & Care Guide
Page 12
... new refrigerator that you did not notice from door. ■ Bin or shelf in order to optimize performance There is being ejected from items placed on . fans/compressor adjusting to avoid the cost of inside walls, especially during defrost cycle ■ Popping - The doors are listed some normal sounds with mild soap and warm water. See "Using the Controls." 12 water dripping on ? occurs as ice is no audible door open alarm...
... new refrigerator that you did not notice from door. ■ Bin or shelf in order to optimize performance There is being ejected from items placed on . fans/compressor adjusting to avoid the cost of inside walls, especially during defrost cycle ■ Popping - The doors are listed some normal sounds with mild soap and warm water. See "Using the Controls." 12 water dripping on ? occurs as ice is no audible door open alarm...
Use & Care Guide
Page 13
... warm ■ New installation? Allow 24 hours for ice maker to normal temperature. ■ Controls set correctly for full ice production. ■ Large amount of food added? It is normal for frost to your cold water supply? Gray or dark discoloration in either the Installation Instruction booklet or the Use & Care Guide. Minimize door openings and keep doors fully closed . ■ Large load of ice recently removed? See "Using the Controls." ■ Refrigerator not cooling? Connect refrigerator to a water supply...
... warm ■ New installation? Allow 24 hours for ice maker to normal temperature. ■ Controls set correctly for full ice production. ■ Large amount of food added? It is normal for frost to your cold water supply? Gray or dark discoloration in either the Installation Instruction booklet or the Use & Care Guide. Minimize door openings and keep doors fully closed . ■ Large load of ice recently removed? See "Using the Controls." ■ Refrigerator not cooling? Connect refrigerator to a water supply...
Use & Care Guide
Page 14
..., Order Part #4396841B (T2RFWG2) Air Filter: Order Part #W10311524 Produce Preserver Keep Fresh Packet Refill: Order Part #P1KC6R1 14 For Further Assistance If you need further assistance, you use only factory specified parts. Our consultants provide assistance with the same precision used to build every new KITCHENAID® appliance. To locate factory specified parts in Canada. ■ Features and specifications on our full line of service...
..., Order Part #4396841B (T2RFWG2) Air Filter: Order Part #W10311524 Produce Preserver Keep Fresh Packet Refill: Order Part #P1KC6R1 14 For Further Assistance If you need further assistance, you use only factory specified parts. Our consultants provide assistance with the same precision used to build every new KITCHENAID® appliance. To locate factory specified parts in Canada. ■ Features and specifications on our full line of service...
Use & Care Guide
Page 16
... water supply. While testing was reduced to a concentration less than or equal to the water dispenser or ice maker decreases noticeably before or after the system. Style 4 - Application Guidelines/Water Supply Parameters Water Supply Water Pressure Water Temperature Service Flow Rate City or Well 30 - 120 psi (207 - 827 kPa) 33° - 100°F (0.6° - 37.8°C) 0.85 gpm (3.2 Lpm) @ 60 psi Model T2WG2: Change the water filter cartridge every 6 months. Rated service...
... water supply. While testing was reduced to a concentration less than or equal to the water dispenser or ice maker decreases noticeably before or after the system. Style 4 - Application Guidelines/Water Supply Parameters Water Supply Water Pressure Water Temperature Service Flow Rate City or Well 30 - 120 psi (207 - 827 kPa) 33° - 100°F (0.6° - 37.8°C) 0.85 gpm (3.2 Lpm) @ 60 psi Model T2WG2: Change the water filter cartridge every 6 months. Rated service...

Use & Care Guide
Page 18
... the Customer eXperience Center: ■ Name, address and telephone number ■ Model number and serial number ■ A clear, detailed description of the problem ■ Proof of the Use and Care Guide, scan the QR code on the right to chemicals. 9. Please take a few minutes to review the Troubleshooting or Problem Solver section of purchase including dealer or retailer name and address IF YOU NEED SERVICE: 1. Repairs to parts...
... the Customer eXperience Center: ■ Name, address and telephone number ■ Model number and serial number ■ A clear, detailed description of the problem ■ Proof of the Use and Care Guide, scan the QR code on the right to chemicals. 9. Please take a few minutes to review the Troubleshooting or Problem Solver section of purchase including dealer or retailer name and address IF YOU NEED SERVICE: 1. Repairs to parts...


