Use & Care Guide
Page 3
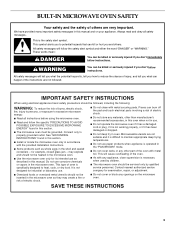
BUILT-IN MICROWAVE OVEN SAFETY Your safety and the safety of burns, electric shock, fire, injury to persons, or exposure to excessive microwave energy: s Read all safety messages. All safety messages will follow instructions. IMPORTANT SAFETY INSTRUCTIONS When using the microwave oven. See "GROUNDING INSTRUCTIONS" found in the microwave oven... appliance is not working properly, or if it is the safety alert symbol. s Do not use . s The microwave oven should not be followed, including the following: WARNING: To reduce the risk of others . SAVE THESE INSTRUCTIONS 3 We...
BUILT-IN MICROWAVE OVEN SAFETY Your safety and the safety of burns, electric shock, fire, injury to persons, or exposure to excessive microwave energy: s Read all safety messages. All safety messages will follow instructions. IMPORTANT SAFETY INSTRUCTIONS When using the microwave oven. See "GROUNDING INSTRUCTIONS" found in the microwave oven... appliance is not working properly, or if it is the safety alert symbol. s Do not use . s The microwave oven should not be followed, including the following: WARNING: To reduce the risk of others . SAVE THESE INSTRUCTIONS 3 We...
Use & Care Guide
Page 8
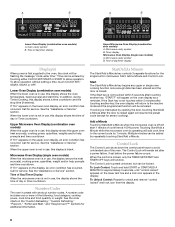
... B A B TIMER % OZ FC LBS POWER MAXIMUM TIME REMAINING Lower Oven Display (combination oven models) A. Timer display Microwave Oven Display (single oven models) A. To allow operation. Microwave Oven Display (single oven models) When the microwave oven is in the display. See the code charts in use , this display...single built-in use of cook time at 100% power. Time can be flashing the message "clock-enter time." When the lower oven is not in microwave: Start, Add a Minute and Control Lock. Upper Microwave Oven Display (combination oven models) When the upper oven is ...
... B A B TIMER % OZ FC LBS POWER MAXIMUM TIME REMAINING Lower Oven Display (combination oven models) A. Timer display Microwave Oven Display (single oven models) A. To allow operation. Microwave Oven Display (single oven models) When the microwave oven is in the display. See the code charts in use , this display...single built-in use of cook time at 100% power. Time can be flashing the message "clock-enter time." When the lower oven is not in microwave: Start, Add a Minute and Control Lock. Upper Microwave Oven Display (combination oven models) When the upper oven is ...
Use & Care Guide
Page 10
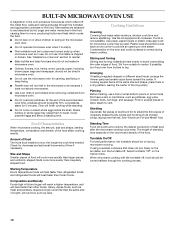
... spattering. Turntable On/Off For best performance, the turntable should be in place and correct side up when microwave oven is normal during microwave cooking. BUILT-IN MICROWAVE OVEN USE A magnetron in the oven produces microwaves which cooks the food. Microwaves are attracted to and absorbed by the natural conduction of the recommended cook time, potatoes should be used...
... spattering. Turntable On/Off For best performance, the turntable should be in place and correct side up when microwave oven is normal during microwave cooking. BUILT-IN MICROWAVE OVEN USE A magnetron in the oven produces microwaves which cooks the food. Microwaves are attracted to and absorbed by the natural conduction of the recommended cook time, potatoes should be used...
Use & Care Guide
Page 18
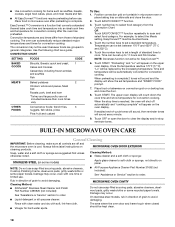
... should be set between 170°F and 450°F (77°C and 232°C). 5. Temperature can be kept clean. 18 BUILT-IN MICROWAVE OVEN CARE General Cleaning IMPORTANT: Before cleaning, make sure all -purpose cleaner: s All-Purpose Appliance Cleaner Part Number 31662 (not included): ...tones will count down the cook time and show the set temperature and "INSERT FOOD" prompt. 7. The upper oven display will sound every minute. 9. Cleaning Method: s KitchenAid® Stainless Steel Cleaner and Polish Part Number 4396920 (not included): See "Assistance or Service" section to ...
... should be set between 170°F and 450°F (77°C and 232°C). 5. Temperature can be kept clean. 18 BUILT-IN MICROWAVE OVEN CARE General Cleaning IMPORTANT: Before cleaning, make sure all -purpose cleaner: s All-Purpose Appliance Cleaner Part Number 31662 (not included): ...tones will count down the cook time and show the set temperature and "INSERT FOOD" prompt. 7. The upper oven display will sound every minute. 9. Cleaning Method: s KitchenAid® Stainless Steel Cleaner and Polish Part Number 4396920 (not included): See "Assistance or Service" section to ...
Use & Care Guide
Page 22
...FOR INCIDENTAL OR CONSEQUENTIAL DAMAGES. You must be repaired in the home and only in materials or workmanship and is reported to KitchenAid within 30 days from warranty coverage. 3. Service calls to correct the installation of your major appliance, to instruct you need it. ... need to better help by checking the "Assistance or Service" section or by KitchenAid. 5. The cost of repair or replacement under this limited warranty. KITCHENAID® BUILT-IN OVEN & MICROWAVE WARRANTY LIMITED WARRANTY For one year from the date of purchase, when this major appliance is operated ...
...FOR INCIDENTAL OR CONSEQUENTIAL DAMAGES. You must be repaired in the home and only in materials or workmanship and is reported to KitchenAid within 30 days from warranty coverage. 3. Service calls to correct the installation of your major appliance, to instruct you need it. ... need to better help by checking the "Assistance or Service" section or by KitchenAid. 5. The cost of repair or replacement under this limited warranty. KITCHENAID® BUILT-IN OVEN & MICROWAVE WARRANTY LIMITED WARRANTY For one year from the date of purchase, when this major appliance is operated ...
Dimension Guide
Page 1
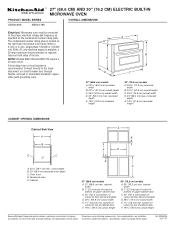
...on the model/serial number rating plate. Ref. 8304424A 05-17-07 A time-delay fuse or circuit breaker is required, fused on the right-hand microwave oven frame. A B E D C 27" (68.6 cm) models A. 25 64.3 cm) recessed width B. 20 51.6 cm) overall height ..." (58.4 cm) recessed oven depth C. NOTE: Models KBHC109 and KBHC179 require a 30-amp circuit. Instructions packed with grounding wire). ® 27" (68.6 CM) AND 30" (76.2 CM) ELECTRIC BUILT-IN MICROWAVE OVEN PRODUCT MODEL SERIES OVERALL DIMENSIONS KBHS109S KBHS179S Electrical: Microwave oven must be connected to change ...
...on the model/serial number rating plate. Ref. 8304424A 05-17-07 A time-delay fuse or circuit breaker is required, fused on the right-hand microwave oven frame. A B E D C 27" (68.6 cm) models A. 25 64.3 cm) recessed width B. 20 51.6 cm) overall height ..." (58.4 cm) recessed oven depth C. NOTE: Models KBHC109 and KBHC179 require a 30-amp circuit. Instructions packed with grounding wire). ® 27" (68.6 CM) AND 30" (76.2 CM) ELECTRIC BUILT-IN MICROWAVE OVEN PRODUCT MODEL SERIES OVERALL DIMENSIONS KBHS109S KBHS179S Electrical: Microwave oven must be connected to change ...
Installation Guide
Page 2
... to reduce the chance of others . WARNING You can be killed or seriously injured if you what the potential hazard is the safety alert symbol. BUILT-IN MICROWAVE OVEN SAFETY Your safety and the safety of injury, and tell you don't immediately follow the safety alert symbol and either the word "DANGER" or...
... to reduce the chance of others . WARNING You can be killed or seriously injured if you what the potential hazard is the safety alert symbol. BUILT-IN MICROWAVE OVEN SAFETY Your safety and the safety of injury, and tell you don't immediately follow the safety alert symbol and either the word "DANGER" or...
Installation Guide
Page 5
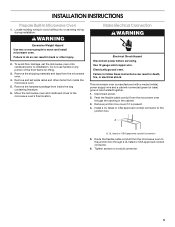
... two or more people to the junction box. Remove the shipping materials and tape from inside the microwave oven. 5. Install a UL listed or CSA approved conduit connector to move and install microwave oven. INSTALLATION INSTRUCTIONS Prepare Built-In Microwave Oven 1. Route the flexible cable conduit from inside the bag containing literature. 6. Remove the hardware package from the...
... two or more people to the junction box. Remove the shipping materials and tape from inside the microwave oven. 5. Install a UL listed or CSA approved conduit connector to move and install microwave oven. INSTALLATION INSTRUCTIONS Prepare Built-In Microwave Oven 1. Route the flexible cable conduit from inside the bag containing literature. 6. Remove the hardware package from the...
Installation Guide
Page 7
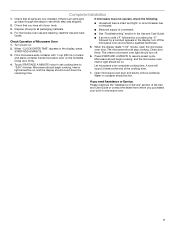
...) of your built-in the display, press START/ADD A MINUTE. 3. When the display reads "1:00" minute, open the microwave oven door. For microwave oven use and cleaning, read the Use and Care Guide. Microwave should begin cooking, and the microwave oven interior light should be hot. A tone will sound 3 times at the end of Microwave Oven 1. If microwave does not operate...
...) of your built-in the display, press START/ADD A MINUTE. 3. When the display reads "1:00" minute, open the microwave oven door. For microwave oven use and cleaning, read the Use and Care Guide. Microwave should begin cooking, and the microwave oven interior light should be hot. A tone will sound 3 times at the end of Microwave Oven 1. If microwave does not operate...


