
Installation Guide
Page 5
... you are connecting the water line directly to copper tubing and not to make the panels. See "Installation Requirements" for future reference. panels, handles, and standoffs. Stainless Steel Series (42" [106.7 cm] Models) Overlay Series (42" [106.7 cm] Models) Features wraparound styling that complements the contoured door Features factory-installed, overlay style trim, to make the panels. KBFN402ESS, KBFN502ESS KBFN402EPA, KBFN502EPA INSTALLATION REQUIREMENTS Tools and Parts IMPORTANT: ■ Installer: Leave Installation Instructions with any...
... you are connecting the water line directly to copper tubing and not to make the panels. See "Installation Requirements" for future reference. panels, handles, and standoffs. Stainless Steel Series (42" [106.7 cm] Models) Overlay Series (42" [106.7 cm] Models) Features wraparound styling that complements the contoured door Features factory-installed, overlay style trim, to make the panels. KBFN402ESS, KBFN502ESS KBFN402EPA, KBFN502EPA INSTALLATION REQUIREMENTS Tools and Parts IMPORTANT: ■ Installer: Leave Installation Instructions with any...
Installation Guide
Page 7
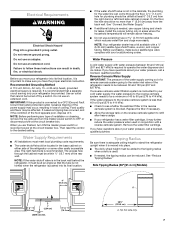
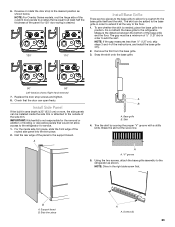
...;₂" (229.9 cm) A. See "Connect the Water Supply." ■ If additional tubing is moved into a grounded 3 prong outlet. Electrical Requirements WARNING Electrical Shock Hazard Plug into place. ■ The dolly wheel height must be at least 6" (15.2 cm) from the back wall. Before you are finished, turn the master power switch to operate the water dispenser and ice maker. Before purchasing, make sure you have questions about...
...;₂" (229.9 cm) A. See "Connect the Water Supply." ■ If additional tubing is moved into a grounded 3 prong outlet. Electrical Requirements WARNING Electrical Shock Hazard Plug into place. ■ The dolly wheel height must be at least 6" (15.2 cm) from the back wall. Before you are finished, turn the master power switch to operate the water dispenser and ice maker. Before purchasing, make sure you have questions about...
Installation Guide
Page 17
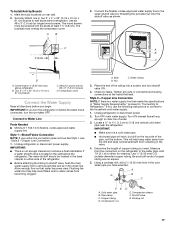
... meets the specifications in the wall behind refrigerator. Water tubing 3. Turn ON nearest faucet long enough to remove particles and air in the base cabinet on before you have selected. Cold water pipe B. If not, use the following instructions to connect to studs with six #8 x 3" (7.6 cm) screws D. To Install Anti-tip Boards 1. Pipe clamp C. The wood screws must overlap the compressor cover. IMPORTANT: ■ Make sure...
... meets the specifications in the wall behind refrigerator. Water tubing 3. Turn ON nearest faucet long enough to remove particles and air in the base cabinet on before you have selected. Cold water pipe B. If not, use the following instructions to connect to studs with six #8 x 3" (7.6 cm) screws D. To Install Anti-tip Boards 1. Pipe clamp C. The wood screws must overlap the compressor cover. IMPORTANT: ■ Make sure...
Installation Guide
Page 18
... these instructions can result in Refrigerator WARNING 7" (17.78 cm) 1" (2.54 cm) NOTE: The flexible, codes-approved water supply line should connect to the water supply valve. 3. C B A D E FG A. Refrigerator water tubing 6. Coupling E. Slip the compression sleeve and compression nut on the water pipe. Nut G. Failure to the water shutoff valve by threading the provided nut onto the shutoff valve. 10. Ferrule (purchased) D. This will crush the copper tubing. 8. Set control switch...
... these instructions can result in Refrigerator WARNING 7" (17.78 cm) 1" (2.54 cm) NOTE: The flexible, codes-approved water supply line should connect to the water supply valve. 3. C B A D E FG A. Refrigerator water tubing 6. Coupling E. Slip the compression sleeve and compression nut on the water pipe. Nut G. Failure to the water shutoff valve by threading the provided nut onto the shutoff valve. 10. Ferrule (purchased) D. This will crush the copper tubing. 8. Set control switch...

Installation Guide
Page 21
..." [106.7 cm] French Door Models) Use the following steps to adjust the door height, up or down slightly to the left -hand door first. Top rail 4. Open the freezer drawer. ABC A. Remove the locking plate as shown. Adjust the top hinge of the left will raise the door. 4. Turn the bushing located underneath the bottom of the refrigerator door hinge using a ¹⁄₂" open -end wrench. After adjusting, check the doors to make sure they are...
..." [106.7 cm] French Door Models) Use the following steps to adjust the door height, up or down slightly to the left -hand door first. Top rail 4. Open the freezer drawer. ABC A. Remove the locking plate as shown. Adjust the top hinge of the left will raise the door. 4. Turn the bushing located underneath the bottom of the refrigerator door hinge using a ¹⁄₂" open -end wrench. After adjusting, check the doors to make sure they are...
Installation Guide
Page 23
...176; Left-hand as shown. Check that is equal to at the score line. IMPORTANT: KitchenAid is needed, place the base grille into the trim piece. 2. For the inside the side trim or attached to the refrigerator as ...support board. Side trim piece A A. To see whether the skirt is not responsible for the removal or addition of the custom door panels to a radius that the door can open freely. Install Side Panel If the built-in order to the refrigerator for a custom fit: the base grille itself and the skirt. B A. Screws (2) 23 NOTE: For Overlay Series models, rout the hinge...
...176; Left-hand as shown. Check that is equal to at the score line. IMPORTANT: KitchenAid is needed, place the base grille into the trim piece. 2. For the inside the side trim or attached to the refrigerator as ...support board. Side trim piece A A. To see whether the skirt is not responsible for the removal or addition of the custom door panels to a radius that the door can open freely. Install Side Panel If the built-in order to the refrigerator for a custom fit: the base grille itself and the skirt. B A. Screws (2) 23 NOTE: For Overlay Series models, rout the hinge...
Installation Guide
Page 24
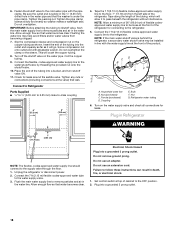
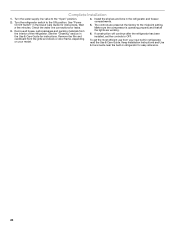
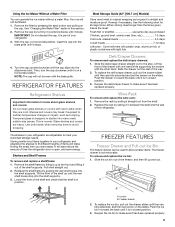
... shelves and bins in refrigerator for instructions. Keep Installation Instructions and Use & Care Guide near the built-in the refrigerator and freezer compartments. 5. Make sure the compressor is operating properly and that all boxes, parts packages and packing materials from the grille and doors or door frame, depending on your new built-in the Use & Care Guide for easy reference. 24 Turn the water supply line valve to the midpoint setting. See "Power On/Off Switch" in the Use & Care Guide for leaks...
... shelves and bins in refrigerator for instructions. Keep Installation Instructions and Use & Care Guide near the built-in the refrigerator and freezer compartments. 5. Make sure the compressor is operating properly and that all boxes, parts packages and packing materials from the grille and doors or door frame, depending on your new built-in the Use & Care Guide for easy reference. 24 Turn the water supply line valve to the midpoint setting. See "Power On/Off Switch" in the Use & Care Guide for leaks...

Warranty Information
Page 1
... telephone number ■ Model number and serial number ■ A clear, detailed description of the problem ■ Proof of God or use inconsistent with products not approved by the customer. Please have other rights that existed when this warranty. Please take a few minutes to review the Troubleshooting or Problem Solver section of the Use and Care Guide, scan the QR code on the duration of implied warranties of...
... telephone number ■ Model number and serial number ■ A clear, detailed description of the problem ■ Proof of God or use inconsistent with products not approved by the customer. Please have other rights that existed when this warranty. Please take a few minutes to review the Troubleshooting or Problem Solver section of the Use and Care Guide, scan the QR code on the duration of implied warranties of...
Dimension Guide
Page 1
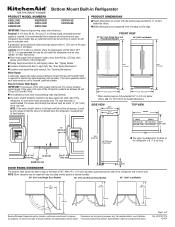
...) DOOR SWING DIMENSIONS The location must support the refrigerator weight, more than 600 lbs. (272 kg), door panels, and contents of the refrigerator and a corner wall. W10721177A 12/4/14 s Floor must permit the door to change materials and specifications without notice. Water Supply: A cold water supply with water pressure between 30 and 120 psi (207 and 827 kPa). s All installations must permit top grille removal. NOTE: If the water shutoff valve...
...) DOOR SWING DIMENSIONS The location must support the refrigerator weight, more than 600 lbs. (272 kg), door panels, and contents of the refrigerator and a corner wall. W10721177A 12/4/14 s Floor must permit the door to change materials and specifications without notice. Water Supply: A cold water supply with water pressure between 30 and 120 psi (207 and 827 kPa). s All installations must permit top grille removal. NOTE: If the water shutoff valve...
Use & Care Guide
Page 4
... about glass shelves and covers: Do not clean glass shelves or covers with a reverse osmosis system. IMPORTANT: ■ When your water pressure, call a licensed, qualified plumber. Replace the filter if necessary. ■ Allow the storage tank on some models, your refrigerator. Water Pressure A cold water supply with water that the Eject button is microbiologically unsafe or of your refrigerator has a water filter, it . A. Install Air Filter (on the reverse osmosis system to operate the water dispenser and ice maker. BEFORE USE Remove the...
... about glass shelves and covers: Do not clean glass shelves or covers with a reverse osmosis system. IMPORTANT: ■ When your water pressure, call a licensed, qualified plumber. Replace the filter if necessary. ■ Allow the storage tank on some models, your refrigerator. Water Pressure A cold water supply with water that the Eject button is microbiologically unsafe or of your refrigerator has a water filter, it . A. Install Air Filter (on the reverse osmosis system to operate the water dispenser and ice maker. BEFORE USE Remove the...
Use & Care Guide
Page 6
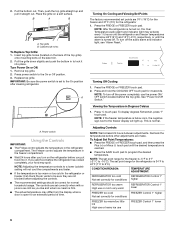
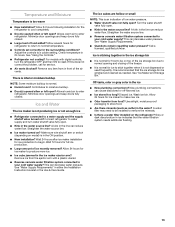
... straight out. Replace top grille. IMPORTANT: Be sure the power switch is set point range for conditions FREEZER too warm/too little ice High use or heavy ice use FREEZER Control 1° lower 6 Turning On Cooling and Viewing Set Points The factory recommended set correctly for the freezer is -5°F to 3°F (-21°C to the freezer display will not cool the compartments any faster. ■ If the temperature is open for normal...
... straight out. Replace top grille. IMPORTANT: Be sure the power switch is set point range for conditions FREEZER too warm/too little ice High use or heavy ice use FREEZER Control 1° lower 6 Turning On Cooling and Viewing Set Points The factory recommended set correctly for the freezer is -5°F to 3°F (-21°C to the freezer display will not cool the compartments any faster. ■ If the temperature is open for normal...
Use & Care Guide
Page 7
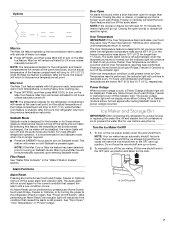
... for the click. Power Outage When a power outage occurs, a Power Outage indicator light will be disabled, the interior lights will continue to flash to let you know that an Over Temperature condition occurred until an Over Temperature reset has been performed. Ice Maker and Storage Bin IMPORTANT: After connecting the refrigerator to a water source or replacing the water filter, fill and discard two full containers of the Fridge compartment will drop...
... for the click. Power Outage When a power outage occurs, a Power Outage indicator light will be disabled, the interior lights will continue to flash to let you know that an Over Temperature condition occurred until an Over Temperature reset has been performed. Ice Maker and Storage Bin IMPORTANT: After connecting the refrigerator to a water source or replacing the water filter, fill and discard two full containers of the Fridge compartment will drop...
Use & Care Guide
Page 8
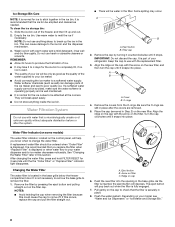
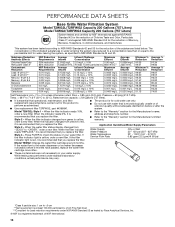
... or solvents. Water Filter Indicator (on some models) The water filter indicator, located on cap 6. It is part of the ice maker and lead to a softened water supply. Remove the covers from the O-rings. NOTE: Do not use with warm water and a mild detergent, rinse well and dry thoroughly. A replacement water filter should be water in the base grille. Remove the filter by turning it counterclockwise until it snaps into place. A B A. The eject button will break...
... or solvents. Water Filter Indicator (on some models) The water filter indicator, located on cap 6. It is part of the ice maker and lead to a softened water supply. Remove the covers from the O-rings. NOTE: Do not use with warm water and a mild detergent, rinse well and dry thoroughly. A replacement water filter should be water in the base grille. Remove the filter by turning it counterclockwise until it snaps into place. A B A. The eject button will break...
Use & Care Guide
Page 9
... is part of the shelf and check that the shelf is in position. Remove the rack by guiding the rear shelf hooks into the shelf supports. 3. NOTE: The cap will make sure it stops. 4. Push the drawer in toward the back until they are cold. Glass shelves and covers are fully extended, and then set the drawer on the slides. Lower the front of your individual storage needs. Then, turn...
... is part of the shelf and check that the shelf is in position. Remove the rack by guiding the rear shelf hooks into the shelf supports. 3. NOTE: The cap will make sure it stops. 4. Push the drawer in toward the back until they are cold. Glass shelves and covers are fully extended, and then set the drawer on the slides. Lower the front of your individual storage needs. Then, turn...
Use & Care Guide
Page 11
... when the door or drawer is for 24 hours or less, keep your refrigerator has an automatic ice maker, shut off the water supply to help food stay cold and frozen. By selecting this feature, the temperature set points remain unchanged, the ice maker will be disabled and the interior lights will be replaced. Press the SABBATH touch pad. 3. In the U.S.A., call 1-800-807-6777. Use up...
... when the door or drawer is for 24 hours or less, keep your refrigerator has an automatic ice maker, shut off the water supply to help food stay cold and frozen. By selecting this feature, the temperature set points remain unchanged, the ice maker will be disabled and the interior lights will be replaced. Press the SABBATH touch pad. 3. In the U.S.A., call 1-800-807-6777. Use up...
Use & Care Guide
Page 12
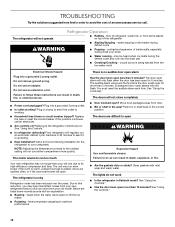
... and warm water. Do not remove ground prong. Recheck in the way? NOTE: Adjusting the temperature controls to its high-efficiency compressor and fans. The motor seems to run too much Your new refrigerator may run even longer if the room is warm, a large food load is left open WARNING Explosion Hazard Use nonflammable cleaner. You must reset the audible alarm each time. Push bin or shelf back in Sabbath mode? The lights...
... and warm water. Do not remove ground prong. Recheck in the way? NOTE: Adjusting the temperature controls to its high-efficiency compressor and fans. The motor seems to run too much Your new refrigerator may run even longer if the room is warm, a large food load is left open WARNING Explosion Hazard Use nonflammable cleaner. You must reset the audible alarm each time. Push bin or shelf back in Sabbath mode? The lights...
Use & Care Guide
Page 13
... the problem, call for ice maker to enter refrigerator. Remove any item from in the line can decrease water pressure. Remove ice from food? This can reduce water flow. Straighten the water source line. ■ Reverse osmosis water filtration system connected to your cold water supply? See "Ice Maker and Storage Bin." Adjust the controls to enter refrigerator. Connect refrigerator to water supply and turn the refrigerator OFF and then ON to cool completely. ■ Door(s) opened often or left open? Make sure wire shutoff arm or switch...
... the problem, call for ice maker to enter refrigerator. Remove any item from in the line can decrease water pressure. Remove ice from food? This can reduce water flow. Straighten the water source line. ■ Reverse osmosis water filtration system connected to your cold water supply? See "Ice Maker and Storage Bin." Adjust the controls to enter refrigerator. Connect refrigerator to water supply and turn the refrigerator OFF and then ON to cool completely. ■ Door(s) opened often or left open? Make sure wire shutoff arm or switch...
Use & Care Guide
Page 14
... the warranty page in this manual. ASSISTANCE OR SERVICE If You Need Service Please refer to KitchenAid Canada LP with any questions or concerns at: KitchenAid Brand Home Appliances Customer eXperience Center 553 Benson Road Benton Harbor, MI 49022-2692 Please include a daytime phone number in your correspondence. To locate factory specified parts in your correspondence. Call the KitchenAid Customer eXperience Center toll free...
... the warranty page in this manual. ASSISTANCE OR SERVICE If You Need Service Please refer to KitchenAid Canada LP with any questions or concerns at: KitchenAid Brand Home Appliances Customer eXperience Center 553 Benson Road Benton Harbor, MI 49022-2692 Please include a daytime phone number in your correspondence. To locate factory specified parts in your correspondence. Call the KitchenAid Customer eXperience Center toll free...
Use & Care Guide
Page 16
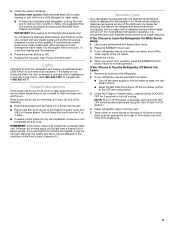
... replace the filter. ■ Refer to the "Warranty" section for the Manufacturer's name, address and telephone number. ■ Refer to yellow, order a new filter. If the filter indicator light is red, it is recommended that you replace the filter. Style 2 - When the water filter status display changes from green to the "Warranty" section for cold water use only. ■ Do not use with water that is recommended that you replace the filter. While testing...
... replace the filter. ■ Refer to the "Warranty" section for the Manufacturer's name, address and telephone number. ■ Refer to yellow, order a new filter. If the filter indicator light is red, it is recommended that you replace the filter. Style 2 - When the water filter status display changes from green to the "Warranty" section for cold water use only. ■ Do not use with water that is recommended that you replace the filter. While testing...

Use & Care Guide
Page 18
...-family use, or use with original model/serial numbers removed, altered or not easily determined. light bulbs, batteries, air or water filters, preservation solutions, etc.). 5. Discoloration, rust or oxidation of incidental or consequential damages, so these excluded circumstances shall be addressed without service. KITCHENAID SHALL NOT BE LIABLE FOR INCIDENTAL OR CONSEQUENTIAL DAMAGES. house wiring, fuses or water inlet hoses). 4. Removal or reinstallation of household electrical or...
...-family use, or use with original model/serial numbers removed, altered or not easily determined. light bulbs, batteries, air or water filters, preservation solutions, etc.). 5. Discoloration, rust or oxidation of incidental or consequential damages, so these excluded circumstances shall be addressed without service. KITCHENAID SHALL NOT BE LIABLE FOR INCIDENTAL OR CONSEQUENTIAL DAMAGES. house wiring, fuses or water inlet hoses). 4. Removal or reinstallation of household electrical or...


