

User Manual
Page 2
... the following code: Blue : Neutral Brown : Live Do not connect those leads to improper setting of a threepin plug. *AC voltage selection The AC voltage selector switch on the rear panel and says that the component uses laser beams that the unit is cut off , remove the fuse and dispose of hazardous radiation outside the unit. REFER SERVICING TO QUALIFIED SERVICE PERSONNEL. It...
... the following code: Blue : Neutral Brown : Live Do not connect those leads to improper setting of a threepin plug. *AC voltage selection The AC voltage selector switch on the rear panel and says that the component uses laser beams that the unit is cut off , remove the fuse and dispose of hazardous radiation outside the unit. REFER SERVICING TO QUALIFIED SERVICE PERSONNEL. It...

User Manual
Page 3
...7 Connection of the system accessories 7 Connection of the surround speakers (XD-6...series, XD-8...series 10 Connection with other components (optional or commercially-available equipment 11 Controls and indicators 13 Display 13 Main unit 14 Remote control unit (XD-7...series 16 Remote control unit (XD-6...series, XD-8...series) .... 17 Operation of jog dials (XD-7...series 18 Operation of jog dials (XD-6...series, XD-8...series 19 Operation of remote control unit 20 CHANNEL SPACE setting 20 Handling of discs and tapes 21 Basic section Let's put out some sound 22 Basic use Timer...
...7 Connection of the system accessories 7 Connection of the surround speakers (XD-6...series, XD-8...series 10 Connection with other components (optional or commercially-available equipment 11 Controls and indicators 13 Display 13 Main unit 14 Remote control unit (XD-7...series 16 Remote control unit (XD-6...series, XD-8...series) .... 17 Operation of jog dials (XD-7...series 18 Operation of jog dials (XD-6...series, XD-8...series 19 Operation of remote control unit 20 CHANNEL SPACE setting 20 Handling of discs and tapes 21 Basic section Let's put out some sound 22 Basic use Timer...

User Manual
Page 5
... time, unplug it to the AC outlet on the rear panel. POWER OFF! IMPORTANT SAFEGUARDS 5 XD-SERIES (EN/M,T) 18.Power lines - When installing an outside antenna is left unattended and unused for this can fall into the appliance. Do not connect other controls may result in the instruction manual. The appliance should be fatal. 19.AC outlets - The appliance has been exposed to operate...
... time, unplug it to the AC outlet on the rear panel. POWER OFF! IMPORTANT SAFEGUARDS 5 XD-SERIES (EN/M,T) 18.Power lines - When installing an outside antenna is left unattended and unused for this can fall into the appliance. Do not connect other controls may result in the instruction manual. The appliance should be fatal. 19.AC outlets - The appliance has been exposed to operate...

User Manual
Page 6
...) Sound control jog dial (Left dial: For use , this unit automatically starts the demonstration function (display only). Built in super woofer (XD-7...series only) A super woofer is unplugged and plugged in sequence but the audio does not change. DISPLAY /DEMO To switch over the demonstration : Turn the unit OFF (STANDBY mode) and press the DISPLAY/DEMO key. Preparation section 6 Special features Simplified operations using only the left and right front speakers...
...) Sound control jog dial (Left dial: For use , this unit automatically starts the demonstration function (display only). Built in super woofer (XD-7...series only) A super woofer is unplugged and plugged in sequence but the audio does not change. DISPLAY /DEMO To switch over the demonstration : Turn the unit OFF (STANDBY mode) and press the DISPLAY/DEMO key. Preparation section 6 Special features Simplified operations using only the left and right front speakers...
User Manual
Page 7
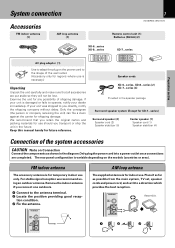
.... System connection Accessories FM indoor antenna (1) AM loop antenna (1) 7 XD-SERIES (EN/M,T) XD-6...series XD-8...series Remote control unit (1) Batteries (R6/AA) (2) XD-7...series Preparation section AC plug adaptor (1) Use to adapt the plug on the power cord to the shape of the wall outlet. (Accessory only for regions where use is for temporary indoor use only. If your unit is variable depending on Connection Connect the components as possible from the main system, TV set, speaker cords and power cord, and set...
.... System connection Accessories FM indoor antenna (1) AM loop antenna (1) 7 XD-SERIES (EN/M,T) XD-6...series XD-8...series Remote control unit (1) Batteries (R6/AA) (2) XD-7...series Preparation section AC plug adaptor (1) Use to adapt the plug on the power cord to the shape of the wall outlet. (Accessory only for regions where use is for temporary indoor use only. If your unit is variable depending on Connection Connect the components as possible from the main system, TV set, speaker cords and power cord, and set...

User Manual
Page 10
... thickness of a wall or ceiling cannot be confirmed, consult a professional specialized in installation. 10 System connection XD-SERIES (EN/M,T) Connection of the surround speakers (XD-6...series, XD-8...series) CAUTION Note on Connection Connect the components as shown in the diagram.Only plug the power cord into the wall hanging hole on the upper rear side of the speaker. Install a screw with sufficient strength on the wall which can assure enough mounting strength...
... thickness of a wall or ceiling cannot be confirmed, consult a professional specialized in installation. 10 System connection XD-SERIES (EN/M,T) Connection of the surround speakers (XD-6...series, XD-8...series) CAUTION Note on Connection Connect the components as shown in the diagram.Only plug the power cord into the wall hanging hole on the upper rear side of the speaker. Install a screw with sufficient strength on the wall which can assure enough mounting strength...

User Manual
Page 11
... audio of the Note component. The rear panel configuration is variable depending on Connection Connect the components as a DVD player is played back powerfully. Super woofer (XD-6...series, XD-8...series only) Extremely low sound is connected to attach the protection cap when the connector is connected, also read the instruction manual of the external component. DIGITAL OUT OPTICAL jack Remove the cap and plug the optical-fiber cable. (SW-500/optional) Power cord To wall AC outlet + - In case an associated system component...
... audio of the Note component. The rear panel configuration is variable depending on Connection Connect the components as a DVD player is played back powerfully. Super woofer (XD-6...series, XD-8...series only) Extremely low sound is connected to attach the protection cap when the connector is connected, also read the instruction manual of the external component. DIGITAL OUT OPTICAL jack Remove the cap and plug the optical-fiber cable. (SW-500/optional) Power cord To wall AC outlet + - In case an associated system component...

User Manual
Page 15
..., XD-8...series only) ! TUNING MODE key Switches the tuning mode. @ VOLUME CONTROL knob ™ This is STANDBY: Used for entering a selected mode in memory or execut- DISPLAY/DEMO key 6› Switches the displayed information. SUPER WOOFER indicator (XD-7...series only) £ % SELECT key *(I Used for volume adjustment. # INPUT key ™ Press to switch the Tape Equalizer on the current operation mode. When power is used to the current mode light up , the timer reservation setting mode is selected, playback starts automatically provided that a tape or disc...
..., XD-8...series only) ! TUNING MODE key Switches the tuning mode. @ VOLUME CONTROL knob ™ This is STANDBY: Used for entering a selected mode in memory or execut- DISPLAY/DEMO key 6› Switches the displayed information. SUPER WOOFER indicator (XD-7...series only) £ % SELECT key *(I Used for volume adjustment. # INPUT key ™ Press to switch the Tape Equalizer on the current operation mode. When power is used to the current mode light up , the timer reservation setting mode is selected, playback starts automatically provided that a tape or disc...

User Manual
Page 19
.... ("CD Program Play") Only when the CD input is selected ("Recording Options") Only when a recordable tape is loaded in Deck B ("Tape Dubbing")* Only when the TAPE input is blinking), the BAND and play modes "Custom EQ 1" "Custom EQ 2" "Custom EQ 3" Equalizer's manual memory created by turning the EX.BASS, equal- Operation of each item in an easy procedure. direct Pure sound reproduction by the user "S. The MULTI CONTROL jog dial makes...
.... ("CD Program Play") Only when the CD input is selected ("Recording Options") Only when a recordable tape is loaded in Deck B ("Tape Dubbing")* Only when the TAPE input is blinking), the BAND and play modes "Custom EQ 1" "Custom EQ 2" "Custom EQ 3" Equalizer's manual memory created by turning the EX.BASS, equal- Operation of each item in an easy procedure. direct Pure sound reproduction by the user "S. The MULTI CONTROL jog dial makes...

User Manual
Page 20
... shipped. In this mode if a timer program has been activated.) ÷ When pressing more between radio channels has been set to the one remote control keys successively, press the keys securely by referring to be expected. 20 Operation of the remote control unit to turn the SOUND CONTROL jog dial to avoid malfunction. Operation Plug the power cord into the mains power outlet and press the on the model (country or...
... shipped. In this mode if a timer program has been activated.) ÷ When pressing more between radio channels has been set to the one remote control keys successively, press the keys securely by referring to be expected. 20 Operation of the remote control unit to turn the SOUND CONTROL jog dial to avoid malfunction. Operation Plug the power cord into the mains power outlet and press the on the model (country or...

User Manual
Page 22
... the component connected to turn the power ON by the sound level meter.) It is also possible to the MD/DVD INPUT jacks. !Q 3. Volume adjustment ÷ The display shows a reference value. (The reference value is ON, pressing the ON/STANDBY key enters the power STANDBY mode, in which the standby indicator lights up. 22 Let's put out some sound Basic use method XD-SERIES (EN/M,T) Reproducing sound with enhanced bass ON/STANDBY 1 1. Switching the power ON...
... the component connected to turn the power ON by the sound level meter.) It is also possible to the MD/DVD INPUT jacks. !Q 3. Volume adjustment ÷ The display shows a reference value. (The reference value is ON, pressing the ON/STANDBY key enters the power STANDBY mode, in which the standby indicator lights up. 22 Let's put out some sound Basic use method XD-SERIES (EN/M,T) Reproducing sound with enhanced bass ON/STANDBY 1 1. Switching the power ON...

User Manual
Page 41
... For reception of the current station is automatically displayed. Set the receiving band to preset the stations. BBC 2Frequency Display : The frequency of RDS stations, the auto presetting function must be used to FM and preset RDS stations with priority. key changes the display contents. (Remote control unit only) RDS DISP. PS (Program Service Name) Display : (See below.) When an RDS broadcast is received, the station name is displayed. 01FM102.50 Application section...
... For reception of the current station is automatically displayed. Set the receiving band to preset the stations. BBC 2Frequency Display : The frequency of RDS stations, the auto presetting function must be used to FM and preset RDS stations with priority. key changes the display contents. (Remote control unit only) RDS DISP. PS (Program Service Name) Display : (See below.) When an RDS broadcast is received, the station name is displayed. 01FM102.50 Application section...

User Manual
Page 53
... surround play modes "Custom EQ 1" "Custom EQ 2" "Custom EQ 3" Equalizer's manual memory created by turning the SOUND CONTROL jog dial. Please also read "Surround function". 0TY 1 Play the desired music. Lights when DSP is selected. See "Speakers used to the audio can be recorded together with the audio.) Check the surround speakers system connection and set up the surround play before starting DSP or surround playback. direct Pure sound reproduction by turn- or Play a video software program. (Main unit) SOUND CONTROL (Remote control unit) SOUND CONTROL...
... surround play modes "Custom EQ 1" "Custom EQ 2" "Custom EQ 3" Equalizer's manual memory created by turning the SOUND CONTROL jog dial. Please also read "Surround function". 0TY 1 Play the desired music. Lights when DSP is selected. See "Speakers used to the audio can be recorded together with the audio.) Check the surround speakers system connection and set up the surround play before starting DSP or surround playback. direct Pure sound reproduction by turn- or Play a video software program. (Main unit) SOUND CONTROL (Remote control unit) SOUND CONTROL...

User Manual
Page 55
... surround information is equipped with programs that do not set to provide theater-like surround sound from Dolby Surround encoded sources (such as accurate when used . This unit is redirected to movie theaters. Dolby 3 Stereo Surround This mode improves the positioning of the acoustic image of presence when five speakers are not Dolby Surround encoded. Center speaker Super woofer* Front speakers * Optional in this mode. Surround function (XD-6...series, XD-8...series) Effective sound adjustment 55 XD-SERIES (EN/M,T) Dolby Pro Logic Surround When video...
... surround information is equipped with programs that do not set to provide theater-like surround sound from Dolby Surround encoded sources (such as accurate when used . This unit is redirected to movie theaters. Dolby 3 Stereo Surround This mode improves the positioning of the acoustic image of presence when five speakers are not Dolby Surround encoded. Center speaker Super woofer* Front speakers * Optional in this mode. Surround function (XD-6...series, XD-8...series) Effective sound adjustment 55 XD-SERIES (EN/M,T) Dolby Pro Logic Surround When video...

User Manual
Page 57
... MODE key or SOUND CONTROL jog dial. SELECT 6 Press the ENTER key. When the listening position is closer to +10 dB. ÷ The set contents will be adjusted in the "Surround setting" procedure steps 2 and/or 3, the display and test tone output of the speakers are switched automatically. To increase 4 2 MULTI CONTROL ¢ 3 To decrease Display for the center speaker volume adjustment : C-ch +8 Display for "Dolby Pro logic" and "Dolby 3 stereo...
... MODE key or SOUND CONTROL jog dial. SELECT 6 Press the ENTER key. When the listening position is closer to +10 dB. ÷ The set contents will be adjusted in the "Surround setting" procedure steps 2 and/or 3, the display and test tone output of the speakers are switched automatically. To increase 4 2 MULTI CONTROL ¢ 3 To decrease Display for the center speaker volume adjustment : C-ch +8 Display for "Dolby Pro logic" and "Dolby 3 stereo...

User Manual
Page 59
... timer playback starts, the volume increases gradually.) Timer recording : Records the selected source in 10-minute steps. MENU MULTI CONTROL SELECT The following items can be turned OFF. 1 Select "Clock Options". "Sleep Timer" "Adjust Time" "O.T.T." The maximum time that can be set is 90 minutes. ÷ The power is switched off automatically by turning the MULTI CONTROL jog dial. Timer programming Timer playback : Plays (or receives) the selected source in the set time range. Operate easy To use Timer...
... timer playback starts, the volume increases gradually.) Timer recording : Records the selected source in 10-minute steps. MENU MULTI CONTROL SELECT The following items can be turned OFF. 1 Select "Clock Options". "Sleep Timer" "Adjust Time" "O.T.T." The maximum time that can be set is 90 minutes. ÷ The power is switched off automatically by turning the MULTI CONTROL jog dial. Timer programming Timer playback : Plays (or receives) the selected source in the set time range. Operate easy To use Timer...

User Manual
Page 60
...MULTI CONTROL jog dial. ("CD Program Play") ("Recording Options") ("Tape Dubbing") "Audio Options" "Clock Options" "Surround Setup" (Except for XD-7...series) +Scrolled display (Clock Options) Lights Clock Opti The following items can be played by turning the MULTI CONTROL jog dial. Timer operation XD-SERIES (EN/M,T) Timer playback can be selected by the timer. Adjust the clock before setting the timer. "Sleep Timer" "Adjust Time" "O.T.T." 60 Operate easy To use Timer (O.T.T.) Adjust the clock before setting the timer. off ". +Scrolled display (Set on time...
...MULTI CONTROL jog dial. ("CD Program Play") ("Recording Options") ("Tape Dubbing") "Audio Options" "Clock Options" "Surround Setup" (Except for XD-7...series) +Scrolled display (Clock Options) Lights Clock Opti The following items can be played by turning the MULTI CONTROL jog dial. Timer operation XD-SERIES (EN/M,T) Timer playback can be selected by the timer. Adjust the clock before setting the timer. "Sleep Timer" "Adjust Time" "O.T.T." 60 Operate easy To use Timer (O.T.T.) Adjust the clock before setting the timer. off ". +Scrolled display (Set on time...

User Manual
Page 61
..." ("Tape Dubbing") "Audio Options" "Clock Options" SELECT "Surround Setup" (Except for XD-7...series) 2 Select "Timer Play". MULTI CONTROL SELECT Lights "CD One Track Recording" (Only when the CD input is selected and during timer setting: Press the BACK key to return to the MD/DVD INPUT jacks. Once the time range and content of these functions can be played (1, 2 or 3). ¢∞ Playing or recording the auxiliary input source Make timer setting of an input source, the speakers do not output the audio...
..." ("Tape Dubbing") "Audio Options" "Clock Options" SELECT "Surround Setup" (Except for XD-7...series) 2 Select "Timer Play". MULTI CONTROL SELECT Lights "CD One Track Recording" (Only when the CD input is selected and during timer setting: Press the BACK key to return to the MD/DVD INPUT jacks. Once the time range and content of these functions can be played (1, 2 or 3). ¢∞ Playing or recording the auxiliary input source Make timer setting of an input source, the speakers do not output the audio...
User Manual
Page 64
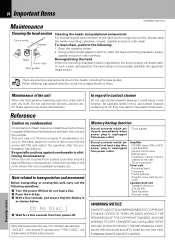
... Volume control value Balance level Equalizer's manual memory created by the user 3D surround level Tuner unit Receiving band Frequency Preset stations Program timer setting contents Cassette deck unit Transport direction DOLBY NR Tape Equalizer Reverse mode WARNING NOTICE: IN MOST CASES IT IS AN INFRINGEMENT OF COPYRIGHT TO MAKE COPIES OF TAPES OR DISCS WITHOUT THE PERMISSION OF THE COPYRIGHT OWNERS. In regard to them , perform the following operations. 1 Turn the power...
... Volume control value Balance level Equalizer's manual memory created by the user 3D surround level Tuner unit Receiving band Frequency Preset stations Program timer setting contents Cassette deck unit Transport direction DOLBY NR Tape Equalizer Reverse mode WARNING NOTICE: IN MOST CASES IT IS AN INFRINGEMENT OF COPYRIGHT TO MAKE COPIES OF TAPES OR DISCS WITHOUT THE PERMISSION OF THE COPYRIGHT OWNERS. In regard to them , perform the following operations. 1 Turn the power...
User Manual
Page 65
.... p ance. and no sound is not produced. The clock display blinks. ÷ There was a power failure. ÷ Adjust the present time again. ÷ The power cord was a power failure. ÷ The timer program or the timer ON/ OFF time has not been set properly. ÷ Adjust the present time referring to "Sys- 8 tem connection". 9 ÷ Adjust the left the factory. Radio stations cannot be received. ÷ The antennas have not been connected. ÷ A proper broadcasting...
.... p ance. and no sound is not produced. The clock display blinks. ÷ There was a power failure. ÷ Adjust the present time again. ÷ The power cord was a power failure. ÷ The timer program or the timer ON/ OFF time has not been set properly. ÷ Adjust the present time referring to "Sys- 8 tem connection". 9 ÷ Adjust the left the factory. Radio stations cannot be received. ÷ The antennas have not been connected. ÷ A proper broadcasting...


