
User Manual
Page 1
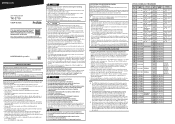
... locations. UHF TRANSCEIVER TK-3710 USER GUIDE This User guide covers only the basic operations of your eyes. https://manual.kenwood.com/files/B5K-0710-00.pdf B5A-3230-00 (X) NOTICES TO THE USER ◆ Refer service to the hospital immediately. Do not touch these channels only for best use. ◆ Interference may short the battery terminals. • Danger of copyrights for firmware embedded in fl...
... locations. UHF TRANSCEIVER TK-3710 USER GUIDE This User guide covers only the basic operations of your eyes. https://manual.kenwood.com/files/B5K-0710-00.pdf B5A-3230-00 (X) NOTICES TO THE USER ◆ Refer service to the hospital immediately. Do not touch these channels only for best use. ◆ Interference may short the battery terminals. • Danger of copyrights for firmware embedded in fl...
User Manual
Page 2
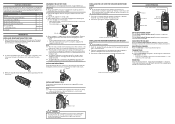
... the received signal matches your transceiver settings. BASIC OPERATION Power switch/ Volume control Selector Antenna PTT switch Speaker Microphone Display Battery pack Speaker/ microphone jack cap Screw INSTALLING THE SPEAKER/ MICROPHONE OR HEADSET Note: ◆ Use the Phillips #1 screwdriver. 1 Insert the speaker/ microphone plugs into the jack located on the selected channel, you will not be guaranteed by securing the supplied cap. Clockwise increases the volume and counterclockwise decreases it before inserting the transceiver into the charger. 1 Plug the AC adapter cable into...
... the received signal matches your transceiver settings. BASIC OPERATION Power switch/ Volume control Selector Antenna PTT switch Speaker Microphone Display Battery pack Speaker/ microphone jack cap Screw INSTALLING THE SPEAKER/ MICROPHONE OR HEADSET Note: ◆ Use the Phillips #1 screwdriver. 1 Insert the speaker/ microphone plugs into the jack located on the selected channel, you will not be guaranteed by securing the supplied cap. Clockwise increases the volume and counterclockwise decreases it before inserting the transceiver into the charger. 1 Plug the AC adapter cable into...
User Manual 1
Page 2
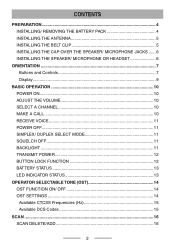
CONTENTS PREPARATION 4 INSTALLING/ REMOVING THE BATTERY PACK 4 INSTALLING THE ANTENNA 5 INSTALLING THE BELT CLIP 5 INSTALLING THE CAP OVER THE SPEAKER/ MICROPHONE JACKS....... 6 INSTALLING THE SPEAKER/ MICROPHONE OR HEADSET 6 ORIENTATION...7 Buttons and Controls 7 Display...9 BASIC OPERATION 10 POWER ON 10 ADJUST THE VOLUME 10 SELECT A CHANNEL 10 MAKE A CALL 10 RECEIVE VOICE 11 POWER OFF 11 SIMPLEX/ DUPLEX SELECT MODE 11 SQUELCH OFF 11 BACKLIGHT 11 TRANSMIT POWER 12 BUTTON LOCK FUNCTION 12 BATTERY STATUS 13 LED INDICATOR STATUS 13 OPERATOR SELECTABLE...
CONTENTS PREPARATION 4 INSTALLING/ REMOVING THE BATTERY PACK 4 INSTALLING THE ANTENNA 5 INSTALLING THE BELT CLIP 5 INSTALLING THE CAP OVER THE SPEAKER/ MICROPHONE JACKS....... 6 INSTALLING THE SPEAKER/ MICROPHONE OR HEADSET 6 ORIENTATION...7 Buttons and Controls 7 Display...9 BASIC OPERATION 10 POWER ON 10 ADJUST THE VOLUME 10 SELECT A CHANNEL 10 MAKE A CALL 10 RECEIVE VOICE 11 POWER OFF 11 SIMPLEX/ DUPLEX SELECT MODE 11 SQUELCH OFF 11 BACKLIGHT 11 TRANSMIT POWER 12 BUTTON LOCK FUNCTION 12 BATTERY STATUS 13 LED INDICATOR STATUS 13 OPERATOR SELECTABLE...
User Manual 1
Page 7
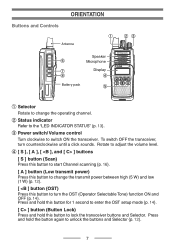
...button to start Channel scanning {p. 16}. [ A ] button (Low transmit power) Press this button to change the operating channel. Rotate to switch ON the transceiver. c Power switch/ Volume control Turn clockwise to adjust the volume level. To switch OFF the transceiver, turn counterclockwise until a click sounds. Press and hold the button again to change the transmit power between high (5 W) and low (1 W) {p. 12}. [ ] button (Button Lock) Press and hold this button to the "LED INDICATOR STATUS" {p. 13}. ORIENTATION Buttons and Controls a Antenna Speaker f Microphone g Display...
...button to start Channel scanning {p. 16}. [ A ] button (Low transmit power) Press this button to change the operating channel. Rotate to switch ON the transceiver. c Power switch/ Volume control Turn clockwise to adjust the volume level. To switch OFF the transceiver, turn counterclockwise until a click sounds. Press and hold the button again to change the transmit power between high (5 W) and low (1 W) {p. 12}. [ ] button (Button Lock) Press and hold this button to the "LED INDICATOR STATUS" {p. 13}. ORIENTATION Buttons and Controls a Antenna Speaker f Microphone g Display...

User Manual 1
Page 8
...; ] buttons [ ] button (Scan Delete/Add) Press this button to remove an undesired channel from the scanning sequence {p. 16}. [ ] button (Battery Status) Press this button, the Battery Status function operates. {p. 13}. [ ] button (Duplex) Press this button to normal operation {p. 11}. Press the button again to return to change between Simplex and Duplex operation {p.11}. f PTT (Push to Talk) switch Press and hold, then speak into the microphone...
...; ] buttons [ ] button (Scan Delete/Add) Press this button to remove an undesired channel from the scanning sequence {p. 16}. [ ] button (Battery Status) Press this button, the Battery Status function operates. {p. 13}. [ ] button (Duplex) Press this button to normal operation {p. 11}. Press the button again to return to change between Simplex and Duplex operation {p.11}. f PTT (Push to Talk) switch Press and hold, then speak into the microphone...

User Manual 1
Page 9
.... (dot 8) Note: ◆ "*" mark functions are set by your dealer has programmed to the scanning sequence. Indicates Priority Channel. * The channel is added to the transceiver. 9 The current zone is added to the Multi-Zone scanning sequence. * The current channel is using low transmit power. Appears when Calling. * Appears while Scanning. Display Indicator Description Displays the signal strength. Refer to "ACCESSIBLE FUNCTIONS" {p. 17...
.... (dot 8) Note: ◆ "*" mark functions are set by your dealer has programmed to the scanning sequence. Indicates Priority Channel. * The channel is added to the transceiver. 9 The current zone is added to the Multi-Zone scanning sequence. * The current channel is using low transmit power. Appears when Calling. * Appears while Scanning. Display Indicator Description Displays the signal strength. Refer to "ACCESSIBLE FUNCTIONS" {p. 17...
User Manual 1
Page 10
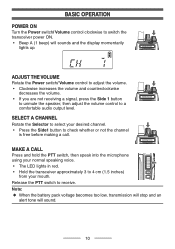
... sound. 10 SELECT A CHANNEL Rotate the Selector to select your mouth. MAKE A CALL Press and hold the PTT switch, then speak into the microphone using your normal speaking voice. • The LED lights in red. • Hold the transceiver approximately 3 to 4 cm (1.5 inches) from your desired channel. • Press the Side1 button to receive. BASIC OPERATION POWER ON Turn the Power switch/ Volume control clockwise to a comfortable audio output...
... sound. 10 SELECT A CHANNEL Rotate the Selector to select your mouth. MAKE A CALL Press and hold the PTT switch, then speak into the microphone using your normal speaking voice. • The LED lights in red. • Hold the transceiver approximately 3 to 4 cm (1.5 inches) from your desired channel. • Press the Side1 button to receive. BASIC OPERATION POWER ON Turn the Power switch/ Volume control clockwise to a comfortable audio output...

User Manual 1
Page 11
... be set to 5 seconds. 11 Pressing any button other channels can be used only in green. RECEIVE VOICE The LED lights in Simplex mode. • The " " indicator appears while using Duplex mode. When the other party transmits it, you cannot hear during normal operation and to adjust the volume when no signals are present on will reset the timer to Duplex mode. POWER OFF After use, turn off the power.
... be set to 5 seconds. 11 Pressing any button other channels can be used only in green. RECEIVE VOICE The LED lights in Simplex mode. • The " " indicator appears while using Duplex mode. When the other party transmits it, you cannot hear during normal operation and to adjust the volume when no signals are present on will reset the timer to Duplex mode. POWER OFF After use, turn off the power.

User Manual 1
Page 12
... turn the Button Lock function off. TRANSMIT POWER Press the [ A ] button to change low transmit power channels to lock the transceiver buttons and Selector. • Beep A (1 beep) sounds when the Button Lock function is activated. • "LOCKED" appears when a button is pressed while the Button Lock function is activated: Side 1 (Squelch Off), Side 2 (Backlight), [ C> ] (Button Lock), and PTT switch. 12 Press and hold the [ C> ] button to high power). Note: ◆ You can still use...
... turn the Button Lock function off. TRANSMIT POWER Press the [ A ] button to change low transmit power channels to lock the transceiver buttons and Selector. • Beep A (1 beep) sounds when the Button Lock function is activated. • "LOCKED" appears when a button is pressed while the Button Lock function is activated: Side 1 (Squelch Off), Side 2 (Backlight), [ C> ] (Button Lock), and PTT switch. 12 Press and hold the [ C> ] button to high power). Note: ◆ You can still use...

User Manual 1
Page 14
... have programmed CTCSS or DCS signaling on your transceiver channels. When a channel is a sub-audible tone/code which allows you transmit will only open when a call containing a matching tone or code is received. A CTCSS tone/ DCS code is set up with a CTCSS tone or DCS code, squelch will only be heard by parties whose CTCSS/ DCS signaling matches your desired channel using the same channel.
... have programmed CTCSS or DCS signaling on your transceiver channels. When a channel is a sub-audible tone/code which allows you transmit will only open when a call containing a matching tone or code is received. A CTCSS tone/ DCS code is set up with a CTCSS tone or DCS code, squelch will only be heard by parties whose CTCSS/ DCS signaling matches your desired channel using the same channel.

User Manual 1
Page 21
... to quickly send DTMF codes from the Autodial List. 1 PF Button: Press the programmed button to enter Autodial Mode. Menu Mode: Select "AUTODIAL" and press the [ S ] button to enter Autodial Mode. 2 Press the [ ] buttons to select your dealer, the backlight can turn the display backlight On or Off. • If Auto backlight is activated by button operations or when receiving a call . PF Button: Press the programmed button to turn the LCD display backlight...
... to quickly send DTMF codes from the Autodial List. 1 PF Button: Press the programmed button to enter Autodial Mode. Menu Mode: Select "AUTODIAL" and press the [ S ] button to enter Autodial Mode. 2 Press the [ ] buttons to select your dealer, the backlight can turn the display backlight On or Off. • If Auto backlight is activated by button operations or when receiving a call . PF Button: Press the programmed button to turn the LCD display backlight...

User Manual 1
Page 27
... set as Direct Channel. 2 PF Button: Press and hold the programmed button to set the currently selected channel as Direct Channel 1 ~ 5. • Beep C (3 beeps) sounds. Menu Mode: Select "DR 1 SEL" ~ "DR 5 SEL" and press the [ S ] button to the formerly selected channel. • Beep B (2 beeps) sounds. If activated by your desired zone and channel using Direct Channel 1 ~ 5. Direct Channel 1 ~ 5 Allows you to go directly to a frequently used zone and channel. • Beep A (1 beep) sounds. PF Button: Press the programmed button...
... set as Direct Channel. 2 PF Button: Press and hold the programmed button to set the currently selected channel as Direct Channel 1 ~ 5. • Beep C (3 beeps) sounds. Menu Mode: Select "DR 1 SEL" ~ "DR 5 SEL" and press the [ S ] button to the formerly selected channel. • Beep B (2 beeps) sounds. If activated by your desired zone and channel using Direct Channel 1 ~ 5. Direct Channel 1 ~ 5 Allows you to go directly to a frequently used zone and channel. • Beep A (1 beep) sounds. PF Button: Press the programmed button...
User Manual 1
Page 28
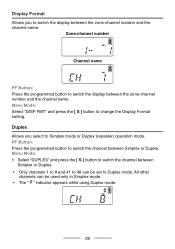
... Duplex. All other channels can be used only in Simplex mode. • The " " indicator appears while using Duplex mode. 28 Menu Mode: Select "DISP FMT" and press the [ S ] button to switch the channel between the zone-channel number and the channel name. Zone-channel number Channel name PF Button: Press the programmed button to switch the channel between the zone-channel number and the channel name. Menu Mode: 1 Select "DUPLEX" and press the [ S ] button to change the Display Format setting.
... Duplex. All other channels can be used only in Simplex mode. • The " " indicator appears while using Duplex mode. 28 Menu Mode: Select "DISP FMT" and press the [ S ] button to switch the channel between the zone-channel number and the channel name. Zone-channel number Channel name PF Button: Press the programmed button to switch the channel between the zone-channel number and the channel name. Menu Mode: 1 Select "DUPLEX" and press the [ S ] button to change the Display Format setting.

User Manual 1
Page 32
... channel using Home Channel Select. Press this button again to return to home channel. • Beep A (1 beep) sounds. • "HOME" is displayed for 1 second. If activated by your dealer, you to jump to home channel (programmed by selecting your dealer). PF Button: Press the programmed button to jump to the formerly selected channel. • Beep B (2 beeps) sounds. Menu Mode: Select "HOME SEL" and press the [ S ] button to set...
... channel using Home Channel Select. Press this button again to return to home channel. • Beep A (1 beep) sounds. • "HOME" is displayed for 1 second. If activated by your dealer, you to jump to home channel (programmed by selecting your dealer). PF Button: Press the programmed button to jump to the formerly selected channel. • Beep B (2 beeps) sounds. Menu Mode: Select "HOME SEL" and press the [ S ] button to set...

User Manual 1
Page 36
.... Menu Mode: Select "OST" and press the [ S ] button to change the OST On or Off. Menu Mode: Select "OST LIST" and press the [ S ] button to enter OST List Mode. 2 Press the [ ] buttons to select the OST List. 3 Press the [ S ] button to an OST (Operator Selectable Tone) pair. While signaling is off, you to enter OST List mode. 1 PF Button: Press and hold the programmed button to momentarily turn the transceiver signaling off. OST List...
.... Menu Mode: Select "OST" and press the [ S ] button to change the OST On or Off. Menu Mode: Select "OST LIST" and press the [ S ] button to enter OST List Mode. 2 Press the [ ] buttons to select the OST List. 3 Press the [ S ] button to an OST (Operator Selectable Tone) pair. While signaling is off, you to enter OST List mode. 1 PF Button: Press and hold the programmed button to momentarily turn the transceiver signaling off. OST List...

User Manual 1
Page 37
... confirm and exit mode. • The " " indicator appears on the display when the channel is given precedence over Priority channel 2. Priority-channel Select A Priority channel must be set as Priority channel. 2 PF Button: Press the programmed button to set the current channel as the Priority Zone-Channel. When using a single Priority channel, the transceiver will automatically change to the Priority channel when a call is received on it, even if...
... confirm and exit mode. • The " " indicator appears on the display when the channel is given precedence over Priority channel 2. Priority-channel Select A Priority channel must be set as Priority channel. 2 PF Button: Press the programmed button to set the current channel as the Priority Zone-Channel. When using a single Priority channel, the transceiver will automatically change to the Priority channel when a call is received on it, even if...

User Manual 1
Page 47
... button programmed as [VOX Function]. • Alternatively, you can be adjusted from the display. Semi-VOX Operation 1 Connect a headset to the transceiver. • The VOX function does not activate when a headset is recognized, the LED lights yellow. 5 Press the [ S ] button to save your new setting. 47 To turn the Semi-VOX function OFF, press the button programmed as [Menu] to enter VOX Mode using the Menu Mode. • Beep A (1 beep) sounds...
... button programmed as [VOX Function]. • Alternatively, you can be adjusted from the display. Semi-VOX Operation 1 Connect a headset to the transceiver. • The VOX function does not activate when a headset is recognized, the LED lights yellow. 5 Press the [ S ] button to save your new setting. 47 To turn the Semi-VOX function OFF, press the button programmed as [Menu] to enter VOX Mode using the Menu Mode. • Beep A (1 beep) sounds...
User Manual 1
Page 48
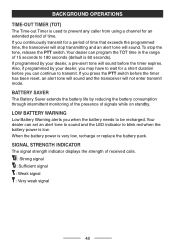
... set an alert tone to sound and the LED indicator to blink red when the battery power is low. Your dealer can continue to transmit. BACKGROUND OPERATIONS TIME-OUT TIMER (TOT) The Time-out Timer is used to prevent any caller from using a channel for an extended period of signals while on standby. Also, if programmed by your dealer, a pre-alert tone will not enter transmit mode...
... set an alert tone to sound and the LED indicator to blink red when the battery power is low. Your dealer can continue to transmit. BACKGROUND OPERATIONS TIME-OUT TIMER (TOT) The Time-out Timer is used to prevent any caller from using a channel for an extended period of signals while on standby. Also, if programmed by your dealer, a pre-alert tone will not enter transmit mode...

User Manual 1
Page 49
... wait until the channel becomes free. The transceiver transmits according to the microphone as below by dealer setting. • When changing the zone and/or channel, the new zone and channel number are announced. • When changing the function setting, the new setting is received. Under these circumstances, use . The transceiver cannot transmit when the selected channel is busy before valid Optional Signaling matches. 49 Low Transmit Power - Scan -
... wait until the channel becomes free. The transceiver transmits according to the microphone as below by dealer setting. • When changing the zone and/or channel, the new zone and channel number are announced. • When changing the function setting, the new setting is received. Under these circumstances, use . The transceiver cannot transmit when the selected channel is busy before valid Optional Signaling matches. 49 Low Transmit Power - Scan -
User Manual 1
Page 50
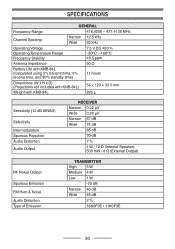
SPECIFICATIONS GENERAL Frequency Range 476.4250 ~ 477.4125 MHz Channel Spacing Narrow 12.5 kHz Wide 25 kHz Operating Voltage Operating Temperature Range Frequency Stability 7.5 V DC ±20 % -30°C ~ +60°C ±0.5 ppm Antenna Impedance 50 Ω Battery Life with KNB-84L (Calculated using 5% transmit time, 5% receive time, and 90% standby time) 11 hours Dimensions (W x H x D) (Projections not included with KNB-84L) 54 × 123 × 33...
SPECIFICATIONS GENERAL Frequency Range 476.4250 ~ 477.4125 MHz Channel Spacing Narrow 12.5 kHz Wide 25 kHz Operating Voltage Operating Temperature Range Frequency Stability 7.5 V DC ±20 % -30°C ~ +60°C ±0.5 ppm Antenna Impedance 50 Ω Battery Life with KNB-84L (Calculated using 5% transmit time, 5% receive time, and 90% standby time) 11 hours Dimensions (W x H x D) (Projections not included with KNB-84L) 54 × 123 × 33...


