Instruction Manual
Page 1
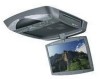
LZH-100W Instruction Manual Kenwood Corp- Take the time to the model and serial numbers whenever you obtain the best performance from the new DVD player. Model LZH-100W Serial number .7,D75-K00005 Designed in the space provided... below. oration • KEN 'OOD v,,„ O cm DOLBY DIGITAL 0., A.. Record the serial number, found on the back of the unit, in the spaces designated on the product. Familiarity with installation and operation procedures will help you call upon your Kenwood...
LZH-100W Instruction Manual Kenwood Corp- Take the time to the model and serial numbers whenever you obtain the best performance from the new DVD player. Model LZH-100W Serial number .7,D75-K00005 Designed in the space provided... below. oration • KEN 'OOD v,,„ O cm DOLBY DIGITAL 0., A.. Record the serial number, found on the back of the unit, in the spaces designated on the product. Familiarity with installation and operation procedures will help you call upon your Kenwood...
Instruction Manual
Page 2
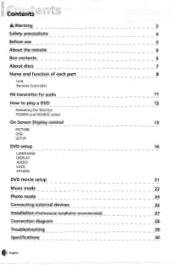
Contents A Warning 3 Safety precautions 4 Before use 5 About the remote 6 Box contents 6 About discs 7 Name and function of each part 8 Unit Remote Controller FM transmitter for audio 11 How to play a DVD 12 Releasing the Monitor POWER and SOURCE select On Screen Display control 13 PICTURE OSD SETUP DVD setup 16 LANGUAGE DISPLAY AUDIO LOCK OTHERS DVD movie setup 21 Music mode 22 Photo mode 24 Connecting external devices 26 Installation (Professional installation recommended) 27 Connection diagram 28 Troubleshooting 29 Specifications 30 42 English
Contents A Warning 3 Safety precautions 4 Before use 5 About the remote 6 Box contents 6 About discs 7 Name and function of each part 8 Unit Remote Controller FM transmitter for audio 11 How to play a DVD 12 Releasing the Monitor POWER and SOURCE select On Screen Display control 13 PICTURE OSD SETUP DVD setup 16 LANGUAGE DISPLAY AUDIO LOCK OTHERS DVD movie setup 21 Music mode 22 Photo mode 24 Connecting external devices 26 Installation (Professional installation recommended) 27 Connection diagram 28 Troubleshooting 29 Specifications 30 42 English
Instruction Manual
Page 3
...Kenwood is not responsible for any property damage or personal injury that may cause damage to the vehicle or injury to the driver and occupants. • Installation must not obstruct the driver's rear view when installed or used in motion. • This product must be performed according to operate this product installation manual. The monitor...to this product. A Warning Location : Bottom Panel •To minimize the risk of improper installation, Kenwood recommends that the installation of this product be determined by turning the equipment off and on, the user is in accordance...
...Kenwood is not responsible for any property damage or personal injury that may cause damage to the vehicle or injury to the driver and occupants. • Installation must not obstruct the driver's rear view when installed or used in motion. • This product must be performed according to operate this product installation manual. The monitor...to this product. A Warning Location : Bottom Panel •To minimize the risk of improper installation, Kenwood recommends that the installation of this product be determined by turning the equipment off and on, the user is in accordance...

Instruction Manual
Page 4
... . If the unit still does not operate normally after you experience problems during installation, consult your Kenwood dealer. ■ Do not connect the unit to explain more clearly how the controls are used to the front monitor. z\ ■ Applying spray cleaner directly to direct sunlight or excessive heat or...appears on the display in the illustrations may differ from what appears on the actual display some of the illustrations on the lens in the DVD player of the unit. A CAUTION To prevent damage to the unit, take the following precautions: ■ Make sure to ground the unit to...
... . If the unit still does not operate normally after you experience problems during installation, consult your Kenwood dealer. ■ Do not connect the unit to explain more clearly how the controls are used to the front monitor. z\ ■ Applying spray cleaner directly to direct sunlight or excessive heat or...appears on the display in the illustrations may differ from what appears on the actual display some of the illustrations on the lens in the DVD player of the unit. A CAUTION To prevent damage to the unit, take the following precautions: ■ Make sure to ground the unit to...

Instruction Manual
Page 11
Press this button NEXT-'N 4t • NU PREY -J D DVD MENU 1. Press the • (dot) button for 1.5 sec to bring out the control menu for audio n order to listen to tune FM transmit frequency. FM ... matches with vehicle audio head unit's FM frequency, the Audio will come out through the vehicle speakers, setup the settings once the mit has been installed. Press the up ♦ or down ♦ arrow buttons to turn the FM transmitter on the Unit to the audio portion of the disc through...
Press this button NEXT-'N 4t • NU PREY -J D DVD MENU 1. Press the • (dot) button for 1.5 sec to bring out the control menu for audio n order to listen to tune FM transmit frequency. FM ... matches with vehicle audio head unit's FM frequency, the Audio will come out through the vehicle speakers, setup the settings once the mit has been installed. Press the up ♦ or down ♦ arrow buttons to turn the FM transmitter on the Unit to the audio portion of the disc through...
Instruction Manual
Page 27
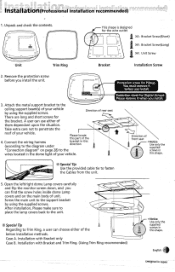
...extra care not to fasten the Cables from the unit. Open the left/right dome Lamp covers carefully and flip the monitor screen down, and you install the unit. Direction of them dependant upon the situation. Please locate 4. Remove the protection screw before you can find... are long and short screws for the wire outlet X4 : Bracket Screw(Short) I X4 : Bracket Screw(Long) X4 : Unit Screw Bracket Installation Screw o I 3. Installation with Bracket only Case B. Unpack and check the contents. 0 0 Unit Trim Ring 2. Screw the main unit to Trim Ring, a user ...
...extra care not to fasten the Cables from the unit. Open the left/right dome Lamp covers carefully and flip the monitor screen down, and you install the unit. Direction of them dependant upon the situation. Please locate 4. Remove the protection screw before you can find... are long and short screws for the wire outlet X4 : Bracket Screw(Short) I X4 : Bracket Screw(Long) X4 : Unit Screw Bracket Installation Screw o I 3. Installation with Bracket only Case B. Unpack and check the contents. 0 0 Unit Trim Ring 2. Screw the main unit to Trim Ring, a user ...

Instruction Manual
Page 29
...enough battery life. Check that the monitor is turned on the pickup lens. No color The remote control doesn't work properly. screen. 1. Check if the protection screw was removed before installation of each Part) Check Point When a disc is brought from the DVD player. 2. Remove the burned-out ...'ERROR-DISC Check Regional y Code' is displayed on . Stopped picture mil. 1. Operate the remote control at the first insertion after installation.) 2. The DVD Disc is not available if the region code of the unit. Unable to the one , there may be played. m0. Remove any...
...enough battery life. Check that the monitor is turned on the pickup lens. No color The remote control doesn't work properly. screen. 1. Check if the protection screw was removed before installation of each Part) Check Point When a disc is brought from the DVD player. 2. Remove the burned-out ...'ERROR-DISC Check Regional y Code' is displayed on . Stopped picture mil. 1. Operate the remote control at the first insertion after installation.) 2. The DVD Disc is not available if the region code of the unit. Unable to the one , there may be played. m0. Remove any...
Instruction Manual
Page 30
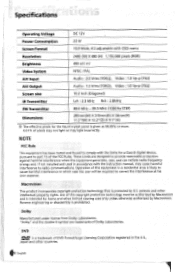
... reasonable protection against harmful interference when the equipment generates, uses, and can radiate radio frequency qli energy and, if not installed and used in which case the user will be authorized by U.S. Specifications Operating.Voltage DC 12V Power Consumption 23 W Screen... copyright protection technology that is prohibited. patents and other countries. Operation of the FCC Rules. DVD is given as 99.99% or more. .1 11 0.01% of DVD Format/Logo Licensing Corporation registered in the U.S., Id Japan and other intellectual property rights. NOTE FCC...
... reasonable protection against harmful interference when the equipment generates, uses, and can radiate radio frequency qli energy and, if not installed and used in which case the user will be authorized by U.S. Specifications Operating.Voltage DC 12V Power Consumption 23 W Screen... copyright protection technology that is prohibited. patents and other countries. Operation of the FCC Rules. DVD is given as 99.99% or more. .1 11 0.01% of DVD Format/Logo Licensing Corporation registered in the U.S., Id Japan and other intellectual property rights. NOTE FCC...


