

North America
Page 2
... found to Part 15 of the FCC Rules. The user could lose the authority to radio communications, if it is connected. • Consult the dealer or an experienced radio/TV technician for a Class B digital device, pursuant to comply with the instructions. CALIFORNIA, USA ONLY This product contains a CR Coin Cell Lithium Battery which the receiver is not installed and used in...
... found to Part 15 of the FCC Rules. The user could lose the authority to radio communications, if it is connected. • Consult the dealer or an experienced radio/TV technician for a Class B digital device, pursuant to comply with the instructions. CALIFORNIA, USA ONLY This product contains a CR Coin Cell Lithium Battery which the receiver is not installed and used in...
North America
Page 6
...[FUNCTION] menu. ( 5) • [XX] indicates the selected items. • ( XX) indicates references are used batteries promptly. CONTENTS BEFORE USE 2 BASICS 3 GETTING STARTED 4 1 Select the display language and cancel the demonstration 2 Set the clock and date 3 Set the initial settings RADIO 6 CD / USB / iPod / ANDROID 7 AUX 9 Pandora® 10 iHeartRadio® 11 SiriusXM® Radio 12 BLUETOOTH® 15 AUDIO SETTINGS 21 DISPLAY SETTINGS 23 REFERENCES 24 Maintenance More information TROUBLESHOOTING 26 SPECIFICATIONS 28 INSTALLATION / CONNECTION...
...[FUNCTION] menu. ( 5) • [XX] indicates the selected items. • ( XX) indicates references are used batteries promptly. CONTENTS BEFORE USE 2 BASICS 3 GETTING STARTED 4 1 Select the display language and cancel the demonstration 2 Set the clock and date 3 Set the initial settings RADIO 6 CD / USB / iPod / ANDROID 7 AUX 9 Pandora® 10 iHeartRadio® 11 SiriusXM® Radio 12 BLUETOOTH® 15 AUDIO SETTINGS 21 DISPLAY SETTINGS 23 REFERENCES 24 Maintenance More information TROUBLESHOOTING 26 SPECIFICATIONS 28 INSTALLATION / CONNECTION...

North America
Page 7
... the first time. Select a source Press repeatedly. Press ATT during playback to attenuate the sound. • Press again to cancel. BASICS Faceplate Volume knob Display window Remote control (RC-406) (supplied for / ) Remote sensor (Do not expose to bright sunlight.) Detach button Attach Detach : USB cable from the rear of the unit How to reset Press the switch twice within 5 seconds after 20 minutes when in standby mode (Auto Power Off).
... the first time. Select a source Press repeatedly. Press ATT during playback to attenuate the sound. • Press again to cancel. BASICS Faceplate Volume knob Display window Remote control (RC-406) (supplied for / ) Remote sensor (Do not expose to bright sunlight.) Detach button Attach Detach : USB cable from the rear of the unit How to reset Press the switch twice within 5 seconds after 20 minutes when in standby mode (Auto Power Off).

North America
Page 8
... volume knob to enter [FUNCTION]. 2 Turn the volume knob to select [12H] or [24H], then press the knob. To adjust the clock 3 Turn the volume knob to select [CLOCK ADJUST], then press the knob. 4 Turn the volume knob to make the settings, then press the knob. GETTING STARTED 1 Select the display language and cancel the demonstration When you turn on the power for the first time (or [FACTORY RESET] is set the date 7 Turn the volume...
... volume knob to enter [FUNCTION]. 2 Turn the volume knob to select [12H] or [24H], then press the knob. To adjust the clock 3 Turn the volume knob to select [CLOCK ADJUST], then press the knob. 4 Turn the volume knob to make the settings, then press the knob. GETTING STARTED 1 Select the display language and cancel the demonstration When you turn on the power for the first time (or [FACTORY RESET] is set the date 7 Turn the volume...

North America
Page 10
...; To select a stored station: Press one of the number buttons (1 to 6) (or press one of traffic information, the adjusted volume is selected for [PRESET TYPE]. ( 4) MONO SET ON: Improves the FM reception, but the stereo effect may be applied the next time traffic information is selected or activated. 4 Press and hold to Traffic Information if available ("TI" lights up). ; CLOCK TIME SYNC ON: Synchronizes the unit's time to...
...; To select a stored station: Press one of the number buttons (1 to 6) (or press one of traffic information, the adjusted volume is selected for [PRESET TYPE]. ( 4) MONO SET ON: Improves the FM reception, but the stereo effect may be applied the next time traffic information is selected or activated. 4 Press and hold to Traffic Information if available ("TI" lights up). ; CLOCK TIME SYNC ON: Synchronizes the unit's time to...
North America
Page 13
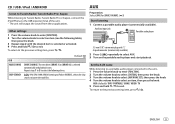
... Radio/ TuneIn Radio Pro/ Aupeo While listening to TuneIn Radio, TuneIn Radio Pro or Aupeo, connect the iPod/iPhone to select AUX. 3 Turn on the portable audio player and start playback. Auxiliary input jack Portable audio player 3.5 mm (1/8") stereo mini plug with "L" shaped connector (commercially available) 2 Press repeatedly to the USB input terminal of the unit. • The unit will output the sound from these applications. Other settings 1 Press the volume knob to enter [FUNCTION]. 2 Turn the volume knob to select...
... Radio/ TuneIn Radio Pro/ Aupeo While listening to TuneIn Radio, TuneIn Radio Pro or Aupeo, connect the iPod/iPhone to select AUX. 3 Turn on the portable audio player and start playback. Auxiliary input jack Portable audio player 3.5 mm (1/8") stereo mini plug with "L" shaped connector (commercially available) 2 Press repeatedly to the USB input terminal of the unit. • The unit will output the sound from these applications. Other settings 1 Press the volume knob to enter [FUNCTION]. 2 Turn the volume knob to select...

North America
Page 17
... SmartFavorite channel, you press , the tuning method switches between "CHANNEL" (manually search for a channel) and "PRESET" (searches for a channel manually. • Pressing and holding S / T changes the channel rapidly. To On the faceplate On the remote control Select a channel Press S / T. Change a channel Press and hold S / . ENGLISH 13 When channel keymode is selected, a pass code input screen appears. rapidly Store a channel of the selected band). Press and hold S / T. Press S / . SiriusXM® Radio 5 Turn the volume knob to select a channel, then...
... SmartFavorite channel, you press , the tuning method switches between "CHANNEL" (manually search for a channel) and "PRESET" (searches for a channel manually. • Pressing and holding S / T changes the channel rapidly. To On the faceplate On the remote control Select a channel Press S / T. Change a channel Press and hold S / . ENGLISH 13 When channel keymode is selected, a pass code input screen appears. rapidly Store a channel of the selected band). Press and hold S / T. Press S / . SiriusXM® Radio 5 Turn the volume knob to select a channel, then...
North America
Page 19
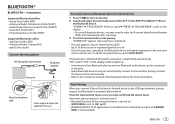
... Android device ( MODE] is turned on the Bluetooth device. Audio/Video Remote Control Profile (AVRCP) - "BT1" and/or "BT2" on the display window lights up. • A maximum of the connected devcie is selected ( 8). 7) and [BROWSE ENGLISH 15 Auto Pairing When you connect iPhone/ iPod touch/ Android device to the USB input terminal, pairing request (via Bluetooth) is installed on the display. • For some Bluetooth devices, you reset the unit. Phonebook Access Profile (PBAP) Supported Bluetooth codecs - "PAIRING OK" appears when pairing is...
... Android device ( MODE] is turned on the Bluetooth device. Audio/Video Remote Control Profile (AVRCP) - "BT1" and/or "BT2" on the display window lights up. • A maximum of the connected devcie is selected ( 8). 7) and [BROWSE ENGLISH 15 Auto Pairing When you connect iPhone/ iPod touch/ Android device to the USB input terminal, pairing request (via Bluetooth) is installed on the display. • For some Bluetooth devices, you reset the unit. Phonebook Access Profile (PBAP) Supported Bluetooth codecs - "PAIRING OK" appears when pairing is...

North America
Page 22
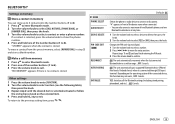
... the number buttons (0 to 9) to enter the phone number. 2 Press to exit. BLUETOOTH® Make a call You can display only non-accent letters. (Accent letters such as "U".) NUMBER DIAL 1 Turn the volume knob to select a number (0 to 9) or character ( , #, +). 2 Press S / T to move the entry position. Make a call using voice recognition) BATT LOW/ MID/ FULL*: Shows the strength of the connected phone for each phone. The first menu (ABCDEFGHIJK...
... the number buttons (0 to 9) to enter the phone number. 2 Press to exit. BLUETOOTH® Make a call You can display only non-accent letters. (Accent letters such as "U".) NUMBER DIAL 1 Turn the volume knob to select a number (0 to 9) or character ( , #, +). 2 Press S / T to move the entry position. Make a call using voice recognition) BATT LOW/ MID/ FULL*: Shows the strength of the connected phone for each phone. The first menu (ABCDEFGHIJK...
North America
Page 23
... [FUNCTION]. 2 Turn the volume knob to select a contact or enter a phone number. BT MODE PHONE SELECT AUDIO SELECT DEVICE DELETE PIN CODE EDIT (0000) RECONNECT AUTO PAIRING INITIALIZE Default: XX Selects the phone or audio device to connect or disconnect. *" " appears in step 2 and store a blank number. OFF: Cancels. Repeat steps 1 and 2 until the desired item is selected/activated or follow the instructions stated on the operating system of the connected device, this function may not work. ; ON: The unit automatically pair supported Bluetooth device (iPhone/ iPod...
... [FUNCTION]. 2 Turn the volume knob to select a contact or enter a phone number. BT MODE PHONE SELECT AUDIO SELECT DEVICE DELETE PIN CODE EDIT (0000) RECONNECT AUTO PAIRING INITIALIZE Default: XX Selects the phone or audio device to connect or disconnect. *" " appears in step 2 and store a blank number. OFF: Cancels. Repeat steps 1 and 2 until the desired item is selected/activated or follow the instructions stated on the operating system of the connected device, this function may not work. ; ON: The unit automatically pair supported Bluetooth device (iPhone/ iPod...

North America
Page 25
...bass. ; Default: XX SUB-W LEVEL -50 to produce a well-balanced sound at a low volume level. ; MANUAL EQ BAND1 LEVEL LEVEL -9 to +9 (0): (Refer to BAND2 LEVEL below.) BASS EXTEND ON: Turns on your device. 2 Connect your preferred low and high frequencies boost to +10 (0): Adjusts the subwoofer output level. LOUDNESS LEVEL1/ LEVEL2: Selects your Bluetooth audio player via Bluetooth connection. ( 15) 3 Press repeatedly to select PANDORA. The source switches and broadcast starts automatically. The source switches and broadcast starts automatically. Adjusts the level...
...bass. ; Default: XX SUB-W LEVEL -50 to produce a well-balanced sound at a low volume level. ; MANUAL EQ BAND1 LEVEL LEVEL -9 to +9 (0): (Refer to BAND2 LEVEL below.) BASS EXTEND ON: Turns on your device. 2 Connect your preferred low and high frequencies boost to +10 (0): Adjusts the subwoofer output level. LOUDNESS LEVEL1/ LEVEL2: Selects your Bluetooth audio player via Bluetooth connection. ( 15) 3 Press repeatedly to select PANDORA. The source switches and broadcast starts automatically. The source switches and broadcast starts automatically. Adjusts the level...

North America
Page 27
... COLOR SELECT VARIABLE SCAN/ CUSTOM R/G/B/ preset colors*: Selects your own color, select [CUSTOM R/G/B]. The color you have set [DIMMER TIME], it will be canceled once you have made will be stored in [CUSTOM R/G/B]. 1 Press the volume knob to enter the detailed color adjustment. 2 Press S / T to select the color (R/ G/ B) to adjust. 3 Turn the volume knob to adjust the level (0 - 9), then press the knob. OFF: Cancels. DIMMER Dim the display illumination and button illumination. OFF: Cancels. * Preset colors...
... COLOR SELECT VARIABLE SCAN/ CUSTOM R/G/B/ preset colors*: Selects your own color, select [CUSTOM R/G/B]. The color you have set [DIMMER TIME], it will be canceled once you have made will be stored in [CUSTOM R/G/B]. 1 Press the volume knob to enter the detailed color adjustment. 2 Press S / T to select the color (R/ G/ B) to adjust. 3 Turn the volume knob to adjust the level (0 - 9), then press the knob. OFF: Cancels. DIMMER Dim the display illumination and button illumination. OFF: Cancels. * Preset colors...
North America
Page 28
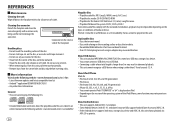
... dirt on the faceplate with coloring on the recording surface or discs that are dirty. • Recordable/ReWritable discs that are stated in a USB device or a CD encoded by iTunes cannot be impossible depending on the types or conditions of the iPod/iPhone, some functions may not operate on this unit. Cleaning the connector Detach the faceplate and clean the connector gently with tape...
... dirt on the faceplate with coloring on the recording surface or discs that are dirty. • Recordable/ReWritable discs that are stated in a USB device or a CD encoded by iTunes cannot be impossible depending on the types or conditions of the iPod/iPhone, some functions may not operate on this unit. Cleaning the connector Detach the faceplate and clean the connector gently with tape...
North America
Page 29
... Bluetooth devices may become unavailable. • Some functions of the services may not be operated from this unit. • For issues using the application, please contact Pandora at Google Play.) Change the display information Each time you press DISP, the display information changes. • If the information is a third-party service, the specifications are subject to change without prior notice. station name, playing time) appears. Please visit for NFC function: Remote devices...
... Bluetooth devices may become unavailable. • Some functions of the services may not be operated from this unit. • For issues using the application, please contact Pandora at Google Play.) Change the display information Each time you press DISP, the display information changes. • If the information is a third-party service, the specifications are subject to change without prior notice. station name, playing time) appears. Please visit for NFC function: Remote devices...
North America
Page 30
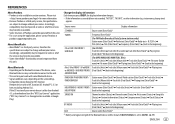
... connections. Make sure the disc contains supported audio files. ( 24) Insert a playable disc into the loading slot. TROUBLESHOOTING Symptom Sound cannot be displayed correctly. Tracks do not play back as you have selected ( 5), some time to USB again. Turn the power on the power and perform the operation again. ( 5) Connect the antenna firmly. If this does not solve the problem, consult your nearest service center. The unit does not work at all. (For ) "SET ERROR" / "DEL ERROR" Radio...
... connections. Make sure the disc contains supported audio files. ( 24) Insert a playable disc into the loading slot. TROUBLESHOOTING Symptom Sound cannot be displayed correctly. Tracks do not play back as you have selected ( 5), some time to USB again. Turn the power on the power and perform the operation again. ( 5) Connect the antenna firmly. If this does not solve the problem, consult your nearest service center. The unit does not work at all. (For ) "SET ERROR" / "DEL ERROR" Radio...

North America
Page 31
... not solve the problem, the connected Android device does not support [BROWSE MODE]. ( 24) Turn off the power saving mode on your device. Call 1-866-635-2349 in good condition. Your subscription is insufficient content to the unit. "CODE ERROR" Make sure you have entered the correct pass code. ( 14) "NO CONTENT" There is updated. Bluetooth pairing cannot be selected. Retry after deleting unnecessary stations from your device. Symptom Remedy...
... not solve the problem, the connected Android device does not support [BROWSE MODE]. ( 24) Turn off the power saving mode on your device. Call 1-866-635-2349 in good condition. Your subscription is insufficient content to the unit. "CODE ERROR" Make sure you have entered the correct pass code. ( 14) "NO CONTENT" There is updated. Bluetooth pairing cannot be selected. Retry after deleting unnecessary stations from your device. Symptom Remedy...
North America
Page 32
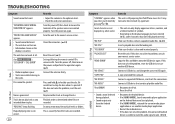
... information. "DEVICE FULL" "N/A VOICE TAG" "NOT SUPPORT" "NO ENTRY" / "NO PAIR" "ERROR" "NO INFO" / "NO DATA" "HF ERROR XX" / "BT ERROR" Remedy • Adjust the microphone unit's position. ( 15) • Check the [ECHO CANCEL] setting. ( 17) • Reduce the distance between the unit and the Bluetooth audio player. • Turn off, then turn on the unit and try the operation again. Try the operation again. CD player Tuner FM Frequency Range...
... information. "DEVICE FULL" "N/A VOICE TAG" "NOT SUPPORT" "NO ENTRY" / "NO PAIR" "ERROR" "NO INFO" / "NO DATA" "HF ERROR XX" / "BT ERROR" Remedy • Adjust the microphone unit's position. ( 15) • Check the [ECHO CANCEL] setting. ( 17) • Reduce the distance between the unit and the Bluetooth audio player. • Turn off, then turn on the unit and try the operation again. Try the operation again. CD player Tuner FM Frequency Range...
North America
Page 34
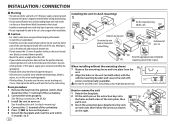
... car are working properly. • If the fuse blows, first make sure the wires are not touching car's chassis, then replace the old fuse with screws (commercially available). Using wrong screws might damage the unit. See Installing the unit (in-dash mounting). 4 Connect the [ terminal of the car battery. 5 Press to turn on the power. 6 Detach the faceplate and reset the unit within 5 seconds. ( 3) 30 Installing the unit (in-dash mounting) Do the required wiring. ( 31, 32) Hook...
... car are working properly. • If the fuse blows, first make sure the wires are not touching car's chassis, then replace the old fuse with screws (commercially available). Using wrong screws might damage the unit. See Installing the unit (in-dash mounting). 4 Connect the [ terminal of the car battery. 5 Press to turn on the power. 6 Detach the faceplate and reset the unit within 5 seconds. ( 3) 30 Installing the unit (in-dash mounting) Do the required wiring. ( 31, 32) Hook...
North America
Page 35
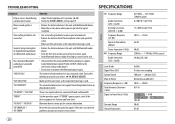
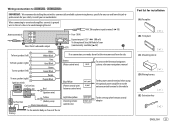
... (C) Mounting sleeve (D) Wiring harness (E) Extraction key ENGLISH 31 Wiring connection (for / ) IMPORTANT : We recommend installing the unit with a commercially available custom wiring harness specific for your car and leave this job to the antenna control terminal in the vehicle To the steering wheel remote control adapter Battery To the metallic body or chassis of the car Part list for your safety. MIC (Microphone input terminal) ( 15) Antenna terminal Fuse (10 A) Rear/ front/ subwoofer output Expansion...
... (C) Mounting sleeve (D) Wiring harness (E) Extraction key ENGLISH 31 Wiring connection (for / ) IMPORTANT : We recommend installing the unit with a commercially available custom wiring harness specific for your car and leave this job to the antenna control terminal in the vehicle To the steering wheel remote control adapter Battery To the metallic body or chassis of the car Part list for your safety. MIC (Microphone input terminal) ( 15) Antenna terminal Fuse (10 A) Rear/ front/ subwoofer output Expansion...
North America
Page 36
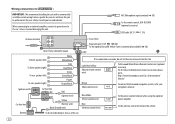
... navigations manual Blue/White (Power control wire) Blue (Antenna control wire) To the power control terminal when using the optional power amplifier To the antenna control terminal in the vehicle Battery To the metallic body or chassis of the car 32 When connecting to an external amplifier, connect its ground wire to the car's chassis to avoid damaging the unit. MIC (Microphone input terminal) ( 15) To the remote control, KCA-RC55MR (optional accessory) USB cable (DC 5 V 1.5 A) Antenna terminal Rear/ front/ subwoofer output Fuse (10...
... navigations manual Blue/White (Power control wire) Blue (Antenna control wire) To the power control terminal when using the optional power amplifier To the antenna control terminal in the vehicle Battery To the metallic body or chassis of the car 32 When connecting to an external amplifier, connect its ground wire to the car's chassis to avoid damaging the unit. MIC (Microphone input terminal) ( 15) To the remote control, KCA-RC55MR (optional accessory) USB cable (DC 5 V 1.5 A) Antenna terminal Rear/ front/ subwoofer output Fuse (10...


