Instruction Manual
Page 2
... : The illustrations in this case, remove the disc and wait for the moisture to evaporate. This may differ from what appears on the actual equipment. When you can only play the CDs with the volume too high may collect on the following site: www.kenwood.com/cs/ce/audiofile/ 2 Detailed ...explain more clearly how the controls are stated in your area. Caution: Adjust the volume so that you purchase external components, check with your Kenwood dealer to make sure that they work with your model and in an online manual on the laser lens. This unit can hear sounds ...
... : The illustrations in this case, remove the disc and wait for the moisture to evaporate. This may differ from what appears on the actual equipment. When you can only play the CDs with the volume too high may collect on the following site: www.kenwood.com/cs/ce/audiofile/ 2 Detailed ...explain more clearly how the controls are stated in your area. Caution: Adjust the volume so that you purchase external components, check with your Kenwood dealer to make sure that they work with your model and in an online manual on the laser lens. This unit can hear sounds ...
Instruction Manual
Page 4
.... Handling discs Do not touch the recording surface of the unit and faceplate. Clean from the center hole and disc edge before inserting a disc. 4 When removing discs from this precaution may result in the unit. IN: A disc is received (FM). on the disc, or use a disc with tape stuck on the... panel with a dry silicon or soft cloth. Do not use any solvents. Do not use any accessories for the disc. Remove the rims from the center of the disc and move outward. Clean the disc with a dry silicon or soft cloth. Use a cotton swab or cloth...
.... Handling discs Do not touch the recording surface of the unit and faceplate. Clean from the center hole and disc edge before inserting a disc. 4 When removing discs from this precaution may result in the unit. IN: A disc is received (FM). on the disc, or use a disc with tape stuck on the... panel with a dry silicon or soft cloth. Do not use any solvents. Do not use any accessories for the disc. Remove the rims from the center of the disc and move outward. Clean the disc with a dry silicon or soft cloth. Use a cotton swab or cloth...
Instruction Manual
Page 12
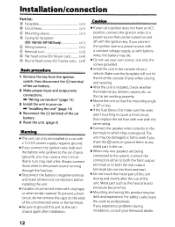
...you may die. Do not use of the unit. Do not touch the metal part of this unit during installation, consult your Kenwood dealer. 12 If you connect the ignition wire (red) and the battery wire (yellow) to the car chassis (ground), you ...list: A Faceplate 1) B Escutcheon 1) C Mounting sleeve 1) D Casing for faceplate (KDC-148/ KDC-MP148CR only 1) E Wiring harness 1) F Removal tool 2) G Flat head screw (for Nissan cars 4) H Round head screw (for Toyota cars).... (×4) Basic procedure 1 Remove the key from the ignition switch, then disconnect the · terminal of the car ...
...you may die. Do not use of the unit. Do not touch the metal part of this unit during installation, consult your Kenwood dealer. 12 If you connect the ignition wire (red) and the battery wire (yellow) to the car chassis (ground), you ...list: A Faceplate 1) B Escutcheon 1) C Mounting sleeve 1) D Casing for faceplate (KDC-148/ KDC-MP148CR only 1) E Wiring harness 1) F Removal tool 2) G Flat head screw (for Nissan cars 4) H Round head screw (for Toyota cars).... (×4) Basic procedure 1 Remove the key from the ignition switch, then disconnect the · terminal of the car ...
Instruction Manual
Page 14
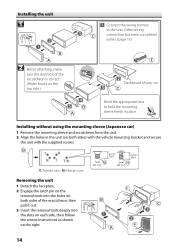
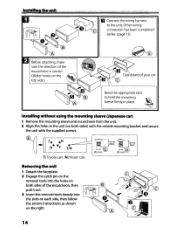
...wiring harness to hold the mounting sleeve firmly in the unit (on both sides of the escutcheon, then pull it out. 3 Insert the removal tools deeply into the slots on each side, then follow the arrows instructions as shown on both sides) with the vehicle mounting bracket and...screws. Installing without using the mounting sleeve (Japanese car) 1 Remove the mounting sleeve and escutcheon from the unit. 2 Align the holes in place. N: Nissan cars Removing the unit 1 Detach the faceplate. 2 Engage the catch pin on the removal tools into the holes on the right. 14 Other wiring ...
...wiring harness to hold the mounting sleeve firmly in the unit (on both sides of the escutcheon, then pull it out. 3 Insert the removal tools deeply into the slots on each side, then follow the arrows instructions as shown on both sides) with the vehicle mounting bracket and...screws. Installing without using the mounting sleeve (Japanese car) 1 Remove the mounting sleeve and escutcheon from the unit. 2 Align the holes in place. N: Nissan cars Removing the unit 1 Detach the faceplate. 2 Engage the catch pin on the removal tools into the holes on the right. 14 Other wiring ...
User Manual
Page 2
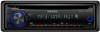
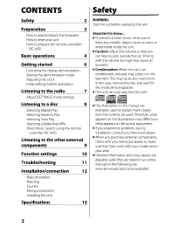
...Therefore, what appears on the illustrations may cause disc read errors. In this case, remove the disc and wait for the moisture to explain more clearly how the controls are stated in your Kenwood dealer to the other external components 9 Function settings 10 Troubleshooting 11 Installation/connection 12 ...the remote controller (RC-405) Listening to make sure that they work with your model and in an online manual on the follOWing site: www.kenwood.com/cs/ce/audiofile/ 2 Important to know... • To prevent a short circuit, never put or leave any metallic objects (such as...
...Therefore, what appears on the illustrations may cause disc read errors. In this case, remove the disc and wait for the moisture to explain more clearly how the controls are stated in your Kenwood dealer to the other external components 9 Function settings 10 Troubleshooting 11 Installation/connection 12 ...the remote controller (RC-405) Listening to make sure that they work with your model and in an online manual on the follOWing site: www.kenwood.com/cs/ce/audiofile/ 2 Important to know... • To prevent a short circuit, never put or leave any metallic objects (such as...
User Manual
Page 4
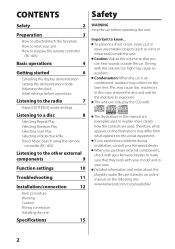
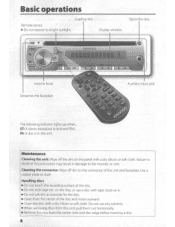
... from the center hole and disc edge before inserting a disc. 4 Use a cotton swab or cloth. Do not use any solvents. • When removing discs from this precaution may result in the unit. Display window Ejects the disc Volume knob Detaches the faceplate Auxiliary input jack The following indicator... lights up when ... Basic operations Loading slot Remote sensor • Do not expose to observe this unit, pull them out horizontally. • Remove the rims from the center of the disc and move outward. • Clean the disc with a dry silicon or soft cloth. IN: A disc...
... from the center hole and disc edge before inserting a disc. 4 Use a cotton swab or cloth. Do not use any solvents. • When removing discs from this precaution may result in the unit. Display window Ejects the disc Volume knob Detaches the faceplate Auxiliary input jack The following indicator... lights up when ... Basic operations Loading slot Remote sensor • Do not expose to observe this unit, pull them out horizontally. • Remove the rims from the center of the disc and move outward. • Clean the disc with a dry silicon or soft cloth. IN: A disc...
User Manual
Page 12
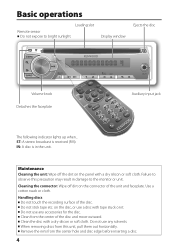
...Do not use of the unconnected wires or the terminals. • Be sure to ground this unit during installation, consult your Kenwood dealer. 12 Metal part such as with battery wires, the battery may be turned on and off with Vinyl tape or other.... ... Installation/connection Part list: ® Faceplate (xl) ® Escutcheon (xl) © Mounting sleeve (xl) @ Casing for faceplate (KDC-148/ KDC-MP148CR only) (xl) ® Wiring harness (xl) ® Removal tool (x2) ® Flat head screw (for Nissan cars) (x4) (8) Round head screw (for Toyota cars) (x4...
...Do not use of the unconnected wires or the terminals. • Be sure to ground this unit during installation, consult your Kenwood dealer. 12 Metal part such as with battery wires, the battery may be turned on and off with Vinyl tape or other.... ... Installation/connection Part list: ® Faceplate (xl) ® Escutcheon (xl) © Mounting sleeve (xl) @ Casing for faceplate (KDC-148/ KDC-MP148CR only) (xl) ® Wiring harness (xl) ® Removal tool (x2) ® Flat head screw (for Nissan cars) (x4) (8) Round head screw (for Toyota cars) (x4...
User Manual
Page 14
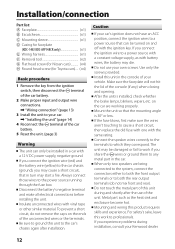
... to the unit. o Connectthe wiring harness to hold the mounting \.~ sleeve firmly in place. ~ Installing without using the mounting sleeve (Japanese car) 1 Remove the mounting sleeve and escutcheon from the unit. 2 Align the holes in the unit (on the right, 14 T: Toyota cars, N. Other wiring connection... has been completed earlier (page 13) Before attaching, make sure the direction of the escutcheon, then pull it out. 3 Insert the removal tools deeply into the slots on each side, then follow the arrows instructions as shown on both sides) with the vehicle mounting bracket and...
... to the unit. o Connectthe wiring harness to hold the mounting \.~ sleeve firmly in place. ~ Installing without using the mounting sleeve (Japanese car) 1 Remove the mounting sleeve and escutcheon from the unit. 2 Align the holes in the unit (on the right, 14 T: Toyota cars, N. Other wiring connection... has been completed earlier (page 13) Before attaching, make sure the direction of the escutcheon, then pull it out. 3 Insert the removal tools deeply into the slots on each side, then follow the arrows instructions as shown on both sides) with the vehicle mounting bracket and...
User Manual
Page 18
...ao consum idor final. This warranty will be presented to a product defect. Corporation ("Kenwood") warrants this warranty. Any product which the serial number has been defaced, modilied or removed. 3. Evenluais reparos realizados no produto durante 0 perfodo de garantia nao implicam na dilatacao...purchaser. Although you must pay the return shipping charges if the repairs are not covered by Kenwood. ANY OTHER DAMAGES, WHETHER INCIDENTAL, CONSEQUENTIAL OR OTHERWISE. Installation or removal of original purchase. Take or ship it to any shipping charges il it is purchased ...
...ao consum idor final. This warranty will be presented to a product defect. Corporation ("Kenwood") warrants this warranty. Any product which the serial number has been defaced, modilied or removed. 3. Evenluais reparos realizados no produto durante 0 perfodo de garantia nao implicam na dilatacao...purchaser. Although you must pay the return shipping charges if the repairs are not covered by Kenwood. ANY OTHER DAMAGES, WHETHER INCIDENTAL, CONSEQUENTIAL OR OTHERWISE. Installation or removal of original purchase. Take or ship it to any shipping charges il it is purchased ...
User Manual
Page 20
... maintenance or repair, including the installation of parts or accessories that do not conform to the length of this kenwood product. Installation and/or removal charges. 6. unauthorized product modification or failure to follow instructions contained in the Owner's Manual. • Accidental... U.S.A, subject to the following are requested to the carrier). • Damages or deteriorations resulling from removal and/ or replacement. Make your Kenwood products, or KENWOOD ELECTRONICS DEUTSCHLAND GMBH: Rembrucker-Str. 15, 63150 Heusenstamm, Germany Tel.: 4~6104-69010 Dear Customer, ...
... maintenance or repair, including the installation of parts or accessories that do not conform to the length of this kenwood product. Installation and/or removal charges. 6. unauthorized product modification or failure to follow instructions contained in the Owner's Manual. • Accidental... U.S.A, subject to the following are requested to the carrier). • Damages or deteriorations resulling from removal and/ or replacement. Make your Kenwood products, or KENWOOD ELECTRONICS DEUTSCHLAND GMBH: Rembrucker-Str. 15, 63150 Heusenstamm, Germany Tel.: 4~6104-69010 Dear Customer, ...


