Instruction Manual
Page 1
... to radio or television reception, which the receiver is connected. This symbol mark indicates that Kenwood manufactured this instruction manual. Familiarity with the limits for a Class B digital device, pursuant to Part 15 of the FCC Rules. Location : Top Panel FCC WARNING This equipment may cause harmful interference unless the modifications are designed to provide reasonable protection against harmful interference in a residential installation. Changes...
... to radio or television reception, which the receiver is connected. This symbol mark indicates that Kenwood manufactured this instruction manual. Familiarity with the limits for a Class B digital device, pursuant to Part 15 of the FCC Rules. Location : Top Panel FCC WARNING This equipment may cause harmful interference unless the modifications are designed to provide reasonable protection against harmful interference in a residential installation. Changes...
Instruction Manual
Page 2
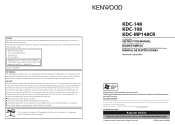
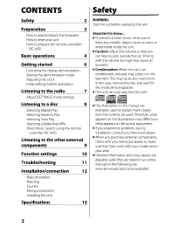
... with your Kenwood dealer to the other external components 9 Function settings 10 Troubleshooting 11 Installation/connection 12 Basic procedure Warning Caution Wiring connection Installing the unit Specifications 15 WARNING Stop the car before operations Listening to the radio 7 Adjust [SETTINGS] mode settings Listening to a disc 8 Selecting Repeat Play Selecting Random Play Selecting Scan Play Selecting a folder/track/file Direct Music Search using the remote controller (RC-405) Listening to make sure that you can only play the CDs with the volume too high may...
... with your Kenwood dealer to the other external components 9 Function settings 10 Troubleshooting 11 Installation/connection 12 Basic procedure Warning Caution Wiring connection Installing the unit Specifications 15 WARNING Stop the car before operations Listening to the radio 7 Adjust [SETTINGS] mode settings Listening to a disc 8 Selecting Repeat Play Selecting Random Play Selecting Scan Play Selecting a folder/track/file Direct Music Search using the remote controller (RC-405) Listening to make sure that you can only play the CDs with the volume too high may...
Instruction Manual
Page 5
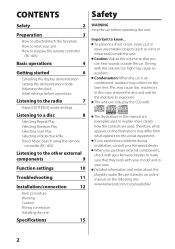
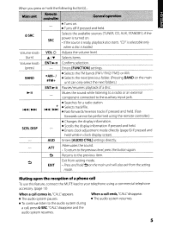
... use this feature, connect the MUTE lead to your telephone using the remote controller.) Changes the display information. Confirms selection. Selects the next/previous folder. (Pressing BAND on . Selects track/file. ATT Attenuates the sound. • To return to the auxiliary input jack. 4 / ¢ + 4 / ¢ Searches for a radio station. Enters [FUNCTION] settings. Muting upon the reception of a disc. - Mutes the sound while listening to a radio or an external component connected to the previous level, press the button...
... use this feature, connect the MUTE lead to your telephone using the remote controller.) Changes the display information. Confirms selection. Selects the next/previous folder. (Pressing BAND on . Selects track/file. ATT Attenuates the sound. • To return to the auxiliary input jack. 4 / ¢ + 4 / ¢ Searches for a radio station. Enters [FUNCTION] settings. Muting upon the reception of a disc. - Mutes the sound while listening to a radio or an external component connected to the previous level, press the button...
Instruction Manual
Page 6
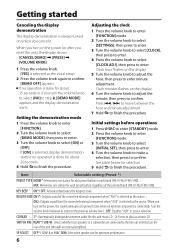
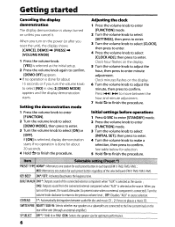
... preset button in each preset button regardless of the unit (through an external amplifier). Setting the demonstration mode 1 Press the volume knob to enter [FUNCTION]. 2 Turn the volume knob to select [DEMO MODE], then press to enter. 3 Turn the volume knob to finish the procedure. KEY BEEP ON*/ OFF: Activates/deactivates the keypress tone. SWITCH PRE REAR*/ SUB-W: Selects whether rear speakers or a subwoofer are connected to finish the procedure. Clock minutes flashes on unless you reset the unit), the display...
... preset button in each preset button regardless of the unit (through an external amplifier). Setting the demonstration mode 1 Press the volume knob to enter [FUNCTION]. 2 Turn the volume knob to select [DEMO MODE], then press to enter. 3 Turn the volume knob to finish the procedure. KEY BEEP ON*/ OFF: Activates/deactivates the keypress tone. SWITCH PRE REAR*/ SUB-W: Selects whether rear speakers or a subwoofer are connected to finish the procedure. Clock minutes flashes on unless you reset the unit), the display...
Instruction Manual
Page 7
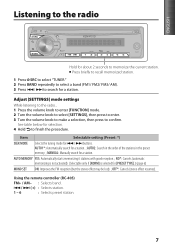
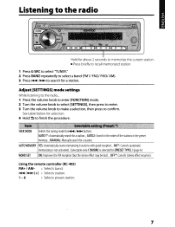
.... MANUAL: Manually search for 4 / ¢ buttons. OFF*: Cancels (stereo effect resumes). Adjust [SETTINGS] mode settings While listening to the radio... 1 Press the volume knob to enter [FUNCTION] mode. 2 Turn the volume knob to select [SETTINGS], then press to enter. 3 Turn the volume knob to make a selection, then press to memorize the current station. Item Selectable setting (Preset: *) SEEK MODE Selects the tuning mode for a station. Using the remote controller (RC-405) FM+ / AM- : Selects band. 4 / ¢ (+) : Selects station. 1 - 6 : Selects preset station. 7 See...
.... MANUAL: Manually search for 4 / ¢ buttons. OFF*: Cancels (stereo effect resumes). Adjust [SETTINGS] mode settings While listening to the radio... 1 Press the volume knob to enter [FUNCTION] mode. 2 Turn the volume knob to select [SETTINGS], then press to enter. 3 Turn the volume knob to make a selection, then press to memorize the current station. Item Selectable setting (Preset: *) SEEK MODE Selects the tuning mode for a station. Using the remote controller (RC-405) FM+ / AM- : Selects band. 4 / ¢ (+) : Selects station. 1 - 6 : Selects preset station. 7 See...
Instruction Manual
Page 10
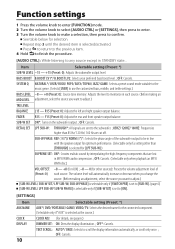
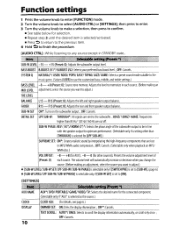
... Selectable setting (Preset: *) SUB-W LEVEL -15 - +15 (Preset: 0): Adjusts the subwoofer output level. OFF: Cancels. SYSTEM Q NATURAL*/ USER/ ROCK/ POPS/ EASY/ TOP40/ JAZZ/ GAME: Selects a preset sound mode suitable to the music genre. (Selects [USER] to use the customized bass, middle, and treble settings.) BASS LEVEL -8 - +8 (Preset: 0): Source tone memory: Adjusts the level to memorize in each source. Repeat step 3 until the desired item is selected as the source.) CLOCK CLOCK ADJ: (For details, see page 6.) DISPLAY DIMMER SET: ON: Dims the display illumination. ; The volume...
... Selectable setting (Preset: *) SUB-W LEVEL -15 - +15 (Preset: 0): Adjusts the subwoofer output level. OFF: Cancels. SYSTEM Q NATURAL*/ USER/ ROCK/ POPS/ EASY/ TOP40/ JAZZ/ GAME: Selects a preset sound mode suitable to the music genre. (Selects [USER] to use the customized bass, middle, and treble settings.) BASS LEVEL -8 - +8 (Preset: 0): Source tone memory: Adjusts the level to memorize in each source. Repeat step 3 until the desired item is selected as the source.) CLOCK CLOCK ADJ: (For details, see page 6.) DISPLAY DIMMER SET: ON: Dims the display illumination. ; The volume...
Instruction Manual
Page 11
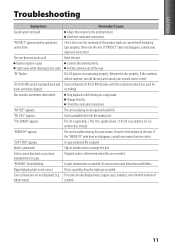
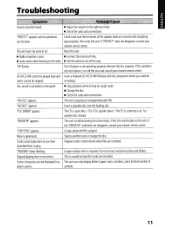
...). Connect the antenna firmly. Disc sound is played. A copy-protected file is sometimes interrupted. Skip to the radio. This is poor. Correct characters are recorded. Radio reception is caused by how the tracks are covered with the component which you have intended them to the optimum level. Reinsert the disc properly. The unit is not operating properly. Adjust the volume to play. The unit does not work...
...). Connect the antenna firmly. Disc sound is played. A copy-protected file is sometimes interrupted. Skip to the radio. This is poor. Correct characters are recorded. Radio reception is caused by how the tracks are covered with the component which you have intended them to the optimum level. Reinsert the disc properly. The unit is not operating properly. Adjust the volume to play. The unit does not work...
Instruction Manual
Page 12
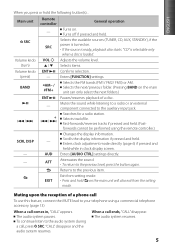
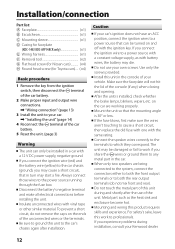
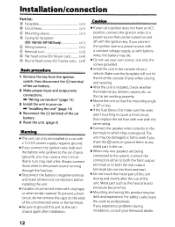
Installation/connection Part list: A Faceplate 1) B Escutcheon 1) C Mounting sleeve 1) D Casing for faceplate (KDC-148/ KDC-MP148CR only 1) E Wiring harness 1) F Removal tool 2) G Flat head screw (for Nissan cars 4) H Round head screw (for Toyota cars).... (×4) Basic procedure 1 Remove the key from the ignition switch, then disconnect the · terminal of the car battery. 2 Make proper input and output wire connections. \ "Wiring connection" (page 13) 3 Install the unit to your car. \ "Installing the unit" (page 14) 4 Reconnect the · terminal of the console (if any metal...
Installation/connection Part list: A Faceplate 1) B Escutcheon 1) C Mounting sleeve 1) D Casing for faceplate (KDC-148/ KDC-MP148CR only 1) E Wiring harness 1) F Removal tool 2) G Flat head screw (for Nissan cars 4) H Round head screw (for Toyota cars).... (×4) Basic procedure 1 Remove the key from the ignition switch, then disconnect the · terminal of the car battery. 2 Make proper input and output wire connections. \ "Wiring connection" (page 13) 3 Install the unit to your car. \ "Installing the unit" (page 14) 4 Reconnect the · terminal of the console (if any metal...
Instruction Manual
Page 13
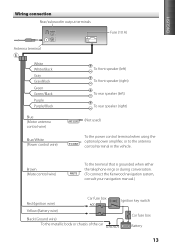
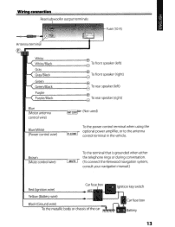
... antenna control wire) Blue/White (Power control wire) To front speaker (left) To front speaker (right) To rear speaker (left) To rear speaker (right) (Not used) To the power control terminal when using the optional power amplifier, or to the antenna control terminal in the vehicle. Brown (Mute control wire) To the terminal that is grounded when either the telephone rings or during conversation. (To connect the Kenwood navigation system, consult your navigation manual.) Red (Ignition wire) Yellow (Battery wire) Car fuse...
... antenna control wire) Blue/White (Power control wire) To front speaker (left) To front speaker (right) To rear speaker (left) To rear speaker (right) (Not used) To the power control terminal when using the optional power amplifier, or to the antenna control terminal in the vehicle. Brown (Mute control wire) To the terminal that is grounded when either the telephone rings or during conversation. (To connect the Kenwood navigation system, consult your navigation manual.) Red (Ignition wire) Yellow (Battery wire) Car fuse...
Instruction Manual
Page 15
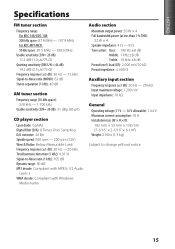
...: Compliant with Windows Media Audio Audio section Maximum output power: 50 W × 4 Full bandwidth power (at less than 1 % THD): 22 W × 4 Speaker impedance: 4 Ω - 8 Ω Tone action: Bass: 100 Hz ±8 dB Middle: 1 kHz ±8 dB Treble: 10 kHz ±8 dB Preout level / load (CD): 2 000 mV/10 kΩ Preout impedance: ≤ 600 Ω Auxiliary input section Frequency response (±3 dB): 20...
...: Compliant with Windows Media Audio Audio section Maximum output power: 50 W × 4 Full bandwidth power (at less than 1 % THD): 22 W × 4 Speaker impedance: 4 Ω - 8 Ω Tone action: Bass: 100 Hz ±8 dB Middle: 1 kHz ±8 dB Treble: 10 kHz ±8 dB Preout level / load (CD): 2 000 mV/10 kΩ Preout impedance: ≤ 600 Ω Auxiliary input section Frequency response (±3 dB): 20...
User Manual
Page 2
... the display demonstration Setting the demonstration mode Adjusting the clock Initial settings before operations Listening to the radio 7 Adjust [SETIINGS] mode settings Listening to a disc 8 Selecting Repeat Play Selecting Random Play Selecting Scan Play Selecting a folder/track/file Direct Music Search using the remote controller (RC-405) Listening to the other external components 9 Function settings 10 Troubleshooting 11 Installation/connection 12 Basic procedure Warning Caution Wiring connection Installing the unit Specifications 15 WARNING Stop the car before operating...
... the display demonstration Setting the demonstration mode Adjusting the clock Initial settings before operations Listening to the radio 7 Adjust [SETIINGS] mode settings Listening to a disc 8 Selecting Repeat Play Selecting Random Play Selecting Scan Play Selecting a folder/track/file Direct Music Search using the remote controller (RC-405) Listening to the other external components 9 Function settings 10 Troubleshooting 11 Installation/connection 12 Basic procedure Warning Caution Wiring connection Installing the unit Specifications 15 WARNING Stop the car before operating...
User Manual
Page 5
.... Mutes the sound while listening to a radio or an external component connected to the audio system during a call comes in clock display screen. When you press or hold ~ on the main unit will also exit from the setting mode. Muting upon the reception of a disc. AUD Enters [AUDIO CTRL] settings directly. VOLO Adjusts the volume level. ~/T Selects items. ENT~II Confirms selection. Selects the available sources (TUNER, CD, AUX, STANDBY), if the SRC power is turned on...
.... Mutes the sound while listening to a radio or an external component connected to the audio system during a call comes in clock display screen. When you press or hold ~ on the main unit will also exit from the setting mode. Muting upon the reception of a disc. AUD Enters [AUDIO CTRL] settings directly. VOLO Adjusts the volume level. ~/T Selects items. ENT~II Confirms selection. Selects the available sources (TUNER, CD, AUX, STANDBY), if the SRC power is turned on...
User Manual
Page 6
..."AUX" in each preset button regardless ofthe selected band (FM1/ FM2/ FM3/ AM). PRESET TYPE NORM*: Memorizes one station for about 20 seconds. 4 Hold ~ to prevent noise when no operation is always turned on unless you turn on the rear ofthe unit (through an external amplifier). KEY BEEP ON*/ OFF: Activates/deactivates the keypress tone. SWITCH PRE REAR*/ SUB-W: Selects whether rear speakers or asubwoofer are connected to enter minute adjustment...
..."AUX" in each preset button regardless ofthe selected band (FM1/ FM2/ FM3/ AM). PRESET TYPE NORM*: Memorizes one station for about 20 seconds. 4 Hold ~ to prevent noise when no operation is always turned on unless you turn on the rear ofthe unit (through an external amplifier). KEY BEEP ON*/ OFF: Activates/deactivates the keypress tone. SWITCH PRE REAR*/ SUB-W: Selects whether rear speakers or asubwoofer are connected to enter minute adjustment...
User Manual
Page 7
... the radio... 1 Press the volume knob to enter [FUNCTION] mode. 2 Turn the volume knob to select [SETTINGS], then press to enter. 3 Turn the volume knob to make a selection, then press to confirm. Using the remote controller (RC-40S) FM+ / AM- : Selects band. ~ I ~ (+) : Selects station. 1- 6 : Selects preset station. 7 AUT02: Search in the order of the stations in the preset memory.; AUTO MEMORY YES: Automatically starts memorizing 6stations with good reception. ; SEEK MODE Selects the tuning mode for astation. MANUAL: Manually search for ~ / ~ buttons. See...
... the radio... 1 Press the volume knob to enter [FUNCTION] mode. 2 Turn the volume knob to select [SETTINGS], then press to enter. 3 Turn the volume knob to make a selection, then press to confirm. Using the remote controller (RC-40S) FM+ / AM- : Selects band. ~ I ~ (+) : Selects station. 1- 6 : Selects preset station. 7 AUT02: Search in the order of the stations in the preset memory.; AUTO MEMORY YES: Automatically starts memorizing 6stations with good reception. ; SEEK MODE Selects the tuning mode for astation. MANUAL: Manually search for ~ / ~ buttons. See...
User Manual
Page 10
... connected component. (Selectable only if"AUX" is selected as the source.) ClOCK ADJ: (For details, see page 6.) DIMMER SET: ON: Dims the display illumination. ;OFF*: Cancels. F15 (Preset: 0): Adjusts the rear and front speaker output balance. OFF: Cancels. The volume level will automatically increase or decrease when you change the source. (Before making an MID LEVEl adjustment, select the source you want to the subwoofer. ; 85Hz/120HZI 160HZ: Frequencies higher than [THROUGH] is selected for [LPF SUB-W].) SUPREME SET...
... connected component. (Selectable only if"AUX" is selected as the source.) ClOCK ADJ: (For details, see page 6.) DIMMER SET: ON: Dims the display illumination. ;OFF*: Cancels. F15 (Preset: 0): Adjusts the rear and front speaker output balance. OFF: Cancels. The volume level will automatically increase or decrease when you change the source. (Before making an MID LEVEl adjustment, select the source you want to the subwoofer. ; 85Hz/120HZI 160HZ: Frequencies higher than [THROUGH] is selected for [LPF SUB-W].) SUPREME SET...
User Manual
Page 11
... track or change the disc. IIREADINGII keeps flashing. Longer readout time is generated. This is determined when files are recorded. Correct characters are covered with the component which you have intended them to the optimum level. • Check the cords and connections. symbols. 11 The CD player is playing an unsupported audio file. The unit is not operating properly. This unit can be...
... track or change the disc. IIREADINGII keeps flashing. Longer readout time is generated. This is determined when files are recorded. Correct characters are covered with the component which you have intended them to the optimum level. • Check the cords and connections. symbols. 11 The CD player is playing an unsupported audio file. The unit is not operating properly. This unit can be...
User Manual
Page 12
..., do not mix front and rear). • Do not touch the metal part of this unit during installation, consult your vehicle. Use only the screws provided. • Install this work if you experience problems during and shortly after the use your car. ... Make sure the faceplate will not hit the lid of the car battery. 2 Make proper input and output wire connections. ... Metal part such as with the ignition key...
..., do not mix front and rear). • Do not touch the metal part of this unit during installation, consult your vehicle. Use only the screws provided. • Install this work if you experience problems during and shortly after the use your car. ... Make sure the faceplate will not hit the lid of the car battery. 2 Make proper input and output wire connections. ... Metal part such as with the ignition key...
User Manual
Page 13
.... (To connect the Kenwood navigation system, consult your navigation manual.) Red (Ignition wire) Yellow (Battery wire) r Black (Ground wire) To the metallic body or chassis of the car Car fuse box + Battery 13 Purple/Black -f+ To rear speaker (right) Blue --=(M=ot-o-r-a-nt-e-n-na----r-::c::-:c-= (Not used) control wire) BluelWhite (Power control wire) P.CONT To the power control terminal when using the optional power amplifier, or to the antenna control terminal in the vehicle. Wirin connedion Rear/subwoofer output terminals Fuse (lOA) Antenna terminal...
.... (To connect the Kenwood navigation system, consult your navigation manual.) Red (Ignition wire) Yellow (Battery wire) r Black (Ground wire) To the metallic body or chassis of the car Car fuse box + Battery 13 Purple/Black -f+ To rear speaker (right) Blue --=(M=ot-o-r-a-nt-e-n-na----r-::c::-:c-= (Not used) control wire) BluelWhite (Power control wire) P.CONT To the power control terminal when using the optional power amplifier, or to the antenna control terminal in the vehicle. Wirin connedion Rear/subwoofer output terminals Fuse (lOA) Antenna terminal...
User Manual
Page 18
... authorized Kenwood car stereo dealer or an automobile dealer, unless the product is authorized, please call1-800-KENWDDD forthe nearest Service Center. 1-800-536-9663). 2. b. Installation or removal of nature, misuse, abuse, neglect, unauthorized product modification or lailure to a product defect. Repair or attempted repair by anyone not authorized by the original purchaser. KENWOOD USA CORPORATION WHO IS PROTECTED This...
... authorized Kenwood car stereo dealer or an automobile dealer, unless the product is authorized, please call1-800-KENWDDD forthe nearest Service Center. 1-800-536-9663). 2. b. Installation or removal of nature, misuse, abuse, neglect, unauthorized product modification or lailure to a product defect. Repair or attempted repair by anyone not authorized by the original purchaser. KENWOOD USA CORPORATION WHO IS PROTECTED This...
User Manual
Page 20
...-040 FA Box 115 FPO Seattle 98766 Okinawa Kenwood Rep,; Kenwood Factory Service; If properly installed and operated in the Owner's Manual. • Accidental or intentional damages. • Repairs or attempted repairs by the warranty. 3. SCOPE OF WARRANTY Except as specified below, this warranty. Voltage conversions. 2. unauthorized product modification or failure to follow instructions contained in accordance with the visual inspection...
...-040 FA Box 115 FPO Seattle 98766 Okinawa Kenwood Rep,; Kenwood Factory Service; If properly installed and operated in the Owner's Manual. • Accidental or intentional damages. • Repairs or attempted repairs by the warranty. 3. SCOPE OF WARRANTY Except as specified below, this warranty. Voltage conversions. 2. unauthorized product modification or failure to follow instructions contained in accordance with the visual inspection...


