
User Manual
Page 2
... tape 5 Notes on playing MP3 6 General features 8 Power Selecting the Source Volume Attenuator Equalizer Control Adjustment of Equalizer type at EASY Adjustment of Equalizer type at PRO Memory preset of adjustment of Equalizer type Audio Control DSP System Spectrum Analyzer Select Station/Disc Naming (SNPS/DNPS) Switching Display Illumination Color Select User Illumination Color Setting Adjusting Clock Tuner features 15 Tuning Direct Access Tuning Station Preset Memory Auto Memory Entry Preset Tuning Frequency Step Setting Cassette player features...........17 Playing Cassette Tapes Fast...
... tape 5 Notes on playing MP3 6 General features 8 Power Selecting the Source Volume Attenuator Equalizer Control Adjustment of Equalizer type at EASY Adjustment of Equalizer type at PRO Memory preset of adjustment of Equalizer type Audio Control DSP System Spectrum Analyzer Select Station/Disc Naming (SNPS/DNPS) Switching Display Illumination Color Select User Illumination Color Setting Adjusting Clock Tuner features 15 Tuning Direct Access Tuning Station Preset Memory Auto Memory Entry Preset Tuning Frequency Step Setting Cassette player features...........17 Playing Cassette Tapes Fast...
User Manual
Page 3
... replacing a fuse, only use automotivegrade wires or other makers cannot be connected to this unit KENWOOD disc changers/ CD players released in damage. The liquid crystal fluid may be connected to this unit. Also avoid places with too much dust or the possibility of place when jolted. • When extending the ignition, battery, or ground wires, make sure to use a new one with its adapter into the unit...
... replacing a fuse, only use automotivegrade wires or other makers cannot be connected to this unit KENWOOD disc changers/ CD players released in damage. The liquid crystal fluid may be connected to this unit. Also avoid places with too much dust or the possibility of place when jolted. • When extending the ignition, battery, or ground wires, make sure to use a new one with its adapter into the unit...

User Manual
Page 4
... says that the component uses laser beams that does not solve the problem, consult your Kenwood dealer. • Press the reset button if the Disc auto changer fails to explain more clearly how the controls are of products using a volatile liquid such as Class 1. Normal operation should be working right, try pressing the reset button first. If the faceplate is utilizing laser beams that are used to operate...
... says that the component uses laser beams that does not solve the problem, consult your Kenwood dealer. • Press the reset button if the Disc auto changer fails to explain more clearly how the controls are of products using a volatile liquid such as Class 1. Normal operation should be working right, try pressing the reset button first. If the faceplate is utilizing laser beams that are used to operate...
User Manual
Page 6
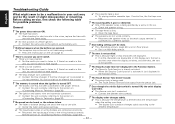
... Disc at Once. The media reproducible on this unit has the following setting when compressing audio data in the long file name format. If you use your MP3 encoder and CD writer Do the following limitations: • Maximum number of directory levels: 8 • Maximum number of... code, refer to the next MP3 file or a File Search or Folder Search may neither be performed smoothly. In addition, it takes a long time until the unit starts playing MP3. Notes on playing MP3 (DPX-MP4050B/ DPX-MP4050/ DPX-MP4030) English This unit can be entered and displayed. Settings for...
... Disc at Once. The media reproducible on this unit has the following setting when compressing audio data in the long file name format. If you use your MP3 encoder and CD writer Do the following limitations: • Maximum number of directory levels: 8 • Maximum number of... code, refer to the next MP3 file or a File Search or Folder Search may neither be performed smoothly. In addition, it takes a long time until the unit starts playing MP3. Notes on playing MP3 (DPX-MP4050B/ DPX-MP4050/ DPX-MP4030) English This unit can be entered and displayed. Settings for...

User Manual
Page 10
... The can be preset. 1 Refer to (page 10) to select the Equalizer type. 2 Select the item for adjustment Press the [FM] or [AM] button. "AUD mode" is pressed, the items that can be adjusted switch as shown below . 3 Adjust the item Press the [4] or [¢] button. Memory preset of adjustment of an Equalizer type selected in Bass Center Frequency change as shown below . Each time the button is displayed. 2 Select the Audio item for...
... The can be preset. 1 Refer to (page 10) to select the Equalizer type. 2 Select the item for adjustment Press the [FM] or [AM] button. "AUD mode" is pressed, the items that can be adjusted switch as shown below . 3 Adjust the item Press the [4] or [¢] button. Memory preset of adjustment of an Equalizer type selected in Bass Center Frequency change as shown below . Each time the button is displayed. 2 Select the Audio item for...

User Manual
Page 11
..., the DSP Control mode closes. Spectrum Analyzer Select Selecting the Spectrum Analyzer display. 1 Enter the Spectrum Analyzer Select mode Press the [S.A] button for at least 1 second. "DSP" indicator is registered and the Analyzer Select mode automatically closes. - 11 - Adjustment Item Display Balance Fader Non Fader Output "BAL" "FAD" "N-F" 4 Exit the Audio Control mode Press the [AUD] button. Turn DSP System OFF Press the [DSP] button for at that time is OFF...
..., the DSP Control mode closes. Spectrum Analyzer Select Selecting the Spectrum Analyzer display. 1 Enter the Spectrum Analyzer Select mode Press the [S.A] button for at least 1 second. "DSP" indicator is registered and the Analyzer Select mode automatically closes. - 11 - Adjustment Item Display Balance Fader Non Fader Output "BAL" "FAD" "N-F" 4 Exit the Audio Control mode Press the [AUD] button. Turn DSP System OFF Press the [DSP] button for at that time is OFF...

User Manual
Page 13
..., the Illumination Color switches as shown below: Illumination Color Display Scan of the display. 1 Enter the Illumination Color Select mode Press the [COLOR] button. "Illumi" is displayed. 2 Select the Illumination Color Press the [COLOR] button. In CD & External disc source Information Track number & Track time Track number & Disc play time Disc name Disc title (In External disc source or DPX-MP4050B/ DPX-MP4050/ DPX-MP4030 internal CD source) Track title (In External disc source or DPX-MP4050B/ DPX-MP4050/ DPX-MP4030 internal CD source) Charactor Clock Display "P-Time" "A-Time" "DNPS...
..., the Illumination Color switches as shown below: Illumination Color Display Scan of the display. 1 Enter the Illumination Color Select mode Press the [COLOR] button. "Illumi" is displayed. 2 Select the Illumination Color Press the [COLOR] button. In CD & External disc source Information Track number & Track time Track number & Disc play time Disc name Disc title (In External disc source or DPX-MP4050B/ DPX-MP4050/ DPX-MP4030 internal CD source) Track title (In External disc source or DPX-MP4050B/ DPX-MP4050/ DPX-MP4030 internal CD source) Charactor Clock Display "P-Time" "A-Time" "DNPS...

User Manual
Page 14
... time the button is pressed, the intensity of color changes as shown below : Intensity of RGB can be adjusted switch as shown below : Adjustment Color Display Red Green Blue "R" is blinks "G" is blinks "B" is displayed. 2 Select the Color for at least 1 second. Adjusting Clock 1 Select the clock display Press the [DISP] button. 2 Enter clock adjustment mode Press the [DISP] button for 10 seconds, the Illumination Color at that can arbitrarily set. 1 Enter the Illumination Color Select mode Press...
... time the button is pressed, the intensity of color changes as shown below : Intensity of RGB can be adjusted switch as shown below : Adjustment Color Display Red Green Blue "R" is blinks "G" is blinks "B" is displayed. 2 Select the Color for at least 1 second. Adjusting Clock 1 Select the clock display Press the [DISP] button. 2 Enter clock adjustment mode Press the [DISP] button for 10 seconds, the Illumination Color at that can arbitrarily set. 1 Enter the Illumination Color Select mode Press...

User Manual
Page 15
.../AM DISC DISP NAME ATT B.NR SCRL AUD B.S SCN SRC RDM PWR OFF REP COLOR S.A MTL FNC M.RDM Tuning Selecting the station. 1 Select tuner source Press the [SRC] button. Example: Desired frequency Press button 92.1 MHz (FM) 810 kHz (AM) [0], [9], [2], [1] [0], [8], [1], [0] Canceling Direct Access Tuning Press the [DIRECT] button on the remote. ST indicator 1 - 6 FNC Band display Frequency display Preset station number Direct Access Tuning (Function of stereo stations the "ST" indicator is ON. "- - - -" is pressed it switches between the...
.../AM DISC DISP NAME ATT B.NR SCRL AUD B.S SCN SRC RDM PWR OFF REP COLOR S.A MTL FNC M.RDM Tuning Selecting the station. 1 Select tuner source Press the [SRC] button. Example: Desired frequency Press button 92.1 MHz (FM) 810 kHz (AM) [0], [9], [2], [1] [0], [8], [1], [0] Canceling Direct Access Tuning Press the [DIRECT] button on the remote. ST indicator 1 - 6 FNC Band display Frequency display Preset station number Direct Access Tuning (Function of stereo stations the "ST" indicator is ON. "- - - -" is pressed it switches between the...

User Manual
Page 16
... operation is repeated, it returns to put in the memory Press the [4] or [¢] button. 3 Put the frequency in the memory Press the [1] - [6] button for at least 1 second. 2 Switch the frequency step While pressing the [1] and [5] button, press the [SRC] button. Frequency Step Setting Changing the tuning frequency step. "Function" is displayed. 3 Select the Auto Memory Entry mode Press the [FM] or [AM] button. Preset Tuning Calling up the stations in the memory on each band, 1 station...
... operation is repeated, it returns to put in the memory Press the [4] or [¢] button. 3 Put the frequency in the memory Press the [1] - [6] button for at least 1 second. 2 Switch the frequency step While pressing the [1] and [5] button, press the [SRC] button. Frequency Step Setting Changing the tuning frequency step. "Function" is displayed. 3 Select the Auto Memory Entry mode Press the [FM] or [AM] button. Preset Tuning Calling up the stations in the memory on each band, 1 station...

User Manual
Page 20
...] button. Each time the button is pressed it pauses and plays. • Disc #10 is displayed as "0". • The functions that can be used and the information that can be followed for writing MP3 data are CD-ROM, CD-R, and CDRW. Fast Forwarding Hold down on the external disc players being connected. Select the "CD" display. Display "CD-CH" "MD-CH" Disc player CD changer MD changer Pause...
...] button. Each time the button is pressed it pauses and plays. • Disc #10 is displayed as "0". • The functions that can be used and the information that can be followed for writing MP3 data are CD-ROM, CD-R, and CDRW. Fast Forwarding Hold down on the external disc players being connected. Select the "CD" display. Display "CD-CH" "MD-CH" Disc player CD changer MD changer Pause...

User Manual
Page 24
... volume adjustment and during Attenuator being ON. Display "Open On" "Open Off" Setting Demonstration is carried out when Power is turned ON. Display "COL Sync" "COL Fix" Setting The color of your display. Equalizer mode Setting the method of adjusting Equalizer types. 1 Select Equalizer mode Press the [FM] or [AM] button. Fix the color set. Non-fading preout. English Function Set Illumination Color Mode Setting the Illumination Color Mode of your display changes from the fader control.) Display "Pout R" "Pout N-F" Setting Rear preout. Each time...
... volume adjustment and during Attenuator being ON. Display "Open On" "Open Off" Setting Demonstration is carried out when Power is turned ON. Display "COL Sync" "COL Fix" Setting The color of your display. Equalizer mode Setting the method of adjusting Equalizer types. 1 Select Equalizer mode Press the [FM] or [AM] button. Fix the color set. Non-fading preout. English Function Set Illumination Color Mode Setting the Illumination Color Mode of your display changes from the fader control.) Display "Pout R" "Pout N-F" Setting Rear preout. Each time...

User Manual
Page 25
... Equalizer type can be released. The Security Code function activates. When the Security Code function is required when it 's removed from the battery power source 1 Turn the power ON. 2 Do the step 3 and 4 operation, and enter the Security Code. Tuning mode Auto seek Preset station seek Manual Display "Auto 1" "Auto 2" "Manual" Operation Automatic search for at least 2 seconds. Normal manual tuning control. Tuning Mode Sets the tuning mode. Monaural Reception Noise can be reduced when stereo broadcasts are received as the 4 digit number of your choice. 1 Select...
... Equalizer type can be released. The Security Code function activates. When the Security Code function is required when it 's removed from the battery power source 1 Turn the power ON. 2 Do the step 3 and 4 operation, and enter the Security Code. Tuning mode Auto seek Preset station seek Manual Display "Auto 1" "Auto 2" "Manual" Operation Automatic search for at least 2 seconds. Normal manual tuning control. Tuning Mode Sets the tuning mode. Monaural Reception Noise can be reduced when stereo broadcasts are received as the 4 digit number of your choice. 1 Select...

User Manual
Page 27
.... For the source switching order refer to the previous level. In Tuner source [FM]/ [AM] buttons Select the band. When the [38] button is pressed the source switches. Loading and Replacing the battery Use one lithium battery (CR2025). When it is pressed it returns to (page 8). [ATT] button Turning the volume down band. [0] - [9] buttons Press buttons [1] - [6] to recall preset stations. [DIRECT] button Enters and cancels the (page 15) mode. Each time the [FM] button is pressed again...
.... For the source switching order refer to the previous level. In Tuner source [FM]/ [AM] buttons Select the band. When the [38] button is pressed the source switches. Loading and Replacing the battery Use one lithium battery (CR2025). When it is pressed it returns to (page 8). [ATT] button Turning the volume down band. [0] - [9] buttons Press buttons [1] - [6] to recall preset stations. [DIRECT] button Enters and cancels the (page 15) mode. Each time the [FM] button is pressed again...

User Manual
Page 29
... in turn may die. • If the fuse blows, first make sure the wires aren't touching to a power source with a constant voltage supply, as shown above. Number of the wiring harness. 4. Installation Procedure 1. Connect the speaker wires of items External view ......... Reconnect the - If you connect the + connector of any metal part in the car. • When only two speakers are working properly. • Mount the unit so that the mounting angle is installed...
... in turn may die. • If the fuse blows, first make sure the wires aren't touching to a power source with a constant voltage supply, as shown above. Number of the wiring harness. 4. Installation Procedure 1. Connect the speaker wires of items External view ......... Reconnect the - If you connect the + connector of any metal part in the car. • When only two speakers are working properly. • Mount the unit so that the mounting angle is installed...

User Manual
Page 30
... KENWOOD disc changer control input NOTE To connect the Disc changer, consult your Disc changer manual. Depending on what antenna you are using the optional power amplifier, connect to the power terminal for the booster amplifier of the motor antenna, or to its power control terminal. Ignition key switch ACC Dimmer control wire (Orange/White) ILLUMI Power control wire (Blue/White) P.CONT Motor antenna control wire (Blue) ANT CONT Ignition wire (Red) Car fuse box (Main fuse) Battery + Battery wire (Yellow) Car fuse box Ground wire (Black) - (To car chassis) REAR R Front left output...
... KENWOOD disc changer control input NOTE To connect the Disc changer, consult your Disc changer manual. Depending on what antenna you are using the optional power amplifier, connect to the power terminal for the booster amplifier of the motor antenna, or to its power control terminal. Ignition key switch ACC Dimmer control wire (Orange/White) ILLUMI Power control wire (Blue/White) P.CONT Motor antenna control wire (Blue) ANT CONT Ignition wire (Red) Car fuse box (Main fuse) Battery + Battery wire (Yellow) Car fuse box Ground wire (Black) - (To car chassis) REAR R Front left output...
User Manual
Page 32
... or balance settings are set on Rear preout. ☞ Set it 's input terminal, You can't switch to an external disc source. ? Nothing happens when the buttons are connected incorrectly.22 ☞ Reconnect the input/output wires or the wiring harness correctly. If there's no media in this unit, you can't switch to each source. ✔ There's no CD inserted. ☞ Set the media you want to listen to. The display color changes subtly...
... or balance settings are set on Rear preout. ☞ Set it 's input terminal, You can't switch to an external disc source. ? Nothing happens when the buttons are connected incorrectly.22 ☞ Reconnect the input/output wires or the wiring harness correctly. If there's no media in this unit, you can't switch to each source. ✔ There's no CD inserted. ☞ Set the media you want to listen to. The display color changes subtly...

User Manual
Page 33
.... ? "AUX" is displayed without achieving External disc control mode.50 ✔ O-N switch is set to "O" side. ☞ Set the switch to off or the disc ejected, even if the power is to the section on (page 30). ? Tuner source ? A CD ejects as soon as it 's recognized as not recorded. ☞ Turn Blank Skip OFF. Cassette tape source ? The desired frequency can't be entered with the Direct Access Tuning.41 ✔ A station...
.... ? "AUX" is displayed without achieving External disc control mode.50 ✔ O-N switch is set to "O" side. ☞ Set the switch to off or the disc ejected, even if the power is to the section on (page 30). ? Tuner source ? A CD ejects as soon as it 's recognized as not recorded. ☞ Turn Blank Skip OFF. Cassette tape source ? The desired frequency can't be entered with the Direct Access Tuning.41 ✔ A station...

User Manual
Page 35
...: No tracks are no device (KCA-S210A, CA-C1AX, KDC-CPS89, KDC-CPS87, KDC-CX87, KDC-CPS85, KDC-CX85, KDC-CPS82 or KDC-CX82) is connected, the Auxiliary input is entered that can take time. ? Error 30: The faceplate of the slave unit being connected to this unit can't display. ☞ For the characters that this unit has been removed.E30 ➪ Replace it correctly. If the "Error 77" code does not disappear...
...: No tracks are no device (KCA-S210A, CA-C1AX, KDC-CPS89, KDC-CPS87, KDC-CX87, KDC-CPS85, KDC-CX85, KDC-CPS82 or KDC-CX82) is connected, the Auxiliary input is entered that can take time. ? Error 30: The faceplate of the slave unit being connected to this unit can't display. ☞ For the characters that this unit has been removed.E30 ➪ Replace it correctly. If the "Error 77" code does not disappear...
User Manual
Page 36
... reinserted, please switch off the power and consult your nearest service center. If the "Error 99" code does not disappear, consult your nearest service center. The tape player section is not operating properly.E59 ➪ Reinsert the CD. English Troubleshooting Guide Error 99: Something is wrong with a format that this unit can't support.E63 - 36 - And then press the reset button on the disc.E57-2 (Blink...
... reinserted, please switch off the power and consult your nearest service center. If the "Error 99" code does not disappear, consult your nearest service center. The tape player section is not operating properly.E59 ➪ Reinsert the CD. English Troubleshooting Guide Error 99: Something is wrong with a format that this unit can't support.E63 - 36 - And then press the reset button on the disc.E57-2 (Blink...


