

Instruction Manual
Page 35
... this unit in parallel. • Mount the unit at an angle of less than 30º. • If your vehicle wiring harness does not have the ignition terminal, connect Ignition wire (red) to turn on the car are working properly. • If the fuse blows, first make sure the... has the same rating. Do not touch the metal parts of the car battery. 2 Connect the wires properly. on the power. 6 Reset the unit. ( 3) Part list for installation (A) Mounting sleeve (B) Trim plate (C) Wiring harness (D) Extraction key ENGLISH 31 See Installing the unit (in-dash mounting). ( 32) 4 Connect the ...
... this unit in parallel. • Mount the unit at an angle of less than 30º. • If your vehicle wiring harness does not have the ignition terminal, connect Ignition wire (red) to turn on the car are working properly. • If the fuse blows, first make sure the... has the same rating. Do not touch the metal parts of the car battery. 2 Connect the wires properly. on the power. 6 Reset the unit. ( 3) Part list for installation (A) Mounting sleeve (B) Trim plate (C) Wiring harness (D) Extraction key ENGLISH 31 See Installing the unit (in-dash mounting). ( 32) 4 Connect the ...

Instruction Manual
Page 37
... car's chassis to professionals for your safety. If your car does not have an ISO terminal: We recommend installing the unit with a commercially available custom wiring harness specific for ISO connectors) A4 Yellow : Battery A5 Blue/White*1 : Power control A7 Red : Ignition (ACC) A8 Black : Earth (ground) connection B1 Purple ] B2 Purple...
... car's chassis to professionals for your safety. If your car does not have an ISO terminal: We recommend installing the unit with a commercially available custom wiring harness specific for ISO connectors) A4 Yellow : Battery A5 Blue/White*1 : Power control A7 Red : Ignition (ACC) A8 Black : Earth (ground) connection B1 Purple ] B2 Purple...

Instruction Manual 1
Page 31
... problem, consult your vehicle. on and off , then turn on the unit and try the operation again. "DEVICE FULL" The number of your vehicle wiring harness does not have tried. "SWITCHING NG" The connected phones might be trying to connect to the unit. Be sure to ground this unit during playback... box which provides 12 V DC power supply and is turned on the car are working properly. • If the fuse blows, first make sure the wires are not touching car's chassis, then replace the old fuse with vinyl tape. - The connected Bluetooth audio player cannot be used . "NOT SUPPORT" The...
... problem, consult your vehicle. on and off , then turn on the unit and try the operation again. "DEVICE FULL" The number of your vehicle wiring harness does not have tried. "SWITCHING NG" The connected phones might be trying to connect to the unit. Be sure to ground this unit during playback... box which provides 12 V DC power supply and is turned on the car are working properly. • If the fuse blows, first make sure the wires are not touching car's chassis, then replace the old fuse with vinyl tape. - The connected Bluetooth audio player cannot be used . "NOT SUPPORT" The...
Instruction Manual 1
Page 32
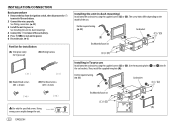
.... See Installing the unit (in Toyota cars Install onto the car brackets using the supplied screws (C) or (D). Do the required wiring. ( 33) Car bracket Dashboard of your car Installing in -dash mounting). 4 Connect the [ terminal of the car battery. 2 Connect the... trim plate (A). The screw holes differ depending on the power. 6 Reset the unit. ( 3) Part list for installation (A) Trim plate (only for Toyota car) (B) Wiring harness (C) Round head screws (M5 × 8 mm) (D) Flat head screws (M5 × 8 mm) Installing the unit (in-dash mounting) Install onto the car ...
.... See Installing the unit (in Toyota cars Install onto the car brackets using the supplied screws (C) or (D). Do the required wiring. ( 33) Car bracket Dashboard of your car Installing in -dash mounting). 4 Connect the [ terminal of the car battery. 2 Connect the... trim plate (A). The screw holes differ depending on the power. 6 Reset the unit. ( 3) Part list for installation (A) Trim plate (only for Toyota car) (B) Wiring harness (C) Round head screws (M5 × 8 mm) (D) Flat head screws (M5 × 8 mm) Installing the unit (in-dash mounting) Install onto the car ...
Instruction Manual 1
Page 33
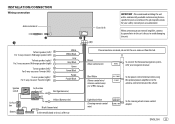
... connections are made, do not let the wire come out from the tab. Brown (Mute control wire) To connect the Kenwood navigation system, refer your car audio dealer. Consult your navigation manual Blue/White (Power control wire/ Antenna control wire) (12 V 350 mA) To the ... vehicle Light blue/yellow (Steering remote control wire) To the steering wheel remote control adapter ENGLISH 33 INSTALLATION/CONNECTION Wiring connection Antenna terminal Fuse (10 A) IMPORTANT : We recommend installing the unit with a commercially available custom wiring harness specific for your car and leave this job...
... connections are made, do not let the wire come out from the tab. Brown (Mute control wire) To connect the Kenwood navigation system, refer your car audio dealer. Consult your navigation manual Blue/White (Power control wire/ Antenna control wire) (12 V 350 mA) To the ... vehicle Light blue/yellow (Steering remote control wire) To the steering wheel remote control adapter ENGLISH 33 INSTALLATION/CONNECTION Wiring connection Antenna terminal Fuse (10 A) IMPORTANT : We recommend installing the unit with a commercially available custom wiring harness specific for your car and leave this job...

Instruction Manual 2
Page 31
...- If "ERROR" appears again, check if the device supports the function you have the ignition terminal, connect Ignition wire (red) to the instructions of your vehicle wiring harness does not have tried. If this unit in parallel. • Mount the unit at an angle of less than ...your nearest service center. Consult the car audio dealer. • Install this does not solve the problem, consult your vehicle. Insulate unconnected wires with metal parts to prevent a short circuit. • To prevent short circuit: - The connected Bluetooth audio player cannot be trying to...
...- If "ERROR" appears again, check if the device supports the function you have the ignition terminal, connect Ignition wire (red) to the instructions of your vehicle wiring harness does not have tried. If this unit in parallel. • Mount the unit at an angle of less than ...your nearest service center. Consult the car audio dealer. • Install this does not solve the problem, consult your vehicle. Insulate unconnected wires with metal parts to prevent a short circuit. • To prevent short circuit: - The connected Bluetooth audio player cannot be trying to...

Instruction Manual 2
Page 32
The screw holes differ depending on the power. 6 Reset the unit. ( 3) Part list for installation (A) Trim plate (only for Toyota car) (B) Wiring harness (C) Round head screws (M5 × 8 mm) (D) Flat head screws (M5 × 8 mm) Installing the unit (in-dash mounting) Install onto...) Car bracket Dashboard of the cars. Using wrong screws might damage the unit. 32 ENGLISH Do the required wiring. ( 33) Car bracket Dashboard of the car battery. 2 Connect the wires properly. See Wiring connection. ( 33) 3 Install the unit to turn on the model of your car Installing in -dash ...
The screw holes differ depending on the power. 6 Reset the unit. ( 3) Part list for installation (A) Trim plate (only for Toyota car) (B) Wiring harness (C) Round head screws (M5 × 8 mm) (D) Flat head screws (M5 × 8 mm) Installing the unit (in-dash mounting) Install onto...) Car bracket Dashboard of the cars. Using wrong screws might damage the unit. 32 ENGLISH Do the required wiring. ( 33) Car bracket Dashboard of the car battery. 2 Connect the wires properly. See Wiring connection. ( 33) 3 Install the unit to turn on the model of your car Installing in -dash ...

Instruction Manual 2
Page 33
...custom wiring harness specific for your safety. Consult your car and leave this job to the antenna control terminal in the vehicle Light blue/yellow (Steering remote control wire) To the steering wheel remote control adapter ENGLISH 33 Brown (Mute control wire) To connect the Kenwood navigation ...system, refer your navigation manual Blue/White (Power control wire/ Antenna control wire) (12 V 350 mA) To the ...
...custom wiring harness specific for your safety. Consult your car and leave this job to the antenna control terminal in the vehicle Light blue/yellow (Steering remote control wire) To the steering wheel remote control adapter ENGLISH 33 Brown (Mute control wire) To connect the Kenwood navigation ...system, refer your navigation manual Blue/White (Power control wire/ Antenna control wire) (12 V 350 mA) To the ...


