

Quick Start Guide
Page 1
...the back of the unit, in the space provided below. For your Kenwood product at www.Kenwoodusa.com © 2010 Kenwood Corporation All Rights Reserved. DNX9980HD GPS NAVIGATION SYSTEM Quick Start Guide SYSTÈME DE NAVIGATION GPS Guide de démarrage rapide SISTEMA DE NAVEGACIÓN GPS Guía...serial numbers whenever you obtain the best performance from your Kenwood dealer for information or service on the warranty card, and in the spaces designated on the product. B59-2041-00/00 (KW) Familiarity with installation and operation procedures will help you call upon your ...
...the back of the unit, in the space provided below. For your Kenwood product at www.Kenwoodusa.com © 2010 Kenwood Corporation All Rights Reserved. DNX9980HD GPS NAVIGATION SYSTEM Quick Start Guide SYSTÈME DE NAVIGATION GPS Guide de démarrage rapide SISTEMA DE NAVEGACIÓN GPS Guía...serial numbers whenever you obtain the best performance from your Kenwood dealer for information or service on the warranty card, and in the spaces designated on the product. B59-2041-00/00 (KW) Familiarity with installation and operation procedures will help you call upon your ...
Quick Start Guide
Page 2
You can download the latest version of the Instruction Manual from manual.kenwood.com/edition/im332/. 2 | Quick Start Guide The Instruction Manual is required in addition to Adobe® Reader™ 7.1 or Adobe® Acrobat® ...Connection 22 System Connection 24 Optional Accessory Connection 25 Installing the GPS Antenna 26 Installing the Push-To-Talk Switch and the Microphone Unit 26 Installing the Escutcheon 27 Installation for modification of specifications and so forth. Contents About the Quick Start Guide 2 Precautions 3 Safety Precautions and Important Information ...
You can download the latest version of the Instruction Manual from manual.kenwood.com/edition/im332/. 2 | Quick Start Guide The Instruction Manual is required in addition to Adobe® Reader™ 7.1 or Adobe® Acrobat® ...Connection 22 System Connection 24 Optional Accessory Connection 25 Installing the GPS Antenna 26 Installing the Push-To-Talk Switch and the Microphone Unit 26 Installing the Escutcheon 27 Installation for modification of specifications and so forth. Contents About the Quick Start Guide 2 Precautions 3 Safety Precautions and Important Information ...
Quick Start Guide
Page 18
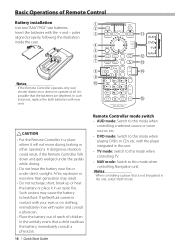
... In such instances, replace the both batteries with water and consult a physician. • Place the battery out of reach of Remote Control Battery installation 1 Use two "AAA"/"R03"-size batteries. 2 Insert the batteries with the player integrated in this unit. • TV mode: Switch to this... may cause the battery to leak fluid. In the unlikely event that a child swallows the battery, immediately consult a physician. 18 | Quick Start Guide Remote Controller mode switch • AUD mode: Switch to this mode when controlling a selected source or tuner source, etc. • DVD mode:...
... In such instances, replace the both batteries with water and consult a physician. • Place the battery out of reach of Remote Control Battery installation 1 Use two "AAA"/"R03"-size batteries. 2 Insert the batteries with the player integrated in this unit. • TV mode: Switch to this... may cause the battery to leak fluid. In the unlikely event that a child swallows the battery, immediately consult a physician. 18 | Quick Start Guide Remote Controller mode switch • AUD mode: Switch to this mode when controlling a selected source or tuner source, etc. • DVD mode:...
Quick Start Guide
Page 20
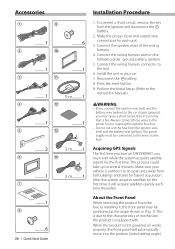
Accessories 1 9 ..........1 ..........6 2 0 ..........1 ..........1 3 ! ..........1 5 m..........1 4 @ ..........1 ..........1 5 # ..........2 3 m..........1 6 $ ..........1 7 3 m..........1 ..........1 8 ..........6 20 | Quick Start Guide Installation Procedure 1. To prevent a short circuit, remove the key from the ignition wire (red) and the battery wire (yellow). The power supply must wait while the system acquires satellite signals for each time thereafter. This is first powered on DNX9980HD, you must be positioned at the angle shown in...
Accessories 1 9 ..........1 ..........6 2 0 ..........1 ..........1 3 ! ..........1 5 m..........1 4 @ ..........1 ..........1 5 # ..........2 3 m..........1 6 $ ..........1 7 3 m..........1 ..........1 8 ..........6 20 | Quick Start Guide Installation Procedure 1. To prevent a short circuit, remove the key from the ignition wire (red) and the battery wire (yellow). The power supply must wait while the system acquires satellite signals for each time thereafter. This is first powered on DNX9980HD, you must be positioned at the angle shown in...
Quick Start Guide
Page 22
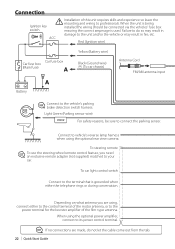
... in fire, etc. Connect to your car. When using the optional power amplifier, connect to professionals. Connection Ignition key switch ¤ Installation of this unit requires skills and experience so leave the mounting and wiring to its power control terminal. ⁄ If no connections are using... either the telephone rings or during conversation. Failure to do not let the cable come out from the tab. 22 | Quick Start Guide Depending on what antenna you need an exclusive remote adapter (not supplied) matched to vehicle's reverse lamp harness when using the optional rear...
... in fire, etc. Connect to your car. When using the optional power amplifier, connect to professionals. Connection Ignition key switch ¤ Installation of this unit requires skills and experience so leave the mounting and wiring to its power control terminal. ⁄ If no connections are using... either the telephone rings or during conversation. Failure to do not let the cable come out from the tab. 22 | Quick Start Guide Depending on what antenna you need an exclusive remote adapter (not supplied) matched to vehicle's reverse lamp harness when using the optional rear...
Quick Start Guide
Page 26
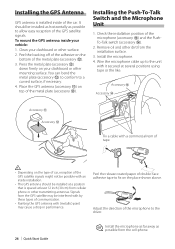
... microphone cable up to fix on your dashboard or other dirt from the cell-phone. Accessory # Accessory $ Accessory ! Check the installation position of the GPS satellite signals. Peel the backing off of the adhesive on top of the car. Place the GPS antenna (...installation surface. 3. Clean your vehicle: 1. Install the microphone. 4. Accessory @ Fix a cable with a commercial item of tape. ¤ • Depending on the type of car, reception of the metal plate (accessory @). 3. Adjust the direction of the microphone to the driver. 26 | Quick Start Guide ⁄ Install...
... microphone cable up to fix on your dashboard or other dirt from the cell-phone. Accessory # Accessory $ Accessory ! Check the installation position of the GPS satellite signals. Peel the backing off of the adhesive on top of the car. Place the GPS antenna (...installation surface. 3. Clean your vehicle: 1. Install the microphone. 4. Accessory @ Fix a cable with a commercial item of tape. ¤ • Depending on the type of car, reception of the metal plate (accessory @). 3. Adjust the direction of the microphone to the driver. 26 | Quick Start Guide ⁄ Install...
Quick Start Guide
Page 28
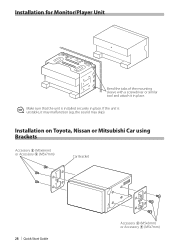
Installation for Monitor/Player Unit Bend the tabs of the mounting sleeve with a screwdriver or similar tool and attach it may malfunction (eg, the sound may skip). Installation on Toyota, Nissan or Mitsubishi Car using Brackets Accessory 8 (M5x6mm) or Accessory 9 (M5x7mm) Car Bracket 28 | Quick Start Guide Accessory 8 (M5x6mm) or Accessory 9 (M5x7mm) If the unit is unstable, it in place. ⁄ Make sure that the unit is installed securely in place.
Installation for Monitor/Player Unit Bend the tabs of the mounting sleeve with a screwdriver or similar tool and attach it may malfunction (eg, the sound may skip). Installation on Toyota, Nissan or Mitsubishi Car using Brackets Accessory 8 (M5x6mm) or Accessory 9 (M5x7mm) Car Bracket 28 | Quick Start Guide Accessory 8 (M5x6mm) or Accessory 9 (M5x7mm) If the unit is unstable, it in place. ⁄ Make sure that the unit is installed securely in place.


