Instruction Manual
Page 1
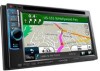
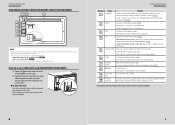
...Take the time to read through this manual, you want to check the latest edition and the modified pages. Model DNX7190HD/ DNX7490BT/ DNX6990HD/ DNX6190HD/ DNX6490BT/ DNX5190/ DNX5060EX Serial number US Residence Only Register Online Register your records Record the serial number, ...found on the back of each media! Thank you obtain the best performance from your Kenwood dealer for purchasing the KENWOOD GPS NAVIGATION SYSTEM. DNX7190HD DNX7490BT DNX6990HD DNX6190HD DNX6490BT DNX5190 DNX5060EX GPS NAVIGATION SYSTEM INSTRUCTION MANUAL Before reading this manual, click the button below...
...Take the time to read through this manual, you want to check the latest edition and the modified pages. Model DNX7190HD/ DNX7490BT/ DNX6990HD/ DNX6190HD/ DNX6490BT/ DNX5190/ DNX5060EX Serial number US Residence Only Register Online Register your records Record the serial number, ...found on the back of each media! Thank you obtain the best performance from your Kenwood dealer for purchasing the KENWOOD GPS NAVIGATION SYSTEM. DNX7190HD DNX7490BT DNX6990HD DNX6190HD DNX6490BT DNX5190 DNX5060EX GPS NAVIGATION SYSTEM INSTRUCTION MANUAL Before reading this manual, click the button below...
Instruction Manual
Page 3
... wait for reference. This unit may not correctly play discs which do not operate the monitor using playlist. 1 Press the button during installation, consult your Kenwood dealer. List Control screen appears. 3 Touch desired track/file. Simple Control screen appears. 2 Touch [ ]. Reference mark Displayed in the device by... out horizontally. • If the disc center hole or outside rim has burrs, use a disc with tape stuck on it again with your model and in the disc player of the disc and move outward. • When removing discs from damage, do not have the mark. •...
... wait for reference. This unit may not correctly play discs which do not operate the monitor using playlist. 1 Press the button during installation, consult your Kenwood dealer. List Control screen appears. 3 Touch desired track/file. Simple Control screen appears. 2 Touch [ ]. Reference mark Displayed in the device by... out horizontally. • If the disc center hole or outside rim has burrs, use a disc with tape stuck on it again with your model and in the disc player of the disc and move outward. • When removing discs from damage, do not have the mark. •...
Instruction Manual
Page 4
.... An SD card slot for 1 second. DNX7190HD and DNX7490BT: If above icon is off (P.80). • Switches attenuation of the volume on , this manual, each model name is closed, pressing for 1 second stores the tag data of the operations. Receives the remote control signal. For how to upgrade the map, refer...
.... An SD card slot for 1 second. DNX7190HD and DNX7490BT: If above icon is off (P.80). • Switches attenuation of the volume on , this manual, each model name is closed, pressing for 1 second stores the tag data of the operations. Receives the remote control signal. For how to upgrade the map, refer...
Instruction Manual
Page 5
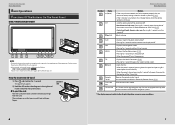
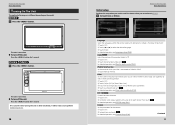
... the Tone Control screen in some conditions. 8 9 You can pull it clicks and then remove your fingers. Return to the Top page Basic Operations DNX6990HD/DNX6190HD/DNX6490BT/DNX5190/DNX5060EX 178 9 2 3 DNX6490BT 4 5 6 10 DNX6990HD DNX6490BT NOTE • The panels shown in this feature by Remote Sensor (P.79).... turns off the display. 5 Volume Knob • Pressing switches attenuation of the volume on/off , turns the power on , this manual, each model name is off (P.80). 2 MENU • Displays the Top Menu screen (P.14). • Pressing for 1 second turns the power off. &#...
... the Tone Control screen in some conditions. 8 9 You can pull it clicks and then remove your fingers. Return to the Top page Basic Operations DNX6990HD/DNX6190HD/DNX6490BT/DNX5190/DNX5060EX 178 9 2 3 DNX6490BT 4 5 6 10 DNX6990HD DNX6490BT NOTE • The panels shown in this feature by Remote Sensor (P.79).... turns off the display. 5 Volume Knob • Pressing switches attenuation of the volume on/off , turns the power on , this manual, each model name is off (P.80). 2 MENU • Displays the Top Menu screen (P.14). • Pressing for 1 second turns the power off. &#...
Instruction Manual
Page 6
... for the camera. 1 Touch [SET]. 2 Set each device. Language Select the language used for the control screen and setting items. Default is turned on the model. 1 Press the button. Camera Set the parameters for each item and touch [ ]. Angle Adjust the position of the monitor. For detailed operation, see Camera Setup...
... for the camera. 1 Touch [SET]. 2 Set each device. Language Select the language used for the control screen and setting items. Default is turned on the model. 1 Press the button. Camera Set the parameters for each item and touch [ ]. Angle Adjust the position of the monitor. For detailed operation, see Camera Setup...
Instruction Manual
Page 54
Some trouble may not support the connected iPod model. Check that an antenna is turned on after warming your iPod The iPod's software is not connected to this unit. Return to the Top page ...
Some trouble may not support the connected iPod model. Check that an antenna is turned on after warming your iPod The iPod's software is not connected to this unit. Return to the Top page ...
Instruction Manual
Page 56
.... • When connecting the USB device, usage of the CA-U1EX (option) is recommended. (However, maximum supply current of the following models can supply power to this manual indicates the iPod/iPhone connected with the KCA-iP202 (optional accessory). T-REP The title repeat function is a ...the operating conditions of channel 1 or 2. The files can control an iPod/iPhone from any erased data. • No USB device comes with this unit, "KENWOOD" or "✓" is 2. IN A disc is inserted. • White: A Disc is on . C-REP The chapter repeat function is inside the unit....
.... • When connecting the USB device, usage of the CA-U1EX (option) is recommended. (However, maximum supply current of the following models can supply power to this manual indicates the iPod/iPhone connected with the KCA-iP202 (optional accessory). T-REP The title repeat function is a ...the operating conditions of channel 1 or 2. The files can control an iPod/iPhone from any erased data. • No USB device comes with this unit, "KENWOOD" or "✓" is 2. IN A disc is inserted. • White: A Disc is on . C-REP The chapter repeat function is inside the unit....

GPS Manual
Page 26
... safety cameras. Your navigation system alerts you when you always have a USB mass storage device and an Internet connection. 1 Go to www.garmin.com/Kenwood. 2 Find your model and select Software Updates > Download. 3 Read and accept the terms of the Software License Agreement. 4 Follow the instructions on the Web site to complete...
... safety cameras. Your navigation system alerts you when you always have a USB mass storage device and an Internet connection. 1 Go to www.garmin.com/Kenwood. 2 Find your model and select Software Updates > Download. 3 Read and accept the terms of the Software License Agreement. 4 Follow the instructions on the Web site to complete...

Quick Start Guide
Page 1
...Model DNX7190HD/ DNX7490BT/ DNX6990HD/ DNX6190HD/ DNX6490BT/ DNX5190/ DNX5060EX Serial number US Residence Only Register Online Register your Kenwood product at www.Kenwoodusa.com © 2011 JVC KENWOOD Corporation B59-2098-00/03 (K/K2/R) Refer to read through this instruction manual. Familiarity with installation and operation procedures will help you call upon your Kenwood... designated on the product. DNX7190HD DNX7490BT DNX6990HD DNX6190HD DNX6490BT DNX5190 DNX5060EX GPS NAVIGATION SYSTEM Quick Start Guide Take the time to the model and serial numbers whenever you obtain the best...
...Model DNX7190HD/ DNX7490BT/ DNX6990HD/ DNX6190HD/ DNX6490BT/ DNX5190/ DNX5060EX Serial number US Residence Only Register Online Register your Kenwood product at www.Kenwoodusa.com © 2011 JVC KENWOOD Corporation B59-2098-00/03 (K/K2/R) Refer to read through this instruction manual. Familiarity with installation and operation procedures will help you call upon your Kenwood... designated on the product. DNX7190HD DNX7490BT DNX6990HD DNX6190HD DNX6490BT DNX5190 DNX5060EX GPS NAVIGATION SYSTEM Quick Start Guide Take the time to the model and serial numbers whenever you obtain the best...

Quick Start Guide
Page 2
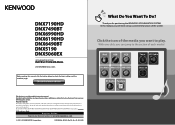
...10.4 or later is subject to provide clear explanations of the operations. DNX7190HD and DNX7490BT: DNX6990HD, DNX6190HD, and DNX6490BT: DNX5190 and DNX5060EX: If above icons are examples used to change for modification of specifications... 7.1 or later. For this reason, they may be different from http:// manual.kenwood.com/edition/ im345. Quick Start Guide About The Quick Start Guide This Quick Start Guide explains the... basic functions of this manual, each model name is abbreviated as follows. You can download the latest version of the Instruction...
...10.4 or later is subject to provide clear explanations of the operations. DNX7190HD and DNX7490BT: DNX6990HD, DNX6190HD, and DNX6490BT: DNX5190 and DNX5060EX: If above icons are examples used to change for modification of specifications... 7.1 or later. For this reason, they may be different from http:// manual.kenwood.com/edition/ im345. Quick Start Guide About The Quick Start Guide This Quick Start Guide explains the... basic functions of this manual, each model name is abbreviated as follows. You can download the latest version of the Instruction...

Quick Start Guide
Page 3
Precautions on battery • Keep battery out of reach of children and in original package until ready to evaporate. DNX7190HD/DNX7490BT/DNX6990HD/DNX6190HD/DNX6490BT/DNX5190/DNX5060EX Precautions 2WARNING To prevent injury or fire, take the following precautions: • To prevent a short circuit, never ...; The Radio Data System or Radio Broadcast Data System feature won't work with your model and in hot places such as coins or metal tools) inside the unit. • Do not watch or fix your Kenwood dealer to display menus, audio file tags, etc. Dispose of the disc. •...
Precautions on battery • Keep battery out of reach of children and in original package until ready to evaporate. DNX7190HD/DNX7490BT/DNX6990HD/DNX6190HD/DNX6490BT/DNX5190/DNX5060EX Precautions 2WARNING To prevent injury or fire, take the following precautions: • To prevent a short circuit, never ...; The Radio Data System or Radio Broadcast Data System feature won't work with your model and in hot places such as coins or metal tools) inside the unit. • Do not watch or fix your Kenwood dealer to display menus, audio file tags, etc. Dispose of the disc. •...

Quick Start Guide
Page 15
... or timeliness of the software update. ● Updating maps You can purchase updated map data from the service provider. DNX7190HD/DNX7490BT/DNX6990HD/DNX6190HD/DNX6490BT/DNX5190/DNX5060EX Other Features ● Manually avoiding traffic on your route 1) From the map, touch the traffic icon. 2) Touch ... a traffic message is received, you must have a USB mass storage device and an internet connection. 1) Go to www.garmin.com/Kenwood. 2) Find your model and select [Software Updates] > [Download]. 3) Read and accept the terms of the Software License Agreement. 4) Follow the instructions on...
... or timeliness of the software update. ● Updating maps You can purchase updated map data from the service provider. DNX7190HD/DNX7490BT/DNX6990HD/DNX6190HD/DNX6490BT/DNX5190/DNX5060EX Other Features ● Manually avoiding traffic on your route 1) From the map, touch the traffic icon. 2) Touch ... a traffic message is received, you must have a USB mass storage device and an internet connection. 1) Go to www.garmin.com/Kenwood. 2) Find your model and select [Software Updates] > [Download]. 3) Read and accept the terms of the Software License Agreement. 4) Follow the instructions on...

Quick Start Guide
Page 16
... the button. Playback starts. ● To disconnect the device: Touch [ ] on the screen and then touch [ 0 ] for 1 second on playable file format, media format, iPod model, etc., refer to the Instruction Manual. 1 Connect the media you want to open the front panel. 2) Insert the disc into the slot. Disconnect the iPod...
... the button. Playback starts. ● To disconnect the device: Touch [ ] on the screen and then touch [ 0 ] for 1 second on playable file format, media format, iPod model, etc., refer to the Instruction Manual. 1 Connect the media you want to open the front panel. 2) Insert the disc into the slot. Disconnect the iPod...

