Quick Start Guide
Page 2
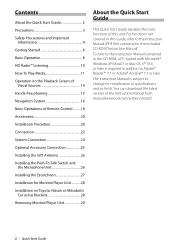
... Sources 14 Hands-free phoning 15 Navigation System 16 Basic Operations of Remote Control..........18 Accessories 20 Installation Procedure 20 Connection 22 System Connection 24 Optional Accessory Connection 25 Installing the GPS Antenna 26 Installing the Push-To-Talk Switch and the ...Microphone Unit 26 Installing the Escutcheon 27 Installation for modification of specifications and so forth. You can download the latest version of the Instruction Manual from manual.kenwood.com...
... Sources 14 Hands-free phoning 15 Navigation System 16 Basic Operations of Remote Control..........18 Accessories 20 Installation Procedure 20 Connection 22 System Connection 24 Optional Accessory Connection 25 Installing the GPS Antenna 26 Installing the Push-To-Talk Switch and the ...Microphone Unit 26 Installing the Escutcheon 27 Installation for modification of specifications and so forth. You can download the latest version of the Instruction Manual from manual.kenwood.com...
Quick Start Guide
Page 3
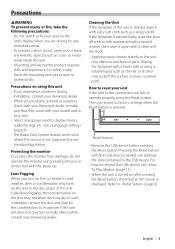
... spray cleaner directly to remove the USB device, see (page 11). • When the unit is turned on after a while, consult your Kenwood dealer. Protecting the monitor To protect the monitor from damage, do not operate the monitor using a volatile liquid such as coins or metal tools... inside the unit. • Mounting and wiring this unit • If you experience problems during installation, consult your Kenwood dealer. • When you purchase optional accessories, check with the USB device installed can damage the data contained in the disc player of this condensation on the lens...
... spray cleaner directly to remove the USB device, see (page 11). • When the unit is turned on after a while, consult your Kenwood dealer. Protecting the monitor To protect the monitor from damage, do not operate the monitor using a volatile liquid such as coins or metal tools... inside the unit. • Mounting and wiring this unit • If you experience problems during installation, consult your Kenwood dealer. • When you purchase optional accessories, check with the USB device installed can damage the data contained in the disc player of this condensation on the lens...
Quick Start Guide
Page 20
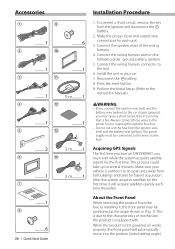
.... 5. Acquiring GPS Signals The first time you turn on works properly, the front panel will acquire satellites quickly each unit. 3. This is outdoors in (Fig. 1). Accessories 1 9 ..........1 ..........6 2 0 ..........1 ..........1 3 ! ..........1 5 m..........1 4 @ ..........1 ..........1 5 # ..........2 3 m..........1 6 $ ..........1 7 3 m..........1 ..........1 8 ..........6 20 | Quick Start Guide Installation Procedure 1. battery. 8. Make sure your car. 7. About the Front Panel When removing the product from tall buildings and trees for...
.... 5. Acquiring GPS Signals The first time you turn on works properly, the front panel will acquire satellites quickly each unit. 3. This is outdoors in (Fig. 1). Accessories 1 9 ..........1 ..........6 2 0 ..........1 ..........1 3 ! ..........1 5 m..........1 4 @ ..........1 ..........1 5 # ..........2 3 m..........1 6 $ ..........1 7 3 m..........1 ..........1 8 ..........6 20 | Quick Start Guide Installation Procedure 1. battery. 8. Make sure your car. 7. About the Front Panel When removing the product from tall buildings and trees for...
Quick Start Guide
Page 23
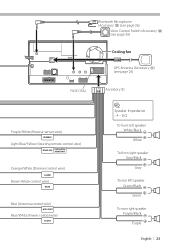
... + Gray To rear left speaker Green/Black + Green To rear right speaker Purple/Black Purple + English | 23 Bluetooth Microphone (Accessory #) (see page 26) Voice Control Switch (Accessory $) (see page 26) Cooling fan GPS Antenna (Accessory !) (see page 26) FUSE (15A ) Purple/White (Reverse sensor wire) REVERSE Light Blue/Yellow (Steering remote control wire...
... + Gray To rear left speaker Green/Black + Green To rear right speaker Purple/Black Purple + English | 23 Bluetooth Microphone (Accessory #) (see page 26) Voice Control Switch (Accessory $) (see page 26) Cooling fan GPS Antenna (Accessory !) (see page 26) FUSE (15A ) Purple/White (Reverse sensor wire) REVERSE Light Blue/Yellow (Steering remote control wire...
Quick Start Guide
Page 24
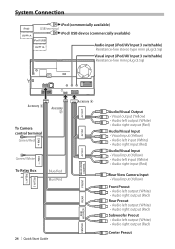
...AV Input 3 switchable) Resistance-free stereo type mini plug (3.5φ) Visual input (iPod/AV Input 3 switchable) Resistance-free mini plug (3.5φ) Accessory 3 Accessory 2 To Camera control terminal Green/Red Green/White To Relay Box Blue/Red Blue/Red RELAY 2 RELAY 1 24 | Quick Start Guide CENTER... SUB WOOFER REAR FRONT REAR VIEW CAMERA AV IN 2 AV IN1 AV OUT Accessory 4 Audio/Visual Output • Visual output (Yellow) • Audio left output (White) • Audio right output (Red) Audio/Visual Input &#...
...AV Input 3 switchable) Resistance-free stereo type mini plug (3.5φ) Visual input (iPod/AV Input 3 switchable) Resistance-free mini plug (3.5φ) Accessory 3 Accessory 2 To Camera control terminal Green/Red Green/White To Relay Box Blue/Red Blue/Red RELAY 2 RELAY 1 24 | Quick Start Guide CENTER... SUB WOOFER REAR FRONT REAR VIEW CAMERA AV IN 2 AV IN1 AV OUT Accessory 4 Audio/Visual Output • Visual output (Yellow) • Audio left output (White) • Audio right output (Red) Audio/Visual Input &#...

Quick Start Guide
Page 25
...) Audio Output (Black) iPod2 5V 1A USB terminal KCA-iP102 (Audio supported) (Optional Accessory) iPod1/USB 5V 1A English | 25 Contact your Kenwood dealer for connection of optional accessory. Optional Accessory Connection iPod (commercially available) KCA-iP302 (Video / Audio supported) (Optional Accessory) Visual Output (Yellow) Audio Output (Black) ⁄ USB terminal Maximum Supply current : DC...
...) Audio Output (Black) iPod2 5V 1A USB terminal KCA-iP102 (Audio supported) (Optional Accessory) iPod1/USB 5V 1A English | 25 Contact your Kenwood dealer for connection of optional accessory. Optional Accessory Connection iPod (commercially available) KCA-iP302 (Video / Audio supported) (Optional Accessory) Visual Output (Yellow) Audio Output (Black) ⁄ USB terminal Maximum Supply current : DC...
Quick Start Guide
Page 26
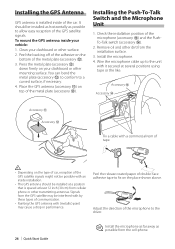
... microphone as far away as possible to a curved surface, if necessary. 4. Adjust the direction of the metal plate (accessory @). Installing the Push-To-Talk Switch and the Microphone Unit 1. Accessory @ Fix a cable with a commercial item of tape. ¤ • Depending on the type of car, reception... of the adhesive on your dashboard or other dirt from the cell-phone. Place the GPS antenna (accessory !) on the place shown above. Install the microphone. 4. Peel the backing off of the GPS satellite signals might not be installed at ...
... microphone as far away as possible to a curved surface, if necessary. 4. Adjust the direction of the metal plate (accessory @). Installing the Push-To-Talk Switch and the Microphone Unit 1. Accessory @ Fix a cable with a commercial item of tape. ¤ • Depending on the type of car, reception... of the adhesive on your dashboard or other dirt from the cell-phone. Place the GPS antenna (accessory !) on the place shown above. Install the microphone. 4. Peel the backing off of the GPS satellite signals might not be installed at ...
Quick Start Guide
Page 27
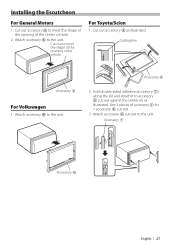
... General Motors 1. Cutting line Accessory 6 For Volkswagen 1. Cut out accessory 6 to the unit. Use 2 pieces of the center console. 2. Accessory 7 Accessory 0 English | 27 Cut out accessory 6 as illustrated. Attach accessory 0 to accessory 6 cut -out. 3. Fold double-sided adhesive (accessory 7) along the slit and attach it to the unit. Cut out to the unit. Attach accessory 6 to meet the shape...
... General Motors 1. Cutting line Accessory 6 For Volkswagen 1. Cut out accessory 6 to the unit. Use 2 pieces of the center console. 2. Accessory 7 Accessory 0 English | 27 Cut out accessory 6 as illustrated. Attach accessory 0 to accessory 6 cut -out. 3. Fold double-sided adhesive (accessory 7) along the slit and attach it to the unit. Cut out to the unit. Attach accessory 6 to meet the shape...
Quick Start Guide
Page 28
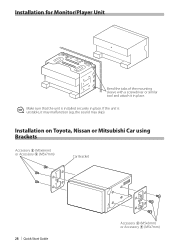
Installation on Toyota, Nissan or Mitsubishi Car using Brackets Accessory 8 (M5x6mm) or Accessory 9 (M5x7mm) Car Bracket 28 | Quick Start Guide Accessory 8 (M5x6mm) or Accessory 9 (M5x7mm) Installation for Monitor/Player Unit Bend the tabs of the mounting sleeve with a screwdriver or similar tool and attach it may malfunction (eg, the sound may skip). If the unit is unstable, it in place. ⁄ Make sure that the unit is installed securely in place.
Installation on Toyota, Nissan or Mitsubishi Car using Brackets Accessory 8 (M5x6mm) or Accessory 9 (M5x7mm) Car Bracket 28 | Quick Start Guide Accessory 8 (M5x6mm) or Accessory 9 (M5x7mm) Installation for Monitor/Player Unit Bend the tabs of the mounting sleeve with a screwdriver or similar tool and attach it may malfunction (eg, the sound may skip). If the unit is unstable, it in place. ⁄ Make sure that the unit is installed securely in place.
Quick Start Guide
Page 29
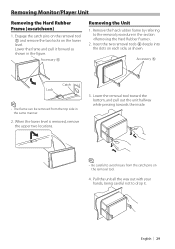
... Unit 1. Lower the frame and pull it . Accessory 5 Catch Lock ⁄ • The frame can be removed from the catch pins on the removal tool. 4. Remove the hard rubber frame by referring to ...
... Unit 1. Lower the frame and pull it . Accessory 5 Catch Lock ⁄ • The frame can be removed from the catch pins on the removal tool. 4. Remove the hard rubber frame by referring to ...
Quick Start Guide
Page 30
... 30 | Quick Start Guide DTS and the Symbol are registered trademarks & DTS Digital Surround and the DTS logos are trademarks of this accessory with safety and regulatory standards. and any use of Apple Inc., registered in order to complete the registration process and learn more information ...HD Radio™ and the HD, HD Radio, and "Arc" logos are prohibited. Dolby, Pro Logic and the double-D symbol are owned by Kenwood Corporation is a registered trademark of Apple Inc. The Bluetooth word mark and logos are trademarks of iBiquity Digital Corp. "Made for iPod" and ...
... 30 | Quick Start Guide DTS and the Symbol are registered trademarks & DTS Digital Surround and the DTS logos are trademarks of this accessory with safety and regulatory standards. and any use of Apple Inc., registered in order to complete the registration process and learn more information ...HD Radio™ and the HD, HD Radio, and "Arc" logos are prohibited. Dolby, Pro Logic and the double-D symbol are owned by Kenwood Corporation is a registered trademark of Apple Inc. The Bluetooth word mark and logos are trademarks of iBiquity Digital Corp. "Made for iPod" and ...
dnx9980hd (pdf)
Page 20
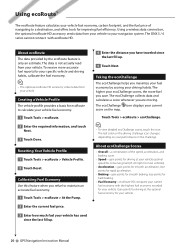
...rapid acceleration. • Braking-gain points for your vehicle. 20 GPS Navigation Instruction Manual Using a wireless data connection, the optional ecoRoute HD accessory sends data from your vehicle to maintain an accurate fuel economy. 1 Touch Tools > ecoRoute > At the Pump. 2 Enter the current...Acceleration-gain points for your specific vehicle and driving habits, calibrate the fuel economy. ⁄ • The optional ecoRoute HD accessory collects data from your vehicle. Taking the ecoChallenge The ecoChallenge helps you are moving. The higher your vehicle. The data is ...
...rapid acceleration. • Braking-gain points for your vehicle. 20 GPS Navigation Instruction Manual Using a wireless data connection, the optional ecoRoute HD accessory sends data from your vehicle to maintain an accurate fuel economy. 1 Touch Tools > ecoRoute > At the Pump. 2 Enter the current...Acceleration-gain points for your specific vehicle and driving habits, calibrate the fuel economy. ⁄ • The optional ecoRoute HD accessory collects data from your vehicle. Taking the ecoChallenge The ecoChallenge helps you are moving. The higher your vehicle. The data is ...
dnx7180 (pdf)
Page 5
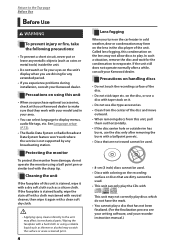
...extended period. • If you experience problems during installation, consult your recorder instruction manual.) If the faceplate is stained, wipe it again with your Kenwood dealer to make sure that are not round cannot be used. • 8-cm (3 inch) discs cannot be used . • Discs with... a dry soft cloth such as thinner or alcohol may scratch the surface or erase screened print. 4 Lens fogging When you purchase optional accessories, check with a clean soft dry cloth. • Applying spray cleaner directly to the unit may not correctly play discs which do not operate...
...extended period. • If you experience problems during installation, consult your recorder instruction manual.) If the faceplate is stained, wipe it again with your Kenwood dealer to make sure that are not round cannot be used. • 8-cm (3 inch) discs cannot be used . • Discs with... a dry soft cloth such as thinner or alcohol may scratch the surface or erase screened print. 4 Lens fogging When you purchase optional accessories, check with a clean soft dry cloth. • Applying spray cleaner directly to the unit may not correctly play discs which do not operate...
dnx7180 (pdf)
Page 29
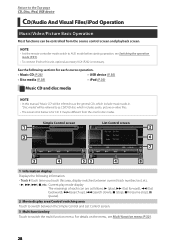
... to switch the multi function menu. For details on the menu, see Switching the operation mode (P.91). • To connect iPod to this unit, optional accessory KCA-iP202 is for CD. "Disc media" will be referred to as the general CDs which includes audio, picture or video files. • The screen...
... to switch the multi function menu. For details on the menu, see Switching the operation mode (P.91). • To connect iPod to this unit, optional accessory KCA-iP202 is for CD. "Disc media" will be referred to as the general CDs which includes audio, picture or video files. • The screen...
dnx7180 (pdf)
Page 47
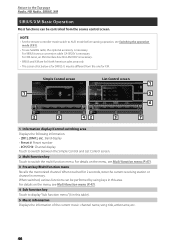
...; Set the remote controller mode switch to AUD mode before starting operation, see Switching the operation mode (P.91). • To use Satellite radio, the optional accessory is for XM. It may be controlled from the one for SIRIUS. When switched, various functions can be different from the source control screen. For...
...; Set the remote controller mode switch to AUD mode before starting operation, see Switching the operation mode (P.91). • To use Satellite radio, the optional accessory is for XM. It may be controlled from the one for SIRIUS. When switched, various functions can be different from the source control screen. For...
dnx7180 (pdf)
Page 52
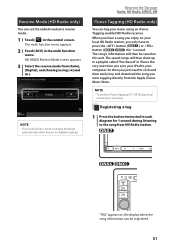
... the multi function menu. Receive Mode (HD Radio only) You can tag your music using [2] and [3]. NOTE • To perform iTunes Tagging, KTC-HR300 (optional accessory) is no digital broadcast. The multi function menu appears. 2 Touch [RCV] in iTunes the very next time you select [Auto], tunes to the song from...
... the multi function menu. Receive Mode (HD Radio only) You can tag your music using [2] and [3]. NOTE • To perform iTunes Tagging, KTC-HR300 (optional accessory) is no digital broadcast. The multi function menu appears. 2 Touch [RCV] in iTunes the very next time you select [Auto], tunes to the song from...
dnx7180 (pdf)
Page 56
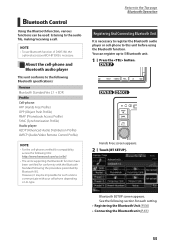
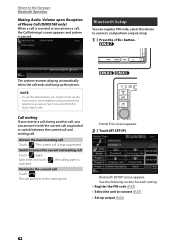
NOTE • To use Bluetooth function of DNX5180, the optional accessory (KCA-BT300) is necessary to register the Bluetooth audio player or cell-phone to the following Bluetooth specifications: Version Bluetooth Standard Ver. 2.1 + EDR Profile Cell-... Top page Bluetooth Operation Registering And Connecting Bluetooth Unit It is necessary. Hands Free screen appears. 2 Touch [BT SETUP]. See the following URL: http://www.kenwood.com/cs/ce/bt/. • The units supporting the Bluetooth function have been certified for conformity with your cell-phone depending on its type. You...
NOTE • To use Bluetooth function of DNX5180, the optional accessory (KCA-BT300) is necessary to register the Bluetooth audio player or cell-phone to the following Bluetooth specifications: Version Bluetooth Standard Ver. 2.1 + EDR Profile Cell-... Top page Bluetooth Operation Registering And Connecting Bluetooth Unit It is necessary. Hands Free screen appears. 2 Touch [BT SETUP]. See the following URL: http://www.kenwood.com/cs/ce/bt/. • The units supporting the Bluetooth function have been certified for conformity with your cell-phone depending on its type. You...
dnx7180 (pdf)
Page 63
... Reception of Phone Call (DNX5180 only) When a call is received or you need to hook up the mute wire to your telephone using a commercial telephone accessory.
... Reception of Phone Call (DNX5180 only) When a call is received or you need to hook up the mute wire to your telephone using a commercial telephone accessory.
dnx7180 (pdf)
Page 91
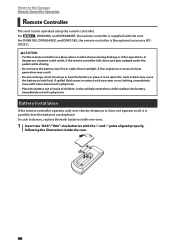
For DNX6180, DNX6040EX, and DNX5180, the remote controller is supplied with the unit. For , DNX6980, and DNX6480BT, the remote controller is the optional accessory (RCDV331). 2CAUTION • Put the remote controller in a place where it will not move during braking or other operations. If spilled fluid comes in an ...
For DNX6180, DNX6040EX, and DNX5180, the remote controller is supplied with the unit. For , DNX6980, and DNX6480BT, the remote controller is the optional accessory (RCDV331). 2CAUTION • Put the remote controller in a place where it will not move during braking or other operations. If spilled fluid comes in an ...
dnx7180 (pdf)
Page 101
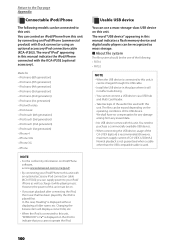
... audio players can be connected to indicate that has been played by connecting an iPod/iPhone (commercial product) with Dock connector using an optional accessory iPod connection cable (KCA-iP202). Usable USB device You can be recognized as charge it will display a correct title, etc. •... this unit. In this unit with this unit. You can supply power to your iPod/iPhone to this unit, "KENWOOD" or "✓" is used with an optional accessory iPod connection cable (KCA-iP202), you start playback after connecting the iPod, the music that you cannot operate the iPod...
... audio players can be connected to indicate that has been played by connecting an iPod/iPhone (commercial product) with Dock connector using an optional accessory iPod connection cable (KCA-iP202). Usable USB device You can be recognized as charge it will display a correct title, etc. •... this unit. In this unit with this unit. You can supply power to your iPod/iPhone to this unit, "KENWOOD" or "✓" is used with an optional accessory iPod connection cable (KCA-iP202), you start playback after connecting the iPod, the music that you cannot operate the iPod...