Quick Start Guide
Page 3
... this unit • If you experience problems during installation, consult your Kenwood dealer. • When you are driving for the condensation to factory settings when the Reset button is pressed. If the unit still does not operate normally after pressing the Reset button, the Initial SETUP screen is stained badly, wipe the stain off with...
... this unit • If you experience problems during installation, consult your Kenwood dealer. • When you are driving for the condensation to factory settings when the Reset button is pressed. If the unit still does not operate normally after pressing the Reset button, the Initial SETUP screen is stained badly, wipe the stain off with...
Quick Start Guide
Page 6
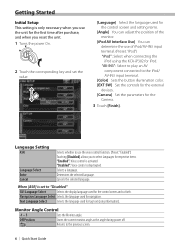
...language used for respective items. "Enabled": Voice control is activated. Returns to the iPod/ AV-IN3 input terminal. [Color] Sets the button illumination color. [EXT SW] Set the controls for the external devices. [Camera] Set the parameters for navigation. Language Setting ASR Language Select... Enter Cancel Selects whether to use the voice control function. (Preset: "Enabled") Touching [Disabled] allows you reset the unit. 1 Turns the power On. 2 Touch the corresponding key and set to "Disabled" GUI Language Select Selects the display language ...
...language used for respective items. "Enabled": Voice control is activated. Returns to the iPod/ AV-IN3 input terminal. [Color] Sets the button illumination color. [EXT SW] Set the controls for the external devices. [Camera] Set the parameters for navigation. Language Setting ASR Language Select... Enter Cancel Selects whether to use the voice control function. (Preset: "Enabled") Touching [Disabled] allows you reset the unit. 1 Turns the power On. 2 Touch the corresponding key and set to "Disabled" GUI Language Select Selects the display language ...

Quick Start Guide
Page 7
...steps can be set to "ON", the illumination color of the [AUD] button needs to "Reverse". For the adjustment method, refer to the manual of .... "Other": When the other camera is connected. The function of the buttons changes one after another. When setting to the previous screen. Returns to ...") "CMOS-300": When the CMOS-300 with each time the button on when the CMOS-300 with ID2 set at the factory. Turn...with ID 1 set to the rear view camera video display, press the [AUD] button for longer than 1 Second] beforehand. Panel Color Coordinate SET Select a color [Blue...
...steps can be set to "ON", the illumination color of the [AUD] button needs to "Reverse". For the adjustment method, refer to the manual of .... "Other": When the other camera is connected. The function of the buttons changes one after another. When setting to the previous screen. Returns to ...") "CMOS-300": When the CMOS-300 with each time the button on when the CMOS-300 with ID2 set at the factory. Turn...with ID 1 set to the rear view camera video display, press the [AUD] button for longer than 1 Second] beforehand. Panel Color Coordinate SET Select a color [Blue...
Quick Start Guide
Page 20
Press the reset button. 9. This process could take up to the power source running through the fuse box. • Do not cut out the fuse from tall buildings and ...
Press the reset button. 9. This process could take up to the power source running through the fuse box. • Do not cut out the fuse from tall buildings and ...

dnx7180 (pdf)
Page 8
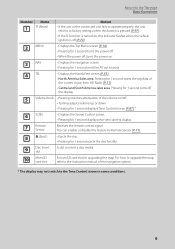
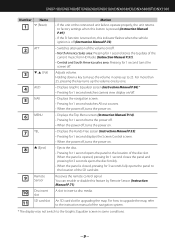
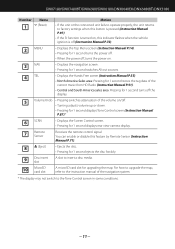
... more than 25, pressing the key turns up to 25. Receives the remote control signal. Return to the Top page Basic Operations Number Name 1 fi (Reset) 2 ATT 3 ∞, 5 (Vol) 4 AUD 5 NAV 6 MENU 7 TEL 8 0 (Eject) 9 Remote Sensor 10 Disc insert slot 11 SD card slot Motion • If ...the unit or the connected unit fails to operate properly, the unit returns to factory settings when this button is pressed (P.97). • If the SI function is turned on, this feature by one. • Displays Graphic Equalizer screen (P.86).* • Pressing...
... more than 25, pressing the key turns up to 25. Receives the remote control signal. Return to the Top page Basic Operations Number Name 1 fi (Reset) 2 ATT 3 ∞, 5 (Vol) 4 AUD 5 NAV 6 MENU 7 TEL 8 0 (Eject) 9 Remote Sensor 10 Disc insert slot 11 SD card slot Motion • If ...the unit or the connected unit fails to operate properly, the unit returns to factory settings when this button is pressed (P.97). • If the SI function is turned on, this feature by one. • Displays Graphic Equalizer screen (P.86).* • Pressing...
dnx7180 (pdf)
Page 10
... the remote control signal. Return to the Top page Basic Operations Number Name 1 fi (Reset) Motion • If the unit or the connected unit fails to operate properly, the unit returns to factory settings when this button is pressed (P.97). • If the SI function is turned on, this feature by Remote...
... the remote control signal. Return to the Top page Basic Operations Number Name 1 fi (Reset) Motion • If the unit or the connected unit fails to operate properly, the unit returns to factory settings when this button is pressed (P.97). • If the SI function is turned on, this feature by Remote...
dnx7180 (pdf)
Page 12
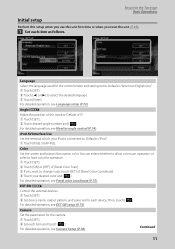
... or [3] to select the desired language. 3 Touch [Enter]. For detailed operation, see EXT SW setup (P.73). Color Set the screen and button illumination color. Then, touch [ ]. For detailed operation, see Monitor angle control (P.74). For detailed operation, see Language setup (P.72). Language Select... For detailed operation, see Camera Setup (P.78). Default is connected to. Angle Adjust the position of [Panel Color Scan]. 3 If you reset the unit (P.97). 1 Set each item and touch [ ]. For detailed operation, see Panel color coordinate (P.75). EXT SW Control the...
... or [3] to select the desired language. 3 Touch [Enter]. For detailed operation, see EXT SW setup (P.73). Color Set the screen and button illumination color. Then, touch [ ]. For detailed operation, see Monitor angle control (P.74). For detailed operation, see Language setup (P.72). Language Select... For detailed operation, see Camera Setup (P.78). Default is connected to. Angle Adjust the position of [Panel Color Scan]. 3 If you reset the unit (P.97). 1 Set each item and touch [ ]. For detailed operation, see Panel color coordinate (P.75). EXT SW Control the...
dnx7180 (pdf)
Page 76
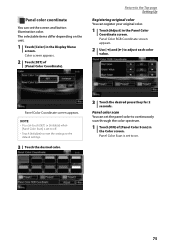
Panel Color Scan is set to off. • Touch [Initialize] to reset the settings to the default settings. 3 Touch the desired color. 3 Touch the desired preset key for 2 seconds. Panel Color RGB Coordinate screen appears. 2 Use [2] and [3] ... set the panel color to continuously scan through the color spectrum. 1 Touch [ON] of [Panel Color Coordinate]. NOTE • You can set the screen and button illumination color. Panel Color Coordinate screen appears. Panel color coordinate You can touch [SET] or [Initialize] when [Panel Color Scan] is set to on the...
Panel Color Scan is set to off. • Touch [Initialize] to reset the settings to the default settings. 3 Touch the desired color. 3 Touch the desired preset key for 2 seconds. Panel Color RGB Coordinate screen appears. 2 Use [2] and [3] ... set the panel color to continuously scan through the color spectrum. 1 Touch [ON] of [Panel Color Coordinate]. NOTE • You can set the screen and button illumination color. Panel Color Coordinate screen appears. Panel color coordinate You can touch [SET] or [Initialize] when [Panel Color Scan] is set to on the...
dnx7180 (pdf)
Page 96
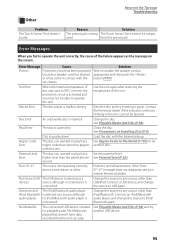
... region code that the unit can play has a Set the parental level. Contact the Kenwood dealer if this unit. Disc is being The Touch Sensor Tone cannot be ejected. Push the unit's Reset button. Parental Level Error The disc you fail to 60°C or more, the protection ...circuit is connected. If the "Error 07−67" message does not disappear, see your nearest Kenwood dealer. Region Code Error The disc you set....
... region code that the unit can play has a Set the parental level. Contact the Kenwood dealer if this unit. Disc is being The Touch Sensor Tone cannot be ejected. Push the unit's Reset button. Parental Level Error The disc you fail to 60°C or more, the protection ...circuit is connected. If the "Error 07−67" message does not disappear, see your nearest Kenwood dealer. Region Code Error The disc you set....
dnx7180 (pdf)
Page 98
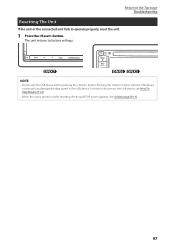
For how to operate properly, reset the unit. 1 Press the button. See Initial setup (P.11). 97 Return to the Top page Troubleshooting Resetting The Unit If the unit or the connected unit fails to disconnect the USB device, see How To Play Media (P.13). • When the unit is turned on after resetting, the Initial SETUP screen appears. NOTE • Disconnect the USB device before pressing the button. Pressing the button with the USB device connected can damage the data stored in the USB device. The unit returns to factory settings.
For how to operate properly, reset the unit. 1 Press the button. See Initial setup (P.11). 97 Return to the Top page Troubleshooting Resetting The Unit If the unit or the connected unit fails to disconnect the USB device, see How To Play Media (P.13). • When the unit is turned on after resetting, the Initial SETUP screen appears. NOTE • Disconnect the USB device before pressing the button. Pressing the button with the USB device connected can damage the data stored in the USB device. The unit returns to factory settings.
Quick Start Guide
Page 2
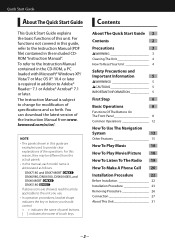
... the key or button you should control. < >: indicates the name of panel buttons. [ ]: indicates the name of specifications and so forth. kenwood.com/cs/ce/. DNX7180 and DNX7480BT: DNX6980, DNX6180, DNX6040EX, and ...DNX6480BT: DNX5180: If above icons are examples used to change for modification of touch keys. Contents About The Quick Start Guide 2 Contents 2 Precautions 3 2WARNING 3 Cleaning The Unit 4 How To Reset...
... the key or button you should control. < >: indicates the name of panel buttons. [ ]: indicates the name of specifications and so forth. kenwood.com/cs/ce/. DNX7180 and DNX7480BT: DNX6980, DNX6180, DNX6040EX, and ...DNX6480BT: DNX5180: If above icons are examples used to change for modification of touch keys. Contents About The Quick Start Guide 2 Contents 2 Precautions 3 2WARNING 3 Cleaning The Unit 4 How To Reset...
Quick Start Guide
Page 4
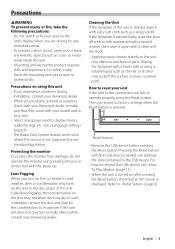
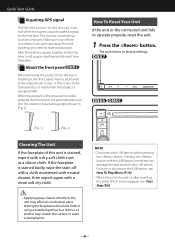
...or alcohol may scratch the surface or erase screened print. See First Step (P.6). 4 This process could take up to operate properly, reset the unit. 1 Press the button. Wiping the faceplate with a clean soft dry cloth. • Applying spray cleaner directly to disconnect the USB device, see How ...To Play Music (P.16). • When the unit is outdoors in (Fig. 1). How To Reset Your Unit If the unit or the connected...
...or alcohol may scratch the surface or erase screened print. See First Step (P.6). 4 This process could take up to operate properly, reset the unit. 1 Press the button. Wiping the faceplate with a clean soft dry cloth. • Applying spray cleaner directly to disconnect the USB device, see How ...To Play Music (P.16). • When the unit is outdoors in (Fig. 1). How To Reset Your Unit If the unit or the connected...
Quick Start Guide
Page 6
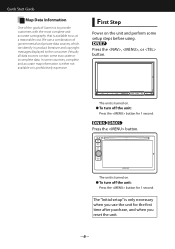
.... ● To turn off the unit: Press the button for the first time after purchase, and when you use a combination of Garmin is to provide customers with the most complete and accurate cartography that is only necessary when you reset the unit. 6 In some countries, complete and accurate ...map information is either not available or is turned on . ● To turn off the unit: Press the button for 1 second. Quick Start Guide Map Data Information One ...
.... ● To turn off the unit: Press the button for the first time after purchase, and when you use a combination of Garmin is to provide customers with the most complete and accurate cartography that is only necessary when you reset the unit. 6 In some countries, complete and accurate ...map information is either not available or is turned on . ● To turn off the unit: Press the button for 1 second. Quick Start Guide Map Data Information One ...
Quick Start Guide
Page 9
... displays the Screen Control screen. • When the power off . 3 ∞, 5 (Vol) Adjusts volume. DNX7180/DNX7480BT/DNX6980/DNX6180/DNX6040EX/DNX6480BT/DNX5180 Number Name 1 fi (Reset) Motion • If the unit or the connected unit fails to operate properly, the unit returns to factory settings when this... button is pressed (Instruction Manual P.97). • If the SI function is turned on, this feature by ...
... displays the Screen Control screen. • When the power off . 3 ∞, 5 (Vol) Adjusts volume. DNX7180/DNX7480BT/DNX6980/DNX6180/DNX6040EX/DNX6480BT/DNX5180 Number Name 1 fi (Reset) Motion • If the unit or the connected unit fails to operate properly, the unit returns to factory settings when this... button is pressed (Instruction Manual P.97). • If the SI function is turned on, this feature by ...
Quick Start Guide
Page 11
...).* 6 SCRN • Displays the Screen Control screen. • Pressing for upgrading the map. DNX7180/DNX7480BT/DNX6980/DNX6180/DNX6040EX/DNX6480BT/DNX5180 Number Name 1 fi (Reset) Motion • If the unit or the connected unit fails to operate properly, the unit returns to factory settings... when this button is pressed (Instruction Manual P.97). • If the SI function is turned on, this feature by Remote Sensor (...
...).* 6 SCRN • Displays the Screen Control screen. • Pressing for upgrading the map. DNX7180/DNX7480BT/DNX6980/DNX6180/DNX6040EX/DNX6480BT/DNX5180 Number Name 1 fi (Reset) Motion • If the unit or the connected unit fails to operate properly, the unit returns to factory settings... when this button is pressed (Instruction Manual P.97). • If the SI function is turned on, this feature by Remote Sensor (...
Quick Start Guide
Page 23
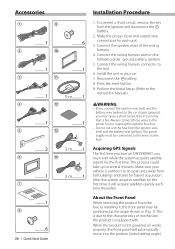
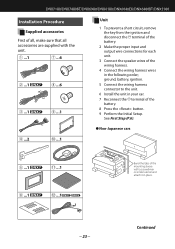
ground, battery, ignition. 5 Connect the wiring harness connector to the unit. 6 Install the unit in your car. 7 Reconnect the terminal of the battery. 8 Press the button. 9 Perform the Initial Setup. See First Step (P.6). ● Non-Japanese cars 4 ...2 0 ...1 5 ...1 - ...1 6 ...1 = ...1 Bend the tabs of the mounting sleeve with ... harness. 4 Connect the wiring harness wires in the following order; Continued 23 DNX7180/DNX7480BT/DNX6980/DNX6180/DNX6040EX/DNX6480BT/DNX5180 Installation Procedure Supplied accessories First of all, make sure that all accessories are supplied...
ground, battery, ignition. 5 Connect the wiring harness connector to the unit. 6 Install the unit in your car. 7 Reconnect the terminal of the battery. 8 Press the button. 9 Perform the Initial Setup. See First Step (P.6). ● Non-Japanese cars 4 ...2 0 ...1 5 ...1 - ...1 6 ...1 = ...1 Bend the tabs of the mounting sleeve with ... harness. 4 Connect the wiring harness wires in the following order; Continued 23 DNX7180/DNX7480BT/DNX6980/DNX6180/DNX6040EX/DNX6480BT/DNX5180 Installation Procedure Supplied accessories First of all, make sure that all accessories are supplied...


