

Quick Start Guide
Page 1
... your records Record the serial number, found on the back of the unit, in the space provided below. Refer to read through this instruction manual. Model DNX9980HD Serial number US Residents Only Register Online Register your new GPS Navigation System. DNX9980HD GPS NAVIGATION SYSTEM Quick Start Guide SYSTÈME DE... NAVIGATION GPS Guide de démarrage rapide SISTEMA DE NAVEGACIÓN GPS Guía de inicio rápido Take the time to the model and serial numbers whenever you obtain the best performance from your Kenwood product at www.Kenwoodusa.com © 2010...
... your records Record the serial number, found on the back of the unit, in the space provided below. Refer to read through this instruction manual. Model DNX9980HD Serial number US Residents Only Register Online Register your new GPS Navigation System. DNX9980HD GPS NAVIGATION SYSTEM Quick Start Guide SYSTÈME DE... NAVIGATION GPS Guide de démarrage rapide SISTEMA DE NAVEGACIÓN GPS Guía de inicio rápido Take the time to the model and serial numbers whenever you obtain the best performance from your Kenwood product at www.Kenwoodusa.com © 2010...
Quick Start Guide
Page 3
... to evaporate. If the unit still does not operate normally after pressing the Reset button, the Initial SETUP screen is displayed. How to reset your Kenwood dealer. Reset button • Remove the USB device before pressing the Reset button. Pressing the Reset button with a hard cloth or using a volatile ... the unit is pressed. Refer to factory settings when the Reset button is turned on using a ball point pen or similar tool with your model and in your eyes on the lens in cold weather, dew or condensation may affect its mechanical parts. If the faceplate is stained, wipe ...
... to evaporate. If the unit still does not operate normally after pressing the Reset button, the Initial SETUP screen is displayed. How to reset your Kenwood dealer. Reset button • Remove the USB device before pressing the Reset button. Pressing the Reset button with a hard cloth or using a volatile ... the unit is pressed. Refer to factory settings when the Reset button is turned on using a ball point pen or similar tool with your model and in your eyes on the lens in cold weather, dew or condensation may affect its mechanical parts. If the faceplate is stained, wipe ...
Quick Start Guide
Page 17
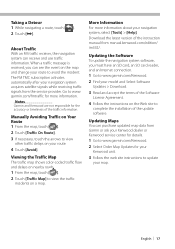
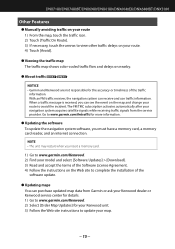
...to www.garmin.com/Kenwood. 2 Find your map. Viewing the Traffic Map The traffic map shows color-coded traffic flow and delays on nearby roads. 1 From the map, touch [ ]. 2 Touch [Traffic Map] to view the traffic incidents on the Web site to update your model and Select Software ...Updates > Download. 3 Read and accept the terms of the instruction manual from manual.kenwood.com/edition/ im332/. Updating the Software To update the navigation system software, you can receive and...
...to www.garmin.com/Kenwood. 2 Find your map. Viewing the Traffic Map The traffic map shows color-coded traffic flow and delays on nearby roads. 1 From the map, touch [ ]. 2 Touch [Traffic Map] to view the traffic incidents on the Web site to update your model and Select Software ...Updates > Download. 3 Read and accept the terms of the instruction manual from manual.kenwood.com/edition/ im332/. Updating the Software To update the navigation system software, you can receive and...
dnx9980hd (pdf)
Page 28
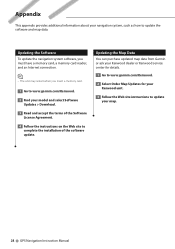
... Updating the Map Data You can purchase updated map data from Garmin or ask your Kenwood dealer or Kenwood service center for details. 1 Go to www.garmin.com/Kenwood. 2 Select Order Map Updates for your Kenwood unit. 3 Follow the Web site instructions to update your navigation system, such as...card reader, and an Internet connection. ⁄ • The unit may restart when you insert a memory card. 1 Go to www.garmin.com/Kenwood. 2 Find your model and select Software Updates > Download. 3 Read and accept the terms of the Software License Agreement. 4 Follow the instructions on the Web site to...
... Updating the Map Data You can purchase updated map data from Garmin or ask your Kenwood dealer or Kenwood service center for details. 1 Go to www.garmin.com/Kenwood. 2 Select Order Map Updates for your Kenwood unit. 3 Follow the Web site instructions to update your navigation system, such as...card reader, and an Internet connection. ⁄ • The unit may restart when you insert a memory card. 1 Go to www.garmin.com/Kenwood. 2 Find your model and select Software Updates > Download. 3 Read and accept the terms of the Software License Agreement. 4 Follow the instructions on the Web site to...
dnx7180 (pdf)
Page 1
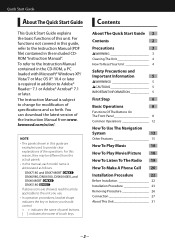
... provided below to read through this manual, click the button below . For your Kenwood dealer for information or service on the warranty card, and in the spaces designated on the product. Model DNX7180/ DNX7480BT/ DNX6980/ DNX6180/ DNX6040EX/ DNX6480BT/ DNX5180 Serial number US Residence Only Register Online Register your new GPS Navigation System. Refer...
... provided below to read through this manual, click the button below . For your Kenwood dealer for information or service on the warranty card, and in the spaces designated on the product. Model DNX7180/ DNX7480BT/ DNX6980/ DNX6180/ DNX6040EX/ DNX6480BT/ DNX5180 Serial number US Residence Only Register Online Register your new GPS Navigation System. Refer...
dnx7180 (pdf)
Page 5
...broadcasting station. In such a situation, remove the disc and wait for any extended period. • If you experience problems during installation, consult your Kenwood dealer. This unit may not correctly play discs which do not operate the monitor using a ball point pen or similar tool with your area. &#... the condensation to evaporate. See Language setup (P.72). • The Radio Data System or Radio Broadcast Data System feature won't work with your model and in the disc player of this unit, pull them out horizontally. • If the disc center hole or outside rim has burrs, use...
...broadcasting station. In such a situation, remove the disc and wait for any extended period. • If you experience problems during installation, consult your Kenwood dealer. This unit may not correctly play discs which do not operate the monitor using a ball point pen or similar tool with your area. &#... the condensation to evaporate. See Language setup (P.72). • The Radio Data System or Radio Broadcast Data System feature won't work with your model and in the disc player of this unit, pull them out horizontally. • If the disc center hole or outside rim has burrs, use...
dnx7180 (pdf)
Page 7
.... For this reason, they may be different from the card. DNX7180 and DNX7480BT: If above icon is abbreviated as the diagram in this manual, each model name is showed, read the article applicable to provide clear explanations of the operations.
.... For this reason, they may be different from the card. DNX7180 and DNX7480BT: If above icon is abbreviated as the diagram in this manual, each model name is showed, read the article applicable to provide clear explanations of the operations.
dnx7180 (pdf)
Page 9
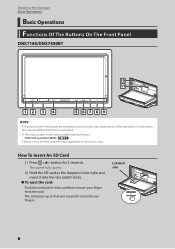
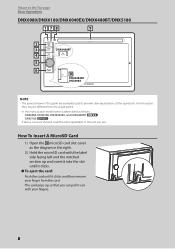
...it out with your finger from the card. For this reason, they may be different from the actual panels. • In this manual, each model name is abbreviated as the diagram in this guide are showed, read the article applicable to the unit you can pull it clicks and then... remove your fingers. 8 DNX6980, DNX6180, DNX6040EX, and DNX6480BT: DNX5180: If above icons are examples used to provide clear explanations of the operations. Return to the Top page Basic Operations DNX6980/DNX6180/DNX6040EX/DNX6480BT...
...it out with your finger from the card. For this reason, they may be different from the actual panels. • In this manual, each model name is abbreviated as the diagram in this guide are showed, read the article applicable to the unit you can pull it clicks and then... remove your fingers. 8 DNX6980, DNX6180, DNX6040EX, and DNX6480BT: DNX5180: If above icons are examples used to provide clear explanations of the operations. Return to the Top page Basic Operations DNX6980/DNX6180/DNX6040EX/DNX6480BT...
dnx7180 (pdf)
Page 11
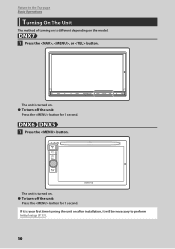
If it will be necessary to the Top page Basic Operations Turning On The Unit The method of turning on is your first time turning the unit on after installation, it is different depending on the model. 1 Press the , , or button. The unit is turned on . ●●To turn off the unit: Press the button for 1 second. The unit is turned on . ●●To turn off the unit: Press the button for 1 second. 1 Press the button. Return to perform Initial setup (P.11). 10
If it will be necessary to the Top page Basic Operations Turning On The Unit The method of turning on is your first time turning the unit on after installation, it is different depending on the model. 1 Press the , , or button. The unit is turned on . ●●To turn off the unit: Press the button for 1 second. The unit is turned on . ●●To turn off the unit: Press the button for 1 second. 1 Press the button. Return to perform Initial setup (P.11). 10
dnx7180 (pdf)
Page 97
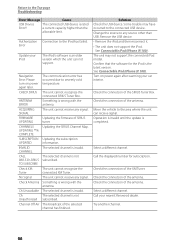
...software is invalid. The unit cannot receive any signal. The broadcast of the antenna. Select a different channel. Call your nearest Kenwood dealer. CHECK SIRIUS ANTENNA ERROR ACQUIRING SIGNAL FIRMWARE UPDATING CHANNELS UPDATING **% COMPLETE SUBSCRIPTION UPDATED INVALID CHANNEL CALL 888-539-SIRIUS TO ... not support. The selected channel is not subscribed. The selected channel is invalid. Some trouble may not support the connected iPod model. Try another channel. 96 See Connectable iPod/iPhone (P.100). Check the connection of the SIRIUS Tuner Box. a current capacity ...
...software is invalid. The unit cannot receive any signal. The broadcast of the antenna. Select a different channel. Call your nearest Kenwood dealer. CHECK SIRIUS ANTENNA ERROR ACQUIRING SIGNAL FIRMWARE UPDATING CHANNELS UPDATING **% COMPLETE SUBSCRIPTION UPDATED INVALID CHANNEL CALL 888-539-SIRIUS TO ... not support. The selected channel is not subscribed. The selected channel is invalid. Some trouble may not support the connected iPod model. Try another channel. 96 See Connectable iPod/iPhone (P.100). Check the connection of the SIRIUS Tuner Box. a current capacity ...
dnx7180 (pdf)
Page 101
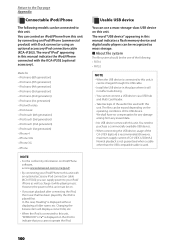
...the USB compatible cable is used with this unit must be on this case, "Reading" is recommended. (However, maximum supply current of the following models can use a mass-storage-class USB device on . • If you start playback after connecting the iPod, the music that you can supply ...CA-U1EX (option) is displayed without displaying a folder name, etc. Usable USB device You can be erased depending on iPod/iPhone software, access www.kenwood.com/cs/ce/ipod/. • By connecting your iPod/iPhone to this unit. The word "iPod" appearing in the place where it while playing...
...the USB compatible cable is used with this unit must be on this case, "Reading" is recommended. (However, maximum supply current of the following models can use a mass-storage-class USB device on . • If you start playback after connecting the iPod, the music that you can supply ...CA-U1EX (option) is displayed without displaying a folder name, etc. Usable USB device You can be erased depending on iPod/iPhone software, access www.kenwood.com/cs/ce/ipod/. • By connecting your iPod/iPhone to this unit. The word "iPod" appearing in the place where it while playing...
Quick Start Guide
Page 1
... warranty card, and in the space provided below. Model DNX7180/ DNX7480BT/ DNX6980/ DNX6180/ DNX6040EX/ DNX6480BT/ DNX5180 Serial number US Residence Only Register Online Register your Kenwood product at www.Kenwoodusa.com © 2010 Kenwood Corporation All Rights Reserved. For your records Record the...through this instruction manual. B59-2045-00_00 (K/K2/R) DNX7180 DNX7480BT DNX6980 DNX6180 DNX6040EX DNX6480BT DNX5180 GPS NAVIGATION SYSTEM Quick Start Guide Take the time to the model and serial numbers whenever you obtain the best performance from your new GPS Navigation System....
... warranty card, and in the space provided below. Model DNX7180/ DNX7480BT/ DNX6980/ DNX6180/ DNX6040EX/ DNX6480BT/ DNX5180 Serial number US Residence Only Register Online Register your Kenwood product at www.Kenwoodusa.com © 2010 Kenwood Corporation All Rights Reserved. For your records Record the...through this instruction manual. B59-2045-00_00 (K/K2/R) DNX7180 DNX7480BT DNX6980 DNX6180 DNX6040EX DNX6480BT DNX5180 GPS NAVIGATION SYSTEM Quick Start Guide Take the time to the model and serial numbers whenever you obtain the best performance from your new GPS Navigation System....
Quick Start Guide
Page 2
...Acrobat® 7.1 or later. To refer to the Instruction Manual contained in addition to change for modification of specifications and so forth. kenwood.com/cs/ce/. You can download the latest version of touch keys. For this reason, they may be different from www. Contents ...this guide are showed, read the article applicable to provide clear explanations of this manual, each model name is abbreviated as follows. DNX7180 and DNX7480BT: DNX6980, DNX6180, DNX6040EX, and DNX6480BT: DNX5180: If above icons are examples used to the unit you use. • In operation procedures...
...Acrobat® 7.1 or later. To refer to the Instruction Manual contained in addition to change for modification of specifications and so forth. kenwood.com/cs/ce/. You can download the latest version of touch keys. For this reason, they may be different from www. Contents ...this guide are showed, read the article applicable to provide clear explanations of this manual, each model name is abbreviated as follows. DNX7180 and DNX7480BT: DNX6980, DNX6180, DNX6040EX, and DNX6480BT: DNX5180: If above icons are examples used to the unit you use. • In operation procedures...
Quick Start Guide
Page 3
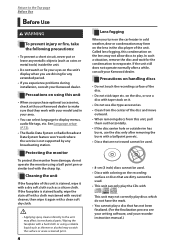
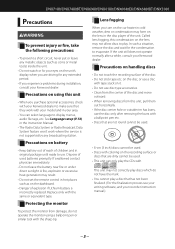
... See Language setup (P.72) in the Instruction Manual. • The Radio Data System or Radio Broadcast Data System feature won't work with your model and in hot places such as coins or metal tools) inside the unit. • Do not watch or fix your eyes on the unit's... the sharp tip. If the unit still does not operate normally after removing the burrs with your Kenwood dealer to display menus, audio file tags, etc. DNX7180/DNX7480BT/DNX6980/DNX6180/DNX6040EX/DNX6480BT/DNX5180 Precautions 2WARNING To prevent injury or fire, take the following precautions: • To prevent a short...
... See Language setup (P.72) in the Instruction Manual. • The Radio Data System or Radio Broadcast Data System feature won't work with your model and in hot places such as coins or metal tools) inside the unit. • Do not watch or fix your eyes on the unit's... the sharp tip. If the unit still does not operate normally after removing the burrs with your Kenwood dealer to display menus, audio file tags, etc. DNX7180/DNX7480BT/DNX6980/DNX6180/DNX6040EX/DNX6480BT/DNX5180 Precautions 2WARNING To prevent injury or fire, take the following precautions: • To prevent a short...
Quick Start Guide
Page 15
NOTE • The unit may restart when you insert a memory card. 1) Go to www.garmin.com/Kenwood. 2) Find your model and select [Software Updates] > [Download]. 3) Read and accept the terms of the Software License Agreement. 4) Follow the instructions on the Web site to ... To update the navigation system software, you can see the event on the map and change your map. 15 DNX7180/DNX7480BT/DNX6980/DNX6180/DNX6040EX/DNX6480BT/DNX5180 Other Features ● Manually avoiding traffic on your route 1) From the map, touch the traffic icon. 2) Touch [Traffic On Route]. 3) If necessary, touch...
NOTE • The unit may restart when you insert a memory card. 1) Go to www.garmin.com/Kenwood. 2) Find your model and select [Software Updates] > [Download]. 3) Read and accept the terms of the Software License Agreement. 4) Follow the instructions on the Web site to ... To update the navigation system software, you can see the event on the map and change your map. 15 DNX7180/DNX7480BT/DNX6980/DNX6180/DNX6040EX/DNX6480BT/DNX5180 Other Features ● Manually avoiding traffic on your route 1) From the map, touch the traffic icon. 2) Touch [Traffic On Route]. 3) If necessary, touch...
Quick Start Guide
Page 16
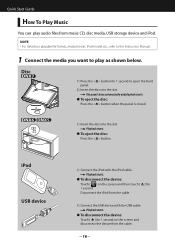
.... ● To eject the disc: Press the button. Playback starts. ● To disconnect the device: Touch [ 0 ] for 1 second on playable file format, media format, iPod model, etc., refer to the Instruction Manual. 1 Connect the media you want to open the front panel. 2) Insert the disc into the slot. Disc 0 1) Press the...
.... ● To eject the disc: Press the button. Playback starts. ● To disconnect the device: Touch [ 0 ] for 1 second on playable file format, media format, iPod model, etc., refer to the Instruction Manual. 1 Connect the media you want to open the front panel. 2) Insert the disc into the slot. Disc 0 1) Press the...

