
Instruction Manual
Page 2
... Picture adjustment 45 Changing the aspect ratio 46 Zooming picture 46 Using a rear view camera............47 Setting menu items 48 Memorizing/recalling the settings 52 Locking the settings 52 Adjusting the touch position 52 BLUETOOTH OPERATIONS (Only for DDX719/DDX7049BT/DDX419/ DDX4049BT) Information for using Bluetooth® devices 53 Bluetooth operations 53 Connecting Bluetooth...
... Picture adjustment 45 Changing the aspect ratio 46 Zooming picture 46 Using a rear view camera............47 Setting menu items 48 Memorizing/recalling the settings 52 Locking the settings 52 Adjusting the touch position 52 BLUETOOTH OPERATIONS (Only for DDX719/DDX7049BT/DDX419/ DDX4049BT) Information for using Bluetooth® devices 53 Bluetooth operations 53 Connecting Bluetooth...
Instruction Manual
Page 3
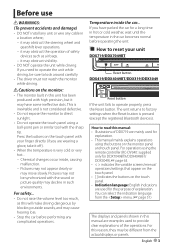
... or very hot... - For operations using the buttons on the monitor: • The monitor built in this manual: • Illustrations of DDX719 are used to operate properly, press the Reset button. it may be sure to operate the unit while driving, be different from the menu...the remote controller (RC-DV340: supplied only for DDX7049BTX/DDX4049BT/ DDX3049), ☞ page 63. • < > indicates the variable screens/menus/ operations/settings that appear on the touch panel. • [ ] indicates the buttons on the touch panel with high precision, but it may obstruct the operation ...
... or very hot... - For operations using the buttons on the monitor: • The monitor built in this manual: • Illustrations of DDX719 are used to operate properly, press the Reset button. it may be sure to operate the unit while driving, be different from the menu...the remote controller (RC-DV340: supplied only for DDX7049BTX/DDX4049BT/ DDX3049), ☞ page 63. • < > indicates the variable screens/menus/ operations/settings that appear on the touch panel. • [ ] indicates the buttons on the touch panel with high precision, but it may obstruct the operation ...
Instruction Manual
Page 5
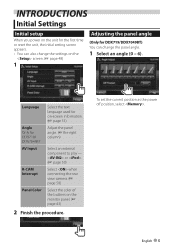
...; page 50) Select the color of the buttons on -screen information. (☞ page 51) Angle Only for DDX719/DDX7049BT) You can change the panel angle. 1 Select an angle (0 - 6). INTRODUCTIONS Initial Settings Initial setup When you power on the unit for the first time or reset the unit, the initial... setting screen appears. • You can also change the settings on the screen. (☞ page 48) 1 Adjusting the panel angle (Only for DDX719/ DDX7049BT AV Input Adjust the panel angle. (☞ the right column) Select...
...; page 50) Select the color of the buttons on -screen information. (☞ page 51) Angle Only for DDX719/DDX7049BT) You can change the panel angle. 1 Select an angle (0 - 6). INTRODUCTIONS Initial Settings Initial setup When you power on the unit for the first time or reset the unit, the initial... setting screen appears. • You can also change the settings on the screen. (☞ page 48) 1 Adjusting the panel angle (Only for DDX719/ DDX7049BT AV Input Adjust the panel angle. (☞ the right column) Select...
Instruction Manual
Page 9
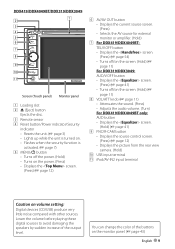
.... (☞ page 43) English 9 Lower the volume before playing these digital sources to avoid damaging the speakers by sudden increase of the buttons on volume setting: Digital devices (CD/USB) produce very little noise compared with other sources.
.... (☞ page 43) English 9 Lower the volume before playing these digital sources to avoid damaging the speakers by sudden increase of the buttons on volume setting: Digital devices (CD/USB) produce very little noise compared with other sources.
Instruction Manual
Page 10
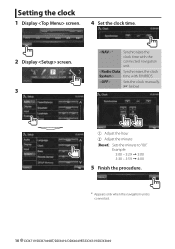
Example: 3:00 - 3:29 = 3:00 3:30 - 3:59 = 4:00 5 Finish the procedure. * Appears only when the navigation unit is connected. 10 DDX719/DDX7049BT/DDX419/DDX4049BT/DDX319/DDX3049 Sets the clock manually. (☞ below) 1 Adjust the hour 2 Adjust the minute [Reset]: Sets the minute to "00." time with the connected navigation unit. Setting the clock 1 Display screen. 4 Set the clock time. 2 Display screen. 3 * Synchronizes the clock time with FM RBDS.
Example: 3:00 - 3:29 = 3:00 3:30 - 3:59 = 4:00 5 Finish the procedure. * Appears only when the navigation unit is connected. 10 DDX719/DDX7049BT/DDX419/DDX4049BT/DDX319/DDX3049 Sets the clock manually. (☞ below) 1 Adjust the hour 2 Adjust the minute [Reset]: Sets the minute to "00." time with the connected navigation unit. Setting the clock 1 Display screen. 4 Set the clock time. 2 Display screen. 3 * Synchronizes the clock time with FM RBDS.
Instruction Manual
Page 12
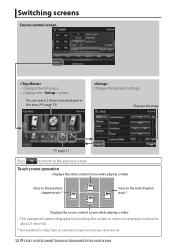
Goes to the previous chapter/track.* Goes to be displayed in this area. (☞ page 13) Changes the detailed settings. Switching screens Source control screen • Changes the AV source. • Displays the screen. Touch screen operation Displays the video control menu while playing a video. ... touching the screen or when no operation is done for about 5 seconds. * Not available for video from an external component and rear view camera. 12 DDX719/DDX7049BT/DDX419/DDX4049BT/DDX319/DDX3049 Changes the page ☞ page 11 Press [ ] to return to the previous screen.
Goes to the previous chapter/track.* Goes to be displayed in this area. (☞ page 13) Changes the detailed settings. Switching screens Source control screen • Changes the AV source. • Displays the screen. Touch screen operation Displays the video control menu while playing a video. ... touching the screen or when no operation is done for about 5 seconds. * Not available for video from an external component and rear view camera. 12 DDX719/DDX7049BT/DDX419/DDX4049BT/DDX319/DDX3049 Changes the page ☞ page 11 Press [ ] to return to the previous screen.

Instruction Manual
Page 13
... to be displayed in this area. (☞ page 49) *2 Switches between the previous and next pages. *3 Only for DDX719/DDX419/DDX319. Plays a disc. AV SOURCE OPERATIONS Selecting the playback source DDX719/DDX419/DDX319 *1 *2 DDX7049BT/DDX4049BT/DDX3049 *1 *2 NAV*3 (☞ page 40) DISC (☞ page 15) TEL*4 (☞...9758; page 27) SiriusXM*6 (☞ page 32) Displays the navigation screen when a navigation unit is connected, "No Navigation" appears. *4 Only for DDX719/DDX7049BT/DDX419/DDX4049BT. *5 Select an appropriate input setting on a USB device. Plays a Bluetooth audio player.
... to be displayed in this area. (☞ page 49) *2 Switches between the previous and next pages. *3 Only for DDX719/DDX419/DDX319. Plays a disc. AV SOURCE OPERATIONS Selecting the playback source DDX719/DDX419/DDX319 *1 *2 DDX7049BT/DDX4049BT/DDX3049 *1 *2 NAV*3 (☞ page 40) DISC (☞ page 15) TEL*4 (☞...9758; page 27) SiriusXM*6 (☞ page 32) Displays the navigation screen when a navigation unit is connected, "No Navigation" appears. *4 Only for DDX719/DDX7049BT/DDX419/DDX4049BT. *5 Select an appropriate input setting on a USB device. Plays a Bluetooth audio player.
Instruction Manual
Page 17
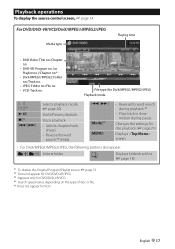
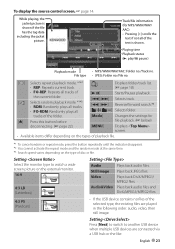
.../forward search.*4 (Hold) [1] [¡] [Mode]*5 [MENU] • Reverse/forward search during playback.*4 • Plays back in slowmotion during pause. File type (for VCD. Changes the settings for disc playback. (☞ page 21) Displays screen. • For DivX/MPEG1/MPEG2/JPEG, the following buttons also appear: [ ] [ ] Selects folder. [] Displays folder/track list...
.../forward search.*4 (Hold) [1] [¡] [Mode]*5 [MENU] • Reverse/forward search during playback.*4 • Plays back in slowmotion during pause. File type (for VCD. Changes the settings for disc playback. (☞ page 21) Displays screen. • For DivX/MPEG1/MPEG2/JPEG, the following buttons also appear: [ ] [ ] Selects folder. [] Displays folder/track list...
Instruction Manual
Page 18
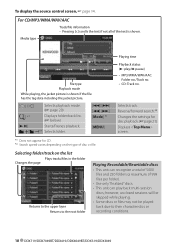
To display the source control screen, ☞ page 14. For CD/MP3/WMA/WAV/AAC Track/file information • Pressing [
To display the source control screen, ☞ page 14. For CD/MP3/WMA/WAV/AAC Track/file information • Pressing [
Instruction Manual
Page 21
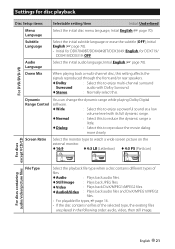
...Initial: Underlined Select the initial disc menu language; For DVD/DVD-VR Down Mix When playing back a multi-channel disc, this setting affects the signals reproduced through the front and/or rear speakers. ♦ Dolby : Select this to enjoy multi-channel surround Surround... disc contains no files of the selected type, the existing files are played in the following order: audio, video, then still image. Settings for DDX719/ DDX419/DDX319: OFF Select the initial audio language; English 21 Subtitle Language Audio Language Select the initial subtitle language or erase the subtitle ...
...Initial: Underlined Select the initial disc menu language; For DVD/DVD-VR Down Mix When playing back a multi-channel disc, this setting affects the signals reproduced through the front and/or rear speakers. ♦ Dolby : Select this to enjoy multi-channel surround Surround... disc contains no files of the selected type, the existing files are played in the following order: audio, video, then still image. Settings for DDX719/ DDX419/DDX319: OFF Select the initial audio language; English 21 Subtitle Language Audio Language Select the initial subtitle language or erase the subtitle ...
Instruction Manual
Page 23
While playing, the jacket picture is shown if the file has the tag data including the jacket picture. Track/file information (for MP3/WMA/WAV/ AAC) • Pressing [ To display the source control screen, ☞ page 14.
While playing, the jacket picture is shown if the file has the tag data including the jacket picture. Track/file information (for MP3/WMA/WAV/ AAC) • Pressing [ To display the source control screen, ☞ page 14.
Instruction Manual
Page 24
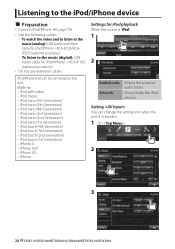
...8226; Use the following cables: - iPod nano (6th Generation) - iPod nano (2nd Generation) - iPod touch (2nd Generation) - iPhone 3G - Setting You can be connected to the music (analog): USB Audio and Video cable for iPod/iPhone-KCA-iP22F/KCAiP202 (optional accessory) - iPod/iPhone that ...iPhone 3GS - iPhone Settings for - iPod touch (3rd Generation) - iPod touch (4th Generation) - iPod nano (4th Generation) - To watch the video and to listen to this unit: Made for iPod playback When the source is in standby. 1 On : 2 3 24 DDX719/DDX7049BT/DDX419/DDX4049BT/DDX319...
...8226; Use the following cables: - iPod nano (6th Generation) - iPod nano (2nd Generation) - iPod touch (2nd Generation) - iPhone 3G - Setting You can be connected to the music (analog): USB Audio and Video cable for iPod/iPhone-KCA-iP22F/KCAiP202 (optional accessory) - iPod/iPhone that ...iPhone 3GS - iPhone Settings for - iPod touch (3rd Generation) - iPod touch (4th Generation) - iPod nano (4th Generation) - To watch the video and to listen to this unit: Made for iPod playback When the source is in standby. 1 On : 2 3 24 DDX719/DDX7049BT/DDX419/DDX4049BT/DDX319...
Instruction Manual
Page 25
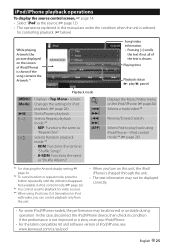
iPod/iPhone playback operations To display the source control screen, ☞ page 14. • Select "iPod" as the source. (☞ page 13) • The operations explained in this manual are under the condition when the unit is selected for controlling playback. (☞ below) While playing, Artwork (the picture displayed on the screen of iPod/iPhone) is shown if the song contains the Artwork.*1 Song/video information • Pressing [
iPod/iPhone playback operations To display the source control screen, ☞ page 14. • Select "iPod" as the source. (☞ page 13) • The operations explained in this manual are under the condition when the unit is selected for controlling playback. (☞ below) While playing, Artwork (the picture displayed on the screen of iPod/iPhone) is shown if the song contains the Artwork.*1 Song/video information • Pressing [

Instruction Manual
Page 29
... stereo broadcast with sufficient signal strength. [P1] - [P6] • Turns in the preset station. (Press) • Presets the currently tuned station. (Hold) [Mode] Displays tuner setting screen. (☞ page 30) [TI] Activates/deactivates TI standby reception mode. (☞ page 31) [Mono] * Activates/deactivates monaural mode for better FM reception. (Stereo effect...
... stereo broadcast with sufficient signal strength. [P1] - [P6] • Turns in the preset station. (Press) • Presets the currently tuned station. (Hold) [Mode] Displays tuner setting screen. (☞ page 30) [TI] Activates/deactivates TI standby reception mode. (☞ page 31) [Mono] * Activates/deactivates monaural mode for better FM reception. (Stereo effect...

Instruction Manual
Page 31
... to the previous level. Not yet activated. If there is a station broadcasting a program of the same PTY code as you have selected, that station is set to Traffic Information, the volume is tuned in. Tune in orange Goes off TI Standby Reception The unit will temporarily switch to another station providing...
... to the previous level. Not yet activated. If there is a station broadcasting a program of the same PTY code as you have selected, that station is set to Traffic Information, the volume is tuned in. Tune in orange Goes off TI Standby Reception The unit will temporarily switch to another station providing...

Instruction Manual
Page 32
....siriusxm.com. SXM1 SXM2 SXM4 SXM3 Changes the seek mode. • SEEK1: Skip to another preset channel. Displays the screen. 32 DDX719/DDX7049BT/DDX419/DDX4049BT/DDX319/DDX3049 Text information Scrolls the text information [P1] - [P6] • Tunes in the preset channel. (Press... Seeks forward or backward (refer to another available channel. • SEEK2: Skip to the above for DDX719/DDX419/DDX319) Everything worth listening to is pressed. [Mode] Changes the settings of the reception restrictions. (☞ page 37) [Direct] Displays the Direct Channel Select screen. (☞...
....siriusxm.com. SXM1 SXM2 SXM4 SXM3 Changes the seek mode. • SEEK1: Skip to another preset channel. Displays the screen. 32 DDX719/DDX7049BT/DDX419/DDX4049BT/DDX319/DDX3049 Text information Scrolls the text information [P1] - [P6] • Tunes in the preset channel. (Press... Seeks forward or backward (refer to another available channel. • SEEK2: Skip to the above for DDX719/DDX419/DDX319) Everything worth listening to is pressed. [Mode] Changes the settings of the reception restrictions. (☞ page 37) [Direct] Displays the Direct Channel Select screen. (☞...

Instruction Manual
Page 34
... You can preset six channels for each band. (24 in total) 1 Tune in step 1 is preset)/ Channel no. if the current station is stored. 34 DDX719/DDX7049BT/DDX419/DDX4049BT/DDX319/DDX3049 Displaying the information on the current channel Selecting a preset channel Selecting a channel directly 1 Band no./ Radio ID* (or Preset no...]. (Hold) The channel selected in to a channel you want to 0. Displays the text information Preset list * The Radio ID is displayed when the channel is set to preset. (☞ page 32) 2 Select a preset number. 2 Enter a channel no .
... You can preset six channels for each band. (24 in total) 1 Tune in step 1 is preset)/ Channel no. if the current station is stored. 34 DDX719/DDX7049BT/DDX419/DDX4049BT/DDX319/DDX3049 Displaying the information on the current channel Selecting a preset channel Selecting a channel directly 1 Band no./ Radio ID* (or Preset no...]. (Hold) The channel selected in to a channel you want to 0. Displays the text information Preset list * The Radio ID is displayed when the channel is set to preset. (☞ page 32) 2 Select a preset number. 2 Enter a channel no .

Instruction Manual
Page 37
...code (1), and then confirm (2). • To clear the entry, press [Clear]. • To cancel setting the code, press [Cancel]. Activating/Deactivating the parental mature lock You can set the parental lock on channels classed as "adult" by SiriusXM™. • To enable the parental control ...based on Mature channels, press [ON] next to , for example, restrict children from receiving adult channels. English 37 Setting the parental lock You can set the parental lock or parental mature lock in order to "Parental Mature Lock". • To release the lock, press [OFF...
...code (1), and then confirm (2). • To clear the entry, press [Clear]. • To cancel setting the code, press [Cancel]. Activating/Deactivating the parental mature lock You can set the parental lock on channels classed as "adult" by SiriusXM™. • To enable the parental control ...based on Mature channels, press [ON] next to , for example, restrict children from receiving adult channels. English 37 Setting the parental lock You can set the parental lock or parental mature lock in order to "Parental Mature Lock". • To release the lock, press [OFF...

Instruction Manual
Page 38
...option allows you to pick the channels to be locked by the parental control feature. 1 Skipping unwanted channels If you do not want to set the lock on multiple channels. • Checkmarks appear beside the locked channels, and the channels are disabled. Activating the channel skipping 1 2...]. • A checkmark appears beside the selected channel. Clearing the channel skipping (Hold) All the skipped channels will be deactivated. 38 DDX719/DDX7049BT/DDX419/DDX4049BT/DDX319/DDX3049 Deactivating the parental lock Repeat this step if you want to receive some channels, you can skip them.
...option allows you to pick the channels to be locked by the parental control feature. 1 Skipping unwanted channels If you do not want to set the lock on multiple channels. • Checkmarks appear beside the locked channels, and the channels are disabled. Activating the channel skipping 1 2...]. • A checkmark appears beside the selected channel. Clearing the channel skipping (Hold) All the skipped channels will be deactivated. 38 DDX719/DDX7049BT/DDX419/DDX4049BT/DDX319/DDX3049 Deactivating the parental lock Repeat this step if you want to receive some channels, you can skip them.
Instruction Manual
Page 39
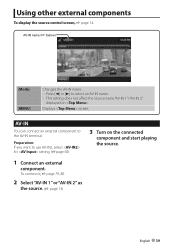
...name (☞ below) [Mode] [MENU] Changes the AV-IN name. • Press [2] or [3] to select an AV-IN name. • This setting does not affect the source name "AV-IN 1"/ "AV-IN 2" displayed on the connected component and start playing the source. 1 Connect an external component.... AV-IN You can connect an external component to use AV-IN2, select for setting. (☞page 50) 3 Turn on . Preparation: If you want to the AV-IN terminal. Displays screen. To connect it, ☞ page ...
...name (☞ below) [Mode] [MENU] Changes the AV-IN name. • Press [2] or [3] to select an AV-IN name. • This setting does not affect the source name "AV-IN 1"/ "AV-IN 2" displayed on the connected component and start playing the source. 1 Connect an external component.... AV-IN You can connect an external component to use AV-IN2, select for setting. (☞page 50) 3 Turn on . Preparation: If you want to the AV-IN terminal. Displays screen. To connect it, ☞ page ...


