
Instruction Manual
Page 2
...40 Sound adjustment 41 Using the sound equalization 41 Adjusting the cross over frequency 42 Changing the display design......43 Setting for video playback .........45 Picture adjustment 45 Changing the aspect ratio 46 Zooming picture 46 Using a rear view camera...............47 Setting menu items 48 Memorizing/recalling the settings 52 Locking the settings 52 Adjusting the touch position 52 BLUETOOTH OPERATIONS (Only for DDX719/DDX7049BT/DDX419/ DDX4049BT) Information for using Bluetooth® devices 53 Bluetooth...
...40 Sound adjustment 41 Using the sound equalization 41 Adjusting the cross over frequency 42 Changing the display design......43 Setting for video playback .........45 Picture adjustment 45 Changing the aspect ratio 46 Zooming picture 46 Using a rear view camera...............47 Setting menu items 48 Memorizing/recalling the settings 52 Locking the settings 52 Adjusting the touch position 52 BLUETOOTH OPERATIONS (Only for DDX719/DDX7049BT/DDX419/ DDX4049BT) Information for using Bluetooth® devices 53 Bluetooth...
Instruction Manual
Page 3
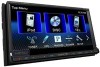
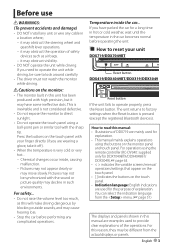
... been produced with the sound or picture quality may obstruct the operation of safety devices such as this manual: • Illustrations of DDX719 are mainly used for explanation. • This manual mainly explains operations using the remote controller (RC-DV340: supplied only for DDX7049BTX/...sharp tip. You can select the indication language from the actual displays or panels. If you have some ineffective dots. Cautions on the touch panel. • Indication language: English indications are used to factory settings when the Reset button is not considered defective. • ...
... been produced with the sound or picture quality may obstruct the operation of safety devices such as this manual: • Illustrations of DDX719 are mainly used for explanation. • This manual mainly explains operations using the remote controller (RC-DV340: supplied only for DDX7049BTX/...sharp tip. You can select the indication language from the actual displays or panels. If you have some ineffective dots. Cautions on the touch panel. • Indication language: English indications are used to factory settings when the Reset button is not considered defective. • ...
Instruction Manual
Page 9
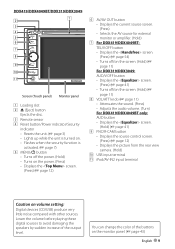
... screen. (Press) (☞ page 54) • Turns off/on the screen. (Hold) (☞ page 11) For DDX319/DDX3049: AUD/V.OFF button • Displays the screen. (Press) (☞ page 41) • Turns off/on the screen. (Hold) (☞ page 11) 8 VOL/ATT knob (☞ page 11) &#...8226; Displays the picture from the rear view camera. (Hold) p USB input terminal q iPod/AV-IN2 input terminal Caution on the monitor panel. (☞ page 43) English 9 Lower the volume before playing these digital sources to avoid damaging the speakers by sudden increase of the buttons on volume setting: Digital...
... screen. (Press) (☞ page 54) • Turns off/on the screen. (Hold) (☞ page 11) For DDX319/DDX3049: AUD/V.OFF button • Displays the screen. (Press) (☞ page 41) • Turns off/on the screen. (Hold) (☞ page 11) 8 VOL/ATT knob (☞ page 11) &#...8226; Displays the picture from the rear view camera. (Hold) p USB input terminal q iPod/AV-IN2 input terminal Caution on the monitor panel. (☞ page 43) English 9 Lower the volume before playing these digital sources to avoid damaging the speakers by sudden increase of the buttons on volume setting: Digital...
Instruction Manual
Page 10
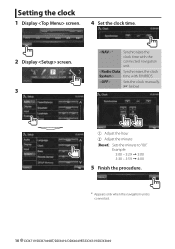
Setting the clock 1 Display screen. 4 Set the clock time. 2 Display screen. 3 * Synchronizes the clock time with FM RBDS. Sets the clock manually. (☞ below) 1 Adjust the hour 2 Adjust the minute [Reset]: Sets the minute to "00." time with the connected navigation unit. Example: 3:00 - 3:29 = 3:00 3:30 - 3:59 = 4:00 5 Finish the procedure. * Appears only when the navigation unit is connected. 10 DDX719/DDX7049BT/DDX419/DDX4049BT/DDX319/DDX3049
Setting the clock 1 Display screen. 4 Set the clock time. 2 Display screen. 3 * Synchronizes the clock time with FM RBDS. Sets the clock manually. (☞ below) 1 Adjust the hour 2 Adjust the minute [Reset]: Sets the minute to "00." time with the connected navigation unit. Example: 3:00 - 3:29 = 3:00 3:30 - 3:59 = 4:00 5 Finish the procedure. * Appears only when the navigation unit is connected. 10 DDX719/DDX7049BT/DDX419/DDX4049BT/DDX319/DDX3049
Instruction Manual
Page 12
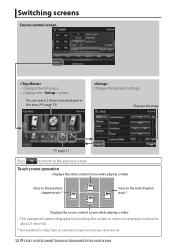
... control menu while playing a video. Changes the page ☞ page 11 Press [ ] to return to the next chapter/ track.* Displays the source control screen while playing a video. • The operation buttons disappear by touching the screen or when no operation is done ... external component and rear view camera. 12 DDX719/DDX7049BT/DDX419/DDX4049BT/DDX319/DDX3049 Goes to the previous chapter/track.* Goes to the previous screen. You can select 3 items to be displayed in this area. (☞ page 13) Changes the detailed settings. Switching screens Source control screen •...
... control menu while playing a video. Changes the page ☞ page 11 Press [ ] to return to the next chapter/ track.* Displays the source control screen while playing a video. • The operation buttons disappear by touching the screen or when no operation is done ... external component and rear view camera. 12 DDX719/DDX7049BT/DDX419/DDX4049BT/DDX319/DDX3049 Goes to the previous chapter/track.* Goes to the previous screen. You can select 3 items to be displayed in this area. (☞ page 13) Changes the detailed settings. Switching screens Source control screen •...

Instruction Manual
Page 13
... Plays an iPod/iPhone. Plays a Bluetooth audio player. Displays the phone control screen. Switches to be displayed in this area. (☞ page 49) *2 Switches between the previous and next pages. *3 Only for DDX719/DDX419/DDX319. Listen to SiriusXM™ channels. *1 You...61) PANDORA*6 (☞ page 27) SiriusXM*6 (☞ page 32) Displays the navigation screen when a navigation unit is connected, "No Navigation" appears. *4 Only for DDX719/DDX7049BT/DDX419/DDX4049BT. *5 Select an appropriate input setting on a USB device. Plays a disc. Switches to an external component ...
... Plays an iPod/iPhone. Plays a Bluetooth audio player. Displays the phone control screen. Switches to be displayed in this area. (☞ page 49) *2 Switches between the previous and next pages. *3 Only for DDX719/DDX419/DDX319. Listen to SiriusXM™ channels. *1 You...61) PANDORA*6 (☞ page 27) SiriusXM*6 (☞ page 32) Displays the navigation screen when a navigation unit is connected, "No Navigation" appears. *4 Only for DDX719/DDX7049BT/DDX419/DDX4049BT. *5 Select an appropriate input setting on a USB device. Plays a disc. Switches to an external component ...
Instruction Manual
Page 17
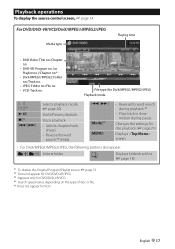
...VCD: Track no. Changes the settings for disc playback. (☞ page 21) Displays screen. • For DivX/MPEG1/MPEG2/JPEG, the following buttons also appear: [ ] [ ] Selects folder. [] Displays folder/track list. (☞ page 18) *1 To display the Original Program/Playlist screen, ...) Playback mode [] [ ]*2 [3 8] [7]*3 [4] [¢] Selects playback mode. (☞ page 20) Starts/Pauses playback. English 17 Playback operations To display the source control screen, ☞ page 14. Stops playback. • Selects chapter/track. (Press) • Reverse/forward search.*4 (Hold) [1] [&#...
...VCD: Track no. Changes the settings for disc playback. (☞ page 21) Displays screen. • For DivX/MPEG1/MPEG2/JPEG, the following buttons also appear: [ ] [ ] Selects folder. [] Displays folder/track list. (☞ page 18) *1 To display the Original Program/Playlist screen, ...) Playback mode [] [ ]*2 [3 8] [7]*3 [4] [¢] Selects playback mode. (☞ page 20) Starts/Pauses playback. English 17 Playback operations To display the source control screen, ☞ page 14. Stops playback. • Selects chapter/track. (Press) • Reverse/forward search.*4 (Hold) [1] [&#...
Instruction Manual
Page 18
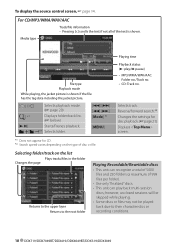
To display the source control screen, ☞ page 14. For CD/MP3/WMA/WAV/AAC Track/file information • Pressing [
To display the source control screen, ☞ page 14. For CD/MP3/WMA/WAV/AAC Track/file information • Pressing [
Instruction Manual
Page 23
While playing, the jacket picture is shown if the file has the tag data including the jacket picture. To display the source control screen, ☞ page 14. Track/file information (for MP3/WMA/WAV/ AAC) • Pressing [
While playing, the jacket picture is shown if the file has the tag data including the jacket picture. To display the source control screen, ☞ page 14. Track/file information (for MP3/WMA/WAV/ AAC) • Pressing [
Instruction Manual
Page 25
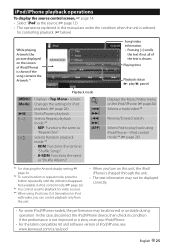
iPod/iPhone playback operations To display the source control screen, ☞ page 14. • Select "iPod" as the source. (☞ page 13) • The operations explained in this manual are under the condition when the unit is selected for controlling playback. (☞ below) While playing, Artwork (the picture displayed on the screen of iPod/iPhone) is shown if the song contains the Artwork.*1 Song/video information • Pressing [
iPod/iPhone playback operations To display the source control screen, ☞ page 14. • Select "iPod" as the source. (☞ page 13) • The operations explained in this manual are under the condition when the unit is selected for controlling playback. (☞ below) While playing, Artwork (the picture displayed on the screen of iPod/iPhone) is shown if the song contains the Artwork.*1 Song/video information • Pressing [

Instruction Manual
Page 29
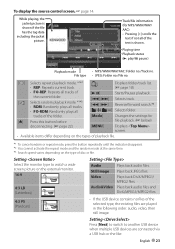
...AUTO1: Auto Search • AUTO2: Tunes in stations in the preset station. (Press) • Presets the currently tuned station. (Hold) [Mode] Displays tuner setting screen. (☞ page 30) [TI] Activates/deactivates TI standby reception mode. (☞ page 31) [Mono] * Activates/deactivates monaural mode for ... monaural mode is selected as the source. Selects FM band. Listening to the selected seek mode. (☞ above) Displays screen. * Appears only when FM is activated. [Text] Displays/hides the information of the current station. (☞ page 30) [PTY] * [AM] [FM] [SEEK] ...
...AUTO1: Auto Search • AUTO2: Tunes in stations in the preset station. (Press) • Presets the currently tuned station. (Hold) [Mode] Displays tuner setting screen. (☞ page 30) [TI] Activates/deactivates TI standby reception mode. (☞ page 31) [Mono] * Activates/deactivates monaural mode for ... monaural mode is selected as the source. Selects FM band. Listening to the selected seek mode. (☞ above) Displays screen. * Appears only when FM is activated. [Text] Displays/hides the information of the current station. (☞ page 30) [PTY] * [AM] [FM] [SEEK] ...

Instruction Manual
Page 32
...start listening to is pressed. [Mode] Changes the settings of the reception restrictions. (☞ page 37) [Direct] Displays the Direct Channel Select screen. (☞ page 34) [Text] Displays/Hides the information on the current channel. (☞ page 34) [IR] Displays the Instant Replay screen. (☞ page 36) []...-free music, plus the best sports, news, talk and entertainment. For more information, visits www.siriusxm.com. Displays the screen. 32 DDX719/DDX7049BT/DDX419/DDX4049BT/DDX319/DDX3049 SXM1 SXM2 SXM4 SXM3 Changes the seek mode. • SEEK1: Skip to another ...
...start listening to is pressed. [Mode] Changes the settings of the reception restrictions. (☞ page 37) [Direct] Displays the Direct Channel Select screen. (☞ page 34) [Text] Displays/Hides the information on the current channel. (☞ page 34) [IR] Displays the Instant Replay screen. (☞ page 36) []...-free music, plus the best sports, news, talk and entertainment. For more information, visits www.siriusxm.com. Displays the screen. 32 DDX719/DDX7049BT/DDX419/DDX4049BT/DDX319/DDX3049 SXM1 SXM2 SXM4 SXM3 Changes the seek mode. • SEEK1: Skip to another ...

Instruction Manual
Page 34
...set to preset. (☞ page 32) 2 Select a preset number. 2 Enter a channel no. (1), and then confirm (2). • To clear the entry, press [Clear]. • To cancel selecting the channel, press [Cancel]. (Hold) The channel selected in step 1 is stored. 34 DDX719/DDX7049BT/DDX419/DDX4049BT/DDX319/DDX3049 Displays... the text information Preset list * The Radio ID is displayed when the channel is preset)/ Channel no . Displaying the information on the current channel Selecting a preset...
...set to preset. (☞ page 32) 2 Select a preset number. 2 Enter a channel no. (1), and then confirm (2). • To clear the entry, press [Clear]. • To cancel selecting the channel, press [Cancel]. (Hold) The channel selected in step 1 is stored. 34 DDX719/DDX7049BT/DDX419/DDX4049BT/DDX319/DDX3049 Displays... the text information Preset list * The Radio ID is displayed when the channel is preset)/ Channel no . Displaying the information on the current channel Selecting a preset...

Instruction Manual
Page 37
... then confirm (2). • To clear the entry, press [Clear]. • To cancel setting the code, press [Cancel]. Setting the reception restrictions Display the SiriusXM Mode screen to confirm your choice. • The initial setting is "0000". Setting the parental lock You can set the parental lock or parental mature lock in order to confirm the code...
... then confirm (2). • To clear the entry, press [Clear]. • To cancel setting the code, press [Cancel]. Setting the reception restrictions Display the SiriusXM Mode screen to confirm your choice. • The initial setting is "0000". Setting the parental lock You can set the parental lock or parental mature lock in order to confirm the code...
Instruction Manual
Page 39
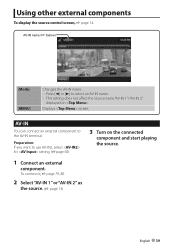
...• Press [2] or [3] to use AV-IN2, select for setting. (☞page 50) 3 Turn on . Preparation: If you want to select an AV-IN name. • This setting does not affect the source name "AV-IN 1"/ "AV-IN 2" displayed on the connected component and start playing the source. 1 Connect an... external component. Displays screen. AV-IN You can connect an external component to the AV-IN...
...• Press [2] or [3] to use AV-IN2, select for setting. (☞page 50) 3 Turn on . Preparation: If you want to select an AV-IN name. • This setting does not affect the source name "AV-IN 1"/ "AV-IN 2" displayed on the connected component and start playing the source. 1 Connect an... external component. Displays screen. AV-IN You can connect an external component to the AV-IN...
Instruction Manual
Page 40
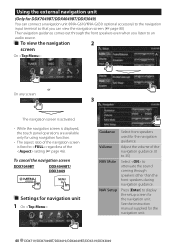
... 3 The navigation screen is activated. • While the navigation screen is displayed, the touch panel operations are available only for using navigation function. • The aspect ratio of the setting (☞ page 46). See the instruction manual supplied for the navigation guidance.... To cancel the navigation screen DDX7049BT DDX4049BT/ DDX3049 Settings for navigation unit 1 On : Guidance Volume NAV Mute NAV Setup Select front speakers used for the navigation unit. 40 DDX719/DDX7049BT/DDX419/DDX4049BT/DDX319/DDX3049 Using the external navigation unit (...
... 3 The navigation screen is activated. • While the navigation screen is displayed, the touch panel operations are available only for using navigation function. • The aspect ratio of the setting (☞ page 46). See the instruction manual supplied for the navigation guidance.... To cancel the navigation screen DDX7049BT DDX4049BT/ DDX3049 Settings for navigation unit 1 On : Guidance Volume NAV Mute NAV Setup Select front speakers used for the navigation unit. 40 DDX719/DDX7049BT/DDX419/DDX4049BT/DDX319/DDX3049 Using the external navigation unit (...
Instruction Manual
Page 43
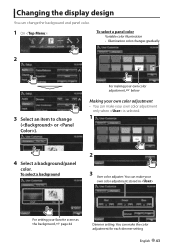
To select a background 2 3 User color adjuster: You can make the color adjustment for each dimmer setting English 43 Changing the display design You can make your own color adjustment stored in For setting your own color adjustment only when is selected. 1 4 Select a background/panel color. For making your own color adjustment, ☞ below Making...
To select a background 2 3 User color adjuster: You can make the color adjustment for each dimmer setting English 43 Changing the display design You can make your own color adjustment stored in For setting your own color adjustment only when is selected. 1 4 Select a background/panel color. For making your own color adjustment, ☞ below Making...

Instruction Manual
Page 45
English 45 Adjusts the brightness Adjusts the contrast Adjusts the black Adjusts the color Adjusts the tint* Adjusts the sharpness * Adjustable only when the incoming signal is NTSC. 2 Select dimmer on () or off (). Setting for video playback. Picture adjustment You can change the setting for video playback You can adjust the picture quality. 1 Display the adjustment menu. 3 Adjust the picture (-15 to +15).
English 45 Adjusts the brightness Adjusts the contrast Adjusts the black Adjusts the color Adjusts the tint* Adjusts the sharpness * Adjustable only when the incoming signal is NTSC. 2 Select dimmer on () or off (). Setting for video playback. Picture adjustment You can change the setting for video playback You can adjust the picture quality. 1 Display the adjustment menu. 3 Adjust the picture (-15 to +15).
Instruction Manual
Page 47
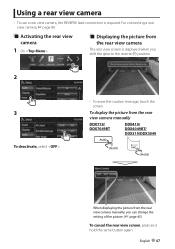
... the screen. English 47 Using a rear view camera • To use a rear view camera, the REVERSE lead connection is displayed when you can change the setting of the picture. (☞ page 45) To cancel the rear view screen, press and hold the same button again. For connecting... a rear view camera, ☞ page 80. To display the picture from the rear view camera manually DDX719/ DDX7049BT DDX419/ DDX4049BT/ DDX319/DDX3049 (Hold) (Hold) When displaying...
... the screen. English 47 Using a rear view camera • To use a rear view camera, the REVERSE lead connection is displayed when you can change the setting of the picture. (☞ page 45) To cancel the rear view screen, press and hold the same button again. For connecting... a rear view camera, ☞ page 80. To display the picture from the rear view camera manually DDX719/ DDX7049BT DDX419/ DDX4049BT/ DDX319/DDX3049 (Hold) (Hold) When displaying...

Instruction Manual
Page 49
... 78) : Activates dimmer. : Cancels. : Activates or deactivates dimmer according to the day/night display setting of the connected navigation unit. Display Scroll ♦ ON ♦ Once : Repeats scrolling. : Scrolls the displayed information once. ♦ OFF : Cancels. • Pressing [ Menu item Selectable setting/item Initial: Underlined Dimmer ♦ Auto ♦ ON ♦ OFF ♦ NAV : Dims...
... 78) : Activates dimmer. : Cancels. : Activates or deactivates dimmer according to the day/night display setting of the connected navigation unit. Display Scroll ♦ ON ♦ Once : Repeats scrolling. : Scrolls the displayed information once. ♦ OFF : Cancels. • Pressing [ Menu item Selectable setting/item Initial: Underlined Dimmer ♦ Auto ♦ ON ♦ OFF ♦ NAV : Dims...


