
Instruction Manual
Page 4
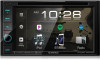
... of the operations. About this manual The displays and panels shown in standby 4 Turning off the screen 4 Adjusting the volume 4 Attenuating the sound 5 Getting Started 5 Initial settings 5 Registering a security code 6 Clock settings 6 Various Screens and Operations 7 Home screen 7 Source control screen 8 List/setting screen 9 Disc 10 Video 11 USB 13 Android 15 iPod/iPhone 15 Radio 16 SiriusXM® Satellite Radio 18 Pandora 25 iHeartRadio 27 Spotify 29 Other External Components 31 AV-IN 31 Rear view camera 32 Using an external...
... of the operations. About this manual The displays and panels shown in standby 4 Turning off the screen 4 Adjusting the volume 4 Attenuating the sound 5 Getting Started 5 Initial settings 5 Registering a security code 6 Clock settings 6 Various Screens and Operations 7 Home screen 7 Source control screen 8 List/setting screen 9 Disc 10 Video 11 USB 13 Android 15 iPod/iPhone 15 Radio 16 SiriusXM® Satellite Radio 18 Pandora 25 iHeartRadio 27 Spotify 29 Other External Components 31 AV-IN 31 Rear view camera 32 Using an external...
Instruction Manual
Page 7
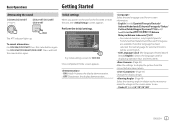
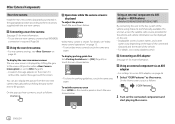
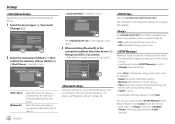
... used for DDX396 Once completed, Home screen appears. • ON (Initial): Activates the display demonstration. • OFF: Deactivates the display demonstration. Basic Operations Getting Started Attenuating the sound DDX396/DDX376BT DDX276BT/DDX26BT/ DDX419BT Initial settings When you power on the unit for displaying operation keys and menu items. (Page 45) Make the settings to display the picture from the connected rear view camera. (Page 43) Change the display design. (Page 44) Select the viewing...
... used for DDX396 Once completed, Home screen appears. • ON (Initial): Activates the display demonstration. • OFF: Deactivates the display demonstration. Basic Operations Getting Started Attenuating the sound DDX396/DDX376BT DDX276BT/DDX26BT/ DDX419BT Initial settings When you power on the unit for displaying operation keys and menu items. (Page 45) Make the settings to display the picture from the connected rear view camera. (Page 43) Change the display design. (Page 44) Select the viewing...
Instruction Manual
Page 9
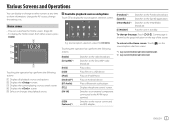
... adapter. Source/option selection screen for DDX396/DDX376BT/DDX276BT. Plays files on the top of the screen. Displays the phone control screen. Switches to the iHeartRadio broadcast. Puts the unit in standby. Switches to an external component connected to display the source/option selection screen. Available playback sources and options Touch 1 to the AV-IN input terminal. E.g. Plays an iPod/iPhone. Switches to the Pandora broadcast. Current page is shown by the page indication on a USB device...
... adapter. Source/option selection screen for DDX396/DDX376BT/DDX276BT. Plays files on the top of the screen. Displays the phone control screen. Switches to the iHeartRadio broadcast. Puts the unit in standby. Switches to an external component connected to display the source/option selection screen. Available playback sources and options Touch 1 to the AV-IN input terminal. E.g. Plays an iPod/iPhone. Switches to the Pandora broadcast. Current page is shown by the page indication on a USB device...
Instruction Manual
Page 18
iPod/iPhone Radio Bluetooth connection Pair the iPod/iPhone with this unit via Bluetooth. (Page 33) Selecting the playback device via the connection method See on page 46 for iPod/iPhone playback 1 Display the screen. Touching the operation keys performs the following actions: [ ] Switches the device on the source control screen Radio 1 Selects the band (AM/FM1/FM2/FM3) 2 Current station frequency/RBDS status 3 Text information • Touching [ Listening to the radio The unit switches to FM alarm scene automatically when...
iPod/iPhone Radio Bluetooth connection Pair the iPod/iPhone with this unit via Bluetooth. (Page 33) Selecting the playback device via the connection method See on page 46 for iPod/iPhone playback 1 Display the screen. Touching the operation keys performs the following actions: [ ] Switches the device on the source control screen Radio 1 Selects the band (AM/FM1/FM2/FM3) 2 Current station frequency/RBDS status 3 Text information • Touching [ Listening to the radio The unit switches to FM alarm scene automatically when...
Instruction Manual
Page 27
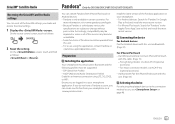
... operated from iPhone/iPod touch or Android devices. • Pandora is a third-party service, the specifications are subject to use, see on your smartphone or at . On the source control screen, touch as follows: : [Reset ] You can stream Pandora from this unit. (Page 33) Selecting the device For selecting the playback device via Bluetooth. (Page 33) For iPhone/iPod touch • Via USB input terminal: Connect iPhone/iPod touch with this unit. • For issues using...
... operated from iPhone/iPod touch or Android devices. • Pandora is a third-party service, the specifications are subject to use, see on your smartphone or at . On the source control screen, touch as follows: : [Reset ] You can stream Pandora from this unit. (Page 33) Selecting the device For selecting the playback device via Bluetooth. (Page 33) For iPhone/iPod touch • Via USB input terminal: Connect iPhone/iPod touch with this unit. • For issues using...

Instruction Manual
Page 32
... iPhone/iPod touch • Via USB input terminal: Connect iPhone/iPod touch with this unit. (Page 33) Selecting the device For selecting the playback device via the connection method to find and install the most recent version. Spotify Install the latest version of the operation keys may differ, however the similar operation keys have the same operations. • See also "Common operation keys on source control screen" on page 46. For 30-pin connector models: Use...
... iPhone/iPod touch • Via USB input terminal: Connect iPhone/iPod touch with this unit. (Page 33) Selecting the device For selecting the playback device via the connection method to find and install the most recent version. Spotify Install the latest version of the operation keys may differ, however the similar operation keys have the same operations. • See also "Common operation keys on source control screen" on page 46. For 30-pin connector models: Use...
Instruction Manual
Page 34
... screen. To display the rear view camera screen The rear view screen is displayed by shifting the gear to the reverse (R) position when is required. (Page 56) Using the rear view camera • For rear camera settings, see "Video menu control operations" on the type of the connected iDataLink and the model of the vehicle using iDataLink (commercially available), this unit can access the satellite radio source provided for DDX396/DDX376BT/DDX276BT) By connecting this unit to the instructions...
... screen. To display the rear view camera screen The rear view screen is displayed by shifting the gear to the reverse (R) position when is required. (Page 56) Using the rear view camera • For rear camera settings, see "Video menu control operations" on the type of the connected iDataLink and the model of the vehicle using iDataLink (commercially available), this unit can access the satellite radio source provided for DDX396/DDX376BT/DDX276BT) By connecting this unit to the instructions...
Instruction Manual
Page 35
Displays the control screen of the Bluetooth Hands Free function provided for the vehicle. Bluetooth devices can pair the device and the unit using the phone book, etc. Phone book - Connection When you connect a Bluetooth device to the unit for the first time: 1 Register the device by pairing the unit and the device. 2 Connect the device to the unit. (Page 34) Registering a new Bluetooth device Pairing allows Bluetooth devices to this unit depending on the Bluetooth version of the device. - For devices with Bluetooth 2.1: You can be connected without cables and communicate...
Displays the control screen of the Bluetooth Hands Free function provided for the vehicle. Bluetooth devices can pair the device and the unit using the phone book, etc. Phone book - Connection When you connect a Bluetooth device to the unit for the first time: 1 Register the device by pairing the unit and the device. 2 Connect the device to the unit. (Page 34) Registering a new Bluetooth device Pairing allows Bluetooth devices to this unit depending on the Bluetooth version of the device. - For devices with Bluetooth 2.1: You can be connected without cables and communicate...

Instruction Manual
Page 36
... your Bluetooth device. 2 Confirm the request both on the screen. Pairing a Bluetooth device using a PIN code (for Bluetooth 2.0) 1 Display the screen. Pairing a Bluetooth device using SSP (for Bluetooth 2.1) When the Bluetooth device is compatible with Bluetooth 2.1, a pairing request is registered on the device and the unit. On the Home screen, touch as follows: Then, on the screen, touch as follows: [System] : [Enter] On the screen, touch as iPhone) devices are automatically paired when connected via USB. Note • The PIN code is initially set...
... your Bluetooth device. 2 Confirm the request both on the screen. Pairing a Bluetooth device using a PIN code (for Bluetooth 2.0) 1 Display the screen. Pairing a Bluetooth device using SSP (for Bluetooth 2.1) When the Bluetooth device is compatible with Bluetooth 2.1, a pairing request is registered on the device and the unit. On the Home screen, touch as follows: Then, on the screen, touch as follows: [System] : [Enter] On the screen, touch as iPhone) devices are automatically paired when connected via USB. Note • The PIN code is initially set...

Instruction Manual
Page 40
Bluetooth® 1 Tag data* (current track title/artist name/album title) • Pressing [
Bluetooth® 1 Tag data* (current track title/artist name/album title) • Pressing [
Instruction Manual
Page 41
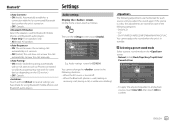
... Setup Audio Equalizer Display Sound Effect Input Fader / Balance System Speaker / X'over Time Alignment Enter Enter Enter Enter Enter E.g. Selecting a preset sound mode Select a preset sound mode on . • OFF: Cancels. Audio settings Display the screen. Audio settings screen for DDX396 You cannot change the screen in the following categories. • DVD/VCD • CD • DivX*1/MPEG1/MPEG2/MP3/WMA/WAV/AAC/FLAC You cannot adjust the sound when the unit is used for Bluetooth mobile phones and Bluetooth audio players. • Front Only: Front speakers...
... Setup Audio Equalizer Display Sound Effect Input Fader / Balance System Speaker / X'over Time Alignment Enter Enter Enter Enter Enter E.g. Selecting a preset sound mode Select a preset sound mode on . • OFF: Cancels. Audio settings Display the screen. Audio settings screen for DDX396 You cannot change the screen in the following categories. • DVD/VCD • CD • DivX*1/MPEG1/MPEG2/MP3/WMA/WAV/AAC/FLAC You cannot adjust the sound when the unit is used for Bluetooth mobile phones and Bluetooth audio players. • Front Only: Front speakers...
Instruction Manual
Page 48
...] (selected initially). If [iPod/iPhone] is selected in step 1: Smartphone Setup USB 1 Wire Bluetooth OK [USB 1 Wire] [Bluetooth] Select this when the device is connected via Bluetooth. (Go to lock the from the rear panel). Memorize, recall, or clear the settings you have made. • The memorized settings are kept even when the unit is reset. • Available only when is connected via the USB input terminal (cable from being changed. Touch [Yes]. Next The screen appears...
...] (selected initially). If [iPod/iPhone] is selected in step 1: Smartphone Setup USB 1 Wire Bluetooth OK [USB 1 Wire] [Bluetooth] Select this when the device is connected via Bluetooth. (Go to lock the from the rear panel). Memorize, recall, or clear the settings you have made. • The memorized settings are kept even when the unit is reset. • Available only when is connected via the USB input terminal (cable from being changed. Touch [Yes]. Next The screen appears...

Instruction Manual
Page 51
... time you press this key. Remote Controller mode switch The functions operated from - with the player integrated in this mode when playing DVDs or CDs etc. Switches the control screen. poles to this unit. • TV mode: Not used. • NAV mode: Not used for RC-DV340 (supplied) Common operations (AUD mode) SRC J/K VOL ATT DISP/V.SEL ENTER FNC/PBC/ MENU MODE/TOP MENU OPEN • Selects the source. • Hangs up the incoming/current call. Adjusts the volume level...
... time you press this key. Remote Controller mode switch The functions operated from - with the player integrated in this mode when playing DVDs or CDs etc. Switches the control screen. poles to this unit. • TV mode: Not used. • NAV mode: Not used for RC-DV340 (supplied) Common operations (AUD mode) SRC J/K VOL ATT DISP/V.SEL ENTER FNC/PBC/ MENU MODE/TOP MENU OPEN • Selects the source. • Hangs up the incoming/current call. Adjusts the volume level...

Instruction Manual
Page 53
... 51 For discs/USB/iPod: Switches to be output. Not used for this unit. DVD/VCD (DVD mode) Common operations (AUD/DVD mode) SRC* VOL J/K ATT VOICE/FNC/ MENU/PBC* ENTER ROUTE M/ MODE/ TOP MENU* VIEW/AV OUT • Selects the source. • Hangs up the incoming/current call. Displays previous screen. Changes the aspect ratio. • The aspect ratio changes each time you press this key. * +/CLEAR # BS/DIRECT ROUTE M/ MODE/ TOP MENU VOICE/FNC/ MENU/PBC CANCEL...
... 51 For discs/USB/iPod: Switches to be output. Not used for this unit. DVD/VCD (DVD mode) Common operations (AUD/DVD mode) SRC* VOL J/K ATT VOICE/FNC/ MENU/PBC* ENTER ROUTE M/ MODE/ TOP MENU* VIEW/AV OUT • Selects the source. • Hangs up the incoming/current call. Displays previous screen. Changes the aspect ratio. • The aspect ratio changes each time you press this key. * +/CLEAR # BS/DIRECT ROUTE M/ MODE/ TOP MENU VOICE/FNC/ MENU/PBC CANCEL...

Instruction Manual
Page 55
... turned on the smartphone's screen, and enables the user to professionals. • Mount the unit so that connects and controls compatible KENWOOD car receivers via the fuse. • Always connect the ignition wire (red) and the battery wire (yellow) to the power source running through the fuse box. CONT) connected. (Page 56) Before installation Precautions on the panel surface when installing the unit to the car. For best safety, leave the mounting and wiring work to make an audio setting using KENWOOD Remote APP. Use...
... turned on the smartphone's screen, and enables the user to professionals. • Mount the unit so that connects and controls compatible KENWOOD car receivers via the fuse. • Always connect the ignition wire (red) and the battery wire (yellow) to the power source running through the fuse box. CONT) connected. (Page 56) Before installation Precautions on the panel surface when installing the unit to the car. For best safety, leave the mounting and wiring work to make an audio setting using KENWOOD Remote APP. Use...

Instruction Manual
Page 56
... head screws, M5 x 8 mm (× 6) " Microphone, 3 m (× 1) Only for DDX396/DDX419BT ] Trim plate (× 1) Only for DDX396 ' Mounting sleeve (× 1) \ Extraction keys (× 2) Only for DDX419BT « Audio and video cable (× 1) Å Steering remote cable (× 1) Installation procedure 1 Remove the key from the ignition and disconnect the · battery. 2 Make the proper input and output wire connections for each unit. 3 Connect the speaker wires of the wiring harness. 4 Connect the wires of...
... head screws, M5 x 8 mm (× 6) " Microphone, 3 m (× 1) Only for DDX396/DDX419BT ] Trim plate (× 1) Only for DDX396 ' Mounting sleeve (× 1) \ Extraction keys (× 2) Only for DDX419BT « Audio and video cable (× 1) Å Steering remote cable (× 1) Installation procedure 1 Remove the key from the ignition and disconnect the · battery. 2 Make the proper input and output wire connections for each unit. 3 Connect the speaker wires of the wiring harness. 4 Connect the wires of...
Instruction Manual
Page 59
... for DDX396/DDX376BT/DDX276BT. *3 Only for DDX419BT. *4 Use the audio and video cable («: supplied for details. 4 Microphone input (MIC) (Page 56) 5 Audio video input (AV-IN)*4 Connect the following codec and extension code: - Contact your KENWOOD dealer for DDX419BT) to connect an external component. *5 When connecting an external amplifier, connect its ground wire to the car's steering remote harness using the steering remote cable (Å). on it. • Do not use a disc with a dry...
... for DDX396/DDX376BT/DDX276BT. *3 Only for DDX419BT. *4 Use the audio and video cable («: supplied for details. 4 Microphone input (MIC) (Page 56) 5 Audio video input (AV-IN)*4 Connect the following codec and extension code: - Contact your KENWOOD dealer for DDX419BT) to connect an external component. *5 When connecting an external amplifier, connect its ground wire to the car's steering remote harness using the steering remote cable (Å). on it. • Do not use a disc with a dry...

Instruction Manual
Page 62
... number of the USB devices and connection ports, some operations may not recognize a memory card inserted into a USB card reader. Folder names: 50 characters - In this case, disconnect the USB device then reset this case, disconnect the iPod/iPhone device, then check its condition. File names: 50 characters * Only for audio files and a maximum of data stored in a USB mass storage class device. - Notes on using this unit...
... number of the USB devices and connection ports, some operations may not recognize a memory card inserted into a USB card reader. Folder names: 50 characters - In this case, disconnect the USB device then reset this case, disconnect the iPod/iPhone device, then check its condition. File names: 50 characters * Only for audio files and a maximum of data stored in a USB mass storage class device. - Notes on using this unit...

Instruction Manual
Page 63
.../rewritable discs are not played back as the instructions supplied with the external components). Discs Recordable/Rewritable discs cannot be trouble is not engaged. General No sound comes out of the speakers. Adjust the volume to the optimum level. Check the cords and connections. Tracks on the screen. (Page 4) The unit does not work at all. Reset the unit. (Page 4) The remote controller*1 does not work. Replace the battery...
.../rewritable discs are not played back as the instructions supplied with the external components). Discs Recordable/Rewritable discs cannot be trouble is not engaged. General No sound comes out of the speakers. Adjust the volume to the optimum level. Check the cords and connections. Tracks on the screen. (Page 4) The unit does not work at all. Reset the unit. (Page 4) The remote controller*1 does not work. Replace the battery...

Instruction Manual
Page 65
.... Troubleshooting "Limited Connectivity" appears. The connection with the Pandora application cannot be controlled. Check whether the connected audio player supports AVRCP (Audio/Video Remote Control Profile). SiriusXM Satellite Radio* "SXM No Signal" appears. Make sure the SiriusXM Satellite Radio antenna is a mature or parental lock channel, and locked by the parental controls. "SXM Incorrect Lock Code" appears. The selected channel is mounted outside the car. "SXM Channel Locked" appears. The selected channel has...
.... Troubleshooting "Limited Connectivity" appears. The connection with the Pandora application cannot be controlled. Check whether the connected audio player supports AVRCP (Audio/Video Remote Control Profile). SiriusXM Satellite Radio* "SXM No Signal" appears. Make sure the SiriusXM Satellite Radio antenna is a mature or parental lock channel, and locked by the parental controls. "SXM Incorrect Lock Code" appears. The selected channel is mounted outside the car. "SXM Channel Locked" appears. The selected channel has...


