
User Manual
Page 2
... inadvertent connection to the mains supply. For replacement, use should you retain the original carton and packing materials for energy efficiency. As an ENERGY STAR® Partner, Kenwood Corpora- Saving energy reduces air pollution and lowers utility bills. *AC voltage selection The AC voltage selector switch on the rear panel is set to your unit is cut off , remove the...
... inadvertent connection to the mains supply. For replacement, use should you retain the original carton and packing materials for energy efficiency. As an ENERGY STAR® Partner, Kenwood Corpora- Saving energy reduces air pollution and lowers utility bills. *AC voltage selection The AC voltage selector switch on the rear panel is set to your unit is cut off , remove the...
User Manual
Page 3
... cassette tapes 10 Preparation 10 Accessories Normal playback 10 Relay playback (CT-403/KXF-W3030 only 11 Convenient music search (DPSS 12 Skip play operation 12 Single-tune repeated playback operation 13 How to ensure safe operation. Be specially cautious against condensation in areas other than Europe. "DOLBY" and the double-D symbol are trademarks of difficulty 19 Specifications 20 Audio cord 2) System control cord ... (1) AC plug adaptor...
... cassette tapes 10 Preparation 10 Accessories Normal playback 10 Relay playback (CT-403/KXF-W3030 only 11 Convenient music search (DPSS 12 Skip play operation 12 Single-tune repeated playback operation 13 How to ensure safe operation. Be specially cautious against condensation in areas other than Europe. "DOLBY" and the double-D symbol are trademarks of difficulty 19 Specifications 20 Audio cord 2) System control cord ... (1) AC plug adaptor...
User Manual
Page 4
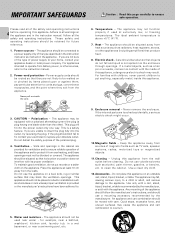
.... If you are unable to your home, consult your obsolete outlet. Slots and openings in the instruction manual. The appliance should not be connected to a power supply only of this appliance on the appliance and in the cabinet are touched accidentally, a serious electric shock might occur. 10.Magnetic fields - to ensure safe operation. Use only with a cart, stand, tripod...
.... If you are unable to your home, consult your obsolete outlet. Slots and openings in the instruction manual. The appliance should not be connected to a power supply only of this appliance on the appliance and in the cabinet are touched accidentally, a serious electric shock might occur. 10.Magnetic fields - to ensure safe operation. Use only with a cart, stand, tripod...
User Manual
Page 5
..., such as contact with antenna terminals. 3. An outside antenna system should not attempt to service the appliance beyond that specified to its normal operation. Never connect other electric light or power circuits, or where it can result in the instruction manual. B. The user should not be referred to the appliance, be sure the service technician has used replacement parts specified by qualified service personnel when: A. Overloading...
..., such as contact with antenna terminals. 3. An outside antenna system should not attempt to service the appliance beyond that specified to its normal operation. Never connect other electric light or power circuits, or where it can result in the instruction manual. B. The user should not be referred to the appliance, be sure the service technician has used replacement parts specified by qualified service personnel when: A. Overloading...
User Manual
Page 6
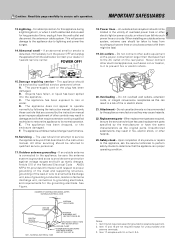
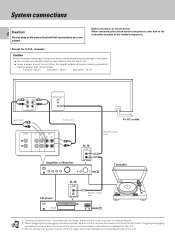
... at rear of sound or noise produced. 2. System connections 6 Caution: Do not plug in the power lead until all cords firmly. Top panel : 50 cm Side panel : 10 cm Back panel : 10 cm REC LL PLAY RR LINE IN LINE OUT Audio cord SYSTEM CONTROL Audio cord PHONO L R CD TUNER TAPE REC PLAY SL-16 SYSTEM CONTROL Amplifier or Receiver To AC outlet System control cord Turntable CD player SL-16 SYSTEM CONTROL 0 System control cord 7 6 4 1 ¢ ¡ Notes 1. If connections are completed. When plugging and unplugging connection cords...
... at rear of sound or noise produced. 2. System connections 6 Caution: Do not plug in the power lead until all cords firmly. Top panel : 50 cm Side panel : 10 cm Back panel : 10 cm REC LL PLAY RR LINE IN LINE OUT Audio cord SYSTEM CONTROL Audio cord PHONO L R CD TUNER TAPE REC PLAY SL-16 SYSTEM CONTROL Amplifier or Receiver To AC outlet System control cord Turntable CD player SL-16 SYSTEM CONTROL 0 System control cord 7 6 4 1 ¢ ¡ Notes 1. If connections are completed. When plugging and unplugging connection cords...
User Manual
Page 7
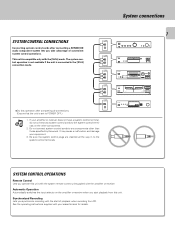
... to POWER OFF.) Notes 1. Be sure the system control plugs are inserted all connections. (Ensure that the unit is set to the system control terminals. 7 TAPE A (dB) - -5 0 +3 +6 (dB) TAPE B SYSTEM CONTROL OPERATIONS Remote Control Lets you start of convenient system control operations. Automatic Operation Automatically switches the input selector on the other than those specified by Kenwood. If your amplifier or receiver does not have a system control terminal, do not connect any components other components. 2. SYSTEM CONTROL SYSTEM CONTROL SYSTEM CONTROL ÷...
... to POWER OFF.) Notes 1. Be sure the system control plugs are inserted all connections. (Ensure that the unit is set to the system control terminals. 7 TAPE A (dB) - -5 0 +3 +6 (dB) TAPE B SYSTEM CONTROL OPERATIONS Remote Control Lets you start of convenient system control operations. Automatic Operation Automatically switches the input selector on the other than those specified by Kenwood. If your amplifier or receiver does not have a system control terminal, do not connect any components other components. 2. SYSTEM CONTROL SYSTEM CONTROL SYSTEM CONTROL ÷...
User Manual
Page 8
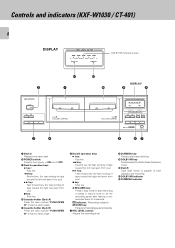
... / CT-401) 8 DISPLAY PEAK LEVEL METER (dB) -5 0 DOLBY NR +3 +6 (dB) DUBBING DOLBY NR reference level ! 2 1 POWER - ON - OFF 1¡ 7 3 PUSH/OPEN 0 TAPE A FULL LOGIC CONTROL 3 4 @ 0 DISPLAY 9 8 PUSH/OPEN 0 TAPE B FULL LOGIC CONTROL PEAK LEVEL METER (dB) -5 0 DOLBY NR +3 +6 (dB) DUBBING DOLBY NR DUBBING 1 ¡ 8PAUSE ¶REC/ARM 7 3 REC LEVEL DPSS MIN MAX 5 67 1 Deck A Playback-only tape deck. 2 POWER switch: Press to select the Dolby Noise Reduction mode...
... / CT-401) 8 DISPLAY PEAK LEVEL METER (dB) -5 0 DOLBY NR +3 +6 (dB) DUBBING DOLBY NR reference level ! 2 1 POWER - ON - OFF 1¡ 7 3 PUSH/OPEN 0 TAPE A FULL LOGIC CONTROL 3 4 @ 0 DISPLAY 9 8 PUSH/OPEN 0 TAPE B FULL LOGIC CONTROL PEAK LEVEL METER (dB) -5 0 DOLBY NR +3 +6 (dB) DUBBING DOLBY NR DUBBING 1 ¡ 8PAUSE ¶REC/ARM 7 3 REC LEVEL DPSS MIN MAX 5 67 1 Deck A Playback-only tape deck. 2 POWER switch: Press to select the Dolby Noise Reduction mode...
User Manual
Page 9
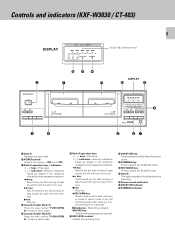
.... @ Reverse mode indicators # DOLBY NR indicator $ DUBBING indicator Controls and indicators (KXF-W3030 / CT-403) 9 DISPLAY PEAK LEVEL METER (dB) Op -5 0 +3 +6 (dB) ∏ DOLBY NR DUBBING DOLBY NR reference level @#$ 2 1 DISPLAY ! 0 9 POWER - Deck B This deck is capable of 4 seconds. ON and - ON - OFF 1¡ @ 7 # PUSH/OPEN 0 TAPE A AUTO REVERSE 3 4 PUSH/OPEN 0 TAPE B AUTO REVERSE PEAK LEVEL METER (dB) Op -5 0 +3 +6 (dB) ∏ DOLBY NR DUBBING REV.MODE DOLBY NR DUBBING...
.... @ Reverse mode indicators # DOLBY NR indicator $ DUBBING indicator Controls and indicators (KXF-W3030 / CT-403) 9 DISPLAY PEAK LEVEL METER (dB) Op -5 0 +3 +6 (dB) ∏ DOLBY NR DUBBING DOLBY NR reference level @#$ 2 1 DISPLAY ! 0 9 POWER - Deck B This deck is capable of 4 seconds. ON and - ON - OFF 1¡ @ 7 # PUSH/OPEN 0 TAPE A AUTO REVERSE 3 4 PUSH/OPEN 0 TAPE B AUTO REVERSE PEAK LEVEL METER (dB) Op -5 0 +3 +6 (dB) ∏ DOLBY NR DUBBING REV.MODE DOLBY NR DUBBING...
User Manual
Page 10
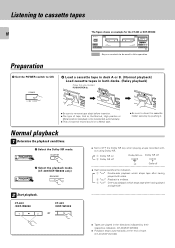
....MODE 2 Start playback. DOLBY NR -5 0 1 ¡ 8 77 REC ÷ Be sure to remove tape slack before insertion. ÷ The type of tape. (CT-401/KXF-W1030) Listening to cassette tapes 10 The figure shows an example for the CT-403 or KXF-W3030 POWER PUSH/OPEN 0 PUSH/OPEN 0 (dB) - -5 0 +3 +6 (dB) 1¡ @ 7 # TAPE A AUTO REVERSE TAPE B AUTO REVERSE 1 ¡ 8PAUSE ¶REC/ARM @ 7 # : Keys or controls to be used in...
....MODE 2 Start playback. DOLBY NR -5 0 1 ¡ 8 77 REC ÷ Be sure to remove tape slack before insertion. ÷ The type of tape. (CT-401/KXF-W1030) Listening to cassette tapes 10 The figure shows an example for the CT-403 or KXF-W3030 POWER PUSH/OPEN 0 PUSH/OPEN 0 (dB) - -5 0 +3 +6 (dB) 1¡ @ 7 # TAPE A AUTO REVERSE TAPE B AUTO REVERSE 1 ¡ 8PAUSE ¶REC/ARM @ 7 # : Keys or controls to be used in...
User Manual
Page 11
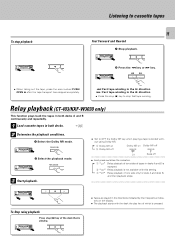
... relay playback Press stop fast tape winding. Relay playback (CT-403/KXF-W3030 only) This function plays back the tapes in both decks A and B continuously and repeatedly. 1 Load cassette tapes in both decks. 0 2 Determine the playback conditions. 1 Select the Dolby NR mode. (dB) - -5 0 +3 +6 (dB) DOLBY NR 2 Select the playback mode. (dB) - -5 0 +3 +6 (dB) REV.MODE 3 Start playback. ÷ Set to stop (7) key of the...
... relay playback Press stop fast tape winding. Relay playback (CT-403/KXF-W3030 only) This function plays back the tapes in both decks A and B continuously and repeatedly. 1 Load cassette tapes in both decks. 0 2 Determine the playback conditions. 1 Select the Dolby NR mode. (dB) - -5 0 +3 +6 (dB) DOLBY NR 2 Select the playback mode. (dB) - -5 0 +3 +6 (dB) REV.MODE 3 Start playback. ÷ Set to stop (7) key of the...
User Manual
Page 12
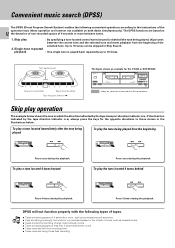
... be skipped in this operation Skip play the tune being played from the beginning of the selected tune. If the direction indicated by the tape transport direction indicator is 2, always press the keys for the CT-403 or KXF-W3030 POWER PUSH/OPEN 0 PUSH/OPEN 0 (dB) - -5 0 +3 +6 (dB) 1¡ @ 7 # TAPE A AUTO REVERSE TAPE B AUTO REVERSE 1 ¡ 8PAUSE ¶REC/ARM @ 7 # : Keys or controls to 16 times. The DPSS functions are...
... be skipped in this operation Skip play the tune being played from the beginning of the selected tune. If the direction indicated by the tape transport direction indicator is 2, always press the keys for the CT-403 or KXF-W3030 POWER PUSH/OPEN 0 PUSH/OPEN 0 (dB) - -5 0 +3 +6 (dB) 1¡ @ 7 # TAPE A AUTO REVERSE TAPE B AUTO REVERSE 1 ¡ 8PAUSE ¶REC/ARM @ 7 # : Keys or controls to 16 times. The DPSS functions are...
User Manual
Page 13
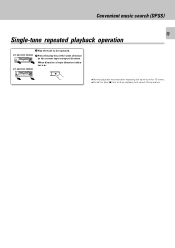
When direction of the same direction (dB) - -5 0 +3 +6 (dB) as the current tape transport direction. Convenient music search (DPSS) 13 Single-tune repeated playback operation 1 Play the tune to be repeated. (CT-401/KXF-W1030) 2 Press the play key of tape direction indicator is 3: (CT-403/KXF-W3030) (dB) - -5 0 +3 +6 (dB) 3 ÷ Normal playback resumes after repeating the same tune for 16 times. ÷ Press the stop (7) key to stop playback and cancel this operation.
When direction of the same direction (dB) - -5 0 +3 +6 (dB) as the current tape transport direction. Convenient music search (DPSS) 13 Single-tune repeated playback operation 1 Play the tune to be repeated. (CT-401/KXF-W1030) 2 Press the play key of tape direction indicator is 3: (CT-403/KXF-W3030) (dB) - -5 0 +3 +6 (dB) 3 ÷ Normal playback resumes after repeating the same tune for 16 times. ÷ Press the stop (7) key to stop playback and cancel this operation.
User Manual
Page 14
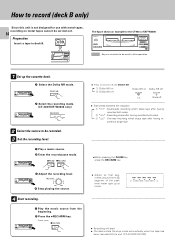
.... 14 Preparation A Insert a tape in this unit is not designed for the CT-403 or KXF-W3030 POWER PUSH/OPEN 0 PUSH/OPEN 0 (dB) - -5 0 +3 +6 (dB) 1¡ @ 7 # TAPE A AUTO REVERSE TAPE B AUTO REVERSE 1 ¡ 8PAUSE ¶REC/ARM @ 7 # : Keys or controls to be recorded. 3 Set the recording level. 1 Play a music source. 2 Enter the record-pause mode. (dB) - -5 0 +3 +6 (dB) 8PAUSE ¶REC/ARM ÷ Press to be used in deck B.
.... 14 Preparation A Insert a tape in this unit is not designed for the CT-403 or KXF-W3030 POWER PUSH/OPEN 0 PUSH/OPEN 0 (dB) - -5 0 +3 +6 (dB) 1¡ @ 7 # TAPE A AUTO REVERSE TAPE B AUTO REVERSE 1 ¡ 8PAUSE ¶REC/ARM @ 7 # : Keys or controls to be recorded. 3 Set the recording level. 1 Play a music source. 2 Enter the record-pause mode. (dB) - -5 0 +3 +6 (dB) 8PAUSE ¶REC/ARM ÷ Press to be used in deck B.
User Manual
Page 15
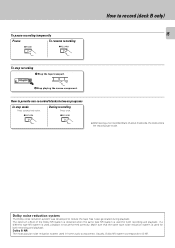
... system is used for both recording and playback. Usually, Dolby NR system corresponds to provide non-recorded blanks between programs In stop recording 1 Stop the tape transport. (dB) - -5 0 +3 +6 (dB) 7 2 Stop playing the source component. Make sure that the same type noise reduction system is used for both recording and playback. The optimum effect of about 4 seconds, the deck enters the record-pause mode...
... system is used for both recording and playback. Usually, Dolby NR system corresponds to provide non-recorded blanks between programs In stop recording 1 Stop the tape transport. (dB) - -5 0 +3 +6 (dB) 7 2 Stop playing the source component. Make sure that the same type noise reduction system is used for both recording and playback. The optimum effect of about 4 seconds, the deck enters the record-pause mode...
User Manual
Page 16
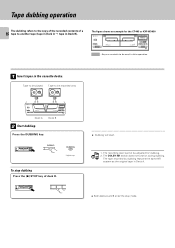
... adjusted for the CT-403 or KXF-W3030 POWER PUSH/OPEN 0 PUSH/OPEN 0 (dB) - -5 0 +3 +6 (dB) 1¡ @ 7 # TAPE A AUTO REVERSE TAPE B AUTO REVERSE 1 ¡ 8PAUSE ¶REC/ARM @ 7 # : Keys or controls to be recorded onto A POWER PUSH/OPEN 0 1¡ @ 7 # TAPE B AUTO REVERSE Deck A PUSH/OPEN 0 (dB) - -5 0 +3 +6 (dB) TAPE B AUTO REVERSE 1 ¡ 8PAUSE ¶REC/ARM @ 7 # Deck B 2 Start dubbing. Press the DUBBING key. (dB) - -5 0 +3 +6 (dB) DUBBING DUBBING Lights up To stop mode. The tape...
... adjusted for the CT-403 or KXF-W3030 POWER PUSH/OPEN 0 PUSH/OPEN 0 (dB) - -5 0 +3 +6 (dB) 1¡ @ 7 # TAPE A AUTO REVERSE TAPE B AUTO REVERSE 1 ¡ 8PAUSE ¶REC/ARM @ 7 # : Keys or controls to be recorded onto A POWER PUSH/OPEN 0 1¡ @ 7 # TAPE B AUTO REVERSE Deck A PUSH/OPEN 0 (dB) - -5 0 +3 +6 (dB) TAPE B AUTO REVERSE 1 ¡ 8PAUSE ¶REC/ARM @ 7 # Deck B 2 Start dubbing. Press the DUBBING key. (dB) - -5 0 +3 +6 (dB) DUBBING DUBBING Lights up To stop mode. The tape...
User Manual
Page 17
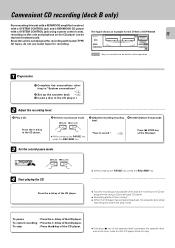
... more than one CD are programmed using system control cords, recording on this unit and playback on the CD player can be used in this operation 1 Preparation 1 Complete the connections referring to "System connections". 6 2 Set up the cassette deck $ 3 (Load a disc in the CD player.) 2 Adjust the recording level. 1 Play a CD. 2 Set the record-pause mode. 8PAUSE ¶REC/ARM 3 Adjust the recording recording 4 Put the CD player in stop mode. POWER PUSH/OPEN 0 PUSH/OPEN 0 (dB) - -5 0 +3 +6 (dB) Since...
... more than one CD are programmed using system control cords, recording on this unit and playback on the CD player can be used in this operation 1 Preparation 1 Complete the connections referring to "System connections". 6 2 Set up the cassette deck $ 3 (Load a disc in the CD player.) 2 Adjust the recording level. 1 Play a CD. 2 Set the record-pause mode. 8PAUSE ¶REC/ARM 3 Adjust the recording recording 4 Put the CD player in stop mode. POWER PUSH/OPEN 0 PUSH/OPEN 0 (dB) - -5 0 +3 +6 (dB) Since...
User Manual
Page 18
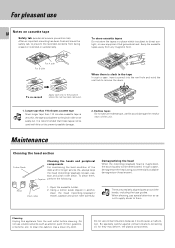
...pinch roller or be easily cut. It is Notes very thin, the tape could adhere to remove the slack. To clean them . Note There are precisely aligned parts around the heads, including the tape guides. When cleaning, pay special attention so as not to apply shock ...may deform the plastic components. Open the cassette holder. 2. Demagnetizing the head When the recording / playback head is subject to direct sunlight, or near equipment that these tapes not be deteriorated. to the position where the tab has been removed. 1. Do not use an endless tape, as alcohol, paint...
...pinch roller or be easily cut. It is Notes very thin, the tape could adhere to remove the slack. To clean them . Note There are precisely aligned parts around the heads, including the tape guides. When cleaning, pay special attention so as not to apply shock ...may deform the plastic components. Open the cassette holder. 2. Demagnetizing the head When the recording / playback head is subject to direct sunlight, or near equipment that these tapes not be deteriorated. to the position where the tab has been removed. 1. Do not use an endless tape, as alcohol, paint...
User Manual
Page 19
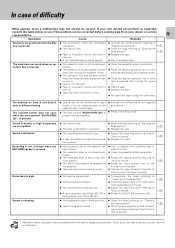
... holder. ¶ Press the desired operation key in the Stop mode. Sound is pressed. In case of difficulty What appears to "Cleaning the head section". * ¶ Replace the tape. ¶ Play a recorded tape. The deck does not work when an operation key is pressed. ¶ The cassette holder is being played. ¶ Connect the cords properly referring to "System connections". 6 ¶ Clean the head...
... holder. ¶ Press the desired operation key in the Stop mode. Sound is pressed. In case of difficulty What appears to "Cleaning the head section". * ¶ Replace the tape. ¶ Play a recorded tape. The deck does not work when an operation key is pressed. ¶ The cassette holder is being played. ¶ Connect the cords properly referring to "System connections". 6 ¶ Clean the head...
User Manual
Page 20
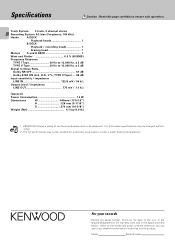
...-freezing temperature). Model Serial Number For this reason specifications may not be changed without notice. 2. The full performance may be exhibited in development. Track System 4 track, 2 channel stereo 20 Recording System AC bias (Frequency: 105 kHz) Heads A DECK Playback heads 1 B DECK Playback / recording heads 1 Erasing head 1 Motors A and B DECK 1 Wow and Flutter 0.3 % (W.RMS) Frequency Response TYPE I Tape 30 Hz to...
...-freezing temperature). Model Serial Number For this reason specifications may not be changed without notice. 2. The full performance may be exhibited in development. Track System 4 track, 2 channel stereo 20 Recording System AC bias (Frequency: 105 kHz) Heads A DECK Playback heads 1 B DECK Playback / recording heads 1 Erasing head 1 Motors A and B DECK 1 Wow and Flutter 0.3 % (W.RMS) Frequency Response TYPE I Tape 30 Hz to...


