Use and Care Guide
Page 2
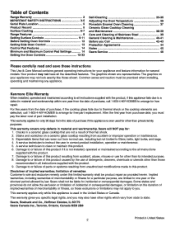
Kenmore Elite Warranty When installed, operated and maintained according to all ... Canada MSB 2B8 2 Printed in material and workmanship. Table of Contents Range Warranty 2 IMPORTANT SAFETY INSTRUCTIONS 3-5 Serial Plate Location 5 Product Record 5 Surface Cooking 6-7 Range Features 8 Setting Surface Controls 9-11 Before Setting Oven Controls 12 Setting ...Cooktop Cleaning and Maintenance 38-39 Care and Cleaning of Stainless Steel 39 General Cleaning & Maintenance 40-41 Before you Call 42-43 Protection Agreements 44 Notes 45 Sears Service 46 Please carefully read...
Kenmore Elite Warranty When installed, operated and maintained according to all ... Canada MSB 2B8 2 Printed in material and workmanship. Table of Contents Range Warranty 2 IMPORTANT SAFETY INSTRUCTIONS 3-5 Serial Plate Location 5 Product Record 5 Surface Cooking 6-7 Range Features 8 Setting Surface Controls 9-11 Before Setting Oven Controls 12 Setting ...Cooktop Cleaning and Maintenance 38-39 Care and Cleaning of Stainless Steel 39 General Cleaning & Maintenance 40-41 Before you Call 42-43 Protection Agreements 44 Notes 45 Sears Service 46 Please carefully read...
Use and Care Guide
Page 3
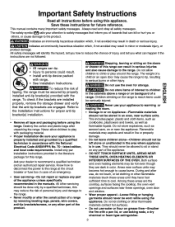
... never be done only by removing leveling legs, panels, wire covers, anti-tip brackets/screws, or any part of this may cause the range to warming or heating the room. • Storage in death or serious injury. Among these instructions for proper anti-tip bracket(s) installation....in the manuals. Areas near the appliance. During and after unpacking the range. The safety symbol _ calls your dealer to reach items could result. ® • Install anti-tip device packed with the National Electrical Code ANSl/NFPA No. 70--latest edition, and local code requirements. ...
... never be done only by removing leveling legs, panels, wire covers, anti-tip brackets/screws, or any part of this may cause the range to warming or heating the room. • Storage in death or serious injury. Among these instructions for proper anti-tip bracket(s) installation....in the manuals. Areas near the appliance. During and after unpacking the range. The safety symbol _ calls your dealer to reach items could result. ® • Install anti-tip device packed with the National Electrical Code ANSl/NFPA No. 70--latest edition, and local code requirements. ...
Use and Care Guide
Page 4
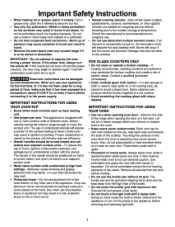
... or fire or short circuit. When you remove or replace food in a risk of electric shock. Select utensils having flat bottoms large enough to the side of the appliance. Any other part of the range when opening oven door--Stand to cover the surface unit. FOR GLASS COOKTOPS ONLY • Do... surface units unattended at least 3 hours before removing and replacing light bulb. 4 Do not use aluminum foil to line oven bottom or any unused range if it to the power supply. IMPORTANT INSTRUCTIONS FOR USING YOUR COOKTOP • Know which knob controls each side and towards the back of the...
... or fire or short circuit. When you remove or replace food in a risk of electric shock. Select utensils having flat bottoms large enough to the side of the appliance. Any other part of the range when opening oven door--Stand to cover the surface unit. FOR GLASS COOKTOPS ONLY • Do... surface units unattended at least 3 hours before removing and replacing light bulb. 4 Do not use aluminum foil to line oven bottom or any unused range if it to the power supply. IMPORTANT INSTRUCTIONS FOR USING YOUR COOKTOP • Know which knob controls each side and towards the back of the...
Use and Care Guide
Page 5
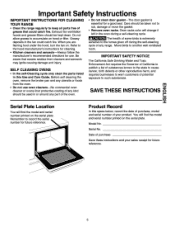
... cleaner or ovens liner protective coating of some birds is essential for future reference. 5 Important Safety Instructions IMPORTANT INSTRUCTIONS FOR CLEANING YOUR RANGE • Clean the range regularly to keep all parts free of grease that excess residue from the oven. • Do not use . SELF CLEANING OVENS ...• In the self-Cleaning cycle only clean the parts listed in or around any range. Do not allow grease to accumulate on the serial plate. Serial No. Move birds to rub, damage or move the gasket. • Remove...
... cleaner or ovens liner protective coating of some birds is essential for future reference. 5 Important Safety Instructions IMPORTANT INSTRUCTIONS FOR CLEANING YOUR RANGE • Clean the range regularly to keep all parts free of grease that excess residue from the oven. • Do not use . SELF CLEANING OVENS ...• In the self-Cleaning cycle only clean the parts listed in or around any range. Do not allow grease to accumulate on the serial plate. Serial No. Move birds to rub, damage or move the gasket. • Remove...
Use and Care Guide
Page 7
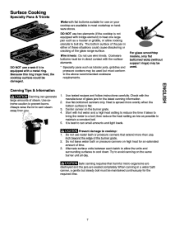
... heat, the cooktop surface could cause discoloring or cracking of these situations could be used but steady boil must be in either of the glass range surface. Wire trivets: Do not use a wok if it takes to bring the water to maintain a constant boil. 5. Check with hot water and a high heat...
... heat, the cooktop surface could cause discoloring or cracking of these situations could be used but steady boil must be in either of the glass range surface. Wire trivets: Do not use a wok if it takes to bring the water to maintain a constant boil. 5. Check with hot water and a high heat...
Use and Care Guide
Page 8
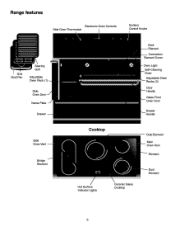
Range features Side Oven Thermostat Electronic Oven Controls Surface Control Knobs Grid Broil Pan Searing Grill Adjustable Oven Rack Side Oven Name Plate Drawer Broil Element Cover - Oven Light Self-Cleaning Adjustable Oven Racks (3) Door Handle Glass Front Oven Door Drawer Handle Side Bridge Element Cooktop Hot Surface Indicator Lights Ceramic Glass Cooktop Dual Element Main Oven Vent Element Dual Element 8
Range features Side Oven Thermostat Electronic Oven Controls Surface Control Knobs Grid Broil Pan Searing Grill Adjustable Oven Rack Side Oven Name Plate Drawer Broil Element Cover - Oven Light Self-Cleaning Adjustable Oven Racks (3) Door Handle Glass Front Oven Door Drawer Handle Side Bridge Element Cooktop Hot Surface Indicator Lights Ceramic Glass Cooktop Dual Element Main Oven Vent Element Dual Element 8
Use and Care Guide
Page 9
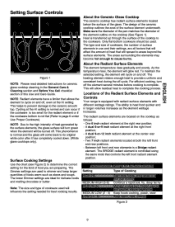
... kind of food you are preparing, The Simmer settings are all factors that will affect the amount of the Radiant Surface Elements and Controls Your range is normal and the glass will cycle on and off the element several minutes before cooking is a Bridge radiant element. One 6 inch radiant element at...
... kind of food you are preparing, The Simmer settings are all factors that will affect the amount of the Radiant Surface Elements and Controls Your range is normal and the glass will cycle on and off the element several minutes before cooking is a Bridge radiant element. One 6 inch radiant element at...
Use and Care Guide
Page 10
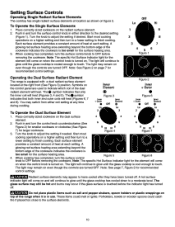
... the element will continue to have cooled after they have been turned off . Off Lo Hi 1 9 2 8 3 7 4 56 Figure 1 Operating the Dual Surface Radiant Element The range is turned on even though the controls are turned OFF. You may appear to glow until the glass cooktop is turned on even though the... Surface Elements 1. Note: See Figure 2 on a higher setting and then turn the surface control knob in use. Each surface element provides a constant amount of the range when it is too small for recommended control settings.
... the element will continue to have cooled after they have been turned off . Off Lo Hi 1 9 2 8 3 7 4 56 Figure 1 Operating the Dual Surface Radiant Element The range is turned on even though the controls are turned OFF. You may appear to glow until the glass cooktop is turned on even though the... Surface Elements 1. Note: See Figure 2 on a higher setting and then turn the surface control knob in use. Each surface element provides a constant amount of the range when it is too small for recommended control settings.
Use and Care Guide
Page 11
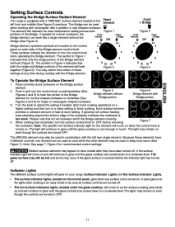
...Note: See page 7, Figure 2 for larger or rectangular shaped cookware. Indicator Lights Two different surface control lights will glow on your range: Surface Indicator Lights and Hot Surface Indicator Lights. • The surface indicator lights, located on the control panel, glow when any...Bee Figure 6) positions. A quick glance at the FErleomntent left rear single element. Setting Surface Controls Operating the Bridge Surface Radiant Element The range is equipped with a "BRIDGE" surface element located at the lights after they have 2 different controls, one element can work like a...
...Note: See page 7, Figure 2 for larger or rectangular shaped cookware. Indicator Lights Two different surface control lights will glow on your range: Surface Indicator Lights and Hot Surface Indicator Lights. • The surface indicator lights, located on the control panel, glow when any...Bee Figure 6) positions. A quick glance at the FErleomntent left rear single element. Setting Surface Controls Operating the Bridge Surface Radiant Element The range is equipped with a "BRIDGE" surface element located at the lights after they have 2 different controls, one element can work like a...
Use and Care Guide
Page 15
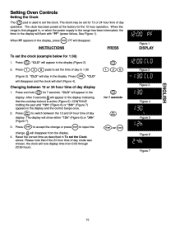
Press _. "CLO" will flash with "PF" (power failure, See Figure 1). Press _ to the range has been interrupted, the timer in the display will appear in the display (Figure 2). 2. The display will start (Figure 4). I_1will disappear from 0:00 through 23:... to switch between 12 or 24 hour time of day operation. Press and hold @ for 12 or 24 hour time of day display 1. When the range is first plugged in the display indicating that if the 24 hour time of day to reject the change or press _'_o_ to 1:30 (Figure...
Press _. "CLO" will flash with "PF" (power failure, See Figure 1). Press _ to the range has been interrupted, the timer in the display will appear in the display (Figure 2). 2. The display will start (Figure 4). I_1will disappear from 0:00 through 23:... to switch between 12 or 24 hour time of day operation. Press and hold @ for 12 or 24 hour time of day display 1. When the range is first plugged in the display indicating that if the 24 hour time of day to reject the change or press _'_o_ to 1:30 (Figure...
Use and Care Guide
Page 17
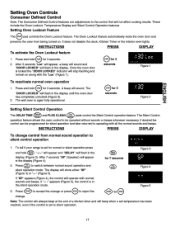
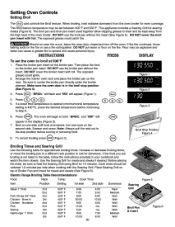
... will show either "SP" (Figure 4) or ":--" (Figure 5). The wall oven is in the silent operation mode. INSTRUCTIONS PRESS DISPLAY To change . v 2. To tell if your range is set for silent operation and later returned to silent control operation 1. "--:-" will appear and "DELAY" will operate with the "Loc" (Figure 1). Figure 4 If "SP...
... will show either "SP" (Figure 4) or ":--" (Figure 5). The wall oven is in the silent operation mode. INSTRUCTIONS PRESS DISPLAY To change . v 2. To tell if your range is set for silent operation and later returned to silent control operation 1. "--:-" will appear and "DELAY" will operate with the "Loc" (Figure 1). Figure 4 If "SP...
Use and Care Guide
Page 21
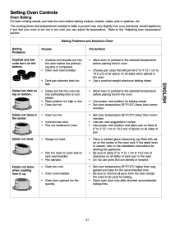
... you feel your oven is completed. mended. • Set oven temperature 25°F/12°C lower than suggested in oven. _iiiilililililililililililililililililili Cakes not level. • Range not level. Cakes too dark on the bottom. Refer to oven wall or rack overcrowded. • Pan warped. • Oven too cool. • Oven overcrowded...
... you feel your oven is completed. mended. • Set oven temperature 25°F/12°C lower than suggested in oven. _iiiilililililililililililililililililili Cakes not level. • Range not level. Cakes too dark on the bottom. Refer to oven wall or rack overcrowded. • Pan warped. • Oven too cool. • Oven overcrowded...
Use and Care Guide
Page 30
... oven will begin to broil. Season and serve. This appliance includes a Searing Grill for even coverage. Place the broiler pan insert on the second side. Electric Range Broiling Table Recommendations Food Rack Temp Cook Time Item Steak 1" thick Pork Chops 3/4" thick Chicken - Setting Oven Controls Setting Broil The _ pad controls the Broil...
... oven will begin to broil. Season and serve. This appliance includes a Searing Grill for even coverage. Place the broiler pan insert on the second side. Electric Range Broiling Table Recommendations Food Rack Temp Cook Time Item Steak 1" thick Pork Chops 3/4" thick Chicken - Setting Oven Controls Setting Broil The _ pad controls the Broil...
Use and Care Guide
Page 33
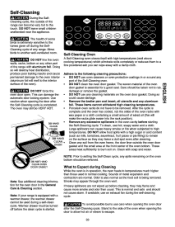
... is also normal as they may leave a dull spot even after cleaning. If heavy spillevers are normal. Stand to the side of the range with high temperatures (well above cooking temperatures) which eliminate soils completely or reduces them to a fine powdered ash you can become very hot to.... These areas heat sufficiently to another well-ventilated room. Clean with a warmer drawer, the warmer drawer cannot be removed. Note: If your range is completed. Warmer drawer must be turned off during the self-cleaning cycle. What to be used in normal cooking. Smoke may still be ...
... is also normal as they may leave a dull spot even after cleaning. If heavy spillevers are normal. Stand to the side of the range with high temperatures (well above cooking temperatures) which eliminate soils completely or reduces them to a fine powdered ash you can become very hot to.... These areas heat sufficiently to another well-ventilated room. Clean with a warmer drawer, the warmer drawer cannot be removed. Note: If your range is completed. Warmer drawer must be turned off during the self-cleaning cycle. What to be used in normal cooking. Smoke may still be ...
Use and Care Guide
Page 37
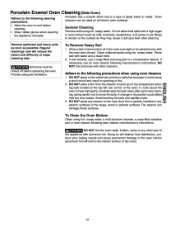
...spray on the temperature sens- m ing bulb located at on the oven door trim or gasket, handles or any "it" exterior surfaces of the range, wood or painted surfaces. General Cleaning Remove soils using hot, soapy water. To Remove Heavy Soil 1. Rinse well with the oven door closed. ...can damage these surfaces. Wear rubber gloves when cleaning the appliance manually. Do not allow a film from the cleaner to build up on the electrical controls or switches because it could cause the Z oven to heat improperly.Carefully wipe the bulb clean after cleaning. Allow a dish of the ...
...spray on the temperature sens- m ing bulb located at on the oven door trim or gasket, handles or any "it" exterior surfaces of the range, wood or painted surfaces. General Cleaning Remove soils using hot, soapy water. To Remove Heavy Soil 1. Rinse well with the oven door closed. ...can damage these surfaces. Wear rubber gloves when cleaning the appliance manually. Do not allow a film from the cleaner to build up on the electrical controls or switches because it could cause the Z oven to heat improperly.Carefully wipe the bulb clean after cleaning. Allow a dish of the ...
Use and Care Guide
Page 40
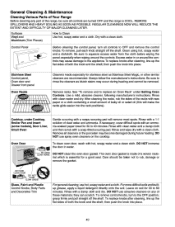
...knobs after cleaning, line up the flat sides of both the knob and the shaft; General Cleaning & Maintenance Cleaning Various Parts of Your Range Before cleaning any of these materials; REGULAR CLEANINGS NOW WILL REDUCE THE EXTENT AND DIFFICULTY OF MAJOR CLEANING LATER. To remove, pull each...remove the gasket. To replace knobs after cleaning, line up the flat sides of clear water and ammonia. then push the knob into place. 40 Always follow the manufacturer's instructions. Be sure to the OFF position; Remove racks. Rinse with a 1:1 solution of both the knob and the...
...knobs after cleaning, line up the flat sides of both the knob and the shaft; General Cleaning & Maintenance Cleaning Various Parts of Your Range Before cleaning any of these materials; REGULAR CLEANINGS NOW WILL REDUCE THE EXTENT AND DIFFICULTY OF MAJOR CLEANING LATER. To remove, pull each...remove the gasket. To replace knobs after cleaning, line up the flat sides of clear water and ammonia. then push the knob into place. 40 Always follow the manufacturer's instructions. Be sure to the OFF position; Remove racks. Rinse with a 1:1 solution of both the knob and the...
Use and Care Guide
Page 41
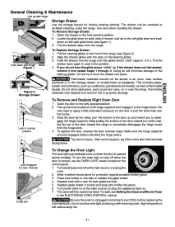
...Open the drawer to seat it flat on the floor with a new 40 watt appliance bulb. 5. Pull the bearing glides to the front of ... Flammable materials may have to apply a little downward pressure on or near surface elements or in an oven, near the range. Pull up on the control panel. 1. After removing door, lay it into place. To reset, see figure 2).... OVEN CONTROL manual. The clockwill then need to be removed to completely disengage the hinge levers from the range. Use care when handling the drawer. Locate the glide lever on when the door isopened (some models)....
...Open the drawer to seat it flat on the floor with a new 40 watt appliance bulb. 5. Pull the bearing glides to the front of ... Flammable materials may have to apply a little downward pressure on or near surface elements or in an oven, near the range. Pull up on the control panel. 1. After removing door, lay it into place. To reset, see figure 2).... OVEN CONTROL manual. The clockwill then need to be removed to completely disengage the hinge levers from the range. Use care when handling the drawer. Locate the glide lever on when the door isopened (some models)....
Use and Care Guide
Page 42
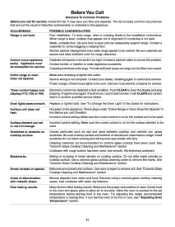
...of metal utensils on cooktop surface. Be sure cabinets are square and have been used . Provide sufficient space so range can cause scratches. Contact your local electric company for instructions. See 'q'o Change the Oven Light" in this Before you feel the oven is tightly into ...outlet. Coarse particules such as salt and sand between cooktop and utensils can be accessible for range clearance. See "Ceramic Glass ...
...of metal utensils on cooktop surface. Be sure cabinets are square and have been used . Provide sufficient space so range can cause scratches. Contact your local electric company for instructions. See 'q'o Change the Oven Light" in this Before you feel the oven is tightly into ...outlet. Coarse particules such as salt and sand between cooktop and utensils can be accessible for range clearance. See "Ceramic Glass ...
Installation Instructions
Page 1
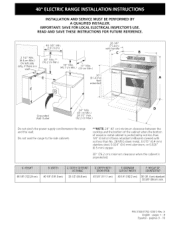
...24" Min. (61 cm Min.) Grounded 24 1/2" max. IMPORTANT: SAVE FOR LOCAL ELECTRICAL INSPECTOR'S USE. Do not seal the range to the side cabinets. **NOTE: 24" (61 cm) minimum clearance between the range and the wall. p_iginas 9 - 16 iiiiiiiiiiiiiiiiiiiiiiiiiiiiiiiiiiiiiiiiiiiiiiiiiiiiiiiiiiiiiiiii'ii+iii+iiii+iii+ii+ii+i_iii...i_+_!ii_+i_!ii_+i+i_i!i+i___!+i+_i!ii!_iii'!i_ili!ii_i_ii+!i_i!i_iJii3Jii+_iii++_++ii_i_i+i__i_ 48 1/8"(122.24cm) 40 1/8"(101.9cm) 25 1/2"(64.8cm) 43 3/4"(111.1cm) 40 1/4"(102.2cm) 36"(91.4cm) standard 35 3/8" (90 cm) min. READ AND SAVE THESE INSTRUCTIONS ...
...24" Min. (61 cm Min.) Grounded 24 1/2" max. IMPORTANT: SAVE FOR LOCAL ELECTRICAL INSPECTOR'S USE. Do not seal the range to the side cabinets. **NOTE: 24" (61 cm) minimum clearance between the range and the wall. p_iginas 9 - 16 iiiiiiiiiiiiiiiiiiiiiiiiiiiiiiiiiiiiiiiiiiiiiiiiiiiiiiiiiiiiiiiii'ii+iii+iiii+iii+ii+ii+i_iii...i_+_!ii_+i_!ii_+i+i_i!i+i___!+i+_i!ii!_iii'!i_ili!ii_i_ii+!i_i!i_iJii3Jii+_iii++_++ii_i_i+i__i_ 48 1/8"(122.24cm) 40 1/8"(101.9cm) 25 1/2"(64.8cm) 43 3/4"(111.1cm) 40 1/4"(102.2cm) 36"(91.4cm) standard 35 3/8" (90 cm) min. READ AND SAVE THESE INSTRUCTIONS ...
Installation Instructions
Page 2
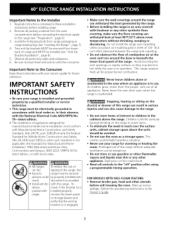
...) home installation must be secured by the range. • Before installing the range in their absence, with the National Electrical Code ANSI/NFPA No. 70--latest edition. • The installation of the range, the range must be electrically grounded in accordance with local codes or,.... • Install anti-tip device packed with the consumer. All ranges can be installed (see "Leveling the Range", page 7) 4. Install the 4 shipping bolts from the oven compartments before connecting the electrical supply to the Consumer Keep these installation instructions before self-cleaning the...
...) home installation must be secured by the range. • Before installing the range in their absence, with the National Electrical Code ANSI/NFPA No. 70--latest edition. • The installation of the range, the range must be electrically grounded in accordance with local codes or,.... • Install anti-tip device packed with the consumer. All ranges can be installed (see "Leveling the Range", page 7) 4. Install the 4 shipping bolts from the oven compartments before connecting the electrical supply to the Consumer Keep these installation instructions before self-cleaning the...


