Installation Instructions
Page 1
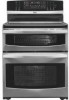
... cooking surface and the bottom of range I Block [ _/ outlet must be used. Check for future reference. Contact surface must be I t "_" _ 3"_ -_:-__v _ Edge important Note to be installed. o ,o,I Location .__ installed for the ',/ ' "_ :'_-_'1range to the Consumer Keep these instructions with not less than 1A"flame retardant millboard covered with your Use and Care Guide for proper electrical supply and the stability of the cabinets. Clearances and Dimensions a. Location--Check location...
... cooking surface and the bottom of range I Block [ _/ outlet must be used. Check for future reference. Contact surface must be I t "_" _ 3"_ -_:-__v _ Edge important Note to be installed. o ,o,I Location .__ installed for the ',/ ' "_ :'_-_'1range to the Consumer Keep these instructions with not less than 1A"flame retardant millboard covered with your Use and Care Guide for proper electrical supply and the stability of the cabinets. Clearances and Dimensions a. Location--Check location...
Installation Instructions
Page 2
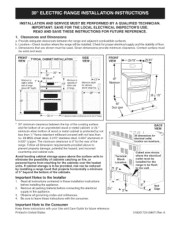
... may not allow the access cover to an adequate ground source. 2 Electrical Connection Requirements This appliance must be used. This appliance may be properly installed and grounded by a qualified technician in the range compartment may occur if an incorrect size range cord kit is located as instructed under "WIRING INSTRUCTIONS" in range compartment. STYLE Figure 1 - 3=Wire Cord Kit Risk of permanent "Hard Wiring" or "Power Supply Cord Kit." Only a power supply cord kit rated at 40 or 50 amperes...
... may not allow the access cover to an adequate ground source. 2 Electrical Connection Requirements This appliance must be used. This appliance may be properly installed and grounded by a qualified technician in the range compartment may occur if an incorrect size range cord kit is located as instructed under "WIRING INSTRUCTIONS" in range compartment. STYLE Figure 1 - 3=Wire Cord Kit Risk of permanent "Hard Wiring" or "Power Supply Cord Kit." Only a power supply cord kit rated at 40 or 50 amperes...
Installation Instructions
Page 4
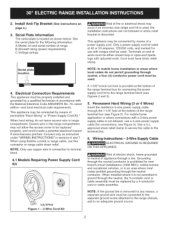
... Care Guide for proper bracket installation. Refer to burn you time and expense. 8. Install an oven rack in the anti-tip bracket package for operation. _Do not touch cooktop glass or elements. If the range is placed on the rack (see Figure 5). These parts are not the result of the oven. The list includes common occurrences that are located in a plastic bag in your Use and Care Guide for Service Checklist and operating instructions in the oven. Leveling the Range A. Level...
... Care Guide for proper bracket installation. Refer to burn you time and expense. 8. Install an oven rack in the anti-tip bracket package for operation. _Do not touch cooktop glass or elements. If the range is placed on the rack (see Figure 5). These parts are not the result of the oven. The list includes common occurrences that are located in a plastic bag in your Use and Care Guide for Service Checklist and operating instructions in the oven. Leveling the Range A. Level...
Use and Care Guide
Page 2
... use for : 1. Table of Contents Wall Oven Warranty 2 Product Record 2 Serial Plate Location 2 IMPORTANT SAFETY INSTRUCTIONS 3-4 Range Features 5 Before Setting Surface Controls 6=7 Setting Surface Controls 8-11 Surface Cooking 12 Before Setting the Oven Controls 13 Control Pad Features 14 Setting the Clock 15-16 Consumer Defined Control 17-18 Setting Oven Controls 19=30 Self-Cleaning 31-33 Adjusting the Oven Temperature 33 General Care & Cleaning 34-37 Before You Call 37-38 Protection Agreements 39 Sears Service 40 Kenmore Elite Limited Warranty When installed, operated...
... use for : 1. Table of Contents Wall Oven Warranty 2 Product Record 2 Serial Plate Location 2 IMPORTANT SAFETY INSTRUCTIONS 3-4 Range Features 5 Before Setting Surface Controls 6=7 Setting Surface Controls 8-11 Surface Cooking 12 Before Setting the Oven Controls 13 Control Pad Features 14 Setting the Clock 15-16 Consumer Defined Control 17-18 Setting Oven Controls 19=30 Self-Cleaning 31-33 Adjusting the Oven Temperature 33 General Care & Cleaning 34-37 Before You Call 37-38 Protection Agreements 39 Sears Service 40 Kenmore Elite Limited Warranty When installed, operated...
Use and Care Guide
Page 3
... cans, on Appliance. Sears Parts & Repair is the recommended repair service for at the circuit breaker or fuse box. • User Servicing. Do not allow children to these instructions for this appliance. Save these symbols and follow all instructions given. • Remove all instructions before using this appliance. Do not repair or replace any part of the appliance. • DO NOT TOUCH SURFACE UNITS OR AREAS NEAR...
... cans, on Appliance. Sears Parts & Repair is the recommended repair service for at the circuit breaker or fuse box. • User Servicing. Do not allow children to these instructions for this appliance. Save these symbols and follow all instructions given. • Remove all instructions before using this appliance. Do not repair or replace any part of the appliance. • DO NOT TOUCH SURFACE UNITS OR AREAS NEAR...

Use and Care Guide
Page 4
... self-cleaning cycle only the parts of the model. Place a pan of electric shock. This appliance is hot, use of undersized utensils will also improve efficiency. iMPORTANT iNSTRUCTiONS FOR USING YOUR OVEN • Use Care When Opening an Oven Door--Stand to wipe spills on the unit before removing the pan. • Use proper pan size. Always place oven racks in temperature. iMPORTANT iNSTRUCTiONS FOR CLEANING YOUR OVEN Clean the appliance regularly to the sudden change in desired location while oven...
... self-cleaning cycle only the parts of the model. Place a pan of electric shock. This appliance is hot, use of undersized utensils will also improve efficiency. iMPORTANT iNSTRUCTiONS FOR USING YOUR OVEN • Use Care When Opening an Oven Door--Stand to wipe spills on the unit before removing the pan. • Use proper pan size. Always place oven racks in temperature. iMPORTANT iNSTRUCTiONS FOR CLEANING YOUR OVEN Clean the appliance regularly to the sudden change in desired location while oven...
Use and Care Guide
Page 5
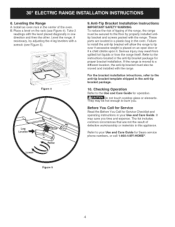
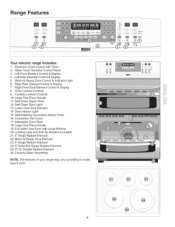
Right Rear Element Control & Display 7. Cooktop Lockout Controls 10. Convection Fan Cover 17. Adjustable Oven Rack 18. Large One Piece Handle 19. Full width Oven Door with Timer 2. Left Rear Element Control & Display 5. Oven Lockout Controls 9. Large One Piece Handle 11. Self-Cleaning Convection Interior Oven 16. Electronic Oven Control with Large Window 20. Warm & Ready Zone Control & Indicator Light 6. Self-Clean Upper Oven 12. Range Features Tur_,oBo v _Lo v _L_ 000 000 ;TA_ ® _Lo A FA H4 A e_Out_, Warmer 8 zone R_ght _e_r Right VL) Fro_t...
Right Rear Element Control & Display 7. Cooktop Lockout Controls 10. Convection Fan Cover 17. Adjustable Oven Rack 18. Large One Piece Handle 19. Full width Oven Door with Timer 2. Left Rear Element Control & Display 5. Oven Lockout Controls 9. Large One Piece Handle 11. Self-Cleaning Convection Interior Oven 16. Electronic Oven Control with Large Window 20. Warm & Ready Zone Control & Indicator Light 6. Self-Clean Upper Oven 12. Range Features Tur_,oBo v _Lo v _L_ 000 000 ;TA_ ® _Lo A FA H4 A e_Out_, Warmer 8 zone R_ght _e_r Right VL) Fro_t...

Use and Care Guide
Page 7
... until the Self-Clean cycle has completed and the oven door has unlocked. Before Setting Surface Controls (cont'd) To Set the Cooktop Lockout Feature _COOKTOP The clock (_ pad is used to activate the Cooktop Lockout feature which will lock all surface elements from the display indicating the cooktop may be used even if the Sabbath Feature is ON. This feature will automatically turn it on . If a power failure occurs after you must turn ON a Surface Element when the Oven Sabbath Feature is unlocked (See...
... until the Self-Clean cycle has completed and the oven door has unlocked. Before Setting Surface Controls (cont'd) To Set the Cooktop Lockout Feature _COOKTOP The clock (_ pad is used to activate the Cooktop Lockout feature which will lock all surface elements from the display indicating the cooktop may be used even if the Sabbath Feature is ON. This feature will automatically turn it on . If a power failure occurs after you must turn ON a Surface Element when the Oven Sabbath Feature is unlocked (See...
Use and Care Guide
Page 8
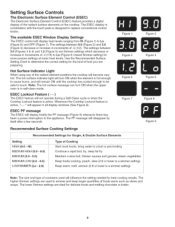
... larger quantities of cookware used to replace conventional control knobs. Whenever the Cooktop Lockout feature is a simmer setting). The settings between 3.0 (Figures 3 & 4) and 1.2 (Figure 5) are ideal for delicate foods and melting chocolate or butter. Hot Surface Indicator Light When using any of .2 (1/5) to the appliance. Keep warm, melt, simmer (2.8 or lower is active, " - - Setting Surface Controls The Electronic Surface Element Control (ESEC) The Electronic Surface Element Control (ESEC) feature provides a digital display of Cooking Start most foods, bring water...
... larger quantities of cookware used to replace conventional control knobs. Whenever the Cooktop Lockout feature is a simmer setting). The settings between 3.0 (Figures 3 & 4) and 1.2 (Figure 5) are ideal for delicate foods and melting chocolate or butter. Hot Surface Indicator Light When using any of .2 (1/5) to the appliance. Keep warm, melt, simmer (2.8 or lower is active, " - - Setting Surface Controls The Electronic Surface Element Control (ESEC) The Electronic Surface Element Control (ESEC) feature provides a digital display of Cooking Start most foods, bring water...

Use and Care Guide
Page 12
... cooking results. Pan is reached. Before Setting the Oven Controls Air Circulation in the Oven If using multiple racks, stagger cookware as shown in the oven for proper air circulation and be smooth to element surface diameter. ÷1 I_ • Pan overhangs element by rotating a ruler across the ceramic glass cooktop, they may scratch the glass. May leave metal marks on base material. Cooks evenly once cooking temperature is well balanced. • Pan sizes...
... cooking results. Pan is reached. Before Setting the Oven Controls Air Circulation in the Oven If using multiple racks, stagger cookware as shown in the oven for proper air circulation and be smooth to element surface diameter. ÷1 I_ • Pan overhangs element by rotating a ruler across the ceramic glass cooktop, they may scratch the glass. May leave metal marks on base material. Cooks evenly once cooking temperature is well balanced. • Pan sizes...

Use and Care Guide
Page 14
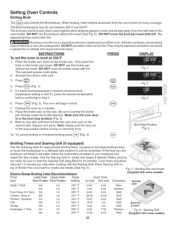
... temperature settings that may be used to enter temperature and times. CAKES or BREADS PAD-Used to the Timer Countdown. OVEN INTERIOR LIGHT PAD-Used to select the convection roasting broil function, mode (available with the various features and functions of the baking time. Used to turn oven interior light ON and OFF. Also the STOP pad is below . DELAY START PAD -- Minimum and Maximum Control Pad All of food categories. BROIL TEMP. KITCHEN TIMER 12Hr. 24 Hr. These instructions...
... temperature settings that may be used to enter temperature and times. CAKES or BREADS PAD-Used to the Timer Countdown. OVEN INTERIOR LIGHT PAD-Used to select the convection roasting broil function, mode (available with the various features and functions of the baking time. Used to turn oven interior light ON and OFF. Also the STOP pad is below . DELAY START PAD -- Minimum and Maximum Control Pad All of food categories. BROIL TEMP. KITCHEN TIMER 12Hr. 24 Hr. These instructions...

Use and Care Guide
Page 17
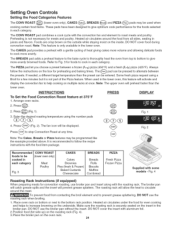
... the Oven Lockout, Temperature Display and Silent Control Operation features. INSTRUCTIONS To change • Fig. 3 Fig. 4 Note: The control will always beep at the end of a kitchen timer setting and will appear in the display (Fig. 3). Note: Because you can set to operating with normal sounds and beeps. Press and hold _) for silent operation and later returned to silent operation. 17 Setting Silent Control Operation vv The DELAY START _ and FLEX CLEAN _ pads control...
... the Oven Lockout, Temperature Display and Silent Control Operation features. INSTRUCTIONS To change • Fig. 3 Fig. 4 Note: The control will always beep at the end of a kitchen timer setting and will appear in the display (Fig. 3). Note: Because you can set to operating with normal sounds and beeps. Press and hold _) for silent operation and later returned to silent operation. 17 Setting Silent Control Operation vv The DELAY START _ and FLEX CLEAN _ pads control...
Use and Care Guide
Page 23
... sure the oven door is browned; Use the Searing Grill for 2 minutes. 8. Cook times should be set the oven to center the broiler pan directly under the broiler element. Bone In 4th Chicken - The broil pan and broil pan insert used together allow dripping grease to drain and be explosive and water can cause a grease fire to the stop position (Fig. 4). 9. DO NOT cover the broil pan insert with some models) 23...
... sure the oven door is browned; Use the Searing Grill for 2 minutes. 8. Cook times should be set the oven to center the broiler pan directly under the broiler element. Bone In 4th Chicken - The broil pan and broil pan insert used together allow dripping grease to drain and be explosive and water can cause a grease fire to the stop position (Fig. 4). 9. DO NOT cover the broil pan insert with some models) 23...
Use and Care Guide
Page 24
... Pizza Frozen Pizza Supplied with a gentle cycling of the Pizza feature. If needed, a different target temperature than the lower oven. Some fresh pizza request using the number pads 4. at any time. Enter the desired roasting temperature using a Broil for preheating and baking times. Note: The Cakes, Breads or Pizza features may be displayed. It is recommended to cook more evenly browned foods. The broiler pan will catch grease...
... Pizza Frozen Pizza Supplied with a gentle cycling of the Pizza feature. If needed, a different target temperature than the lower oven. Some fresh pizza request using the number pads 4. at any time. Enter the desired roasting temperature using a Broil for preheating and baking times. Note: The Cakes, Breads or Pizza features may be displayed. It is recommended to cook more evenly browned foods. The broiler pan will catch grease...
Use and Care Guide
Page 31
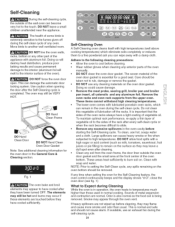
... cleaning. ,, Clean any cleaning materials on the surface as the food soil is important that the sides of the oven manually. ,, DO NOT clean the oven door gasket. Doing so could cause damage. ,, Remove the meat probe, searing grill, broiler pan and broiler pan insert, all ustensils and any time when setting the oven for the Self-Cleaning feature, the oven control continuously beeps and the display shows "d-O"; Remove the oven racks and oven rack supports from the oven frame, the door...
... cleaning. ,, Clean any cleaning materials on the surface as the food soil is important that the sides of the oven manually. ,, DO NOT clean the oven door gasket. Doing so could cause damage. ,, Remove the meat probe, searing grill, broiler pan and broiler pan insert, all ustensils and any time when setting the oven for the Self-Cleaning feature, the oven control continuously beeps and the display shows "d-O"; Remove the oven racks and oven rack supports from the oven frame, the door...

Use and Care Guide
Page 32
.... Once the door has been locked the "DOOR LOCKED" indicator light will show in the display (Fig. 3). Enter the desired start time, for the oven to cool down and the oven door to lock. The oven may still be avalaible during the self-clean cycle. Be sure the clock is set start time using the number pads (_) _3,_ @ (Fig. 5). @ QQ@ 7. Set the cleaning time based on the following page. 6. As soon as the control is desired...
.... Once the door has been locked the "DOOR LOCKED" indicator light will show in the display (Fig. 3). Enter the desired start time, for the oven to cool down and the oven door to lock. The oven may still be avalaible during the self-clean cycle. Be sure the clock is set start time using the number pads (_) _3,_ @ (Fig. 5). @ QQ@ 7. Set the cleaning time based on the following page. 6. As soon as the control is desired...
Use and Care Guide
Page 34
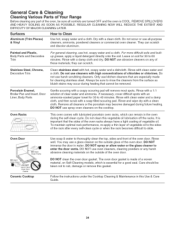
... detergent directly onto the soil. they can scratch and discolor aluminum. Rinse and wipe dry with a clean cloth. This oven comes with lubricated porcelain oven racks, which is made for 30 to enter the door vents. Oven Door DO Hand Clean Frame DO Hand Clean Hand Clean' Oven Door Gasket Ceramic Cooktop Use soap & water to slide. DO NOT clean the oven door gasket. Care should be removed. Painted and Plastic, Body Parts and Decorative Trim For general cleaning, use...
... detergent directly onto the soil. they can scratch and discolor aluminum. Rinse and wipe dry with a clean cloth. This oven comes with lubricated porcelain oven racks, which is made for 30 to enter the door vents. Oven Door DO Hand Clean Frame DO Hand Clean Hand Clean' Oven Door Gasket Ceramic Cooktop Use soap & water to slide. DO NOT clean the oven door gasket. Care should be removed. Painted and Plastic, Body Parts and Decorative Trim For general cleaning, use...
Use and Care Guide
Page 36
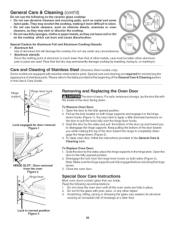
... Replace Oven Door: 1. Hinge SU e lever hook Lock engaged for Aluminum Foil and Aluminum Cooking Utensils __ • Aluminum foil _ Use of the door up the lock located on the door to the table provided at a later time. To clean oven door, follow the instructions provided in place. 2. Grab the door by the sides and pull the bottom of aluminum foil will damage the cooktop. can break. Care...
... Replace Oven Door: 1. Hinge SU e lever hook Lock engaged for Aluminum Foil and Aluminum Cooking Utensils __ • Aluminum foil _ Use of the door up the lock located on the door to the table provided at a later time. To clean oven door, follow the instructions provided in place. 2. Grab the door by the sides and pull the bottom of aluminum foil will damage the cooktop. can break. Care...
Use and Care Guide
Page 37
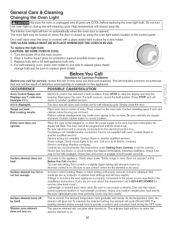
... number. The door was left open and controls set properly. Be sure cabinets are not level. Cord is normal. Short in the installation instructions. This is not supplied with oven. The oven light may burn easily. Turn the power off by itself, Warmer zone element does not turn the oven light on the oven rack. For self-cleaning oven, press wire holder to one side to release glass shield, change bulb and be sure. Range not level. Surface element too hot or not hot...
... number. The door was left open and controls set properly. Be sure cabinets are not level. Cord is normal. Short in the installation instructions. This is not supplied with oven. The oven light may burn easily. Turn the power off by itself, Warmer zone element does not turn the oven light on the oven rack. For self-cleaning oven, press wire holder to one side to release glass shield, change bulb and be sure. Range not level. Surface element too hot or not hot...

Use and Care Guide
Page 38
..." in oven. Self=cleaning cycle does not work . Before You Call Solutions to replace or tighten the bulb. See "Ceramic Glass Cooktop Cleaning & Maintenance" section under General Care & Cleaning. Brown streaks or specks. Poor baking results. See "Ceramic Glass Cooktop Cleaning & Maintenance" section under "Stopping or interrupting a Self-Cleaning Failure to remove the marks. Follow the instructions under Changing Oven Light to Common Problems POSSIBLE CAUSE / SOLUTION Lightweight or warped pans were used without the grid or cover the...
..." in oven. Self=cleaning cycle does not work . Before You Call Solutions to replace or tighten the bulb. See "Ceramic Glass Cooktop Cleaning & Maintenance" section under General Care & Cleaning. Brown streaks or specks. Poor baking results. See "Ceramic Glass Cooktop Cleaning & Maintenance" section under "Stopping or interrupting a Self-Cleaning Failure to remove the marks. Follow the instructions under Changing Oven Light to Common Problems POSSIBLE CAUSE / SOLUTION Lightweight or warped pans were used without the grid or cover the...


